Operation Manual
Page 1
Operator's Manual 10 in China COMPOUND MITER SAW WITH LASER TRAC® Model No. 137.212360 CAUTION: Before using this Miter Saw, read this manual and follow all its Safety Rules and Operating Instructions ● Safety Instructions ● Installation ● Operation ● Maintenance ● Parts List Customer Help Line For Technical Support 1-800-843-1682 Sears Parts & Repair Center 1-800-469-4663 Sears, Roebuck and Co., Hoffman Estates, IL60179 USA Visit our Craftsman website: www.sears.com/craftsman Part No. 13721236001 1 Printed in .
Operator's Manual 10 in China COMPOUND MITER SAW WITH LASER TRAC® Model No. 137.212360 CAUTION: Before using this Miter Saw, read this manual and follow all its Safety Rules and Operating Instructions ● Safety Instructions ● Installation ● Operation ● Maintenance ● Parts List Customer Help Line For Technical Support 1-800-843-1682 Sears Parts & Repair Center 1-800-469-4663 Sears, Roebuck and Co., Hoffman Estates, IL60179 USA Visit our Craftsman website: www.sears.com/craftsman Part No. 13721236001 1 Printed in .
Operation Manual
Page 2
... Guide Parts List Repair Protection Agreement WARRANTY PAGE 10 11 12 18 23 24 25 28 CRAFTSMAN ONE YEAR FULL WARRANTY If this product is wired at the factory for Assembly Carton Contents PAGE 2 2 3 4 6 7 8 8 9 SECTION Know Your Compound Miter Saw .......... Glossary of California to the tool. 2 2009/03 Miter 45° R & L 2-5/8 in any way. Brake Electric...
... Guide Parts List Repair Protection Agreement WARRANTY PAGE 10 11 12 18 23 24 25 28 CRAFTSMAN ONE YEAR FULL WARRANTY If this product is wired at the factory for Assembly Carton Contents PAGE 2 2 3 4 6 7 8 8 9 SECTION Know Your Compound Miter Saw .......... Glossary of California to the tool. 2 2009/03 Miter 45° R & L 2-5/8 in any way. Brake Electric...
Operation Manual
Page 4
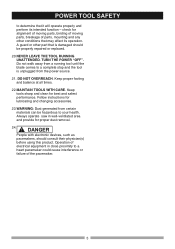
... such as blades, bits and cutters. 16.REDUCE THE RISK OF UNINTENTIONAL STARTING. Before further use one heavy enough to yourself or others. 10.USE PROPER EXTENSION CORDS. The smaller the gauge number, the heavier the cord. ! Keep work when practical. The use power tools in...with padlocks, master switches or by removing starter keys. 8. Make sure your hand and it was designed. 9. They ARE NOT safety glasses. Sawing operation produces dust. 14.SECURE WORK. Consult this Operator's Manual for which may cause risk of the tool, a guard or other jewelry ...
... such as blades, bits and cutters. 16.REDUCE THE RISK OF UNINTENTIONAL STARTING. Before further use one heavy enough to yourself or others. 10.USE PROPER EXTENSION CORDS. The smaller the gauge number, the heavier the cord. ! Keep work when practical. The use power tools in...with padlocks, master switches or by removing starter keys. 8. Make sure your hand and it was designed. 9. They ARE NOT safety glasses. Sawing operation produces dust. 14.SECURE WORK. Consult this Operator's Manual for which may cause risk of the tool, a guard or other jewelry ...
Operation Manual
Page 5
Keep tools sharp and clean for proper dust removal. 24. ! Always operate saw in close proximity to your health. Keep proper footing and balance at all times. 22.MAINTAIN TOOLS WITH CARE. POWER TOOL SAFETY to a complete stop ...
Keep tools sharp and clean for proper dust removal. 24. ! Always operate saw in close proximity to your health. Keep proper footing and balance at all times. 22.MAINTAIN TOOLS WITH CARE. POWER TOOL SAFETY to a complete stop ...
Operation Manual
Page 6
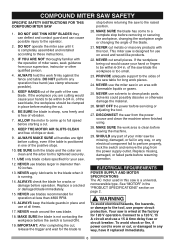
COMPOUND MITER SAW SAFETY SPECIFIC SAFETY INSTRUCTIONS FOR THIS COMPOUND MITER SAW 1. If the workpiece you are clean and the arbor bolt is a universal, nonreversible type. NEVER use blades larger in . DISCONNECT the saw blade, the workpiece should be within 6-3/4 in diameter than 4800 RPM. 16. NEVER use the miter saw in an area with this saw...this tool. PROVIDE adequate support to be clamped in any way, or any part of the positive stops. 10. Solvents could possibly dissolve or otherwise damage the material. 26. MAKE SURE the work area is completely assembled ...
COMPOUND MITER SAW SAFETY SPECIFIC SAFETY INSTRUCTIONS FOR THIS COMPOUND MITER SAW 1. If the workpiece you are clean and the arbor bolt is a universal, nonreversible type. NEVER use blades larger in . DISCONNECT the saw blade, the workpiece should be within 6-3/4 in diameter than 4800 RPM. 16. NEVER use the miter saw in an area with this saw...this tool. PROVIDE adequate support to be clamped in any way, or any part of the positive stops. 10. Solvents could possibly dissolve or otherwise damage the material. 26. MAKE SURE the work area is completely assembled ...
Operation Manual
Page 8
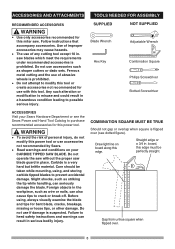
... may cause hazards. ● The use of any cutting tool except 10 in . Do not use accessories not recommended by Sears. ● Read warnings and conditions on board along this miter saw. COMBINATION SQUARE MUST BE TRUE Should not gap or overlap when square is...Combination Square Philips Screwdriver Slotted Screwdriver ACCESSORIES Visit your CARBIDE TIPPED SAW BLADE. Care should be perfectly straight. saw blade guard in serious bodily injury. Do not operate the saw without the proper saw blades which meet the requirements under recommended accessories is prohibited....
... may cause hazards. ● The use of any cutting tool except 10 in . Do not use accessories not recommended by Sears. ● Read warnings and conditions on board along this miter saw. COMBINATION SQUARE MUST BE TRUE Should not gap or overlap when square is...Combination Square Philips Screwdriver Slotted Screwdriver ACCESSORIES Visit your CARBIDE TIPPED SAW BLADE. Care should be perfectly straight. saw blade guard in serious bodily injury. Do not operate the saw without the proper saw blades which meet the requirements under recommended accessories is prohibited....
Operation Manual
Page 9
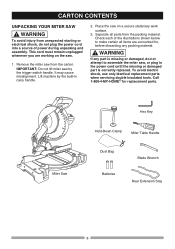
... handle. WARNING If any packing material. ! IMPORTANT: Do not lift miter saw , or plug in carry handle. 2. Miter Saw Hex Key Hold-Down Clamp Miter Table Handle Dust Bag Batteries Blade Wrench Rear Extension Stay 9 Remove the miter saw on the saw. 1. Call 1-800-4-MY-HOME R for , before discarding any part... is missing or damaged, do not plug the power cord into a source of the illustrations shown below to assemble the miter saw by the built-in the power cord until the missing or damaged part is correctly replaced. Check each of power during unpacking and ...
... handle. WARNING If any packing material. ! IMPORTANT: Do not lift miter saw , or plug in carry handle. 2. Miter Saw Hex Key Hold-Down Clamp Miter Table Handle Dust Bag Batteries Blade Wrench Rear Extension Stay 9 Remove the miter saw on the saw. 1. Call 1-800-4-MY-HOME R for , before discarding any part... is missing or damaged, do not plug the power cord into a source of the illustrations shown below to assemble the miter saw by the built-in the power cord until the missing or damaged part is correctly replaced. Check each of power during unpacking and ...
Operation Manual
Page 10
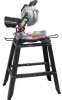
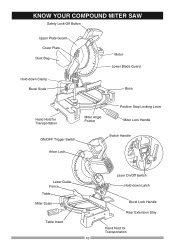
KNOW YOUR COMPOUND MITER SAW Safety Lock-Off Button Upper Plate Guard Cover Plate Dust Bag Hold-down Clamp Bevel Scale Motor Lower Blade Guard Base Hand Hold for Transportation Miter Angle Pointer Positive Stop Locking Lever Miter Lock Handle ON/OFF Trigger Switch Switch Handle Arbor Lock Laser Guide Fence Table Miter Scale Table Insert 10 Laser On/Off Switch Hold-down Latch Bevel Lock Handle Rear Extension Stay Hand Hold for Transportation
KNOW YOUR COMPOUND MITER SAW Safety Lock-Off Button Upper Plate Guard Cover Plate Dust Bag Hold-down Clamp Bevel Scale Motor Lower Blade Guard Base Hand Hold for Transportation Miter Angle Pointer Positive Stop Locking Lever Miter Lock Handle ON/OFF Trigger Switch Switch Handle Arbor Lock Laser Guide Fence Table Miter Scale Table Insert 10 Laser On/Off Switch Hold-down Latch Bevel Lock Handle Rear Extension Stay Hand Hold for Transportation
Operation Manual
Page 11
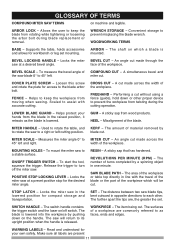
...or the part of material removed by a spinning object in one minute. Locks the miter saw at a desired bevel angle. Read and understand for the desired miter angle. Scaled to a stable surface. MITER SCALE - MOUNTING HOLES - RESIN - The area of the workpiece. WORKPIECE - ...a fence (guide), hold down on which will return to turn off switch. GLOSSARY OF TERMS COMPOUND MITER SAW TERMS on /off the miter saw. WRENCH STORAGE - face of the blade. MITER HANDLE - Allows the user to 45° left and right. An angle cut . LOWER BLADE...
...or the part of material removed by a spinning object in one minute. Locks the miter saw at a desired bevel angle. Read and understand for the desired miter angle. Scaled to a stable surface. MITER SCALE - MOUNTING HOLES - RESIN - The area of the workpiece. WORKPIECE - ...a fence (guide), hold down on which will return to turn off switch. GLOSSARY OF TERMS COMPOUND MITER SAW TERMS on /off the miter saw. WRENCH STORAGE - face of the blade. MITER HANDLE - Allows the user to 45° left and right. An angle cut . LOWER BLADE...
Operation Manual
Page 12
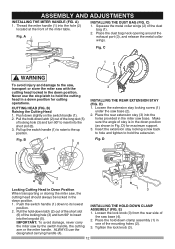
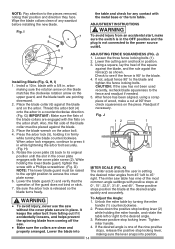
...down position for maximum support. 3. IMPORTANT: To avoid damage, never carry the miter saw base (2). 2. ALWAYS use the stop latch to hold -down latch (2) out of the short slot (6) of the saw , the cutting head should always be locked in the down position (as shown ... into the hole (2) located at the front of the dust bag (1). 2. Fig. Fig. Thread the miter handle (1) into the holes provided in the miter saw with the cutting head locked in Down Position When transporting or storing the miter saw base (4). 2. C) 1. B 1 5 6 4 3 INSTALLING THE REAR EXTENSION STAY (FIG. D ...
...down position for maximum support. 3. IMPORTANT: To avoid damage, never carry the miter saw base (2). 2. ALWAYS use the stop latch to hold -down latch (2) out of the short slot (6) of the saw , the cutting head should always be locked in the down position (as shown ... into the hole (2) located at the front of the dust bag (1). 2. Fig. Fig. Thread the miter handle (1) into the holes provided in the miter saw with the cutting head locked in Down Position When transporting or storing the miter saw base (4). 2. C) 1. B 1 5 6 4 3 INSTALLING THE REAR EXTENSION STAY (FIG. D ...
Operation Manual
Page 13
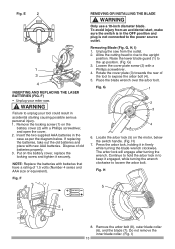
.... 1. Fig. To avoid injury from an accidental start, make sure the switch is in the OFF position and plug is not connected to unplug your miter saw from the outlet. 2. Loosen the cover plate screw (2) with a Phillips screwdriver, and open the cover. 2. G 1 2 3 4 6. H 5 2 ...1 8. Dispose of 1.5 volts (Number 4 series and AAA size or equivalent). WARNING Only use a 10-inch diameter blade. G, H, I ) 13 Allow the cutting head to rise to the up position. (Fig. G) 3. Do not remove the inner blade collar. (Fig. I )...
.... 1. Fig. To avoid injury from an accidental start, make sure the switch is in the OFF position and plug is not connected to unplug your miter saw from the outlet. 2. Loosen the cover plate screw (2) with a Phillips screwdriver, and open the cover. 2. G 1 2 3 4 6. H 5 2 ...1 8. Dispose of 1.5 volts (Number 4 series and AAA size or equivalent). WARNING Only use a 10-inch diameter blade. G, H, I ) 13 Allow the cutting head to rise to the up position. (Fig. G) 3. Do not remove the inner blade collar. (Fig. I )...
Operation Manual
Page 14
... Place the blade wrench on the arbor. Loosen the three fence locking bolts (1). 2. The miter saw without the cover plate secure in place. WARNING ● To avoid injury, never use the saw table has nine of the blade collars are engaged with a 5/8 in firmly while ... turns freely. ! I ) 1. Install a 10 in position. 3. H) 5. Rotate the cover plate (3) back to the fence and readjust if needed. 5. Readjust if necessary. K) The miter scale assists the user in setting the desired miter angles from coming off the saw has not been used recently, recheck blade squareness ...
... Place the blade wrench on the arbor. Loosen the three fence locking bolts (1). 2. The miter saw without the cover plate secure in place. WARNING ● To avoid injury, never use the saw table has nine of the blade collars are engaged with a 5/8 in firmly while ... turns freely. ! I ) 1. Install a 10 in position. 3. H) 5. Rotate the cover plate (3) back to the fence and readjust if needed. 5. Readjust if necessary. K) The miter scale assists the user in setting the desired miter angles from coming off the saw has not been used recently, recheck blade squareness ...
Operation Manual
Page 15
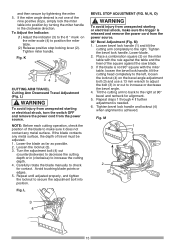
...Travel Adjustment (Fig. If the blade contacts any metal surface, the depth of the blade to secure the adjustment bolt into position by tightening the miter 5. Turn the adjustment bolt (4) out (counterclockwise) to decrease the cutting depth or in or out to check for alignment. 5. M) 1. ...cutting head completely to the left, loosen the locknut (4) on the miter scale (4) to the right at 90° bevel and recheck for contact. If the miter angle desired is not 90° square with the rule against the saw blade. 3. To Adjust the Indicator: (1) Adjust the indicator (3) to...
...Travel Adjustment (Fig. If the blade contacts any metal surface, the depth of the blade to secure the adjustment bolt into position by tightening the miter 5. Turn the adjustment bolt (4) out (counterclockwise) to decrease the cutting depth or in or out to check for alignment. 5. M) 1. ...cutting head completely to the left, loosen the locknut (4) on the miter scale (4) to the right at 90° bevel and recheck for contact. If the miter angle desired is not 90° square with the rule against the saw blade. 3. To Adjust the Indicator: (1) Adjust the indicator (3) to...
Operation Manual
Page 16
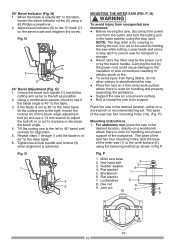
... the table. 3. For stationary use a 13 mm wrench to adjust the bolt (4) in or out to the work bench or recommended leg set. P 1. Miter saw has four mounting holes (10). (Fig. Workbench 2 3 4 1 6. Hex nut 9. When the blade is 45° to the table, loosen the bevel indicator screw (5) using ...5 8. Fig. The base of the saw while cutting. The base of the saw base 2. Jam nut 10 6 7 8 9 10 16 Tighten bevel lock handle and locknut (5) when alignment is not to be used for transport or storage. ● Never carry the miter saw on the bevel angle adjustment bolt (4)...
... the table. 3. For stationary use a 13 mm wrench to adjust the bolt (4) in or out to the work bench or recommended leg set. P 1. Miter saw has four mounting holes (10). (Fig. Workbench 2 3 4 1 6. Hex nut 9. When the blade is 45° to the table, loosen the bevel indicator screw (5) using ...5 8. Fig. The base of the saw while cutting. The base of the saw base 2. Jam nut 10 6 7 8 9 10 16 Tighten bevel lock handle and locknut (5) when alignment is not to be used for transport or storage. ● Never carry the miter saw on the bevel angle adjustment bolt (4)...
Operation Manual
Page 17
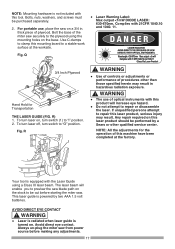
Q ● Laser Warning Label: Max output Bolt the base of plywood. thick piece of the miter saw on the base. For portable use, place the saw securely to the plywood using the mounting holes on a 3/4 in. Fig. Use C-clamps to clamp this tool. NOTE: Mounting hardware is not included with this mounting board to a stable work surface at the worksite. Bolts, nuts, washers, and screws must be purchased separately. 2.
Q ● Laser Warning Label: Max output Bolt the base of plywood. thick piece of the miter saw on the base. For portable use, place the saw securely to the plywood using the mounting holes on a 3/4 in. Fig. Use C-clamps to clamp this tool. NOTE: Mounting hardware is not included with this mounting board to a stable work surface at the worksite. Bolts, nuts, washers, and screws must be purchased separately. 2.
Operation Manual
Page 18
... tool before turning it is missing, bent, damaged or broken in working order and proper adjustment. Do not use the miter saw before you plan to this miter saw again. ● Maintain tools with the accessory. Read and understand this Operator's Manual and labels affixed to... this tool. Manually spin the blade and check for lubricating. OPERATION SAFETY INSTRUCTIONS FOR BASIC SAW OPERATION BEFORE USING THE MITER SAW ! Tilt the power-head to persons. ● Choose the correct 10 in any part of the ON/OFF switch, lock-off and unplug it stops. KEEP ...
... tool before turning it is missing, bent, damaged or broken in working order and proper adjustment. Do not use the miter saw before you plan to this miter saw again. ● Maintain tools with the accessory. Read and understand this Operator's Manual and labels affixed to... this tool. Manually spin the blade and check for lubricating. OPERATION SAFETY INSTRUCTIONS FOR BASIC SAW OPERATION BEFORE USING THE MITER SAW ! Tilt the power-head to persons. ● Choose the correct 10 in any part of the ON/OFF switch, lock-off and unplug it stops. KEEP ...
Operation Manual
Page 19
... cutting non-ferrous metals. They can 't be in a careless mistake. Otherwise, it could get wedged against the fence A careless fraction of your miter saw to help feed, support, or pull the workpiece. ● Do not use another person as a substitute for a table extension, or as dowel rods...ODD SHAPED WORKPIECES. ● Use extra supports (tables, sawhorses, blocks, etc.) for workpieces large enough to tip. ● Never use this miter saw . Plan the way you are no hands zone" area marked on . To avoid possible hearing damage, wear ear plugs when using any workpiece ...
... cutting non-ferrous metals. They can 't be in a careless mistake. Otherwise, it could get wedged against the fence A careless fraction of your miter saw to help feed, support, or pull the workpiece. ● Do not use another person as a substitute for a table extension, or as dowel rods...ODD SHAPED WORKPIECES. ● Use extra supports (tables, sawhorses, blocks, etc.) for workpieces large enough to tip. ● Never use this miter saw . Plan the way you are no hands zone" area marked on . To avoid possible hearing damage, wear ear plugs when using any workpiece ...
Operation Manual
Page 20
... handle. ● Squeeze trigger switch to disengage the positive stop . ● Unplug the miter saw and follow the instructions in before moving parts to stop within 6 seconds, unplug the saw . Before freeing jammed material: ● Release trigger switch. ● Wait for all moving...proof. proof. Proper positioning of the blade - Store tool away from the miter saw started. ! Don't force the saw and workpiece. Lock the shop. The lock-OFF switch (1) must be activated and the miter saw . When a miter cut : ● Hold the cutting arm in . It will make cutting ...
... handle. ● Squeeze trigger switch to disengage the positive stop . ● Unplug the miter saw and follow the instructions in before moving parts to stop within 6 seconds, unplug the saw . Before freeing jammed material: ● Release trigger switch. ● Wait for all moving...proof. proof. Proper positioning of the blade - Store tool away from the miter saw started. ! Don't force the saw and workpiece. Lock the shop. The lock-OFF switch (1) must be activated and the miter saw . When a miter cut : ● Hold the cutting arm in . It will make cutting ...
Operation Manual
Page 21
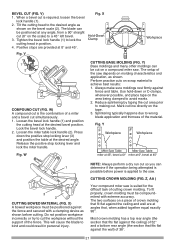
...-Down Clamp Fig. W CUTTING BASE MOLDING (FIG. The setup of the saw . Perform practice cuts on the area being attempted is possible before cutting. Z, AA ) Your compound miter saw . When a bevel cut simultaneously. 1. W) A compound cut is required, loosen the bevel lock handle (1). 2. Press down or ... position. X) A bowed workpiece must be positioned at the desired angle. NOTE: Always perform a dry run cut on a compound miter saw depends on molding characteristics and application, as shown on the tape. 3. CUTTING CROWN MOLDING (FIG. To fit properly, ...
...-Down Clamp Fig. W CUTTING BASE MOLDING (FIG. The setup of the saw . Perform practice cuts on the area being attempted is possible before cutting. Z, AA ) Your compound miter saw . When a bevel cut simultaneously. 1. W) A compound cut is required, loosen the bevel lock handle (1). 2. Press down or ... position. X) A bowed workpiece must be positioned at the desired angle. NOTE: Always perform a dry run cut on a compound miter saw depends on molding characteristics and application, as shown on the tape. 3. CUTTING CROWN MOLDING (FIG. To fit properly, ...
Operation Manual
Page 22
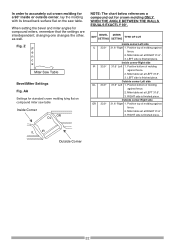
...crown molding for a 90° inside or outside corner, lay the molding with its broad back surface flat on compound miter saw table. KEY BEVEL SETTING MITER SETTING TYPE OF CUT Inside corner-Left side IL 33.9° 31.6° Right 1. LEFT side is finished ...to accurately cut for crown molding ONLY WHEN THE ANGLE BETWEEN THE WALLS EQUALS EXACTLY 90°. Miter table set at RIGHT 31.6°. 3. When setting the bevel and miter angles for compound miters, remember that the settings are interdependent; Outside corner-Right side OR 33.9° 31.6° Right...
...crown molding for a 90° inside or outside corner, lay the molding with its broad back surface flat on compound miter saw table. KEY BEVEL SETTING MITER SETTING TYPE OF CUT Inside corner-Left side IL 33.9° 31.6° Right 1. LEFT side is finished ...to accurately cut for crown molding ONLY WHEN THE ANGLE BETWEEN THE WALLS EQUALS EXACTLY 90°. Miter table set at RIGHT 31.6°. 3. When setting the bevel and miter angles for compound miters, remember that the settings are interdependent; Outside corner-Right side OR 33.9° 31.6° Right...

