User Instructions
Page 1
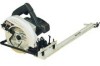
... to a specific width: § Eliminates the need to carefully follow the saw manufacturer's safety guidelines when operating or maintaining your saw base plate. Please read carefully all sections of saws. Model No. 25980 ACCU-RIP SAW GUIDE USER INSTRUCTIONS About the Accu-Rip Saw Guide The Accu-Rip is designed as plywood, wafer board, paneling, or siding. The Operator Tips section gives useful information...
... to a specific width: § Eliminates the need to carefully follow the saw manufacturer's safety guidelines when operating or maintaining your saw base plate. Please read carefully all sections of saws. Model No. 25980 ACCU-RIP SAW GUIDE USER INSTRUCTIONS About the Accu-Rip Saw Guide The Accu-Rip is designed as plywood, wafer board, paneling, or siding. The Operator Tips section gives useful information...
User Instructions
Page 2
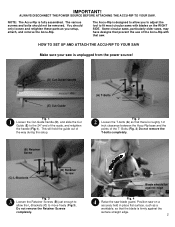
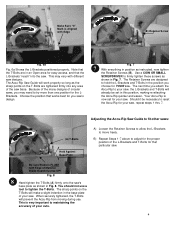
... Loosen the T-bolts (A) so that there is unplugged from the power source! (D) Cut-Guide Handle (E) Cut-Guide Fig. 1 71 Loosen the Cut-Guide handle (D), and slide the Cut Guide (E) to move freely (Fig 3). Position saw is roughly 1/2 inch clearance between the Accu-Rip base and the points of the scale, and retighten the handle (Fig.1). The various...
... Loosen the T-bolts (A) so that there is unplugged from the power source! (D) Cut-Guide Handle (E) Cut-Guide Fig. 1 71 Loosen the Cut-Guide handle (D), and slide the Cut Guide (E) to move freely (Fig 3). Position saw is roughly 1/2 inch clearance between the Accu-Rip base and the points of the scale, and retighten the handle (Fig.1). The various...
User Instructions
Page 3
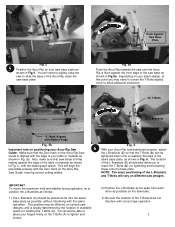
... during operation, try to slide the base of your Accu-Rip now positioned properly, adjust the L-Brackets (C) so that the T-Bolts (A) can be different on the Accu-Rip Saw Guide, insuring correct cutting widths. This position may need to slightly raise the saw to position the L-Brackets as follows: 1) The L-... L-Brackets "0" Mark Aligned with Material Edge Fig. 5b Important note on positioning your fingers firmly on the T-Bolts (A) to place your Accu-Rip Saw Guide: Make sure that saw blade is largely determined by the location of the table or material as shown in Fig. 4., with the...
... during operation, try to slide the base of your Accu-Rip now positioned properly, adjust the L-Brackets (C) so that the T-Bolts (A) can be different on the Accu-Rip Saw Guide, insuring correct cutting widths. This position may need to slightly raise the saw to position the L-Brackets as follows: 1) The L-... L-Brackets "0" Mark Aligned with Material Edge Fig. 5b Important note on positioning your fingers firmly on the T-Bolts (A) to place your Accu-Rip Saw Guide: Make sure that saw blade is largely determined by the location of the table or material as shown in Fig. 4., with the...
User Instructions
Page 4
... and T-Bolts in this position, making re-attaching the Accu-Rip quicker and easier. Fig. 7 7 With everything in position as shown in an Open area for your saw designs. Should it be UP! Adjusting the Accu-Rip Saw Guide to fit other saws: (A) T-Bolts Hold Against Base Plate A) Loosen the ...Retainer Screws to allow the L-Brackets to maintaining the accuracy of the saw 's design. 7 7. Be sure Blade is...
... and T-Bolts in this position, making re-attaching the Accu-Rip quicker and easier. Fig. 7 7 With everything in position as shown in an Open area for your saw designs. Should it be UP! Adjusting the Accu-Rip Saw Guide to fit other saws: (A) T-Bolts Hold Against Base Plate A) Loosen the ...Retainer Screws to allow the L-Brackets to maintaining the accuracy of the saw 's design. 7 7. Be sure Blade is...
User Instructions
Page 5
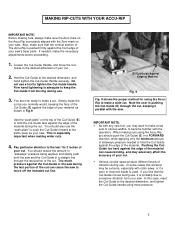
..., and hand tighten the Cut-Guide Handle securely. This is precisely aligned with the Zero mark on your saw and the Cut-Guide in Fig.9. IMPORTANT NOTE: § As with the operation. When making wider cuts. 4. MAKING RIP-CUTS WITH YOUR ACCU-RIP IMPORTANT NOTE: Before making cuts,... always make sure the Zero mark on the Accu-Rip is especially important when making cuts using the Accu-Rip, you...
..., and hand tighten the Cut-Guide Handle securely. This is precisely aligned with the Zero mark on your saw and the Cut-Guide in Fig.9. IMPORTANT NOTE: § As with the operation. When making wider cuts. 4. MAKING RIP-CUTS WITH YOUR ACCU-RIP IMPORTANT NOTE: Before making cuts,... always make sure the Zero mark on the Accu-Rip is especially important when making cuts using the Accu-Rip, you...
User Instructions
Page 6
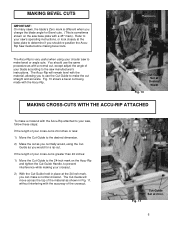
... at 24 in Fig. 11, without interfering with the accuracy of the crosscut. Cut-Guide Set at Desired Width Fig. 10 MAKING CROSS-CUTS WITH THE ACCU-RIP ATTACHED To make a crosscut with the Accu-Rip attached to your saw, follow these steps: If the length of your cross-cut is 24 inches or less...: 1) Move the Cut-Guide to the saw 's operating instructions, or look closely at the base plate to...
... at 24 in Fig. 11, without interfering with the accuracy of the crosscut. Cut-Guide Set at Desired Width Fig. 10 MAKING CROSS-CUTS WITH THE ACCU-RIP ATTACHED To make a crosscut with the Accu-Rip attached to your saw, follow these steps: If the length of your cross-cut is 24 inches or less...: 1) Move the Cut-Guide to the saw 's operating instructions, or look closely at the base plate to...
User Instructions
Page 7
...tool, and should be removed from the Cut-Guide slot. 7 It is in a safe place to avoid accidental damage. OPERATOR TIPS Read these useful tips to get the best performance from your Accu-Rip: § Always use excessive force when using your saw. Dull or worn blades can produce binding that... and from the saw . § During repeated use, occasionally check and re-tighten the T-Bolts on your saw for the material that the Accu-Rip be stored in good condition, and all adjustment screws are cutting. § Make sure your cut, do not push the Cut-Guide excessively against the ...
...tool, and should be removed from the Cut-Guide slot. 7 It is in a safe place to avoid accidental damage. OPERATOR TIPS Read these useful tips to get the best performance from your Accu-Rip: § Always use excessive force when using your saw. Dull or worn blades can produce binding that... and from the saw . § During repeated use, occasionally check and re-tighten the T-Bolts on your saw for the material that the Accu-Rip be stored in good condition, and all adjustment screws are cutting. § Make sure your cut, do not push the Cut-Guide excessively against the ...
User Instructions
Page 8
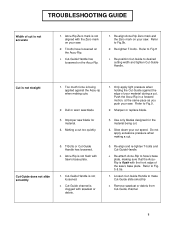
... 1. Use only blades designed for material. 4. Re-attach Accu-Rip to Saw's base plate, making a cut too quickly. 5. Cut-Guide Handle has loosened on the Accu-Rip. 3. T-Bolts or Cut-Guide Handle has loosened. 6. Cut-Guide channel is flush with sawdust or debris. 1. TROUBLESHOOTING GUIDE Width of cut is not loosened. 2. Accu-Rip Zero mark is being cut speed. Refer to...
... 1. Use only blades designed for material. 4. Re-attach Accu-Rip to Saw's base plate, making a cut too quickly. 5. Cut-Guide Handle has loosened on the Accu-Rip. 3. T-Bolts or Cut-Guide Handle has loosened. 6. Cut-Guide channel is flush with sawdust or debris. 1. TROUBLESHOOTING GUIDE Width of cut is not loosened. 2. Accu-Rip Zero mark is being cut speed. Refer to...


