
Owners Manual
Page 1
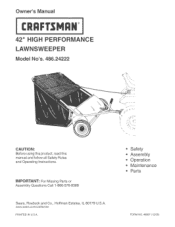
mMPORTANT: For Missing Parts or AssembUy Questions Call 1-866-576-8388 Sears, Roebuck and Co., Hoffman Estates, IL 60179 U.S.A. www, sea rs,com/craftsman PRINTED IN U.S.A. • Safety • Assembly • Operation • Maintenance • Parts FORM NO. 49997 (12/05) Owner's Manuat ® 42" HiGH PERFORMANCE LAWNSWEEPER Model No's, 486.24222 CAUTION: Before using this product, read this manuaU and follow aH Safety RuUes and Operating Instructions.
mMPORTANT: For Missing Parts or AssembUy Questions Call 1-866-576-8388 Sears, Roebuck and Co., Hoffman Estates, IL 60179 U.S.A. www, sea rs,com/craftsman PRINTED IN U.S.A. • Safety • Assembly • Operation • Maintenance • Parts FORM NO. 49997 (12/05) Owner's Manuat ® 42" HiGH PERFORMANCE LAWNSWEEPER Model No's, 486.24222 CAUTION: Before using this product, read this manuaU and follow aH Safety RuUes and Operating Instructions.
Owners Manual
Page 2
... place for commercia! Repair any part of steep slopes° 7. This warranty is void if this product is used for future reference. Exercise caution at reduced speed on rough terrain, near ditches and on sweeper. 4. Maintenance Schedule 12 Storage 12 Service and Adjustments 13 Troubleshooting 13 Repair Parts Illustration 14 Repair Parts List 15 Parts Ordering/Service Back Cover TWO YEAR FULL WARRANTY ON CRAFTSMAN LAWNSWEEPER When assembled, operated and maintained according...
... place for commercia! Repair any part of steep slopes° 7. This warranty is void if this product is used for future reference. Exercise caution at reduced speed on rough terrain, near ditches and on sweeper. 4. Maintenance Schedule 12 Storage 12 Service and Adjustments 13 Troubleshooting 13 Repair Parts Illustration 14 Repair Parts List 15 Parts Ordering/Service Back Cover TWO YEAR FULL WARRANTY ON CRAFTSMAN LAWNSWEEPER When assembled, operated and maintained according...
Owners Manual
Page 3
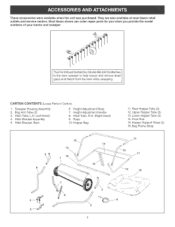
... 6. Upper Hopper Tube (2) 13. Hopper Support Strap (2) 16. Most Seers stores can order repair parts for you when you provide the model numbers of your tractor and sweeper to the lawn sweeper to help loosen and remove dead i TgrhaessFraonndt MthoautncthDferothmatcthheeDlaMwnodweh! Hitch Tube, R.H. (Right Hand) 9. Bag Frame Strap )/11 Sweeper Housing Assembly 2. Hitch Tube, LH. (Left Hand) 4. Height Adjustment Strap 7. Rear Hopper Tube (2) 12. Hopper...
... 6. Upper Hopper Tube (2) 13. Hopper Support Strap (2) 16. Most Seers stores can order repair parts for you when you provide the model numbers of your tractor and sweeper to the lawn sweeper to help loosen and remove dead i TgrhaessFraonndt MthoautncthDferothmatcthheeDlaMwnodweh! Hitch Tube, R.H. (Right Hand) 9. Bag Frame Strap )/11 Sweeper Housing Assembly 2. Hitch Tube, LH. (Left Hand) 4. Height Adjustment Strap 7. Rear Hopper Tube (2) 12. Hopper...
Owners Manual
Page 4
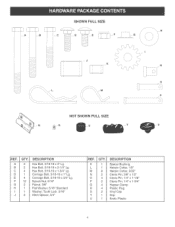
... Cotter, 1/8" Hairpin Cotter, 3/32" Clevis Pin, 3/8" x 1/2" Clevis Pin, 1/4" x 1-1/8" Clevis Pin, 1/4" x 1o3/4" Hopper Clamp Plastic Plug Vinyl Cap Grip Knob, Plastic A B C D E F G H I ] 1 \ \\\ NOT SHOWN FULL SIZE ..... A L ......... .... Q SHOWN FULL SmZE J ' L_--\ \ I, I J QTY. 2 2 4 1 4 12 2 1 1 2 DESCRmPTION Hex Bolt, 5/16-18 x 3" Lg, Hex Bolt, 5/16-18 x 2-1/4" Lg, Hex Bolt, 5/16-18 x 1-3/4" Lg, Carriage Bolt, 5/16-18 x 1" Lg, Carriage Bolt, 5/16-18 x 3/4" Lg, Nylock Nut, 5/16" Palnut, 3/8" Flat Washer, 5/16...
... Cotter, 1/8" Hairpin Cotter, 3/32" Clevis Pin, 3/8" x 1/2" Clevis Pin, 1/4" x 1-1/8" Clevis Pin, 1/4" x 1o3/4" Hopper Clamp Plastic Plug Vinyl Cap Grip Knob, Plastic A B C D E F G H I ] 1 \ \\\ NOT SHOWN FULL SIZE ..... A L ......... .... Q SHOWN FULL SmZE J ' L_--\ \ I, I J QTY. 2 2 4 1 4 12 2 1 1 2 DESCRmPTION Hex Bolt, 5/16-18 x 3" Lg, Hex Bolt, 5/16-18 x 2-1/4" Lg, Hex Bolt, 5/16-18 x 1-3/4" Lg, Carriage Bolt, 5/16-18 x 1" Lg, Carriage Bolt, 5/16-18 x 3/4" Lg, Nylock Nut, 5/16" Palnut, 3/8" Flat Washer, 5/16...
Owners Manual
Page 5
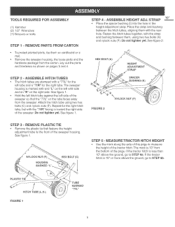
... ASSEMBLE HEIGHT ADJ. Do not tighten yet. Attach the hitch tube using two hex bolts (A) and nyiock nuts (F). Place the strap and bushing between them on cardboard or a mat. If the tractor hitch is 10" from the carton. Remove the sweeper housing, the loose parts ...and the hardware package from the bottom of the tractor hitch. If the tractor hitch is marked with and "L" on pages 3 and 4. 10" STEP 4 - The sweeper housing is less than 10" above the ground, go to measure the height of the page. TOOLS REQUIRED FOR ASSEMBLY...
... ASSEMBLE HEIGHT ADJ. Do not tighten yet. Attach the hitch tube using two hex bolts (A) and nyiock nuts (F). Place the strap and bushing between them on cardboard or a mat. If the tractor hitch is 10" from the carton. Remove the sweeper housing, the loose parts ...and the hardware package from the bottom of the tractor hitch. If the tractor hitch is marked with and "L" on pages 3 and 4. 10" STEP 4 - The sweeper housing is less than 10" above the ground, go to measure the height of the page. TOOLS REQUIRED FOR ASSEMBLY...
Owners Manual
Page 6
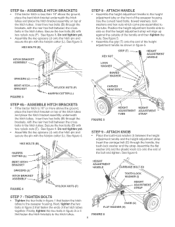
... tubes. BRACKET FIGURE 3 _ NYLOCK NUTS (F) """"" HAmRPmNCOTTER (L) STEP 6b - if the tractor hitch is less than 10" above the ground, place the bent hitch bracket on top of the sweeper housing, Use the curved head bolts, bowed washers, lock washers and hex nuts which come pre-assembled to the tube, Position the height adjustment handle side to the hitch tubes. KNOB (U) FLAT WASHER (H) FIGURE 6 STEP...
... tubes. BRACKET FIGURE 3 _ NYLOCK NUTS (F) """"" HAmRPmNCOTTER (L) STEP 6b - if the tractor hitch is less than 10" above the ground, place the bent hitch bracket on top of the sweeper housing, Use the curved head bolts, bowed washers, lock washers and hex nuts which come pre-assembled to the tube, Position the height adjustment handle side to the hitch tubes. KNOB (U) FLAT WASHER (H) FIGURE 6 STEP...
Owners Manual
Page 7
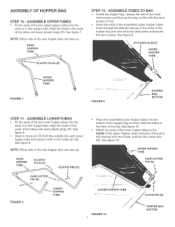
...Align the holes in the sides of the upper hopper tubes using two clevis pins (N) inserted from the outside into the ends of the rear hopper tube can face up . See figure 10. REAR HOPPER TUBE_,_ PLASTIC PLUG (B) _ CLEVIS PiN (O) Place the assembled lower hopper tubes into the ends of the rear hopper ... each lower hopper tube and secure it with the wind screen on top= , insert the ends of the assembled upper hopper tubes down through the stitched sleeves in the ends of the tubes and insert plastic plugs (R). See figure 7. Attach the ends of the lower hopper tubes to the back ...
...Align the holes in the sides of the upper hopper tubes using two clevis pins (N) inserted from the outside into the ends of the rear hopper tube can face up . See figure 10. REAR HOPPER TUBE_,_ PLASTIC PLUG (B) _ CLEVIS PiN (O) Place the assembled lower hopper tubes into the ends of the rear hopper ... each lower hopper tube and secure it with the wind screen on top= , insert the ends of the assembled upper hopper tubes down through the stitched sleeves in the ends of the tubes and insert plastic plugs (R). See figure 7. Attach the ends of the lower hopper tubes to the back ...
Owners Manual
Page 8
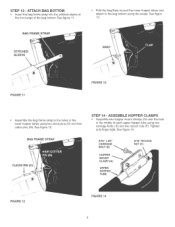
... bag flaps around the lower hopper tubes and attach to the bag bottom using the snaps, See figure 13, SNAP FIGURE 11 FIGURE 13 Assemble the bag frame strap to the holes in the lower hopper tubes using two carriage bolts (E) and two nylock nuts (F), Tighten only finger tight= See figure 14...16" x 3/4" CARR{AGE BOLT (E) HOPPER MOUNT _ CLAMP (Q) UPPER HOPPER TUBE 5/16" NYLOCK NUT (F) FIGURE 12 FIGURE 14 ATTACH BAG BOTTOM , insert the bag frame strap into the stitched sleeve at the front edge of each upper hopper tube using two clevis pins (O) and hair cotter pins (M), See figure 12, BAG ...
... bag flaps around the lower hopper tubes and attach to the bag bottom using the snaps, See figure 13, SNAP FIGURE 11 FIGURE 13 Assemble the bag frame strap to the holes in the lower hopper tubes using two carriage bolts (E) and two nylock nuts (F), Tighten only finger tight= See figure 14...16" x 3/4" CARR{AGE BOLT (E) HOPPER MOUNT _ CLAMP (Q) UPPER HOPPER TUBE 5/16" NYLOCK NUT (F) FIGURE 12 FIGURE 14 ATTACH BAG BOTTOM , insert the bag frame strap into the stitched sleeve at the front edge of each upper hopper tube using two clevis pins (O) and hair cotter pins (M), See figure 12, BAG ...

Owners Manual
Page 9
...HINT: To ease assembly of the pivot rod using a hammer. CAP (S) PALNUT (G) \ @, FIGURE 15 HOPPER SUPPORT STRAP BAG ARM TUBE Attach the bottoms of the upper rear hopper tube as shown in the lower hopper tubes, securing the straps with two clevis pins (P) and hairpin cotters (M). TmGHTEN NUTS FIGURE 17 STEP 16...and a hopper support strap onto the rod. ASSEMBLE PIVOT ROD . With the bottom end of the pivot rod against the surface, tap a palnut onto the top end of the hitch tubes and secure with the previously assembled hair cotter pins (M). Secure the rope to the sweeper, slide the...
...HINT: To ease assembly of the pivot rod using a hammer. CAP (S) PALNUT (G) \ @, FIGURE 15 HOPPER SUPPORT STRAP BAG ARM TUBE Attach the bottoms of the upper rear hopper tube as shown in the lower hopper tubes, securing the straps with two clevis pins (P) and hairpin cotters (M). TmGHTEN NUTS FIGURE 17 STEP 16...and a hopper support strap onto the rod. ASSEMBLE PIVOT ROD . With the bottom end of the pivot rod against the surface, tap a palnut onto the top end of the hitch tubes and secure with the previously assembled hair cotter pins (M). Secure the rope to the sweeper, slide the...

Owners Manual
Page 10
... TRACTOR Place the tractor and sweeper on a fiat level sutlace, Set the sweeper height adjustment handle to about the middle of its adjustment range, Attach the sweeper hitch to the tractor hitch, arranging the 3/4" spacers in one of six possible combinations as shown in figure 20, BRUSH HEIGHT ADJUSTED APPROXUMATELYMInD°WAY \ APPROXUMATELY LEVEL (5" to 13" ground clearance. X \\\ \ \ HUTCHBRACKET MOUNTED ABOVE HITCH TUBES ] I BLACK LiNE mSTRACTOR...
... TRACTOR Place the tractor and sweeper on a fiat level sutlace, Set the sweeper height adjustment handle to about the middle of its adjustment range, Attach the sweeper hitch to the tractor hitch, arranging the 3/4" spacers in one of six possible combinations as shown in figure 20, BRUSH HEIGHT ADJUSTED APPROXUMATELYMInD°WAY \ APPROXUMATELY LEVEL (5" to 13" ground clearance. X \\\ \ \ HUTCHBRACKET MOUNTED ABOVE HITCH TUBES ] I BLACK LiNE mSTRACTOR...
Owners Manual
Page 11
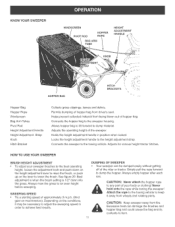
... height adjustment lever to raise the brush, or push up on the lever to lower the brush, See figure 20, Best adjustment is when the brush setting is 1/2" down into the grass, Always mow the grass to an even height before sweeping, SWEEPING SPEED Try a starting speed of approximately 3 m,p,h, (third gear on most tractors), Depending on the conditions, it away from wheels and rotating parts, CAUTmON: Keep sweeper...
... height adjustment lever to raise the brush, or push up on the lever to lower the brush, See figure 20, Best adjustment is when the brush setting is 1/2" down into the grass, Always mow the grass to an even height before sweeping, SWEEPING SPEED Try a starting speed of approximately 3 m,p,h, (third gear on most tractors), Depending on the conditions, it away from wheels and rotating parts, CAUTmON: Keep sweeper...
Owners Manual
Page 12
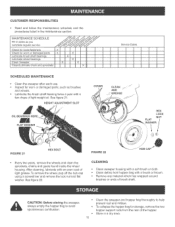
... WASHER Service Dates COVER CLEAN S AND ,S GREASE HEX LOCK NUT WASHER FLAT fi FIGURE 21 HEX BOLT Every two years, remove the wheels and dean the sprockets, chains and gears found inside the wheel housing. FIGURE 22 _HUB CAP/_ CLEANING Clean sweeper housing with a brush or broom. To collapse the hopper bag for worn or damaged parts X Lubricate brush shaft bearings Lubricate wheel bearings Ctean Sweeper -- _ Clean/Lubricate chain and sprockets X _ X X X X SCHEDULED MAINTENANCE Clean the sweeper after each use. inspect...
... WASHER Service Dates COVER CLEAN S AND ,S GREASE HEX LOCK NUT WASHER FLAT fi FIGURE 21 HEX BOLT Every two years, remove the wheels and dean the sprockets, chains and gears found inside the wheel housing. FIGURE 22 _HUB CAP/_ CLEANING Clean sweeper housing with a brush or broom. To collapse the hopper bag for worn or damaged parts X Lubricate brush shaft bearings Lubricate wheel bearings Ctean Sweeper -- _ Clean/Lubricate chain and sprockets X _ X X X X SCHEDULED MAINTENANCE Clean the sweeper after each use. inspect...
Owners Manual
Page 13
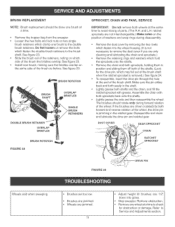
... time to the double brush retainers. Lightly grease the axle and then reassemble the wheel. Wheels are only cleaning and lubricating the chain and sprockets.) . Remove one wheel at a time. . Refer to the brush shaft. Loosen the hex bolts and lock nuts on the same side of the brush shaft when the ratchet sprocket is not necessary to check for the drive pin, which fasten the double brush retainers to Service and Adjustments...
... time to the double brush retainers. Lightly grease the axle and then reassemble the wheel. Wheels are only cleaning and lubricating the chain and sprockets.) . Remove one wheel at a time. . Refer to the brush shaft. Loosen the hex bolts and lock nuts on the same side of the brush shaft when the ratchet sprocket is not necessary to check for the drive pin, which fasten the double brush retainers to Service and Adjustments...

Owners Manual
Page 15
... 1 Housing Assembly 45 24189 1 Strap, Bag Frame 1 Skirt, 42" 46 25813 2 Strap, Hopper Support 1 Retainer, Skirt 47 43737 1 Hopper Rope 1 Height Adjustment Tube Ass'y. 48 49768 1 Hopper Bag 2 Bolt, Cvd. PART NO. LH. 82 43080 4 Bolt, Carriage 5/16-18 x 3/4" 1 Housing, Wheel Drive Ass'y. REPAUR PARTS LiST FOR MODELS 486.24222 - 42" HUGH PERFORMANCE LAWNSWEEPER REF, NO. R.H. 83 23331 4 Hopper Mount Clamp 2 Tube, Upper Hopper Frame 49997 1 Owners Manual 15...
... 1 Housing Assembly 45 24189 1 Strap, Bag Frame 1 Skirt, 42" 46 25813 2 Strap, Hopper Support 1 Retainer, Skirt 47 43737 1 Hopper Rope 1 Height Adjustment Tube Ass'y. 48 49768 1 Hopper Bag 2 Bolt, Cvd. PART NO. LH. 82 43080 4 Bolt, Carriage 5/16-18 x 3/4" 1 Housing, Wheel Drive Ass'y. REPAUR PARTS LiST FOR MODELS 486.24222 - 42" HUGH PERFORMANCE LAWNSWEEPER REF, NO. R.H. 83 23331 4 Hopper Mount Clamp 2 Tube, Upper Hopper Frame 49997 1 Owners Manual 15...

Owners Manual
Page 16
...repair-in items like garage door openers and water heaters. 1-800-4-MY-H O ME® (1-800-469-4663) Call anytime, day or night (U.S.A. For the replacement parts, accessories and owner's manuals that you need to do-it ! For Sears professional installation of all major brand appliances, lawn... vacuums, lawn equipment, and electronics, call or go on-line for the location of your nearest Sears Parts & Repair Center. 1-080-48 2 Call anytime, day or night (USA www.sears.com only) To purchase a protection agreement (USA) or maintenance agreement (Canada)on a product serviced by Sears: 1-800...
...repair-in items like garage door openers and water heaters. 1-800-4-MY-H O ME® (1-800-469-4663) Call anytime, day or night (U.S.A. For the replacement parts, accessories and owner's manuals that you need to do-it ! For Sears professional installation of all major brand appliances, lawn... vacuums, lawn equipment, and electronics, call or go on-line for the location of your nearest Sears Parts & Repair Center. 1-080-48 2 Call anytime, day or night (USA www.sears.com only) To purchase a protection agreement (USA) or maintenance agreement (Canada)on a product serviced by Sears: 1-800...


