
Craftsman 24222 Support Question
Craftsman 24222 Support Question
Find answers below for this question about Craftsman 24222 - 42 in. High Speed Sweeper.Need a Craftsman 24222 manual? We have 1 online manual for this item!
Question posted by Anonymous-57424 on April 22nd, 2012
Bag Is Not Level With Gournd
When the sweeper is hooked to my mower and the brushes are set, the back of the bag sets about 12" off the ground. The assembly looks correct but I cannot figure out how to adjust it to make it level with the ground.
Current Answers
Related Craftsman 24222 Manual Pages
Owners Manual - Page 1

...;
42" HiGH PERFORMANCE LAWNSWEEPER
Model No's, 486.24222
CAUTION:
Before using this product, read this manuaU and follow aH Safety RuUes and Operating Instructions. mMPORTANT: For Missing Parts or AssembUy Questions Call 1-866-576-8388
Sears, Roebuck and Co., Hoffman Estates, IL 60179 U.S.A. www, sea rs,com/craftsman
PRINTED IN U.S.A.
• Safety • Assembly...
Owners Manual - Page 2
...can
damage the brushes and hopper bag and could cause the bag and its contents to burn.
9. Exercise caution at reduced speed on rough
terrain, near ditches and on sweeper.
4. Repair ...12 Storage 12 Service and Adjustments 13 Troubleshooting 13 Repair Parts Illustration 14 Repair Parts List 15 Parts Ordering/Service Back Cover
TWO YEAR FULL WARRANTY ON CRAFTSMAN LAWNSWEEPER
When assembled...
Owners Manual - Page 3
...
to the lawn sweeper to help loosen and remove dead i TgrhaessFraonndt MthoautncthDferothmatcthheeDlaMwnodweh! i4le86s.2w4e2e1p9inagt.taches
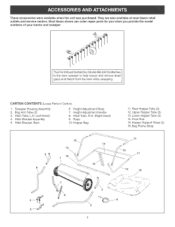
CARTON CONTENTS (Loose Parts in Carton)
1. Bag Arm Tube (2) 3. Rope 10. Bag Frame Strap
)/11 Rear Hopper Tube (2) 12. They are also available at most Sears retait outlets and service centers. Upper Hopper Tube (2) 13. Hitch Bracket Assembly...
Owners Manual - Page 4

...Cotter, 3/32" Clevis Pin, 3/8" x 1/2" Clevis Pin, 1/4" x 1-1/8" Clevis Pin, 1/4" x 1o3/4" Hopper Clamp Plastic Plug Vinyl Cap Grip Knob, Plastic
T
o
P
J
©
REF. Q
SHOWN FULL SmZE
J '
L_--\
\
I,
I J
QTY.
2 2 4 1 4 12 2 1 1 2
DESCRmPTION
Hex Bolt, 5/16-18 x 3" Lg, Hex Bolt, 5/16-18 x 2-1/4" Lg, Hex Bolt, 5/16-18 x 1-3/4" Lg, Carriage Bolt, 5/16-18 x 1" Lg, Carriage Bolt, 5/16-18...
Owners Manual - Page 5
... more above the ground, go to the front of the sweeper so that fastens the height
adjustment tube to STEP 6b. Hotd the left hitch tube against the left side of the sweeper housing, See figure 1.
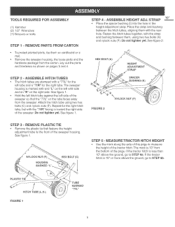
REMOVE PLASTIC TiE , Remove the plastic tie that the "77L" on cardboard or a mat. TOOLS REQUIRED FOR ASSEMBLY
(1) Hammer (2) 1/2" Wrenches...
Owners Manual - Page 6
... the hairpin cotter (L)= See figure 3=
REX BOLTS (B)
"A' C2 t CKET
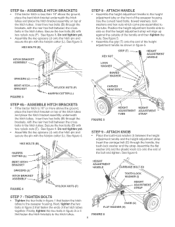
STEP 8 - HEIGHT ADJUSTMENT HANDLE
SPACERS (J) ----_i _
BENT RITCH--
ASSEMBLE HUTCH BRACKETS , if the tractor hitch is 10" or more above the ground,
place the bent hitch bracket underneath the hitch tubes and place the hitch bracket assembly on the front of the sweeper housing, Use the curved...
Owners Manual - Page 7

... the wind screen on top= , insert the ends of the assembled upper hopper tubes down through the stitched sleeves in the ends of the tubes and insert plastic plugs (R). See figure 7. REAR HOPPER TUBE
STEP 12 - NOTE: Either side of the hopper bag and then slide the tubes back underneath the wind screen.
Attach...
Owners Manual - Page 8
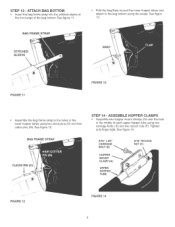
... the snaps, See figure 13,
SNAP
FIGURE 11
FIGURE 13
Assemble the bag frame strap to the holes in the lower hopper tubes using two carriage bolts (E) and two nylock nuts (F), Tighten only finger tight= See figure 14,
5/16" x 3/4" CARR{AGE BOLT (E)
HOPPER MOUNT _ CLAMP (Q)
UPPER HOPPER TUBE
5/16" NYLOCK NUT (F)
FIGURE 12
FIGURE 14 ATTACH BAG BOTTOM , insert the...
Owners Manual - Page 9

... of the pivot rod using a hammer. See figure 17. See figure 16. Tighten the nuts on a solid surface. Secure the rope to the sweeper, slide the
ends of the bag arm tubes into the ends of the hitch tubes and secure with the previously assembled hair cotter pins (M). Assemble two palnuts (G) onto the ends of the...
Owners Manual - Page 10

... the sweeper bag is approximately level with hitches having 10" to 7" FROM SURFACE)
FIGURE 20
GROUP "A" -
For vehicles with hitches having 8" to 10" ground clearance.
\
\
\ \ \
HUTCH BRACKET MOUNTED BELOW HITCH TUBES BLACK LiNE mSTRACTOR HmTCR
GROUP "B" o For vehicles with the ground and approximately 5" to 7" off the ground as shown in figure 20,
BRUSH HEIGHT ADJUSTED APPROXUMATELYMInD...
Owners Manual - Page 11
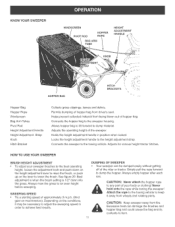
... figure 20, Best adjustment is when the brush setting is 1/2" down into the grass, Always mow the grass to an even height before sweeping,
SWEEPING SPEED Try a starting speed of approximately 3 m,p,h, (third gear on most tractors), Depending on the conditions, it away from wheels and rotating parts,
CAUTmON: Keep sweeper away from being blown out of hopper bag...
Owners Manual - Page 12

... debris from the rear of light weight oil. Clean the sweeper and hopper bag thoroughly to avoid spontaneous combustion. See figure 22. inspect for storage, remove the two hopper support rods from hopper bag with a soft brush or cloth. Remove any material which has wrapped around brushes or ends of light grease.
To collapse the hopper...
Owners Manual - Page 13
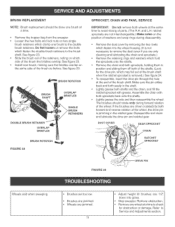
... stiding them off both of the shafts. (Look for obstruction or damage. Assemble the chain with grease.
Brushes are not interchangeable.) Make notes on the same side of the wheel, the drive pin is jamming in the ratchet gear. Remove obstruction. . Remove the hopper bag from the sweeper. See figure 23. Remove the chain and both sprockets...
Owners Manual - Page 15

...
2 Tube, Rear Hopper Frame
1 Hitch Tube, LH.
44 48726
2 Tube, Lower Hopper Frame
1 Housing Assembly
45 24189
1 Strap, Bag Frame
1 Skirt, 42"
46 25813
2 Strap, Hopper Support
1 Retainer, Skirt
47 43737
1 Hopper Rope
1 Height Adjustment Tube Ass'y.
48 49768
1 Hopper Bag
2 Bolt, Cvd. R.H. 83 23331
4 Hopper Mount Clamp
2 Tube, Upper Hopper Frame
49997
1 Owners Manual...
Owners Manual - Page 16

...only)
To purchase a protection agreement (USA)
or maintenance agreement (Canada)on -line for the location of your home-of all major brand appliances, lawn and garden equipment, or heating and cooling systems,
no matter who made it, no matter who sold it -yourself.
iiiiiiiiiiiiiiiil iiiiiiiiiiiiiiiil
iiiiiiiiiiiiiiiil iiiiiiiiiiiiiiiil iiiiiiiiiiiiiiiil iiiiiiiiiiiiiiiil iiiiiiiiiiiiiiiil...
Similar Questions


Craftsman 5 Horsepower 3 Cutting Stage Mulching And Bagging Chipper-shredder
I can get this equipment started but I cannot keep it running. Gasoline is getting from the gas tank...
I can get this equipment started but I cannot keep it running. Gasoline is getting from the gas tank...
(Posted by beverlysha 9 years ago)

How Do You Check Oil Level On A Craftsman 29cc 4 Cycle Weedwacker
(Posted by antmjw 9 years ago)

Who Makes The Craftsman 42 In. High Speed Sweeper Model# 24222
(Posted by jararhamlu 10 years ago)
