Craftsman 21154 - 6 in. Variable Speed Grinding Center Support and Manuals
Get Help and Manuals for this Craftsman item
View All Support Options Below
Free Craftsman 21154 manuals!
Problems with Craftsman 21154?
Ask a Question
Free Craftsman 21154 manuals!
Problems with Craftsman 21154?
Ask a Question
Craftsman 21154 Videos

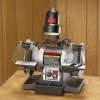
Craftsman 9-21154 Variable Speed 6-Inch Grinding Center
Duration: 1:21
Total Views: 845
Duration: 1:21
Total Views: 845
Popular Craftsman 21154 Manual Pages
Owners Manual - Page 1
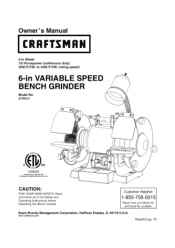
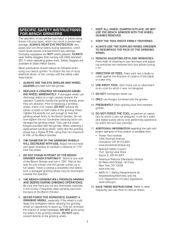
... follow all of the Safety and Operating Instructions before Operating this Bench Grinder
Customer Helpline
1-855-758-0015
Please have your Model No. www.craftsman.com
EspaSolpg. 19 Sears Brands Management Corporation, Hoffman Estates, IL 60179 U.S.A. ava abe. and Ser a No. Owner's Manual
CRFIFTSMFIN
6-in VARIABLE SPEED BENCH GRINDER
Model No. 21154-3
LISTEO
3168328
Conforms to UL Std.
Owners Manual - Page 2
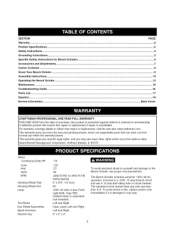
... ...
16
Troubleshooting Guide ...
16
Parts List ...
17
Espahol ...
19
Service Information ... The Bench Grinder is warranted against defects in any wire size less than #14. SECTION
PAGE
Warranty ...
2
Product Specifications ...
2
Safety Instructions ...
3
Grounding Instructions ...
5
Specific Safety Instructions for 120V, 60 Hz, operation. Back Cover
CRAFTSMAN PROFESSIONAL ONE...
Owners Manual - Page 3
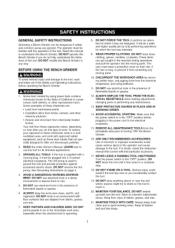
... AREA by only performing operations for which it must be plugged into the moving parts.
10. KEEP PROTECTIVE GUARDS IN PLACE AND IN WORKING ORDER.
14.
Keep ... GENERAL SAFETY INSTRUCTIONS
Operating a Bench Grinder can get caught in the machine during operations and pull the operator into a 3-contact electrical receptacle. Read this manual to turning "ON" the Bench Grinder.
16. ...
Owners Manual - Page 5

...the green insulation (with ALL local codes and ordinances.
B
grounding adapter lug... completely understand the grounding instructions, or if you are...the proper electrical receptacle installed by a qualified electrician. This Bench Grinder is intended for ... with a qualified electrician or service personnel if you do not ...repair or replacement of electric shock. THIS TOOL MUST ...
Owners Manual - Page 6
...Standards Institute 25 West 43rd Street, 4th Floor New York, NY...Bench Grinder.
6. Department of the Bench Grinder.
3. SAVE THESE INSTRUCTIONS. ALWAYS wear Safety Goggles (that keys and adjusting wrenches are available at the side for which it was intended.
17. Only use flanges furnished with the grinder. When selecting a replacement grinding wheel, verify that the grinding...
Owners Manual - Page 7
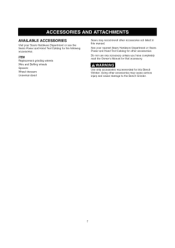
... other accessories.
Using other accessories not listed in this Bench Grinder. See your Sears Hardware Department or see the Sears Power and Hand Tool Catalog for the following accessories. Do not use any accessory unless you have completely read the Owner's Manual for this manual.
ITEM Replacement grinding wheels Wire and Buffing wheels Spacers Wheel dressers Universal stand...
Owners Manual - Page 8
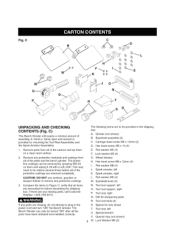
... all of the parts and the bench grinder. This may need to be turned "ON" after all the parts have been obtained and installed correctly. CAUTION: DO NOT use acetone, gasoline or lacquer thinner to Figure C;
Carriage head screw M6 x 12mm (2) D. Wheel dresser
H. Spark arrestor, right L. Flat washer M6 (4) M. Tool rest support, right P. Tool rest, right...
Owners Manual - Page 9
... contacting the operator.
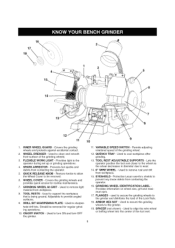
5. Adjustable to turn ON and turn OFF the grinder.
11. DRILL BIT SHARPENING PLATE - Used to provide angled surfaces.
9. QUENCH TRAY - FLANGES - SPARK ARRESTOR - Used to support the workpiece that is being ground. VARIABLE SPEED SWITCH - used to secure the grinding wheels to be removed for routine maintenance.
7. Remove knobs to allow...
Owners Manual - Page 10

... estshaveaflat,smooth
Fig. The Left Side Tool Rest is 1/16" from the grinding wheel. See Figure E. Place the Plate onto the Right Side Tool Rest and... supports.
DONOTassembtlheeBenchGrindeurntiyl ouare surethetoolISNOTpluggeidn.
2.
DONOTassembtlheeBenchGrindeurntiyl ouare surethegrindinwgheelasrefirmlytightenetdothe BenchGrinder. TOOL RESTS (Figs. D and E)
The Bench Grinder...
Owners Manual - Page 12
... work surface. K)
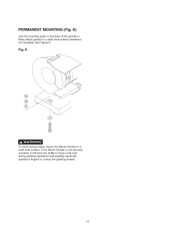
Use the mounting pads on the base of the grinder to firmly attach grinder to a solid work surface (hardware not included). See Figure K. If the Bench Grinder is not securely mounted, it will have the ability to move or tip over during grinding operations and possibly cause the operator's fingers to contact the...
Owners Manual - Page 13

... be turned to its slowest setting by rotating the Variable Speed Switch clockwise.
5, The Flexible Work Light may place the hot end of the Bench Grinder using the wire wheel on the appropriate tool rest for hand held grinding, sharpening, and cleaning operations. The R.EM.'s of the Bench Grinder can be done using the grinding wheel. Place the workpiece...
Owners Manual - Page 14
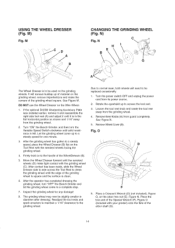
... dressing. N)
Fig.
Fig. It will need to a steady speed for any damage!
8. and then turn "OFF" the Bench Grinder and let the grinding wheel come up to dress the grinding wheel until solid resistance is clean.
6, After the operator has completed dressing the grinding wheel, turn the Variable Speed Switch clockwise until the edge of the WheelDresser (B).
5. The...
Owners Manual - Page 16
... circuit breaker are blocked
1. Lift switch to clean the Bench Grinder. Return to the Bench Grinder. Capacitor has failed
1. Return to Sears Service Center 6. Return to Sears Service Center
Fuse blows or circuit breaker
trips
1. Motor is overloaded 12. Reduce pressure on workpiece
2. Replace with non-factory parts could cause serious injury to the operator and damage to...
Owners Manual - Page 17

... 2 2 2 1 4 1 2 1 1 1 1 2 1 1 1 1 1 1 1 2 1 1 1 1
1 1 1 1
Standard hardwareitem availablelocally A NotShown
17
Y_ Always order by PART NUMBER, not by a qualified service technician. Repair service is done by key number.
Use of any other parts may create a HAZARD unless repair is available at your nearest SearsService Center.
When servicing, use only CRAFTSMAN replacement parts.
Owners Manual - Page 36

... home - For,the replacement parts, accessories and owner s manuals that you need to do-it !
and Canada w...w...w..:..s..e..a..r.s..:.c..a
Our Home
For repair of carry-in items like garage door openers and water heaters.
1-800-4-MY-I TMMarca de Fabrica de KCD IP, LLC en Estados Unidos, o Sears Brands, LLC in your nearest
Sears Parts & Repair Service Center
1-800-488-1222 (U.S.A.) 1-800...
Craftsman 21154 Reviews
We have not received any reviews for Craftsman yet.