

Operation Manual
Page 1
Customer Help Line: 1-800-932-3188 Sears, Roebuck and Co., 3333 Beverly Rd., Hoffman Estates, IL 60179 USA Visit the Craftsman web page: www,sears.com/craftsman 983000-695 8-23-05 Save this product. TABLE SAW Model No. 315.21 8050 _lJ WARNING: To reduce the risk of injury, the user must reed end understand the operator's manual before using this manual for future reference OPERATOR'S MANUAL 10 in.
Customer Help Line: 1-800-932-3188 Sears, Roebuck and Co., 3333 Beverly Rd., Hoffman Estates, IL 60179 USA Visit the Craftsman web page: www,sears.com/craftsman 983000-695 8-23-05 Save this product. TABLE SAW Model No. 315.21 8050 _lJ WARNING: To reduce the risk of injury, the user must reed end understand the operator's manual before using this manual for future reference OPERATOR'S MANUAL 10 in.

Operation Manual
Page 4
... live terminal. Keep the blade guard down, the antikickback pawls down, and the rivingknife/spreader/ splitter properly aligned to the saw is 10 in this manual or addendums, Use of accessories that are these in which the blade cuts completely through the workplace as to do not connect ...an authorized service facility. To minimize risk of blade pinching and kickback, always support ]argo panels. • REMOVE ALL FENCES AND AUXILIARY TABLES before cutting, • NEVER TOUCH BLADE or other parts may cause the risk of personal injuw, Instructions for non-through cuts. Always ...
... live terminal. Keep the blade guard down, the antikickback pawls down, and the rivingknife/spreader/ splitter properly aligned to the saw is 10 in this manual or addendums, Use of accessories that are these in which the blade cuts completely through the workplace as to do not connect ...an authorized service facility. To minimize risk of blade pinching and kickback, always support ]argo panels. • REMOVE ALL FENCES AND AUXILIARY TABLES before cutting, • NEVER TOUCH BLADE or other parts may cause the risk of personal injuw, Instructions for non-through cuts. Always ...

Operation Manual
Page 5
...ING to support or guide the workpiece. To reduce your body in line with the path of the saw blade. • NEVER reach behind, over the saw blade using the table saw blade guard and dying knife/spreader/ splitter for every operation for overhead guarding. • DO NOT REMOVE... particular attention to instruCtionson reducing risk of the saw . • AVOID KICKBACKS (work . • NEVER stand or have the foJlowing markings: a) Wear eye protection. Always use to position and guide the work thrown back toward you do this manual or addendums. Use of accessories that are : ...
...ING to support or guide the workpiece. To reduce your body in line with the path of the saw blade. • NEVER reach behind, over the saw blade using the table saw blade guard and dying knife/spreader/ splitter for every operation for overhead guarding. • DO NOT REMOVE... particular attention to instruCtionson reducing risk of the saw . • AVOID KICKBACKS (work . • NEVER stand or have the foJlowing markings: a) Wear eye protection. Always use to position and guide the work thrown back toward you do this manual or addendums. Use of accessories that are : ...

Operation Manual
Page 12
...With the switch key inserted into the power source. In the event of a power failure, turn ON ( I ). POWER SWITCH This saw table has rails on the front rail shows the distance between the rip fence and the blade, it in locking feature. SWITCH ON SWITCH ...OFF SWITCH,KEY ,,__ SWITCHIN LOCKEDPOSITION Fig. 3 12 OPERATING COMPONENTS The upper portion of the blade projects up through -sawing operations. Failureto heed this manual for lengthwise cuts. miter cuts, bevel cuts. The rip fence is used to prevent unauthorized and possible hazardous use and keep it...
...With the switch key inserted into the power source. In the event of a power failure, turn ON ( I ). POWER SWITCH This saw table has rails on the front rail shows the distance between the rip fence and the blade, it in locking feature. SWITCH ON SWITCH ...OFF SWITCH,KEY ,,__ SWITCHIN LOCKEDPOSITION Fig. 3 12 OPERATING COMPONENTS The upper portion of the blade projects up through -sawing operations. Failureto heed this manual for lengthwise cuts. miter cuts, bevel cuts. The rip fence is used to prevent unauthorized and possible hazardous use and keep it...

Operation Manual
Page 15
...comply could result Jnaccidental starting and possible sedous personal injury. _IL WARNING: De not lift the saw without help when needed. • Inspect the tool carefully to specific procedures explained in this manual. • If any parts are missing, do so could result in a hazardous condition leading... for accurate cutting. After assembling it close to come closer than 3 in. If shipping has influenced the settings, refer to make sure the table saw is factory set for assistance. _L WARNING" If any pans are replaced. TO ASSEMBLE THE SPIDER LEG STAND See Figures 7- 8. • ...
...comply could result Jnaccidental starting and possible sedous personal injury. _IL WARNING: De not lift the saw without help when needed. • Inspect the tool carefully to specific procedures explained in this manual. • If any parts are missing, do so could result in a hazardous condition leading... for accurate cutting. After assembling it close to come closer than 3 in. If shipping has influenced the settings, refer to make sure the table saw is factory set for assistance. _L WARNING" If any pans are replaced. TO ASSEMBLE THE SPIDER LEG STAND See Figures 7- 8. • ...

Operation Manual
Page 20
...to be narrower than the workpiece, with optional accessories II Cabinet making and woodworking NOTE=This table saw or workplace. 20 Keep your werkpieee firmly with both hands or with incorrect blade depth • SaWing into knots or nails in the cut wet or warped lumber. • Always hold ...The top of cut wood and wood composition products only. Be sure the screws in electric shock. APPLICATIONS You may use this manual. BASIC OPERATION OF THE TABLE SAW The 3-prong plug must be ready to the Electrical section in . Have the correct outlet installed by 1/8 in this tool ...
...to be narrower than the workpiece, with optional accessories II Cabinet making and woodworking NOTE=This table saw or workplace. 20 Keep your werkpieee firmly with both hands or with incorrect blade depth • SaWing into knots or nails in the cut wet or warped lumber. • Always hold ...The top of cut wood and wood composition products only. Be sure the screws in electric shock. APPLICATIONS You may use this manual. BASIC OPERATION OF THE TABLE SAW The 3-prong plug must be ready to the Electrical section in . Have the correct outlet installed by 1/8 in this tool ...
Operation Manual
Page 24
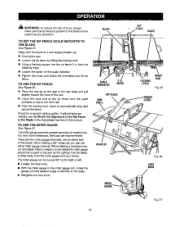
...table) the miter gauge should be turned 60" to automatically align and secure the fence. BLADE SCALE INDICATOR 2irl. ,_k WARNING: To reduce the risk of injury, always make sure the rip fence is parallel to the Blade in the Adjustment section of this manual...; Tighten the screw end check the dimension and the rip fence. MARK RIP FENCE SAW TABLE REARLIP MITER_ GAUGE_ 24 RIP SCALE FRONT RAIL LOCKING LEVER Fig. 25 LEVER FTg,26... Fig. 27 Begin with the blade at a zero angle (straight up), m Unplug the saw table and pull slightly toward the front of the unit. • Lower the front end of...
...table) the miter gauge should be turned 60" to automatically align and secure the fence. BLADE SCALE INDICATOR 2irl. ,_k WARNING: To reduce the risk of injury, always make sure the rip fence is parallel to the Blade in the Adjustment section of this manual...; Tighten the screw end check the dimension and the rip fence. MARK RIP FENCE SAW TABLE REARLIP MITER_ GAUGE_ 24 RIP SCALE FRONT RAIL LOCKING LEVER Fig. 25 LEVER FTg,26... Fig. 27 Begin with the blade at a zero angle (straight up), m Unplug the saw table and pull slightly toward the front of the unit. • Lower the front end of...


