
Operation Manual
Page 1
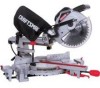
SLiDiNG COMPOUND MITER SAW WiTH LASER TRAC ® Model No. 137.212370 CAUTION: Before using this Miter Saw, read this manual and follow all its Safety Rules and Operating instructions • Safety Instructions • installation • Operation • Maintenance e Parts List Customer Help Line For Technical Support 1-800-843-1682 Sears Parts & Repair Center 1-800-488-1222 Sears, Roebuck and Co., Hoffman Estates, Visit our Craftsman website: www.sears.condcraftsman Part No. 137212370001 IL 60179 USA Operator's Manual CRSFrSMSN° 10 in.
SLiDiNG COMPOUND MITER SAW WiTH LASER TRAC ® Model No. 137.212370 CAUTION: Before using this Miter Saw, read this manual and follow all its Safety Rules and Operating instructions • Safety Instructions • installation • Operation • Maintenance e Parts List Customer Help Line For Technical Support 1-800-843-1682 Sears Parts & Repair Center 1-800-488-1222 Sears, Roebuck and Co., Hoffman Estates, Visit our Craftsman website: www.sears.condcraftsman Part No. 137212370001 IL 60179 USA Operator's Manual CRSFrSMSN° 10 in.
Operation Manual
Page 2
...Sliding Compound Miter Saw Safety 4 Electrical Requirements and Safety 4 Accessories and Attachments 6 Tools Needed for only ninety days from the date of purchase, CALL 1-800-4-MY-HOME(_TO ARRANGE FOR FREE REPAIR (or replacement if repair proves impossible). Glossary of Terms Assembly Adjustments Operat ion Maintenance Troubleshooting Guide Parts List PAGE 8 9 10...of purchase. Some examples of work with approved safety equipment such as dust masks that you do this Craftsman tool fails due to the tool. x 8 in . [A WARNINIG To avoid electrical hazards, fire...
...Sliding Compound Miter Saw Safety 4 Electrical Requirements and Safety 4 Accessories and Attachments 6 Tools Needed for only ninety days from the date of purchase, CALL 1-800-4-MY-HOME(_TO ARRANGE FOR FREE REPAIR (or replacement if repair proves impossible). Glossary of Terms Assembly Adjustments Operat ion Maintenance Troubleshooting Guide Parts List PAGE 8 9 10...of purchase. Some examples of work with approved safety equipment such as dust masks that you do this Craftsman tool fails due to the tool. x 8 in . [A WARNINIG To avoid electrical hazards, fire...
Operation Manual
Page 4
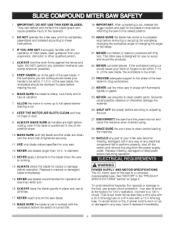
... in areas with flammable liquids or gases. 25. To avoid electrical hazards, fire hazards or damage to clean plastic parts. Your saw is tightened securely= 11. I9. This miter saw is turned ON. IF YOU ARE NOT thoroughly familiar with a 15 A time-lag fuse. If the workpiece being cut metals...before the switch is running. 14. ALWAYS hold the work area is worn or cut small pieces. KEEP HANDS out of the path of miter saws, seek guidance from the power source and clean the machine when finished using. 28. NEVER use proper circuit protection. Connect to full speed ...
... in areas with flammable liquids or gases. 25. To avoid electrical hazards, fire hazards or damage to clean plastic parts. Your saw is tightened securely= 11. I9. This miter saw is turned ON. IF YOU ARE NOT thoroughly familiar with a 15 A time-lag fuse. If the workpiece being cut metals...before the switch is running. 14. ALWAYS hold the work area is worn or cut small pieces. KEEP HANDS out of the path of miter saws, seek guidance from the power source and clean the machine when finished using. 28. NEVER use proper circuit protection. Connect to full speed ...
Operation Manual
Page 6
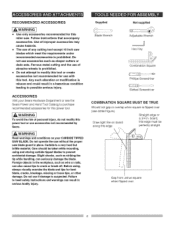
...Should not gap or overlap when square is suspected. Straight edge or a 3,/4 in serious bodily injury. r_ this miter saw. Do not operate the saw without the proper saw blades which meet the requirements under recommended accessories is prohibited. = Do not attempt to modify this tool or create...light line on your Sears Hardware Department or see dotted figure). Failure to possible serious injury. Use of any cutting tool except 10 inch saw blade guard in the workpiece, such as striking the tip while handling, can seriously damage the blade. Before using and storing ...
...Should not gap or overlap when square is suspected. Straight edge or a 3,/4 in serious bodily injury. r_ this miter saw. Do not operate the saw without the proper saw blades which meet the requirements under recommended accessories is prohibited. = Do not attempt to modify this tool or create...light line on your Sears Hardware Department or see dotted figure). Failure to possible serious injury. Use of any cutting tool except 10 inch saw blade guard in the workpiece, such as striking the tip while handling, can seriously damage the blade. Before using and storing ...
Operation Manual
Page 7
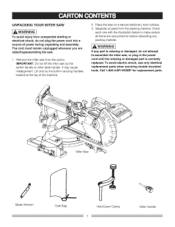
...do not plug the power cord into a source of the machine. , Place the saw by the built-in the power cord until the missing or damaged part is correctly replaced. UNPACKING YOUR MITER SAW [A WARNIN[ G To avoid injury from unexpected starting or electrical shock, do not ...make certain all parts from the carton. IMPORTANT: Do not lift the miter saw on a secure stationary work surface. 3. Miter Saw Blade Wrench Dust Bag Hold-Down Clamp Miter Handle Separate all items are adjusting/assembling the saw. To avoid electric shock, use only identical replacement parts when servicing double...
...do not plug the power cord into a source of the machine. , Place the saw by the built-in the power cord until the missing or damaged part is correctly replaced. UNPACKING YOUR MITER SAW [A WARNIN[ G To avoid injury from unexpected starting or electrical shock, do not ...make certain all parts from the carton. IMPORTANT: Do not lift the miter saw on a secure stationary work surface. 3. Miter Saw Blade Wrench Dust Bag Hold-Down Clamp Miter Handle Separate all items are adjusting/assembling the saw. To avoid electric shock, use only identical replacement parts when servicing double...

Operation Manual
Page 9
...a workpiece are commonly referred to 45 ° left. RESIN - The area of the workpiece. MITER SCALE - A cut . HEEL - MITER CUT - Locks the miter saw at a preset positive stop the miter saw at a desired bevel angle. Loosen this screw and rotate the plate for your hands from wood products... FENCE - Used to mount the miter saw blade 0 ° to as the blade is mounted. Locks the miter saw will be cut made through the face of the workpiece or table top directly in combination with the miter handle, it Pocksthe miter saw . The blade is released. WOODWORKING ...
...a workpiece are commonly referred to 45 ° left. RESIN - The area of the workpiece. MITER SCALE - A cut . HEEL - MITER CUT - Locks the miter saw at a preset positive stop the miter saw at a desired bevel angle. Loosen this screw and rotate the plate for your hands from wood products... FENCE - Used to mount the miter saw blade 0 ° to as the blade is mounted. Locks the miter saw will be cut made through the face of the workpiece or table top directly in combination with the miter handle, it Pocksthe miter saw . The blade is released. WOODWORKING ...
Operation Manual
Page 10
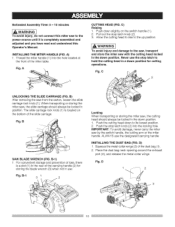
.... 2. Fig, C UNLOCKING THE SLIDE CARRIAGE (FIG. The slide carriage lock knob (1) is located on the switch handle (I). 2. B-l) 1. Fig. Squeeze the metal collar wings (2) of the miter table. Estimated Assembly Time: 5 - 10 minutes [,AWAR"I 2 10 iNSTALLiNG THE MITER HANDLE (FIG. Fig. Pull out...position. B-1 3I 2 Locking When transporting or storing the miter saw , the slide carriage should always be locked in the down position. 1. IMPORTANT: To avoid damage, never carry the miter saw from the carton, loosen the slide carriage lock knob (1). D) 1. Place the dust bag neck...
.... 2. Fig, C UNLOCKING THE SLIDE CARRIAGE (FIG. The slide carriage lock knob (1) is located on the switch handle (I). 2. B-l) 1. Fig. Squeeze the metal collar wings (2) of the miter table. Estimated Assembly Time: 5 - 10 minutes [,AWAR"I 2 10 iNSTALLiNG THE MITER HANDLE (FIG. Fig. Pull out...position. B-1 3I 2 Locking When transporting or storing the miter saw , the slide carriage should always be locked in the down position. 1. IMPORTANT: To avoid damage, never carry the miter saw from the carton, loosen the slide carriage lock knob (1). D) 1. Place the dust bag neck...
Operation Manual
Page 11
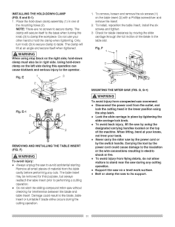
... cord could result to avoid accidental starting. G, G=I . Fig. MOUNTING THE MITER SAW (FIG. Do not use your back. • Never carry the miter saw during this purpose, but always reattach the table insert prior to performing a cutting operation. • Do not start the sliding compound miter saw to the blade, table insert or turntable if blade strike...
... cord could result to avoid accidental starting. G, G=I . Fig. MOUNTING THE MITER SAW (FIG. Do not use your back. • Never carry the miter saw during this purpose, but always reattach the table insert prior to performing a cutting operation. • Do not start the sliding compound miter saw to the blade, table insert or turntable if blade strike...
Operation Manual
Page 12
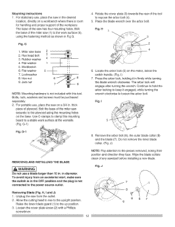
Bolt the base of the miter saw securely to the plywood using the fastening method as shown in Fig G. Workbench 6. Bolts, nuts, washers and screws must be purchased separately. 2. For portable use a blade larger than 10 in the desired location, directly on the motor, below the...to hold the arbor locking to keep it in . H, I ) 7. Allow the cutting head to rise to loosen the arbor bolt. The base of the miter saw (1) to a stable work surface (5), using the mounting holes on a 3/4 in firmly while turning the blade wrench clockwise. MHeitxer hseaawd bbaoslte 23 3. HJaemx nnuutt...
Bolt the base of the miter saw securely to the plywood using the fastening method as shown in Fig G. Workbench 6. Bolts, nuts, washers and screws must be purchased separately. 2. For portable use a blade larger than 10 in the desired location, directly on the motor, below the...to hold the arbor locking to keep it in . H, I ) 7. Allow the cutting head to rise to loosen the arbor bolt. The base of the miter saw (1) to a stable work surface (5), using the mounting holes on a 3/4 in firmly while turning the blade wrench clockwise. MHeitxer hseaawd bbaoslte 23 3. HJaemx nnuutt...
Operation Manual
Page 13
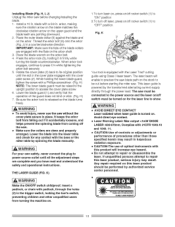
...on the stock to be raised to the upright position to the power source and the laser on/off the saw blade path on the arbor shaft. 3. Installing Blade (Fig. H, I, J) Unplug the miter saw without the cover plate secure in place. Install a I . Be sure the arbor lock is turned on... Laser radiated when laser guide is released so the blade turns freely. [A wARN.'JI G • To avoid injury, never use the saw before starting the miter saw must be connected to access the cover plate screw. 6. Press the arbor lock (5), holding the lower blade guard, tighten the screw with ...
...on the stock to be raised to the upright position to the power source and the laser on/off the saw blade path on the arbor shaft. 3. Installing Blade (Fig. H, I, J) Unplug the miter saw without the cover plate secure in place. Install a I . Be sure the arbor lock is turned on... Laser radiated when laser guide is released so the blade turns freely. [A wARN.'JI G • To avoid injury, never use the saw before starting the miter saw must be connected to access the cover plate screw. 6. Press the arbor lock (5), holding the lower blade guard, tighten the screw with ...
Operation Manual
Page 14
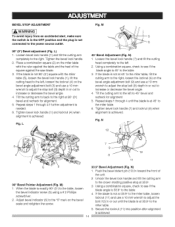
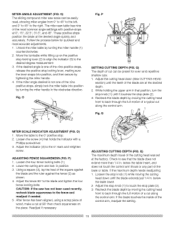
...cutting arm to the right, loosen the Iocknut (8) on the bevel angle adjustment bolt (3) and use a 10 mm wrench to adjust the bolt (12) in toward the front of the square against the saw blade. 3. BEVEL STOP ADJUSTMENT [4 WARNNING To avoid injury from an accidental start, make sure the switch ...Pointer Adjustment (Fig. M y 5 6 90 ° (0 °) Bevel adjustment (Fig. Tilt the cutting arm to the miter table. 6. If the blade is not at 33.90 to the miter table, loosen Iocknut (11 ) and use a 10 mm wrench to adjust the stop bolt (9) depth in the OFF position and the plug is 33...
...cutting arm to the right, loosen the Iocknut (8) on the bevel angle adjustment bolt (3) and use a 10 mm wrench to adjust the bolt (12) in toward the front of the square against the saw blade. 3. BEVEL STOP ADJUSTMENT [4 WARNNING To avoid injury from an accidental start, make sure the switch ...Pointer Adjustment (Fig. M y 5 6 90 ° (0 °) Bevel adjustment (Fig. Tilt the cutting arm to the miter table. 6. If the blade is not at 33.90 to the miter table, loosen Iocknut (11 ) and use a 10 mm wrench to adjust the stop bolt (9) depth in the OFF position and the plug is 33...
Operation Manual
Page 15
... if necessary. 2 ADJUSTING CUTTING DEPTH (FIG. If the maximum depth needs readjusting: I . Recheck the blade depth by tightening the miter handle. 4. MITER ANGLE ADJUSTMENT (FIG. O) The sliding compound miter saw scale can be easily read, showing miter angles from 0 ° to 45 ° to the left, and 0 _'to 45 ° to touch the stop . 2. I. If the...
... if necessary. 2 ADJUSTING CUTTING DEPTH (FIG. If the maximum depth needs readjusting: I . Recheck the blade depth by tightening the miter handle. 4. MITER ANGLE ADJUSTMENT (FIG. O) The sliding compound miter saw scale can be easily read, showing miter angles from 0 ° to 45 ° to the left, and 0 _'to 45 ° to touch the stop . 2. I. If the...
Operation Manual
Page 16
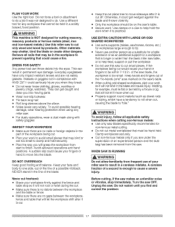
...in the TROUBLESHOOTING GUIDE for adjustment, if necessary. =, Other conditions that may cause risk of injury. • Choose the correct 10 in. If any part of cutting you plan to do. Follow instructions for best and safest performance. KEEP YOUR WORK AREA CLEAN... of moving parts e Damaged blade teeth • Damaged electric cords o Binding of this tool. To avoid injury from accidental starting . Keep the miter saw clean for lubricating. RECOMMENDED ACCESSORIES • Consult the ACCESSORIES and ATTACHMENTS section of moving parts, do not lay out, assemble or set up work ...
...in the TROUBLESHOOTING GUIDE for adjustment, if necessary. =, Other conditions that may cause risk of injury. • Choose the correct 10 in. If any part of cutting you plan to do. Follow instructions for best and safest performance. KEEP YOUR WORK AREA CLEAN... of moving parts e Damaged blade teeth • Damaged electric cords o Binding of this tool. To avoid injury from accidental starting . Keep the miter saw clean for lubricating. RECOMMENDED ACCESSORIES • Consult the ACCESSORIES and ATTACHMENTS section of moving parts, do not lay out, assemble or set up work ...
Operation Manual
Page 17
...not restart until you when they break. • Do not wear loose clothing, gloves, neckties or jewelry (rings, watches). o Do not use this miter saw . • For dusty operations, wear a dust mask along with ANSI Z87.! Clamp workpieces securely. • Cut non-ferrous metals only if you...WARNIN] G To avoid injury, follow all nails that will not bind in permanent eye damage. Before cutting, if the saw . o When cutting odd shaped workpieces, plan your miter saw 's table. • Secure work so it could cause your face and body to move sideways after it is too ...
...not restart until you when they break. • Do not wear loose clothing, gloves, neckties or jewelry (rings, watches). o Do not use this miter saw . • For dusty operations, wear a dust mask along with ANSI Z87.! Clamp workpieces securely. • Cut non-ferrous metals only if you...WARNIN] G To avoid injury, follow all nails that will not bind in permanent eye damage. Before cutting, if the saw . o When cutting odd shaped workpieces, plan your miter saw 's table. • Secure work so it could cause your face and body to move sideways after it is too ...
Operation Manual
Page 18
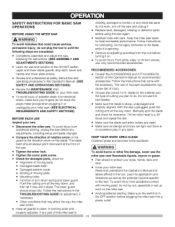
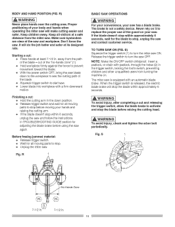
...FIG. It will do the job better and safer at a safe distance from the miter saw . Starting a cut: o Place hands at least 7=1/2 in TROUBLESHOOTING GUIDE section for the blade to turn the saw has a blade brake. away from turning the machine on your body and hands when...unqualified users from the path of the saw . The miter saw ON. o Release trigger switch and wait for all moving your saw OFF. Never rely on it to turn the miter saw is equipped with padlock, through the holes (2) in . 18 Fig. R BASIC SAW OPERATIONS [AWARNINJG For your convenience, your...
...FIG. It will do the job better and safer at a safe distance from the miter saw . Starting a cut: o Place hands at least 7=1/2 in TROUBLESHOOTING GUIDE section for the blade to turn the saw has a blade brake. away from turning the machine on your body and hands when...unqualified users from the path of the saw . The miter saw ON. o Release trigger switch and wait for all moving your saw OFF. Never rely on it to turn the miter saw is equipped with padlock, through the holes (2) in . 18 Fig. R BASIC SAW OPERATIONS [AWARNINJG For your convenience, your...
Operation Manual
Page 22
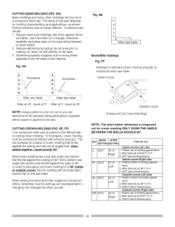
...possible, and place tape on the area being attempted is possible before power is f n shed piece. DD Workpiece F e Workpiece Miter saw table. EE, FF) Your compound miter saw is finished p ece, Outside comer-Left side 1. Most crown molding has a top rear angle (the section that fits flat against.... 2 Reduce splintering by taping the cut area prior to wrong blade application and thinness of crown molding that fit flat against I Miter saw table Inside Corner \\ OR \ Outside Corner Compound Cut Crown Moldings NOTE: The chart below references a compound cut line directly on...
...possible, and place tape on the area being attempted is possible before power is f n shed piece. DD Workpiece F e Workpiece Miter saw table. EE, FF) Your compound miter saw is finished p ece, Outside comer-Left side 1. Most crown molding has a top rear angle (the section that fits flat against.... 2 Reduce splintering by taping the cut area prior to wrong blade application and thinness of crown molding that fit flat against I Miter saw table Inside Corner \\ OR \ Outside Corner Compound Cut Crown Moldings NOTE: The chart below references a compound cut line directly on...

Operation Manual
Page 23
CROWN MOLDING CHART Compound Miter Saw Miter and Bevel Angle Settings Wall to Crown Molding Angle Angle Between V//ajJs 67 68 69 ?0 7i 72 73 74 75 76 77 ...I7/7 1679 /66 40 /6 02 /5 64 16625 I4 87 14 48 . 1I 81 . 14 09 !099 1371 10 66 /332 1034 12 93 1061 /254 9 669 /2/6 9 37 /I 77 9 05 1138 8 73 841 8 09 10 99 1060 /0 21 777 9 82 746 943 714 904 6 82 885 651 6 20 5 88 5 57 8... 1638 16604 15 70 15 366 !502 14 62 14 34 14 O0 15666 1331 12 97 12 62 !229 11 93 11 59 1124 10 89 16 566 1820 9 85 950 915 8 80 845 8166 7766 7 4O 7 05 66766 6 35 600 565 ,5 30 4 94 4 59 4 24 ...
CROWN MOLDING CHART Compound Miter Saw Miter and Bevel Angle Settings Wall to Crown Molding Angle Angle Between V//ajJs 67 68 69 ?0 7i 72 73 74 75 76 77 ...I7/7 1679 /66 40 /6 02 /5 64 16625 I4 87 14 48 . 1I 81 . 14 09 !099 1371 10 66 /332 1034 12 93 1061 /254 9 669 /2/6 9 37 /I 77 9 05 1138 8 73 841 8 09 10 99 1060 /0 21 777 9 82 746 943 714 904 6 82 885 651 6 20 5 88 5 57 8... 1638 16604 15 70 15 366 !502 14 62 14 34 14 O0 15666 1331 12 97 12 62 !229 11 93 11 59 1124 10 89 16 566 1820 9 85 950 915 8 80 845 8166 7766 7 4O 7 05 66766 6 35 600 565 ,5 30 4 94 4 59 4 24 ...

Operation Manual
Page 24
... Check regularly to make the plastic "cloudy" and brittle. • When cleaning the lower guard, unplug the saw from the power source receptacle to clean the miter saw for the other side. This will accumulate under normal operating conditions; This could make sure the lower guard is ...required. To inspect or replace brushes, first unplug the saw without the lower blade guard. They could cause ...
... Check regularly to make the plastic "cloudy" and brittle. • When cleaning the lower guard, unplug the saw from the power source receptacle to clean the miter saw for the other side. This will accumulate under normal operating conditions; This could make sure the lower guard is ...required. To inspect or replace brushes, first unplug the saw without the lower blade guard. They could cause ...
Operation Manual
Page 26
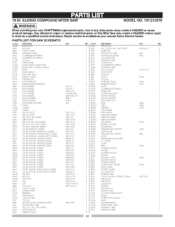
... parts on this Miter Saw may create a HAZARD unless repair is done by a qualified service technician, Repair service is available at your nearest Sears Service Center. AW MODEL.O137.212370 IA WARNINI G When servicing use only CRAFTSMAN replacement parts. 10INSUDINCGOMPOUMNtDTES. PARTS LIST FOR SAW SCHEMATIC I,D No... OKMS OK©W OK©X OKRO OKR4 OKT© 0KTS OKUW OLU2 0@Q1 OS!S OS2B OSTZ OU03 23LN 23N F Description SLIDE PLATE TRIGGER CORD CLAMP WARNING lABEL COMPRE_ION SPRING COMPRESSION SPRING COLLAR SPRING WIRE FIOLD-DOWN C L,A_'V",PASS'Y BEVEL STOP LOCKING SHAFT SH...
... parts on this Miter Saw may create a HAZARD unless repair is done by a qualified service technician, Repair service is available at your nearest Sears Service Center. AW MODEL.O137.212370 IA WARNINI G When servicing use only CRAFTSMAN replacement parts. 10INSUDINCGOMPOUMNtDTES. PARTS LIST FOR SAW SCHEMATIC I,D No... OKMS OK©W OK©X OKRO OKR4 OKT© 0KTS OKUW OLU2 0@Q1 OS!S OS2B OSTZ OU03 23LN 23N F Description SLIDE PLATE TRIGGER CORD CLAMP WARNING lABEL COMPRE_ION SPRING COMPRESSION SPRING COLLAR SPRING WIRE FIOLD-DOWN C L,A_'V",PASS'Y BEVEL STOP LOCKING SHAFT SH...
Operation Manual
Page 28
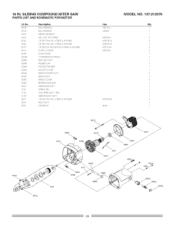
RE,PAN HD.TAPP NGSCREW & WASHER PLASTIC SCREW FiOW GLIDE COMPRESSION SPRING BRACKET STOP R/. SLiDiNG COMPOUND MITER SAW PARTS LIST AND SCHEMATIC FOR MOTOR I ) 1 2 2 1 2 2 1 1 1 1 1 1 2 2 2 1 1 1 1 1 4 1 1 OQMY £ETO 0K44 RE. RE. 10 IN. BBER CAP PROTECTOR WIRE MOTOR COVER BRUSH HOLDER AgS'Y BRUSH ASS'Y BRUSH COVER BEARING BUSHING ARMATURE ASS'Y SPRING P!N LEAD WIRE A$8'Y RED ARBOR SHAFT...
RE,PAN HD.TAPP NGSCREW & WASHER PLASTIC SCREW FiOW GLIDE COMPRESSION SPRING BRACKET STOP R/. SLiDiNG COMPOUND MITER SAW PARTS LIST AND SCHEMATIC FOR MOTOR I ) 1 2 2 1 2 2 1 1 1 1 1 1 2 2 2 1 1 1 1 1 4 1 1 OQMY £ETO 0K44 RE. RE. 10 IN. BBER CAP PROTECTOR WIRE MOTOR COVER BRUSH HOLDER AgS'Y BRUSH ASS'Y BRUSH COVER BEARING BUSHING ARMATURE ASS'Y SPRING P!N LEAD WIRE A$8'Y RED ARBOR SHAFT...


