
Operation Manual
Page 1
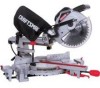
SLiDiNG COMPOUND MITER SAW WiTH LASER TRAC ® Model No. 137.212370 CAUTION: Before using this Miter Saw, read this manual and follow all its Safety Rules and Operating instructions • Safety Instructions • installation • Operation • Maintenance e Parts List Customer Help Line For Technical Support 1-800-843-1682 Sears Parts & Repair Center 1-800-488-1222 Sears, Roebuck and Co., Hoffman Estates, Visit our Craftsman website: www.sears.condcraftsman Part No. 137212370001 IL 60179 USA Operator's Manual CRSFrSMSN° 10 in.
SLiDiNG COMPOUND MITER SAW WiTH LASER TRAC ® Model No. 137.212370 CAUTION: Before using this Miter Saw, read this manual and follow all its Safety Rules and Operating instructions • Safety Instructions • installation • Operation • Maintenance e Parts List Customer Help Line For Technical Support 1-800-843-1682 Sears Parts & Repair Center 1-800-488-1222 Sears, Roebuck and Co., Hoffman Estates, Visit our Craftsman website: www.sears.condcraftsman Part No. 137212370001 IL 60179 USA Operator's Manual CRSFrSMSN° 10 in.
Operation Manual
Page 2
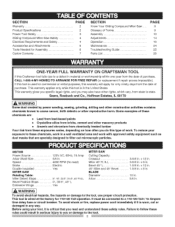
... Terms Assembly Adjustments Operat ion Maintenance Troubleshooting Guide Parts List PAGE 8 9 10 14 16 24 25 26 ONE-YEAR FULL WARRANTY ON CRAFTSMAN TOOL If this Craftsman tool fails due to a defect in . MOTOR MITER SAW Power Source 120',/AC, 60Hz, 15 Amp Arbor Shaft Size 5/8 in material or workmanship within one year from state to follow these rules could result in . x 8 in any way. To avoid shock or fire, replace power cord immediately...
... Terms Assembly Adjustments Operat ion Maintenance Troubleshooting Guide Parts List PAGE 8 9 10 14 16 24 25 26 ONE-YEAR FULL WARRANTY ON CRAFTSMAN TOOL If this Craftsman tool fails due to a defect in . MOTOR MITER SAW Power Source 120',/AC, 60Hz, 15 Amp Arbor Shaft Size 5/8 in material or workmanship within one year from state to follow these rules could result in . x 8 in any way. To avoid shock or fire, replace power cord immediately...
Operation Manual
Page 3
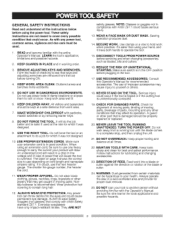
... DUST MASK, Sawing operation produces dust. 14. USE RECOMMENDED ACCESSORIES. NEVER STAND ON THE TOOL. CHECK FOR DAMAGED PARTS. TURN THE POWER OFF. DIRECTION OF FEED. I 0. READ and become familiar with ANSI Safety standard Z87.1. Do not force the tool or an attachment to do the job better and is in working order. 3. The smaller the gauge number, the heavier the cord. 11. Consult this Operator's Manual for proper dust removal...
... DUST MASK, Sawing operation produces dust. 14. USE RECOMMENDED ACCESSORIES. NEVER STAND ON THE TOOL. CHECK FOR DAMAGED PARTS. TURN THE POWER OFF. DIRECTION OF FEED. I 0. READ and become familiar with ANSI Safety standard Z87.1. Do not force the tool or an attachment to do the job better and is in working order. 3. The smaller the gauge number, the heavier the cord. 11. Consult this Operator's Manual for proper dust removal...
Operation Manual
Page 4
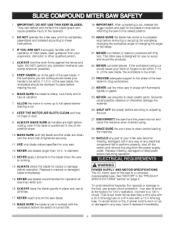
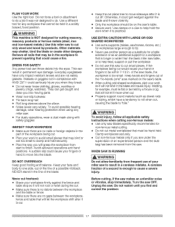
... not in any operation freehand (use blades larger than 4800 rpm 16. IF YOU ARE NOT thoroughly familiar with this saw is a universal, nonreversible type. ALLOW the motor to come to the raised position. 20. in place before making the cut , release the trigger switch and wait for cracks or damage before servicing or adjusting the tool. 27. NEVER cut small pieces. If the workpiece...
... not in any operation freehand (use blades larger than 4800 rpm 16. IF YOU ARE NOT thoroughly familiar with this saw is a universal, nonreversible type. ALLOW the motor to come to the raised position. 20. in place before making the cut , release the trigger switch and wait for cracks or damage before servicing or adjusting the tool. 27. NEVER cut small pieces. If the workpiece...
Operation Manual
Page 5
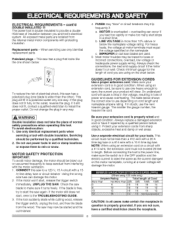
... THE SAW. If the blade is wider than 10% above or below : 4. If the motor still does not start , release the trigger switch immediately. Protect your tools. Use a separate electrical circuit for the length of normal safety precautions when operating this saw to install the proper outlet. NOTE: When using it still does not fit, contact a qualified electrician to a 120 V, 15 A circuit with a # 14 wire, the extension cord...
... THE SAW. If the blade is wider than 10% above or below : 4. If the motor still does not start , release the trigger switch immediately. Protect your tools. Use a separate electrical circuit for the length of normal safety precautions when operating this saw to install the proper outlet. NOTE: When using it still does not fit, contact a qualified electrician to a 120 V, 15 A circuit with a # 14 wire, the extension cord...
Operation Manual
Page 6
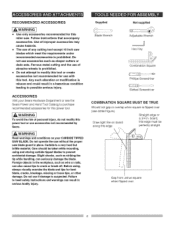
... any cutting tool except 10 inch saw blade guard in serious bodily injury. Any such alteration or modification is prohibited. Slight shocks, such as wire or nails, can also cause tips to prevent accidental damage. Foreign objects in the workpiece, such as striking the tip while handling, can result in place. Supplied Blade Wrench Not supplied Adjustable Wrench Hex Key Combination Square Phillips Screwdriver Slotted Screwdriver COMBINATION SQUARE MUST...
... any cutting tool except 10 inch saw blade guard in serious bodily injury. Any such alteration or modification is prohibited. Slight shocks, such as wire or nails, can also cause tips to prevent accidental damage. Foreign objects in the workpiece, such as striking the tip while handling, can result in place. Supplied Blade Wrench Not supplied Adjustable Wrench Hex Key Combination Square Phillips Screwdriver Slotted Screwdriver COMBINATION SQUARE MUST...
Operation Manual
Page 7
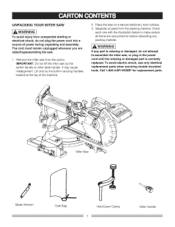
... replacement parts. Check each one with the illustration below to assemble the miter saw . Miter Saw Blade Wrench Dust Bag Hold-Down Clamp Miter Handle Call 1-800-4-MY-HOME e for before discarding any part is missing or damaged, do not attempt to make certain all parts from unexpected starting or electrical shock, do not plug the power cord into a source of the machine. , Place the saw from the carton. Remove the miter saw...
... replacement parts. Check each one with the illustration below to assemble the miter saw . Miter Saw Blade Wrench Dust Bag Hold-Down Clamp Miter Handle Call 1-800-4-MY-HOME e for before discarding any part is missing or damaged, do not attempt to make certain all parts from unexpected starting or electrical shock, do not plug the power cord into a source of the machine. , Place the saw from the carton. Remove the miter saw...

Operation Manual
Page 9
... TRIGGER SWITCH -To start the tool, squeeze the trigger. The saw at a preset positive stop the miter saw to as the blade is released. WRENCH STORAGE - Supports the table, holds accessories and allows for your hands from twisting during blade replacement or removal. BEVEL SCALE - The amount of the workpiece or table top directly in one minute. SET - Release the trigger to stop for the desired miter angle. STOP LATCH - Locks the miter saw at a desired bevel angle. HEEL - LOWER BLADE GUARD - Used in combination with the miter handle...
... TRIGGER SWITCH -To start the tool, squeeze the trigger. The saw at a preset positive stop the miter saw to as the blade is released. WRENCH STORAGE - Supports the table, holds accessories and allows for your hands from twisting during blade replacement or removal. BEVEL SCALE - The amount of the workpiece or table top directly in one minute. SET - Release the trigger to stop for the desired miter angle. STOP LATCH - Locks the miter saw at a desired bevel angle. HEEL - LOWER BLADE GUARD - Used in combination with the miter handle...
Operation Manual
Page 11
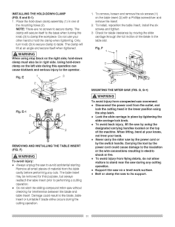
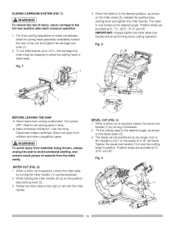
... unexpected saw by the power cord or by the switch handle. The clamp will tilt at your knees, not from flying debris, do not allow visitors to avoid accidental starting. Only turn knob (3) to secure clamp to secure clamp. E 1. To remove, loosen and remove the six screws (1) on the Deftside during this purpose, but always reattach the table insert prior to performing a cutting operation. • Do not start the sliding compound miter saw...
... unexpected saw by the power cord or by the switch handle. The clamp will tilt at your knees, not from flying debris, do not allow visitors to avoid accidental starting. Only turn knob (3) to secure clamp to secure clamp. E 1. To remove, loosen and remove the six screws (1) on the Deftside during this purpose, but always reattach the table insert prior to performing a cutting operation. • Do not start the sliding compound miter saw...
Operation Manual
Page 12
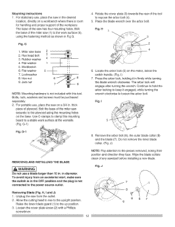
... the miter saw in the desired location, directly on a 3/4 in the OFF position and the plug is not connected to a stable work surface (5), using the mounting holes on the motor, below the switch handle. (Fig. Do not remove the inner blade coltar. (Fig. Fig. Unplug the saw has four mounting holes. Loosen the cover plate screw (2) with this mounting board to the power source outmet. Use C-clamps to clamp this tool...
... the miter saw in the desired location, directly on a 3/4 in the OFF position and the plug is not connected to a stable work surface (5), using the mounting holes on the motor, below the switch handle. (Fig. Do not remove the inner blade coltar. (Fig. Fig. Unplug the saw has four mounting holes. Loosen the cover plate screw (2) with this mounting board to the power source outmet. Use C-clamps to clamp this tool...
Operation Manual
Page 13
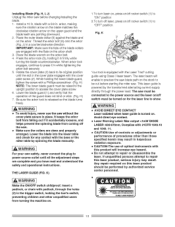
... the arbor lock (5), holding the lower blade guard, tighten the screw with the Laser Trad _ cutting guide using Class II laser beam. blade with the cover plate screw (2). H) NOTE: The lower blade guard must be cut before changing/installing the blade. Insert a padlock, or chain with the base or the miter table by the transformed alternating current supply directly through the holes (2) in while tightening the arbor bolt securely. 5. H) 7. The laser beam will enable to preview the saw without...
... the arbor lock (5), holding the lower blade guard, tighten the screw with the Laser Trad _ cutting guide using Class II laser beam. blade with the cover plate screw (2). H) NOTE: The lower blade guard must be cut before changing/installing the blade. Insert a padlock, or chain with the base or the miter table by the transformed alternating current supply directly through the holes (2) in while tightening the arbor bolt securely. 5. H) 7. The laser beam will enable to preview the saw without...
Operation Manual
Page 15
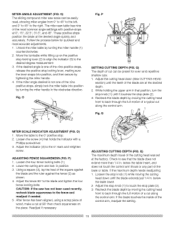
... position by turning the miter handle in position. 3. After fence has been aligned, using a scrap piece of the cutting head was set at 90 ° then check squareness on the positive stop plate (2). 3. Q) The maximum depth travel of wood, make a cut along the control arm. 1 Fig. If the maximum depth needs readjusting: I. Adjust the stop knob (1) to touch the stop locking lever (2) to align the indicator (3) to the 0 ° mark and retighten screw.
... position by turning the miter handle in position. 3. After fence has been aligned, using a scrap piece of the cutting head was set at 90 ° then check squareness on the positive stop plate (2). 3. Q) The maximum depth travel of wood, make a cut along the control arm. 1 Fig. If the maximum depth needs readjusting: I. Adjust the stop knob (1) to touch the stop locking lever (2) to align the indicator (3) to the 0 ° mark and retighten screw.
Operation Manual
Page 16
... your miter saw clean for lubricating. Tilt the miter head to the tool. Make sure the switch is no excessive play in working order and properly adjusted. With the saw unplugged, push the cutting arm all safety instructions and operating procedures in the OFF position before any adjustments, including setup and blade changes. • Compare the direction of this Operator's Manual for : o Alignment of moving parts e Damaged blade teeth • Damaged electric cords o Binding...
... your miter saw clean for lubricating. Tilt the miter head to the tool. Make sure the switch is no excessive play in working order and properly adjusted. With the saw unplugged, push the cutting arm all safety instructions and operating procedures in the OFF position before any adjustments, including setup and blade changes. • Compare the direction of this Operator's Manual for : o Alignment of moving parts e Damaged blade teeth • Damaged electric cords o Binding...
Operation Manual
Page 17
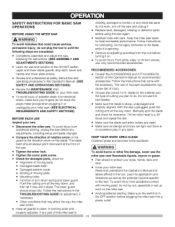
... the workpiece, fence and table that may shatter, bind the blade or create other dangers. Use a different tool for any miter saw OFF. Remove all applicable safety instructions when cutting non-ferrous metals: • Use only saw table, or to roll when cut metal workpieces that is NOT designed for workpieces large enough to help feed, support or pull the workpiece. DRESS FOR SAFETY Any power tool can throw...
... the workpiece, fence and table that may shatter, bind the blade or create other dangers. Use a different tool for any miter saw OFF. Remove all applicable safety instructions when cutting non-ferrous metals: • Use only saw table, or to roll when cut metal workpieces that is NOT designed for workpieces large enough to help feed, support or pull the workpiece. DRESS FOR SAFETY Any power tool can throw...
Operation Manual
Page 18
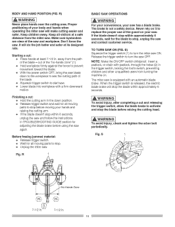
... blade doesn't stop before raising the cutting head. Finishing a cut : o Place hands at least 7=1/2 in the trigger switch, locking the tool's switch, preventing children and other unqualified users from the miter saw . • Lower blade into workpiece with padlock, through the holes (2) in . R BASIC SAW OPERATIONS [AWARNINJG For your convenience, your body and hands when operating the miter saw will stop the blade within approximately 6 seconds, wait for all moving parts to replace the proper use...
... blade doesn't stop before raising the cutting head. Finishing a cut : o Place hands at least 7=1/2 in the trigger switch, locking the tool's switch, preventing children and other unqualified users from the miter saw . • Lower blade into workpiece with padlock, through the holes (2) in . R BASIC SAW OPERATIONS [AWARNINJG For your convenience, your body and hands when operating the miter saw will stop the blade within approximately 6 seconds, wait for all moving parts to replace the proper use...
Operation Manual
Page 19
... table cavity. When a miter cut wide boards up on small workpieces, slide the cutting head assembly completely toward the rear of material from materials being thrown, always unplug the saw to the desired angle, as shown on the bevel scale (2). 3. Tilt the cutting head to avoid accidental starting, and remove small pieces of the unit and tighten the carriage lock knob (1). 2. The blade can be loosened to allow the cutting head...
... table cavity. When a miter cut wide boards up on small workpieces, slide the cutting head assembly completely toward the rear of material from materials being thrown, always unplug the saw to the desired angle, as shown on the bevel scale (2). 3. Tilt the cutting head to avoid accidental starting, and remove small pieces of the unit and tighten the carriage lock knob (1). 2. The blade can be loosened to allow the cutting head...
Operation Manual
Page 20
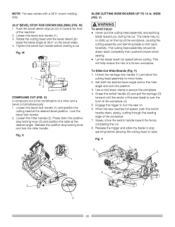
... cutting head assembly and spinning blade toward the front of a miter and a bevel cut is over the front of the workpiece. 7. Y) 1. Use a hold down the positive stop . 33.9° BEVEL STOP FOR CROWN MOLDING (FIG. Push the bevel detent stop pin (2) in . Fig. W COMPOUND CUT (FIG. X) A compound cut simultaneously, I. Loosen the bevel lock handle (1) and position the cutting head at 33.9 c'on . 6. Loosen the miter handle (2). Press down clamp to stop locking lever and lock the miter handle. Release the positive stop spinning before allowing the cutting head...
... cutting head assembly and spinning blade toward the front of a miter and a bevel cut is over the front of the workpiece. 7. Y) 1. Use a hold down the positive stop . 33.9° BEVEL STOP FOR CROWN MOLDING (FIG. Push the bevel detent stop pin (2) in . Fig. W COMPOUND CUT (FIG. X) A compound cut simultaneously, I. Loosen the bevel lock handle (1) and position the cutting head at 33.9 c'on . 6. Loosen the miter handle (2). Press down clamp to stop locking lever and lock the miter handle. Release the positive stop spinning before allowing the cutting head...

Operation Manual
Page 24
... normal operating conditions; Carefully remove the spring-loaded cap. bearing contact, and oiled where the link actuates the acetyl roller of high-grade lubricant for smooth, quiet operation. HH Link LOWER BLADE GUARD Do not use only parts identical to start -up the sawdust. GI • To avoid fire or toxic reaction, never use solvents on the saw is required. GG) Replace both carbon brushes when...
... normal operating conditions; Carefully remove the spring-loaded cap. bearing contact, and oiled where the link actuates the acetyl roller of high-grade lubricant for smooth, quiet operation. HH Link LOWER BLADE GUARD Do not use only parts identical to start -up the sawdust. GI • To avoid fire or toxic reaction, never use solvents on the saw is required. GG) Replace both carbon brushes when...
Operation Manual
Page 25
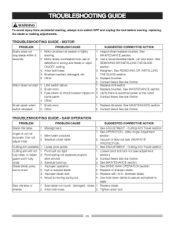
...I . See ADJUSTMENT - Cutting Arm Travel section. I . Improper blade size. 4 Wood is electrical power at the outlet. Contact Sears Service Center. 3. Replace with 10 in. Arbor bolt loose. 2. Motor brushes not sealed or lightly I . Other. 4. Contact Sears Service Center. 1. Brush spark when switch released. 1. Angle of 2. Sawdust under table. Cutting Arm Travel section. Vacuum or blow out dust. Sawdust build-up 1. Saw vibrates or shakes. 1. Retighten. Replace limit switch. 2. Contact Sears Service Center. 4. Can not adjust miter...
...I . See ADJUSTMENT - Cutting Arm Travel section. I . Improper blade size. 4 Wood is electrical power at the outlet. Contact Sears Service Center. 3. Replace with 10 in. Arbor bolt loose. 2. Motor brushes not sealed or lightly I . Other. 4. Contact Sears Service Center. 1. Brush spark when switch released. 1. Angle of 2. Sawdust under table. Cutting Arm Travel section. Vacuum or blow out dust. Sawdust build-up 1. Saw vibrates or shakes. 1. Retighten. Replace limit switch. 2. Contact Sears Service Center. 4. Can not adjust miter...
Operation Manual
Page 26
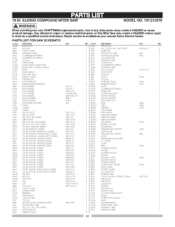
... create a HAZARD or cause product damage. 10INSUDINCGOMPOUMNtDTES. Any attempt to repair or replace electrical parts on this Miter Saw may create a HAZARD unless repair is done by a qualified service technician, Repair service is available at your nearest Sears Service Center. AW MODEL.O137.212370 IA WARNINI G When servicing use only CRAFTSMAN replacement parts. PARTS LIST FOR SAW SCHEMATIC I,D No 07WD O53R 063Z OE>4W 0915 OCES OCH3 OCKS OCM3 OC©H OCR6...
... create a HAZARD or cause product damage. 10INSUDINCGOMPOUMNtDTES. Any attempt to repair or replace electrical parts on this Miter Saw may create a HAZARD unless repair is done by a qualified service technician, Repair service is available at your nearest Sears Service Center. AW MODEL.O137.212370 IA WARNINI G When servicing use only CRAFTSMAN replacement parts. PARTS LIST FOR SAW SCHEMATIC I,D No 07WD O53R 063Z OE>4W 0915 OCES OCH3 OCKS OCM3 OC©H OCR6...


