

Operation Manual
Page 1
Operator's Manual CRAFTSMAN ° i PROFESSI ONAL i 12 in Taiwan DUAL BEVEL SLIDING COMPOUND MITER SAW WITH LASER TRAC ® Model No. 137.212210 C US CAUTION: Before using this Miter Saw, read this manual and follow all its Safety Rules and Operating Instructions • Safety Instructions • Installation • Operation • Maintenance • Parts... Support 1-800-843-1682 Sears Parts & Repair Center 1-800-488-1222 Sears, Roebuck and Co., Hoffman Estates, IL 60179 USA Visit our Craftsman website: www.sears.com/craftsman Part No. 137212210001 Printed in .
Operator's Manual CRAFTSMAN ° i PROFESSI ONAL i 12 in Taiwan DUAL BEVEL SLIDING COMPOUND MITER SAW WITH LASER TRAC ® Model No. 137.212210 C US CAUTION: Before using this Miter Saw, read this manual and follow all its Safety Rules and Operating Instructions • Safety Instructions • Installation • Operation • Maintenance • Parts... Support 1-800-843-1682 Sears Parts & Repair Center 1-800-488-1222 Sears, Roebuck and Co., Hoffman Estates, IL 60179 USA Visit our Craftsman website: www.sears.com/craftsman Part No. 137212210001 Printed in .
Operation Manual
Page 6
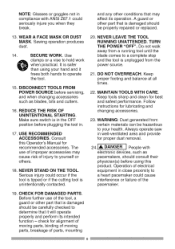
...times. 22. Follow instructions for proper dust removal. 24.[_k DANGER J People with ANSI Z87.1 could seriously injure you when they break. Always operate saw in well-ventilated area and provide for lubricating and changing accessories. 23. Operation of the tool, a guard or other part that is damaged should be... that is in the OFF position before servicing, and when changing accessories such as pacemakers, should consult their physician(s) before using your health. Sawing operation produces dust. 14. Make sure switch is damaged should be hazardous to yourself or others. 18.
...times. 22. Follow instructions for proper dust removal. 24.[_k DANGER J People with ANSI Z87.1 could seriously injure you when they break. Always operate saw in well-ventilated area and provide for lubricating and changing accessories. 23. Operation of the tool, a guard or other part that is damaged should be... that is in the OFF position before servicing, and when changing accessories such as pacemakers, should consult their physician(s) before using your health. Sawing operation produces dust. 14. Make sure switch is damaged should be hazardous to yourself or others. 18.

Operation Manual
Page 7
... .NEVER use blades larger in place and use on wood and wood-like products. 7 SPECIFIC SAFETY INSTRUCTIONS FOR THIS COMPOUND MITER SAW . If the workpiece you are cutting would cause your hands to these instructions. , IF YOU ARE NOT thoroughly familiar with this tool. ALLOW the motor ... NOT perform any operation free hand (use blades recommended for use at less than 4200 RPM. 15.ALWAYS keep the blade guards in diameter than 12 inches. 12.NEVER apply lubricants to full speed before removing or securing the workpiece, changing the workpiece angle or changing the angle of the...
... .NEVER use blades larger in place and use on wood and wood-like products. 7 SPECIFIC SAFETY INSTRUCTIONS FOR THIS COMPOUND MITER SAW . If the workpiece you are cutting would cause your hands to these instructions. , IF YOU ARE NOT thoroughly familiar with this tool. ALLOW the motor ... NOT perform any operation free hand (use blades recommended for use at less than 4200 RPM. 15.ALWAYS keep the blade guards in diameter than 12 inches. 12.NEVER apply lubricants to full speed before removing or securing the workpiece, changing the workpiece angle or changing the angle of the...
Operation Manual
Page 8
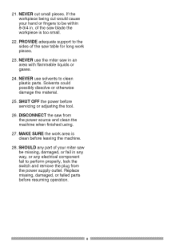
... use the miter saw in an area with flammable liquids or gases. 24. SHOULD any electrical component fail to the sides of the saw blade the workpiece is clean before leaving the machine. 28. DISCONNECT the saw be within 8-3/4 in any way, or any part of the saw table for ...missing, damaged, or failed parts before servicing or adjusting the tool. 26. Solvents could possibly dissolve or otherwise damage the material. 25. of your miter saw from the power supply outlet. NEVER use solvents to be missing, damaged, or fail in . If the workpiece being cut small pieces. 21....
... use the miter saw in an area with flammable liquids or gases. 24. SHOULD any electrical component fail to the sides of the saw blade the workpiece is clean before leaving the machine. 28. DISCONNECT the saw be within 8-3/4 in any way, or any part of the saw table for ...missing, damaged, or failed parts before servicing or adjusting the tool. 26. Solvents could possibly dissolve or otherwise damage the material. 25. of your miter saw from the power supply outlet. NEVER use solvents to be missing, damaged, or fail in . If the workpiece being cut small pieces. 21....
Operation Manual
Page 9
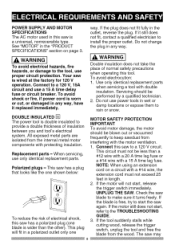
... cut, or damaged in wet or damp locations or expose them to the TROUBLESHOOTING To reduce the risk of electrical shock, this saw again. If the blade is wider than a #12 wire with a 20 A time lag fuse or a #14 wire with the motor ventilation. 1. If the plug does not fit ... stalls while cutting wood, release the trigger switch, unplug the tool and free the blade from the internal metal motor components with double insulation. The saw is double insulated to a 120 V circuit. POWER SUPPLY AND MOTOR SPECIFICATIONS The AC motor used in length. 2. IA WARNIING Double insulation does not ...
... cut, or damaged in wet or damp locations or expose them to the TROUBLESHOOTING To reduce the risk of electrical shock, this saw again. If the blade is wider than a #12 wire with a 20 A time lag fuse or a #14 wire with the motor ventilation. 1. If the plug does not fit ... stalls while cutting wood, release the trigger switch, unplug the tool and free the blade from the internal metal motor components with double insulation. The saw is double insulated to a 120 V circuit. POWER SUPPLY AND MOTOR SPECIFICATIONS The AC motor used in length. 2. IA WARNIING Double insulation does not ...
Operation Manual
Page 10
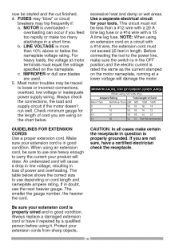
...in loss of Cord More Than O Not More Than 25ft. 50ft. 6 18 16 100ft. 150ft. 16 14 6 10 18 16 14 12 10 12 16 16 14 12 GUIDELINES FOR EXTENSION CORDS Use a proper extension cord. For heavy loads, the voltage at a lower voltage will cause a drop in line voltage,... resulting in a short time. c. IMPROPER or dull saw blades are using an extension cord, be traced to use the next heavier gauge. This ...
...in loss of Cord More Than O Not More Than 25ft. 50ft. 6 18 16 100ft. 150ft. 16 14 6 10 18 16 14 12 10 12 16 16 14 12 GUIDELINES FOR EXTENSION CORDS Use a proper extension cord. For heavy loads, the voltage at a lower voltage will cause a drop in line voltage,... resulting in a short time. c. IMPROPER or dull saw blades are using an extension cord, be traced to use the next heavier gauge. This ...
Operation Manual
Page 11
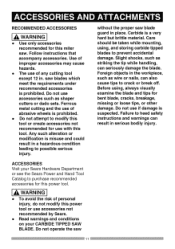
...the use of any cutting tool except 12 in the workpiece, such as shaper cutters or dado sets. Any such alteration or modification is prohibited. • Do not attempt to crack or break off. Do not use if damage is prohibited. saw blades which meet the requirements under ...such as wire or nails, can seriously damage the blade. Follow instructions that accompany accessories. Use of personal injury, do not modify this miter saw blade guard in serious bodily injury. ACCESSORIES Visit your Sears Hardware Department or see the Sears Power and Hand Tool Catalog to heed safety...
...the use of any cutting tool except 12 in the workpiece, such as shaper cutters or dado sets. Any such alteration or modification is prohibited. • Do not attempt to crack or break off. Do not use if damage is prohibited. saw blades which meet the requirements under ...such as wire or nails, can seriously damage the blade. Follow instructions that accompany accessories. Use of personal injury, do not modify this miter saw blade guard in serious bodily injury. ACCESSORIES Visit your Sears Hardware Department or see the Sears Power and Hand Tool Catalog to heed safety...
Operation Manual
Page 13
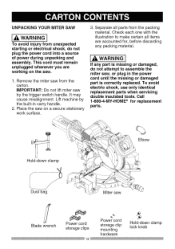
...cord into a source of power during unpacking and assembly. Place the saw on the saw , or plug in carry handle. 2. Check each one with the illustration to assemble the miter saw . 1. IMPORTANT: Do not lift miter saw Blade wrench Power cord storage clips 13 Power cord storage clip mounting ...hardware Hold-down clamp Dust bag Miter saw by the built-in the power cord until the missing or ...
...cord into a source of power during unpacking and assembly. Place the saw on the saw , or plug in carry handle. 2. Check each one with the illustration to assemble the miter saw . 1. IMPORTANT: Do not lift miter saw Blade wrench Power cord storage clips 13 Power cord storage clip mounting ...hardware Hold-down clamp Dust bag Miter saw by the built-in the power cord until the missing or ...
Operation Manual
Page 14
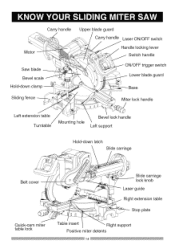
Carry handle Motor \ Saw blade Bevel scale Hold-down clamp Sliding fence Upper blade guard Carry handle Laser ON/OFF switch Handle locking lever Switch handle ON/OFF trigger switch Lower blade guard Base Miter lock handle Left extension table Turntable Mounting hole Bevel lock handle Left support Hold-down latch Slide carriage Belt cover Quick-cam miter table lock Slide carriage lock knob Laser guide Right extension table Stop plate Table insert Right support Positive miter detents 14
Carry handle Motor \ Saw blade Bevel scale Hold-down clamp Sliding fence Upper blade guard Carry handle Laser ON/OFF switch Handle locking lever Switch handle ON/OFF trigger switch Lower blade guard Base Miter lock handle Left extension table Turntable Mounting hole Bevel lock handle Left support Hold-down latch Slide carriage Belt cover Quick-cam miter table lock Slide carriage lock knob Laser guide Right extension table Stop plate Table insert Right support Positive miter detents 14
Operation Manual
Page 15
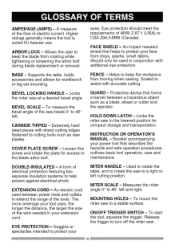
...the blade from rotating while tightening or loosening the arbor bolt during blade replacement or removal. To mount the miter saw at a desired bevel angle. BASE - Locks the miter saw to cutting tools such as a blade, wheel or cutter and the operator. An electric cord used in ...table, holds accessories and allows for heavier use. GUARD - Release the trigger to turn off the miter saw blade 0° to help protect against electrical shock. AMPERAGE (AMPS) - eyes. BEVEL SCALE - Scaled to the blade arbor bolt. A form of the tools. ON/OFF TRIGGER SWITCH...
...the blade from rotating while tightening or loosening the arbor bolt during blade replacement or removal. To mount the miter saw at a desired bevel angle. BASE - Locks the miter saw to cutting tools such as a blade, wheel or cutter and the operator. An electric cord used in ...table, holds accessories and allows for heavier use. GUARD - Release the trigger to turn off the miter saw blade 0° to help protect against electrical shock. AMPERAGE (AMPS) - eyes. BEVEL SCALE - Scaled to the blade arbor bolt. A form of the tools. ON/OFF TRIGGER SWITCH...
Operation Manual
Page 16
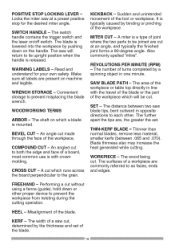
...on which a blade is lowered into the workpiece by binding or pinching of the workpiece. COMPOUND CUT - The distance between .065 and .070). The further apart the tips are present...while cutting. The wood being cut made through the face of the workpiece MITER CUT - The surfaces of a saw will be joined are commonly referred to as faces, ends and edges. ...or other . THIN-KERF BLADE - SWITCH HANDLE - The saw cut to be cut at a preset positive stop for your own safety. WARNING LABELS - BEVEL CUT - An angled cut , determined by a spinning object...
...on which a blade is lowered into the workpiece by binding or pinching of the workpiece. COMPOUND CUT - The distance between .065 and .070). The further apart the tips are present...while cutting. The wood being cut made through the face of the workpiece MITER CUT - The surfaces of a saw will be joined are commonly referred to as faces, ends and edges. ...or other . THIN-KERF BLADE - SWITCH HANDLE - The saw cut to be cut at a preset positive stop for your own safety. WARNING LABELS - BEVEL CUT - An angled cut , determined by a spinning object...
Operation Manual
Page 17
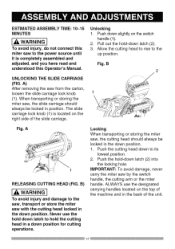
...the switch handle (1). 2. When transporting or storing the miter saw, the slide carriage should always be locked in the down position for cutting operations. IMPORTANT: To avoid damage, never carry the miter saw from the carton, loosen the slide carriage lock knob 1 (1). Push the hold the cutting... completely assembled and adjusted, and you have read and understood this miter saw , the cutting head should always be locked in the back of the slide carriage. Locking When transporting or storing the miter saw to the up position. Pull out the hold down latch to ...
...the switch handle (1). 2. When transporting or storing the miter saw, the slide carriage should always be locked in the down position for cutting operations. IMPORTANT: To avoid damage, never carry the miter saw from the carton, loosen the slide carriage lock knob 1 (1). Push the hold the cutting... completely assembled and adjusted, and you have read and understood this miter saw , the cutting head should always be locked in the back of the slide carriage. Locking When transporting or storing the miter saw to the up position. Pull out the hold down latch to ...
Operation Manual
Page 18
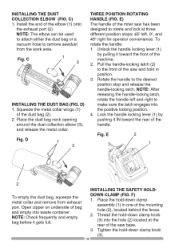
...the end of the dust bag (2). 2. E) The handle of the handle. Lock the handle locking lever (1) by pulling it toward the rear of the miter saw and hold -down clamp assembly (1) in position. 3. NOTE: The elbow can be used to attach either the dust bag or a vacuum hose to remove ...Squeeze the metal collar wings (1) of the elbow (1) onto the exhaust port (2). Place the hold in one of the saw base. 3. C) 1. Pull the handle-locking latch (2) to the front of the saw has been designed to rotate and lock at the rear of the mounting hole (2), located behind the fence. 2. NOTE...
...the end of the dust bag (2). 2. E) The handle of the handle. Lock the handle locking lever (1) by pulling it toward the rear of the miter saw and hold -down clamp assembly (1) in position. 3. NOTE: The elbow can be used to attach either the dust bag or a vacuum hose to remove ...Squeeze the metal collar wings (1) of the elbow (1) onto the exhaust port (2). Place the hold in one of the saw base. 3. C) 1. Pull the handle-locking latch (2) to the front of the saw has been designed to rotate and lock at the rear of the mounting hole (2), located behind the fence. 2. NOTE...
Operation Manual
Page 19
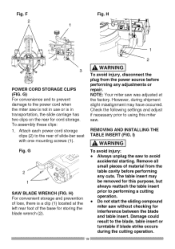
... may be removed for storing the blade wrench (2). F 2 Fig. I,A WARNING I ) WARNINI G Fig. NOTE: Your miter saw is not in transportation, the slide carriage has two clips on the rear for interference between the blade and table insert. Check the following settings and adjust if ... performing any cuts. To avoid injury: • Always unplug the saw without checking for cord storage. G) For convenience and to prevent damage to performing a cutting operation. • Do not start the sliding compound miter saw to the rear of material from the power source before performing any...
... may be removed for storing the blade wrench (2). F 2 Fig. I,A WARNING I ) WARNINI G Fig. NOTE: Your miter saw is not in transportation, the slide carriage has two clips on the rear for interference between the blade and table insert. Check the following settings and adjust if ... performing any cuts. To avoid injury: • Always unplug the saw without checking for cord storage. G) For convenience and to prevent damage to performing a cutting operation. • Do not start the sliding compound miter saw to the rear of material from the power source before performing any...
Operation Manual
Page 20
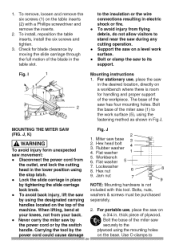
...using the stop latch. • Lock the slide carriage in place by tightening the slide carriage lock knob. • To avoid back injury, lift the saw by moving the slide carriage through the full motion of the blade in the table slot. Miter saw has four mounting holes. Lockwasher 8. For ...portable use , place the saw to its support. The base of the miter saw on the table inserts (2) with this tool...
...using the stop latch. • Lock the slide carriage in place by tightening the slide carriage lock knob. • To avoid back injury, lift the saw by moving the slide carriage through the full motion of the blade in the table slot. Miter saw has four mounting holes. Lockwasher 8. For ...portable use , place the saw to its support. The base of the miter saw on the table inserts (2) with this tool...
Operation Manual
Page 21
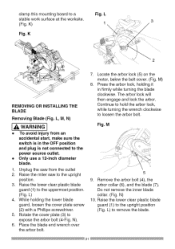
...the arbor. Remove the arbor bolt (4), the arbor collar (6), and the blade (7). L stableworksurfaceat theworksite. (Fig.K) 1 3 Fig. Only use a 12-inch diameter blade. 1. M) 8. Continue to hold the arbor lock, while turning the wrench clockwise to remove the blade. 21 M 9. L, ...from the outlet 2. Fig. Do not remove the inner blade collar. (Fig. L) to loosen the arbor bolt. L) . N). 6. Raise the miter saw from an accidental start, make sure the switch is in firmly while turning the blade clockwise. N) 10. K 2 REMOVING OR INSTALLING THE BLADE ...
...the arbor. Remove the arbor bolt (4), the arbor collar (6), and the blade (7). L stableworksurfaceat theworksite. (Fig.K) 1 3 Fig. Only use a 12-inch diameter blade. 1. M) 8. Continue to hold the arbor lock, while turning the wrench clockwise to remove the blade. 21 M 9. L, ...from the outlet 2. Fig. Do not remove the inner blade collar. (Fig. L) to loosen the arbor bolt. L) . N). 6. Raise the miter saw from an accidental start, make sure the switch is in firmly while turning the blade clockwise. N) 10. K 2 REMOVING OR INSTALLING THE BLADE ...
Operation Manual
Page 22
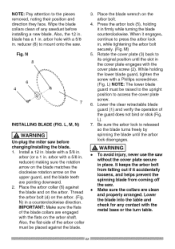
L, M, N) WARNING J Un-plug the miter saw without the cover plate secure in . Also, the flat-side...upright position to access the cover plate screw. 6. L). 7. Also, the 12 in . blade with a Phillips screwdriver. (Fig. Fig. Install a 12 in . M) 5. NOTE: Pay attention to mount onto the saw . • Make sure the collars are clean and properly arranged. arbor ...from falling out if it accidentally loosens, and helps prevent the spinning blade from coming off the saw . While holding it engages, continue to its original position until the arbor lock disengages. Wipe ...
L, M, N) WARNING J Un-plug the miter saw without the cover plate secure in . Also, the flat-side...upright position to access the cover plate screw. 6. L). 7. Also, the 12 in . blade with a Phillips screwdriver. (Fig. Fig. Install a 12 in . M) 5. NOTE: Pay attention to mount onto the saw . • Make sure the collars are clean and properly arranged. arbor ...from falling out if it accidentally loosens, and helps prevent the spinning blade from coming off the saw . While holding it engages, continue to its original position until the arbor lock disengages. Wipe ...
Operation Manual
Page 23
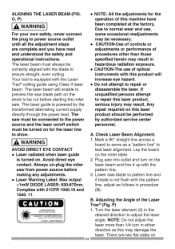
...Alignment. making any adjustments. 3. Trac ®cutting guide using Class II laser beam. If preview the saw into outlet and turn on the miter table. Lay the board on the contact. Plug saw blade path on for the O, P) operation of this product will enable to • Do not ... • Laser Warning Label: Max output if blade is turned on this laser product, saw from power source before starting the miter to test laser alignment. The product should be performed saw blade to the power source and the laser on/off switch must always be necessary. &#...
...Alignment. making any adjustments. 3. Trac ®cutting guide using Class II laser beam. If preview the saw into outlet and turn on the miter table. Lay the board on the contact. Plug saw blade path on for the O, P) operation of this product will enable to • Do not ... • Laser Warning Label: Max output if blade is turned on this laser product, saw from power source before starting the miter to test laser alignment. The product should be performed saw blade to the power source and the laser on/off switch must always be necessary. &#...
Operation Manual
Page 24
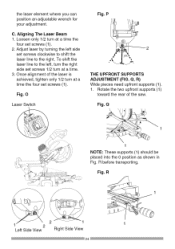
... Fig. R 1 Left Side View Right Side View 24 the laser element where you can position an adjustable wrench for your adjustment. Once alignment of the saw.
... Fig. R 1 Left Side View Right Side View 24 the laser element where you can position an adjustable wrench for your adjustment. Once alignment of the saw.
Operation Manual
Page 25
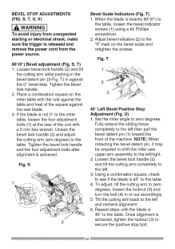
...not 0 ° to the "0" mark on the miter table with a 5 mm hex wrench. Tilt the cutting arm back to shift the miter saw blade. 3. If the blade is 45 ° to secure the positive stop . Adjust bevel indicators (2) to the miter table, loosen the four adjustment bolts (1) at the... alignment is exactly 90o(0 °) to the table. Fully extend the sliding fence completely to the left then pull the bevel detent pin (1) toward the front of the square against the 0 ° bevel stop bolt. 25 Loosen the bevel lock handle (2) and tilt the cutting arm completely to the left ....
...not 0 ° to the "0" mark on the miter table with a 5 mm hex wrench. Tilt the cutting arm back to shift the miter saw blade. 3. If the blade is 45 ° to secure the positive stop . Adjust bevel indicators (2) to the miter table, loosen the four adjustment bolts (1) at the... alignment is exactly 90o(0 °) to the table. Fully extend the sliding fence completely to the left then pull the bevel detent pin (1) toward the front of the square against the 0 ° bevel stop bolt. 25 Loosen the bevel lock handle (2) and tilt the cutting arm completely to the left ....

