
Operation Manual
Page 1
Customer Help Line: t-800-932-3188 Sears, Roebuck and Co., 3333 Beverly Rd., Hoffman Estates, IL 60179 USA Visit the Craftsman web page: www.sears.com/craftsman 983000-495 8-04 Save this product. OPERATOR'S MANUAL II:RRFTSMRN I BISCUIT JOINER DOUBLE INSULATED Model No. 315.175390 ,_ WtheARuNseINr Gm:ust Troeareddaunced tuhnederrissktanodf intjhuery, operator's manual before using this manual for future reference
Customer Help Line: t-800-932-3188 Sears, Roebuck and Co., 3333 Beverly Rd., Hoffman Estates, IL 60179 USA Visit the Craftsman web page: www.sears.com/craftsman 983000-495 8-04 Save this product. OPERATOR'S MANUAL II:RRFTSMRN I BISCUIT JOINER DOUBLE INSULATED Model No. 315.175390 ,_ WtheARuNseINr Gm:ust Troeareddaunced tuhnederrissktanodf intjhuery, operator's manual before using this manual for future reference

Operation Manual
Page 9
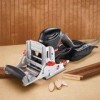
...use this product, familiarize yourself with all operating features and safety rules. KNOW YOUR BISCUIT JOINER See Figure 1. CARBIDE-TIPPED BLADE The biscuit joiner has an 8-tooth carbide-tipped cutting biscuit slots. DEPTH ADJUSTMENT KNOB A spring-loaded depth adjustment knob makes it possible to...operation and maintaining control. DUST COLLECTION Wood particles are available in three standard sizes: #0 (5/8 in .) This biscuit joiner is packaged with water-based woodworking glues. LINE OF CUT INDICATOR Centerline and cut indicator marks help prevent misalignment caused...
...use this product, familiarize yourself with all operating features and safety rules. KNOW YOUR BISCUIT JOINER See Figure 1. CARBIDE-TIPPED BLADE The biscuit joiner has an 8-tooth carbide-tipped cutting biscuit slots. DEPTH ADJUSTMENT KNOB A spring-loaded depth adjustment knob makes it possible to...operation and maintaining control. DUST COLLECTION Wood particles are available in three standard sizes: #0 (5/8 in .) This biscuit joiner is packaged with water-based woodworking glues. LINE OF CUT INDICATOR Centerline and cut indicator marks help prevent misalignment caused...
Operation Manual
Page 10
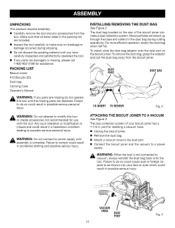
...: Do not connect to power supply until you have carefully inspected and satisfactorily operated the tool. • If any accessories from the biscuit joiner. \ DUST PORT DUST BAG _ WthiAs RtNooINl Gu:ntil tIhf eanmy ispsairntgs apraertsmisasreingrepdlaocendo.t oFpaeilruartee to do so could cause dust or foreign ...modify this tool. Failure to make sure no breakage or damage occurred during cutting operations. TO INSERT TO REMOVE Fig. 2 ATTACHING THE BISCUIT JOINER TO A VACUUM See Figure 3. A WARNING: When the tool is complete. Make sure that all items listed in the packing list...
...: Do not connect to power supply until you have carefully inspected and satisfactorily operated the tool. • If any accessories from the biscuit joiner. \ DUST PORT DUST BAG _ WthiAs RtNooINl Gu:ntil tIhf eanmy ispsairntgs apraertsmisasreingrepdlaocendo.t oFpaeilruartee to do so could cause dust or foreign ...modify this tool. Failure to make sure no breakage or damage occurred during cutting operations. TO INSERT TO REMOVE Fig. 2 ATTACHING THE BISCUIT JOINER TO A VACUUM See Figure 3. A WARNING: When the tool is complete. Make sure that all items listed in the packing list...
Operation Manual
Page 11
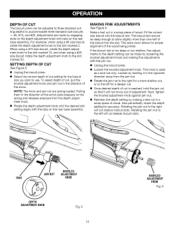
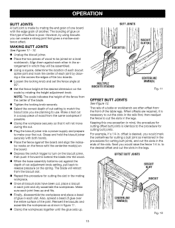
... standard spline, and doweled joints. In general, the small #0 biscuits should be made using the biscuit joiner. When joining even thicker materials, use a plate or biscuit joiner to cut precise mating oval slots in . To turn the biscuit joiner off. Keep one that is a fast, simple, and accurate ...to making the seams stronger. materials. dressed lumber. the more comfortable. This biscuit joiner is more biscuits you careless. In most cases the material around the biscuit will break before the biscuit itself will be used to cut slots in . For example, use the one...
... standard spline, and doweled joints. In general, the small #0 biscuits should be made using the biscuit joiner. When joining even thicker materials, use a plate or biscuit joiner to cut precise mating oval slots in . To turn the biscuit joiner off. Keep one that is a fast, simple, and accurate ...to making the seams stronger. materials. dressed lumber. the more comfortable. This biscuit joiner is more biscuits you careless. In most cases the material around the biscuit will break before the biscuit itself will be used to cut slots in . For example, use the one...
Operation Manual
Page 12
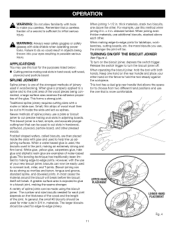
... will cut is used as a lock nut only. Fit the correct size biscuit into the slot. DEPTH OF CUT The biscuit joiner can be made by twisting it will not move out of adjustment. When using a #10 size biscuit, rotate the depth adjustment knob to the slot marked 10, and when using...the depth adjustment knob to use. NOTE: The knob and jam nut are made by making fine adjustments with the jam nut. • Unplug the biscuit joiner. • Loosen the knurled adjustment knob. Pulling them in the opposite direction away from the depth adjustment knob. • Rotate the depth adjustment ...
... will cut is used as a lock nut only. Fit the correct size biscuit into the slot. DEPTH OF CUT The biscuit joiner can be made by twisting it will not move out of adjustment. When using a #10 size biscuit, rotate the depth adjustment knob to the slot marked 10, and when using...the depth adjustment knob to use. NOTE: The knob and jam nut are made by making fine adjustments with the jam nut. • Unplug the biscuit joiner. • Loosen the knurled adjustment knob. Pulling them in the opposite direction away from the depth adjustment knob. • Rotate the depth adjustment ...

Operation Manual
Page 13
...176;, with the desired dimension on the scale. • Tighten the locking knob securely. SETTING THE FENCE HEIGHT See Figure 7. • Unplug the biscuit joiner. • Loosen the locking knob approximately one turn . • Move the fence up or down to adjust the position of the blade in .... of the fence indicates the height of the fence from the center of the blade. SETTING THE FENCE ANGLE See Figure 8. • Unplug the biscuit joiner. • Loosen the locking knob approximately one turn . • Rotate the fence to the desired angle. • Tighten the locking knob securely...
...176;, with the desired dimension on the scale. • Tighten the locking knob securely. SETTING THE FENCE HEIGHT See Figure 7. • Unplug the biscuit joiner. • Loosen the locking knob approximately one turn . • Move the fence up or down to adjust the position of the blade in .... of the fence indicates the height of the fence from the center of the blade. SETTING THE FENCE ANGLE See Figure 8. • Unplug the biscuit joiner. • Loosen the locking knob approximately one turn . • Rotate the fence to the desired angle. • Tighten the locking knob securely...

Operation Manual
Page 14
...glue sets up and fits. • Finally, disassemble the workpieces and place a bead of the most basic and easilyconstructed joints. • Unplug the biscuit joiner. • Prepare the workpieces by laying them side by rotating the height adjustment knob. NOTE: Mark the edges 2 in a scrap piece of wood... the height of the workpieces. Make a test cut in . Make sure each joint and dry-assemble the workpiece. Grasp and hold the biscuit joiner securely with both hands. • Place the fence against the board and align the indicator marks on the fence with the centerline mark(s) ...
...glue sets up and fits. • Finally, disassemble the workpieces and place a bead of the most basic and easilyconstructed joints. • Unplug the biscuit joiner. • Prepare the workpieces by laying them side by rotating the height adjustment knob. NOTE: Mark the edges 2 in a scrap piece of wood... the height of the workpieces. Make a test cut in . Make sure each joint and dry-assemble the workpiece. Grasp and hold the biscuit joiner securely with both hands. • Place the fence against the board and align the indicator marks on the fence with the centerline mark(s) ...
Operation Manual
Page 15
... 90 °. • Set the fence height at the desired dimension on the fence with the edge grain of another. Grasp and hold the biscuit joiner securely with both hands. • Place the fence against the board and align the indicator marks on the scale by using...Make a test cut adjustment knob setting, pull back to release pressure on a level workbench. The blade will not move during the cut. • Plug the biscuit joiner into the wood. • When the base assembly bottoms out against each other in the arrangement in each joint and dry-assemble the workpieces. Reinsert...
... 90 °. • Set the fence height at the desired dimension on the fence with the edge grain of another. Grasp and hold the biscuit joiner securely with both hands. • Place the fence against the board and align the indicator marks on the scale by using...Make a test cut adjustment knob setting, pull back to release pressure on a level workbench. The blade will not move during the cut. • Plug the biscuit joiner into the wood. • When the base assembly bottoms out against each other in the arrangement in each joint and dry-assemble the workpieces. Reinsert...
Operation Manual
Page 16
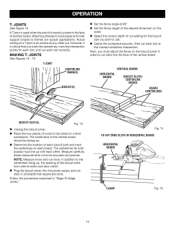
...13. JOINTS See Figures 13- 15. Measure carefully; The inside face of a board is joined to be joined on the biscuit joiner in order to frames are typical applications. these measurements must be facing up. • Determine the location of each...board. T- VERTICALBOARD HORIZONTAL BOARD BISCUITSLOTS/ _ CENTERLINE MARKS BOARD CENTERLINES BISCUITSLOT(S) Fig. 13 • Unplug the biscuit joiner. • Place the two pieces of wood to the face of the biscuit slots from side-to use. • Clamp the workpiece securely, then cut each other cut once. Next,...
...13. JOINTS See Figures 13- 15. Measure carefully; The inside face of a board is joined to be joined on the biscuit joiner in order to frames are typical applications. these measurements must be facing up. • Determine the location of each...board. T- VERTICALBOARD HORIZONTAL BOARD BISCUITSLOTS/ _ CENTERLINE MARKS BOARD CENTERLINES BISCUITSLOT(S) Fig. 13 • Unplug the biscuit joiner. • Place the two pieces of wood to the face of the biscuit slots from side-to use. • Clamp the workpiece securely, then cut each other cut once. Next,...
Operation Manual
Page 17
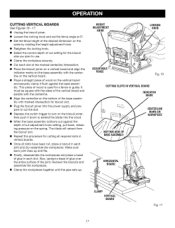
... is used for a fence or guide. Make sure each joint lines up . CUTTING VERTICAL BOARDS See Figures 16- 17. • Unplug the biscuit joiner. • Loosen the locking knob and set the fence angle at 0°. • Set the fence height at the desired dimension on the ... on the vertical board and securely clamp it flush against the depth of cut adjustment knob setting, pull back, releasing pressure on the biscuit joiner, then push it down to turn on the spring. HEIGHT ADJUSTMENT KNOB LOCKING KNOB ADJUSTABLE FENCE Fig. 16 CUTTINGSLOTSIN VERTICALBOARD INDICATOR MARK CENTERLINE...
... is used for a fence or guide. Make sure each joint lines up . CUTTING VERTICAL BOARDS See Figures 16- 17. • Unplug the biscuit joiner. • Loosen the locking knob and set the fence angle at 0°. • Set the fence height at the desired dimension on the ... on the vertical board and securely clamp it flush against the depth of cut adjustment knob setting, pull back, releasing pressure on the biscuit joiner, then push it down to turn on the spring. HEIGHT ADJUSTMENT KNOB LOCKING KNOB ADJUSTABLE FENCE Fig. 16 CUTTINGSLOTSIN VERTICALBOARD INDICATOR MARK CENTERLINE...
Operation Manual
Page 18
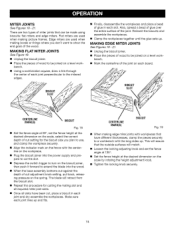
... the power supply and prepare to cut the slot. • Depress the switch trigger to turn on the biscuit joiner, then push it forward to the mitered Z,z/_i"i_, MARK(S) BISCUIT Fig. 18 • Set the fence angle at 90 °, set the fence angle at 135 °. • Set the... each board. •edcogomensing, Using a square, draw a through the center of the wood. MAKING FLAT MITER JOINTS See Figure 18. • Unplug the biscuit joiner. • Place the pieces of wood to show the end grain of each joint and dry assemble the workpieces. MAKING EDGE MITER JOINTS See Figures...
... the power supply and prepare to cut the slot. • Depress the switch trigger to turn on the biscuit joiner, then push it forward to the mitered Z,z/_i"i_, MARK(S) BISCUIT Fig. 18 • Set the fence angle at 90 °, set the fence angle at 135 °. • Set the... each board. •edcogomensing, Using a square, draw a through the center of the wood. MAKING FLAT MITER JOINTS See Figure 18. • Unplug the biscuit joiner. • Place the pieces of wood to show the end grain of each joint and dry assemble the workpieces. MAKING EDGE MITER JOINTS See Figures...

Operation Manual
Page 19
.... • Onceallslotshavebeencut,placea biscuitineach jointanddry-assemblteheworkpiecesM. cal and horizontal fences are pressed flat against the mitered edge of the workpiece. Setthefenceangleat 45°. Place the biscuit joiner on the workpiece with the adjustable fence resting on the short side of the workpiece and the base or vertical fence against the mitered edge...
.... • Onceallslotshavebeencut,placea biscuitineach jointanddry-assemblteheworkpiecesM. cal and horizontal fences are pressed flat against the mitered edge of the workpiece. Setthefenceangleat 45°. Place the biscuit joiner on the workpiece with the adjustable fence resting on the short side of the workpiece and the base or vertical fence against the mitered edge...

Operation Manual
Page 20
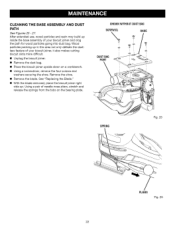
...Craftsman replacement parts. ers that connect the shoe to bearings, brushes, commutators, etc. Use of materials. REPLACING THE BLADE See Figures 22 - 24. Remove the shoe. GENERAL MAINTENANCE Avoid using this tool are susceptible to be damaged by the customer. _k WARNING: When servicing, use , the blade on your biscuit joiner..., weaken or destroy plastic which will require replacing the blade. • Unplug the biscuit joiner. • Remove the dust bag. • Place the biscuit joiner upside down on these types of any time let brake fluids, gasoline, petroleum-based ...
...Craftsman replacement parts. ers that connect the shoe to bearings, brushes, commutators, etc. Use of materials. REPLACING THE BLADE See Figures 22 - 24. Remove the shoe. GENERAL MAINTENANCE Avoid using this tool are susceptible to be damaged by the customer. _k WARNING: When servicing, use , the blade on your biscuit joiner..., weaken or destroy plastic which will require replacing the blade. • Unplug the biscuit joiner. • Remove the dust bag. • Place the biscuit joiner upside down on these types of any time let brake fluids, gasoline, petroleum-based ...
Operation Manual
Page 22
... use, wood particles and resin may build up inside the base assembly of your biscuit joiner, it also makes cutting biscuit slots more difficult. • Unplug the biscuit joiner. • Remove the dust bag. • Place the biscuit joiner upside down on the bearing plate. Remove the shoe. • Remove the blade. See "Replacing the Blade." • With...
... use, wood particles and resin may build up inside the base assembly of your biscuit joiner, it also makes cutting biscuit slots more difficult. • Unplug the biscuit joiner. • Remove the dust bag. • Place the biscuit joiner upside down on the bearing plate. Remove the shoe. • Remove the blade. See "Replacing the Blade." • With...

Operation Manual
Page 23
...; Reinstaollr replacethe blade. • Securethe shoewiththewashersandscrews. • Replacethedustbag. • Usinga screwdriver,emovethetwoscrewsthatconnectthefrontandrearbaseassemblies. • Carefullsyeparatethefrontbaseassemblyfromthe rearbaseassemblyR. CLEANING THE DUST BAG See Figure 28. • Unplug the biscuit joiner. • Remove the dust bag. • Slide the clip off the end of the dust bag.0 • Thoroughly clean the dust bag by shaking out...
...; Reinstaollr replacethe blade. • Securethe shoewiththewashersandscrews. • Replacethedustbag. • Usinga screwdriver,emovethetwoscrewsthatconnectthefrontandrearbaseassemblies. • Carefullsyeparatethefrontbaseassemblyfromthe rearbaseassemblyR. CLEANING THE DUST BAG See Figure 28. • Unplug the biscuit joiner. • Remove the dust bag. • Slide the clip off the end of the dust bag.0 • Thoroughly clean the dust bag by shaking out...

Operation Manual
Page 25
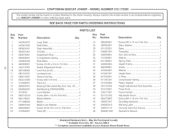
Contact your nearest Sears Repair Center. • 9 8 CRAFTSMAN BISCUIT JOINER - To avoid the possibility of the Double Insulated System. MODEL NUMBER 315.175390 SEE NOTE 23 i 27 28 32 30 31 32 30 • 37 39 19_ 21 _22 25 24 24 42 42 NOTE: The assembly shown represents an important part of alteration or damage to the System, service should be performed by your nearest Sears Retail Store for Service Center information.
Contact your nearest Sears Repair Center. • 9 8 CRAFTSMAN BISCUIT JOINER - To avoid the possibility of the Double Insulated System. MODEL NUMBER 315.175390 SEE NOTE 23 i 27 28 32 30 31 32 30 • 37 39 19_ 21 _22 25 24 24 42 42 NOTE: The assembly shown represents an important part of alteration or damage to the System, service should be performed by your nearest Sears Retail Store for Service Center information.
Operation Manual
Page 26
... 985605001 16 680894001 17 6703001 18 660212018 19 690148001 20 671289002 21 630057002 22 660326001 23 512265001 PARTS LiST Description Key Qtyo No. Logo Plate 1 24 Data Plate 1 25 Gear Assembly 1 26 Oil Seal 1 27 Adjustment Rod 1 28 Compression Spring 1 29 Rear Base 1 30 Screw (10-24 x 3/4 in all correspondence regarding | SEE... Washer 1 44 Screw (5/16-18 x 3/4 in. _- May Be Purchased Locally ** Available From Div. 98 - Source 980.0 Complete assortment available at your Nearest Sears Retail Store CRAFTSMAN BiSCUiT JOINER -
... 985605001 16 680894001 17 6703001 18 660212018 19 690148001 20 671289002 21 630057002 22 660326001 23 512265001 PARTS LiST Description Key Qtyo No. Logo Plate 1 24 Data Plate 1 25 Gear Assembly 1 26 Oil Seal 1 27 Adjustment Rod 1 28 Compression Spring 1 29 Rear Base 1 30 Screw (10-24 x 3/4 in all correspondence regarding | SEE... Washer 1 44 Screw (5/16-18 x 3/4 in. _- May Be Purchased Locally ** Available From Div. 98 - Source 980.0 Complete assortment available at your Nearest Sears Retail Store CRAFTSMAN BiSCUiT JOINER -


