End User License Agreement
Page 1
.... You may make archival or back-up purposes. Storage. You do not have Software Product into Your Computer's AGREE TO ALL TERMS AND temporary memory (RAM) for use with all or any Software Product, installed on or made available by HP for CONDITIONS OF THIS EULA. Use of the Software Product...
.... You may make archival or back-up purposes. Storage. You do not have Software Product into Your Computer's AGREE TO ALL TERMS AND temporary memory (RAM) for use with all or any Software Product, installed on or made available by HP for CONDITIONS OF THIS EULA. Use of the Software Product...

Reference Guide
Page 5
...Off . . . . . 4-7 5 Add-On Devices Connecting External Devices 5-1 To Insert or Remove a PC Card 5-1 To Connect an Audio Device 5-3 To Connect a TV to Your Notebook (Select Models Only 5-4 Switching the Display to the External Monitor (Select Models Only 5-5 To Connect a 1394 ...Device (Select Models Only 5-7 To Connect an Infrared Device (Select Models Only 5-7 Installing Additional RAM (Memory 5-9 To Install a RAM Expansion Module 5-9 To Remove a RAM Expansion...
...Off . . . . . 4-7 5 Add-On Devices Connecting External Devices 5-1 To Insert or Remove a PC Card 5-1 To Connect an Audio Device 5-3 To Connect a TV to Your Notebook (Select Models Only 5-4 Switching the Display to the External Monitor (Select Models Only 5-5 To Connect a 1394 ...Device (Select Models Only 5-7 To Connect an Infrared Device (Select Models Only 5-7 Installing Additional RAM (Memory 5-9 To Install a RAM Expansion Module 5-9 To Remove a RAM Expansion...
Reference Guide
Page 10
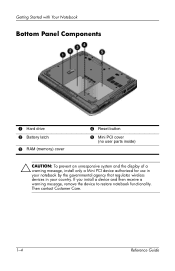
Getting Started with Your Notebook Bottom Panel Components 1 Hard drive 2 Battery latch 3 RAM (memory) cover 4 Reset button 5 Mini PCI cover (no user parts inside) Ä CAUTION: To prevent an unresponsive system and the display of a warning message, install only a Mini PCI device authorized for use in your notebook by the governmental agency that regulates wireless devices in your country. If you install a device and then receive a warning message, remove the device to restore notebook functionality. Then contact Customer Care. 1-4 Reference Guide
Getting Started with Your Notebook Bottom Panel Components 1 Hard drive 2 Battery latch 3 RAM (memory) cover 4 Reset button 5 Mini PCI cover (no user parts inside) Ä CAUTION: To prevent an unresponsive system and the display of a warning message, install only a Mini PCI device authorized for use in your notebook by the governmental agency that regulates wireless devices in your country. If you install a device and then receive a warning message, remove the device to restore notebook functionality. Then contact Customer Care. 1-4 Reference Guide

Reference Guide
Page 19
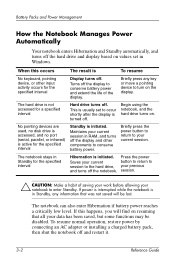
...; Saves current session to time out. You can also customize the way these power modes work. power. -or- ■ Turns off the notebook. If the system has stopped responding and Windows shutdown procedures cannot be used, press and hold the power button for 4 seconds to turn off...Operation Default Power Settings Power mode To enter this guide. 2-2 Reference Guide See the "Battery Packs and Power Management" chapter in RAM. ■ Restarts quickly. ■ Restores network connections. shuts down. -or- ■ Restores network Allow the system to disk, then ...
...; Saves current session to time out. You can also customize the way these power modes work. power. -or- ■ Turns off the notebook. If the system has stopped responding and Windows shutdown procedures cannot be used, press and hold the power button for 4 seconds to turn off...Operation Default Power Settings Power mode To enter this guide. 2-2 Reference Guide See the "Battery Packs and Power Management" chapter in RAM. ■ Restarts quickly. ■ Restores network connections. shuts down. -or- ■ Restores network Allow the system to disk, then ...
Reference Guide
Page 36
... initiated. The notebook can also enter Hibernation if battery power reaches a critically low level. Briefly press the power button to return to conserve battery power and extend the life of saving your work before allowing your current session in RAM, and turns off the display and other ...input activity occurs for a specified interval Hard drive turns off. To resume normal operation, restore power by connecting an AC adapter or installing a charged battery pack, then shut the notebook off the display to ...
... initiated. The notebook can also enter Hibernation if battery power reaches a critically low level. Briefly press the power button to return to conserve battery power and extend the life of saving your work before allowing your current session in RAM, and turns off the display and other ...input activity occurs for a specified interval Hard drive turns off. To resume normal operation, restore power by connecting an AC adapter or installing a charged battery pack, then shut the notebook off the display to ...

Reference Guide
Page 58
... edges. You can be permanently damaged by it. Unplug the AC adapter, if present, then remove the battery pack. 3. Handle the RAM module only by touching the metal shielding around the connectors on the back of your notebook are extremely sensitive to static electricity and can use both slots to expand your...
... edges. You can be permanently damaged by it. Unplug the AC adapter, if present, then remove the battery pack. 3. Handle the RAM module only by touching the metal shielding around the connectors on the back of your notebook are extremely sensitive to static electricity and can use both slots to expand your...

Reference Guide
Page 59
...discharge static electricity by its edges. Select Start > Turn Off Computer > Turn Off. 2. Handle the RAM module only by touching the metal shielding around the connectors on the back of the notebook. 1. Unplug the AC adapter, if present, then remove the battery pack. 3. You will need ...a small Phillips screwdriver for these steps. Ä CAUTION: Your notebook internal components are extremely sensitive to remove a RAM module so you can be permanently damaged by it is fully inserted. Then press down at about a 30-degree angle...
...discharge static electricity by its edges. Select Start > Turn Off Computer > Turn Off. 2. Handle the RAM module only by touching the metal shielding around the connectors on the back of the notebook. 1. Unplug the AC adapter, if present, then remove the battery pack. 3. You will need ...a small Phillips screwdriver for these steps. Ä CAUTION: Your notebook internal components are extremely sensitive to remove a RAM module so you can be permanently damaged by it is fully inserted. Then press down at about a 30-degree angle...

Reference Guide
Page 60
Insert the battery pack. Add-On Devices 4. Pull the board out of the board pops up. Reference Guide 5-11 Match your notebook to the following illustration. 5. Replace the cover. 7. Release the 2 latches at the sides of the RAM board, so the free edge of the connector. 6.
Insert the battery pack. Add-On Devices 4. Pull the board out of the board pops up. Reference Guide 5-11 Match your notebook to the following illustration. 5. Replace the cover. 7. Release the 2 latches at the sides of the RAM board, so the free edge of the connector. 6.
Reference Guide
Page 72
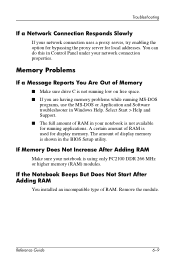
...the proxy server for local addresses. If the Notebook Beeps But Does Not Start After Adding RAM You installed an incompatible type of RAM is used for display memory. Troubleshooting If a Network Connection Responds Slowly If your notebook is not available for running MS-DOS programs,... use the MS-DOS or Application and Software troubleshooter in Windows Help. A certain amount of RAM. If Memory Does Not Increase After Adding RAM Make sure your network connection properties. ...
...the proxy server for local addresses. If the Notebook Beeps But Does Not Start After Adding RAM You installed an incompatible type of RAM is used for display memory. Troubleshooting If a Network Connection Responds Slowly If your notebook is not available for running MS-DOS programs,... use the MS-DOS or Application and Software troubleshooter in Windows Help. A certain amount of RAM. If Memory Does Not Increase After Adding RAM Make sure your network connection properties. ...
Reference Guide
Page 87
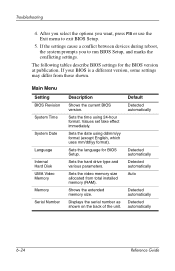
...-hour format. The following tables describe BIOS settings for BIOS Setup. If your BIOS is a different version, some settings may differ from total installed memory (RAM). Sets the hard drive type and various parameters. Default Detected automatically Detected automatically Detected automatically Auto Detected automatically Detected automatically 6-24 Reference Guide Troubleshooting 4. Main...
...-hour format. The following tables describe BIOS settings for BIOS Setup. If your BIOS is a different version, some settings may differ from total installed memory (RAM). Sets the hard drive type and various parameters. Default Detected automatically Detected automatically Detected automatically Auto Detected automatically Detected automatically 6-24 Reference Guide Troubleshooting 4. Main...

Reference Guide
Page 98
... hot keys 2-6 I identifying components 1-1 increasing display brightness 2-6 infrared port connecting a device 5-7 location 1-2 transferring files 5-8 troubleshooting 6-6 using the port 5-8 inserting battery pack 1-7 CD 2-10 DVD 2-10 PC Card 5-1 RAM (memory) 5-9 K keyboard status lights 1-2, 1-6 troubleshooting 6-7 keys ALT GR 2-9 Applications 2-8 Fn (Function) 2-6 Windows 2-8 L LAN connection 4-5 troubleshooting 6-8 left panel components 1-3 locking the hard drive 2-15 low...
... hot keys 2-6 I identifying components 1-1 increasing display brightness 2-6 infrared port connecting a device 5-7 location 1-2 transferring files 5-8 troubleshooting 6-6 using the port 5-8 inserting battery pack 1-7 CD 2-10 DVD 2-10 PC Card 5-1 RAM (memory) 5-9 K keyboard status lights 1-2, 1-6 troubleshooting 6-7 keys ALT GR 2-9 Applications 2-8 Fn (Function) 2-6 Windows 2-8 L LAN connection 4-5 troubleshooting 6-8 left panel components 1-3 locking the hard drive 2-15 low...
Reference Guide
Page 99
...30 P parallel connection, troubleshooting 6-20 parallel port (LPT1) 1-3 parts of the notebook back panel 1-3 bottom panel 1-4 front panel 1-2 left panel 1-3 right panel 1-2 status lights 1-5 password protection 2-13 PC Cards installing 5-1 removing 5-2 slot location 1-3 troubleshooting 6-13 ports 1394 1-3 external ...data 2-16 hard drive 2-15 R RAM cover 1-4 installing 5-9 removing 5-10 troubleshooting 6-9 recharging the battery pack 3-5 reinstalling operating system 6-31 software 6-32 reinstalling software 6-28 removing CD 2-10 DVD 2-10 PC Cards 5-2 RAM (memory) 5-10 repairing the operating ...
...30 P parallel connection, troubleshooting 6-20 parallel port (LPT1) 1-3 parts of the notebook back panel 1-3 bottom panel 1-4 front panel 1-2 left panel 1-3 right panel 1-2 status lights 1-5 password protection 2-13 PC Cards installing 5-1 removing 5-2 slot location 1-3 troubleshooting 6-13 ports 1394 1-3 external ...data 2-16 hard drive 2-15 R RAM cover 1-4 installing 5-9 removing 5-10 troubleshooting 6-9 recharging the battery pack 3-5 reinstalling operating system 6-31 software 6-32 reinstalling software 6-28 removing CD 2-10 DVD 2-10 PC Cards 5-2 RAM (memory) 5-10 repairing the operating ...

Reference Guide
Page 101
One-Touch button 5-5 U updating software 6-28 USB ports location 1-3 troubleshooting 6-20 using BIOS Setup Utility 6-23 V virus-protection software 2-14 volume control 1-3 W wireless indicator light 1-2 network connection 4-6 on-off button 1-2 troubleshooting 6-21 wireless network connection turning off notebook 2-2 wireless network connection 4-8 turning on 4-7 Index-6 Reference Guide Index RAM (memory) 6-9 serial 6-19 startup 6-20 USB 6-20 wireless 6-21 turning off 4-8 turning on notebook 1-10, 2-2 wireless network connection 4-7 TV Now!
One-Touch button 5-5 U updating software 6-28 USB ports location 1-3 troubleshooting 6-20 using BIOS Setup Utility 6-23 V virus-protection software 2-14 volume control 1-3 W wireless indicator light 1-2 network connection 4-6 on-off button 1-2 troubleshooting 6-21 wireless network connection turning off notebook 2-2 wireless network connection 4-8 turning on 4-7 Index-6 Reference Guide Index RAM (memory) 6-9 serial 6-19 startup 6-20 USB 6-20 wireless 6-21 turning off 4-8 turning on notebook 1-10, 2-2 wireless network connection 4-7 TV Now!

HP Compaq nx9020, nx9030 and nx9040 Notebook PCs- Startup Guide
Page 11
Getting Started with Your Notebook Bottom Panel Components 1 Hard drive 2 Battery latch 3 RAM (memory) cover 4 Reset button 5 Mini PCI cover (no user parts inside) Ä CAUTION: To prevent an unresponsive system and the display of a warning message, install only a Mini PCI device authorized for use in your notebook by the governmental agency that regulates wireless devices in your country. If you install a device and then receive a warning message, remove the device to restore notebook functionality. Startup Guide 1-5 Then contact Customer Care.
Getting Started with Your Notebook Bottom Panel Components 1 Hard drive 2 Battery latch 3 RAM (memory) cover 4 Reset button 5 Mini PCI cover (no user parts inside) Ä CAUTION: To prevent an unresponsive system and the display of a warning message, install only a Mini PCI device authorized for use in your notebook by the governmental agency that regulates wireless devices in your country. If you install a device and then receive a warning message, remove the device to restore notebook functionality. Startup Guide 1-5 Then contact Customer Care.

HP Compaq nx9020, nx9030 and nx9040 Notebook PCs- Startup Guide
Page 20
... Documentation CD included with your notebook. 2-2 Startup Guide See the "Battery Packs and Power Management" chapter in RAM. ■ Restarts quickly. ■ Restores network connections. Standby-Power status light will turn off the notebook. If the system has stopped...power. ■ Saves current session to disk, then shuts down. ■ Restores network connections. If the notebook is already on the notebook. Basic Operation Default Power Settings Power mode To enter this mode Function ON-Power status light will blink. ...
... Documentation CD included with your notebook. 2-2 Startup Guide See the "Battery Packs and Power Management" chapter in RAM. ■ Restarts quickly. ■ Restores network connections. Standby-Power status light will turn off the notebook. If the system has stopped...power. ■ Saves current session to disk, then shuts down. ■ Restores network connections. If the notebook is already on the notebook. Basic Operation Default Power Settings Power mode To enter this mode Function ON-Power status light will blink. ...

HP Compaq nx9020, nx9030 and nx9040 Notebook PCs- Startup Guide
Page 49
... System CD reinstall 4-11 repair 4-10 P parallel port (LPT1) 1-4 parts of the notebook back panel 1-4 bottom panel 1-5 front panel 1-3 left panel 1-4 right panel 1-3 status lights 1-6 PC Card slot location 1-4 ports 1394 1-4 external monitor 1-4 infrared 1-3 LPT1 (parallel) 1-4 serial... port (COM1) 1-4 USB 1-4 power button 1-3, 1-11 mode status light 1-6 settings 2-2 troubleshooting 4-5 R RAM cover 1-5 recharging the battery pack 3-3 reinstalling...
... System CD reinstall 4-11 repair 4-10 P parallel port (LPT1) 1-4 parts of the notebook back panel 1-4 bottom panel 1-5 front panel 1-3 left panel 1-4 right panel 1-3 status lights 1-6 PC Card slot location 1-4 ports 1394 1-4 external monitor 1-4 infrared 1-3 LPT1 (parallel) 1-4 serial... port (COM1) 1-4 USB 1-4 power button 1-3, 1-11 mode status light 1-6 settings 2-2 troubleshooting 4-5 R RAM cover 1-5 recharging the battery pack 3-3 reinstalling...

Startup Guide
Page 9
Then contact Customer Care. Startup Guide 1-5 If you install a device and then receive a warning message, remove the device to restore notebook functionality. Getting Started with Your Notebook Bottom Panel Components 1 Hard drive 2 Battery latch 3 RAM (memory) cover 4 Reset button 5 Mini PCI cover (no user parts inside) Ä CAUTION: To prevent an unresponsive system and the display of a warning message, install only a Mini PCI device authorized for use in your notebook by the governmental agency that regulates wireless devices in your country.
Then contact Customer Care. Startup Guide 1-5 If you install a device and then receive a warning message, remove the device to restore notebook functionality. Getting Started with Your Notebook Bottom Panel Components 1 Hard drive 2 Battery latch 3 RAM (memory) cover 4 Reset button 5 Mini PCI cover (no user parts inside) Ä CAUTION: To prevent an unresponsive system and the display of a warning message, install only a Mini PCI device authorized for use in your notebook by the governmental agency that regulates wireless devices in your country.

Startup Guide
Page 18
...To enter this mode Function ON-Power status light will turn off. Computer > Stand By. Powers off . power. -or- ■ Turns off the notebook. turn off the notebook. Powers on . OFF-Power status light will turn off the display Allow the system to disk, then Press Fn+F12. button. -or- ■... press and hold the power button for 4 seconds to time out. shuts down. -or- ■ Restores network Allow the system to turn on the notebook. See the "Battery Packs and Power Management" chapter in RAM. ■ Restarts quickly. ■ Restores network connections.
...To enter this mode Function ON-Power status light will turn off. Computer > Stand By. Powers off . power. -or- ■ Turns off the notebook. turn off the notebook. Powers on . OFF-Power status light will turn off the display Allow the system to disk, then Press Fn+F12. button. -or- ■... press and hold the power button for 4 seconds to time out. shuts down. -or- ■ Restores network Allow the system to turn on the notebook. See the "Battery Packs and Power Management" chapter in RAM. ■ Restarts quickly. ■ Restores network connections.

Startup Guide
Page 45
... System CD reinstall 4-11 repair 4-10 P parallel port (LPT1) 1-4 parts of the notebook back panel 1-4 bottom panel 1-5 front panel 1-3 left panel 1-4 right panel 1-3 status lights 1-6 PC Card slot location 1-4 ports 1394 1-4 external monitor 1-4 infrared 1-3 LPT1 (parallel) 1-4 serial... port (COM1) 1-4 USB 1-4 power button 1-3, 1-11 mode status light 1-6 settings 2-2 troubleshooting 4-5 R RAM cover 1-5 recharging the battery pack 3-3 reinstalling...
... System CD reinstall 4-11 repair 4-10 P parallel port (LPT1) 1-4 parts of the notebook back panel 1-4 bottom panel 1-5 front panel 1-3 left panel 1-4 right panel 1-3 status lights 1-6 PC Card slot location 1-4 ports 1394 1-4 external monitor 1-4 infrared 1-3 LPT1 (parallel) 1-4 serial... port (COM1) 1-4 USB 1-4 power button 1-3, 1-11 mode status light 1-6 settings 2-2 troubleshooting 4-5 R RAM cover 1-5 recharging the battery pack 3-3 reinstalling...


