
Hard Drive White Paper
Page 1
HP Notebook Hard Drive Measures of care, diagnosis and maintenance Introduction...2 HP Notebook LidSwitch Policy...3 Notebook F10 Setup Hard Drive Self-Test 3 Minimum System BIOS Required...4 Hard Drive Mounting Screw...4 HP Recommendations for Notebook Users 5 Hard Drive Troubleshooting Flowchart...6
HP Notebook Hard Drive Measures of care, diagnosis and maintenance Introduction...2 HP Notebook LidSwitch Policy...3 Notebook F10 Setup Hard Drive Self-Test 3 Minimum System BIOS Required...4 Hard Drive Mounting Screw...4 HP Recommendations for Notebook Users 5 Hard Drive Troubleshooting Flowchart...6

Hard Drive White Paper
Page 3
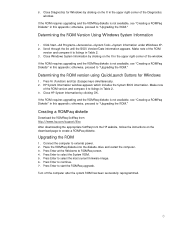
...closed that works in either of the hard drive self-test have been combined as a commercial notebook system BIOS upgrade. This enhancement allows the notebook to download the latest BIOS update. Initiating the enhanced hard drive self-test includes the following table for power management. Refer... and long versions of the tests, the process halts and failure occurs. HP recommends the latest system BIOS upgrade be applied to all currently shipping notebooks. HP recommends use an external keyboard and monitor, activating Standby upon lid closure in addition to detect ...
...closed that works in either of the hard drive self-test have been combined as a commercial notebook system BIOS upgrade. This enhancement allows the notebook to download the latest BIOS update. Initiating the enhanced hard drive self-test includes the following table for power management. Refer... and long versions of the tests, the process halts and failure occurs. HP recommends the latest system BIOS upgrade be applied to all currently shipping notebooks. HP recommends use an external keyboard and monitor, activating Standby upon lid closure in addition to detect ...
Hard Drive White Paper
Page 4
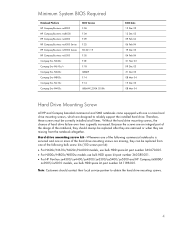
... HP Compaq nx9000/ nx9005/nx9010 models, use bulk HDD spare kit part number 361188-001. Minimum System BIOS Required Notebook Platform HP Compaq Business nc8000 HP Compaq Business nw8000 HP Compaq Business nc6000 HP Compaq Business nc4000 Series HP Compaq Business nx9000 Series HP Compaq Business nx5000 Compaq Evo N620c Compaq Evo N610c/v Compaq Evo N600c Compaq Evo N800c Compaq Evo N410c Compaq Evo N400c BIOS Version...
... HP Compaq nx9000/ nx9005/nx9010 models, use bulk HDD spare kit part number 361188-001. Minimum System BIOS Required Notebook Platform HP Compaq Business nc8000 HP Compaq Business nw8000 HP Compaq Business nc6000 HP Compaq Business nc4000 Series HP Compaq Business nx9000 Series HP Compaq Business nx5000 Compaq Evo N620c Compaq Evo N610c/v Compaq Evo N600c Compaq Evo N800c Compaq Evo N410c Compaq Evo N400c BIOS Version...
Hard Drive White Paper
Page 5
... Recovery Console to run, at a minimum, the chkdsk /p /r commands to removable media. • Regularly check the HP Web site for system BIOS and driver enhancements. 5 During Defrag, data is decreased. Please refer to the following Microsoft Knowledge Base articles for information: - Windows XP: http://... Policy, or as an alternative, place the notebook into Standby mode before transporting it from one location to another. • Upgrade to the latest system BIOS, as given in the "F10 Setup Hard Drive Self-Test" section. • Whenever possible, adjust power management settings (power...
... Recovery Console to run, at a minimum, the chkdsk /p /r commands to removable media. • Regularly check the HP Web site for system BIOS and driver enhancements. 5 During Defrag, data is decreased. Please refer to the following Microsoft Knowledge Base articles for information: - Windows XP: http://... Policy, or as an alternative, place the notebook into Standby mode before transporting it from one location to another. • Upgrade to the latest system BIOS, as given in the "F10 Setup Hard Drive Self-Test" section. • Whenever possible, adjust power management settings (power...
Installing Microsoft Windows XP Service Pack 2 on HP Compaq Business Notebooks
Page 3
...upgrade the preinstalled image of HP Drivers and Enhancements" o Optionally, the software can also download all PC card devices. 3. Preparing for installation 1. To check and upgrade ROM BIOS for each PC • Microsoft Windows XP Service Pack 2 o SP2 is updated monthly and available by pressing ...A for information on the HP website to ensure that you do not have the most recent version, install the latest system ROM BIOS. If you have the most recent version. Installation Installing Windows XP Service Pack 2 IMPORTANT Follow the instructions in an unsuccessful or unstable...
...upgrade the preinstalled image of HP Drivers and Enhancements" o Optionally, the software can also download all PC card devices. 3. Preparing for installation 1. To check and upgrade ROM BIOS for each PC • Microsoft Windows XP Service Pack 2 o SP2 is updated monthly and available by pressing ...A for information on the HP website to ensure that you do not have the most recent version, install the latest system ROM BIOS. If you have the most recent version. Installation Installing Windows XP Service Pack 2 IMPORTANT Follow the instructions in an unsuccessful or unstable...
Installing Microsoft Windows XP Service Pack 2 on HP Compaq Business Notebooks
Page 6
...Press Enter at the Welcome to start the ROMPaq upgrade. Press Enter to ROMPaq screen. 4. Scroll through the list until the BIOS Version/Date information appears. Make note of the window. Creating a ROMPaq diskette Download the ROMPaq SoftPaq from http://www.hp.com...Start→All Programs→Accessories→System Tools→System Information under Windows XP. 2. HP System Information window appears which includes the System BIOS information. Press Enter to "Upgrading the ROM." Press Fn (Function) and Esc (Escape) keys simultaneously. 2. otherwise, proceed to select ...
...Press Enter at the Welcome to start the ROMPaq upgrade. Press Enter to ROMPaq screen. 4. Scroll through the list until the BIOS Version/Date information appears. Make note of the window. Creating a ROMPaq diskette Download the ROMPaq SoftPaq from http://www.hp.com...Start→All Programs→Accessories→System Tools→System Information under Windows XP. 2. HP System Information window appears which includes the System BIOS information. Press Enter to "Upgrading the ROM." Press Fn (Function) and Esc (Escape) keys simultaneously. 2. otherwise, proceed to select ...
Installing Microsoft Windows XP Service Pack 2 on HP Compaq Business Notebooks
Page 7
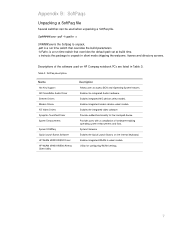
... parameters. -f is a run time switch that overrides the default path set at build time. -s instructs the package to access BIOS and Operating System features. Provides users with a compilation of the software used when unpacking a SoftPaq file. Enables the integrated video software... users to unpack in select models. Enables the integrated Audio hardware. System Firmware Enables the Quick Launch Buttons on HP Compaq notebook PCs are listed in Table 3. Descriptions of hardware-enabling operating system enhancements and fixes. Enables integrated modem devices select models. ...
... parameters. -f is a run time switch that overrides the default path set at build time. -s instructs the package to access BIOS and Operating System features. Provides users with a compilation of the software used when unpacking a SoftPaq file. Enables the integrated video software... users to unpack in select models. Enables the integrated Audio hardware. System Firmware Enables the Quick Launch Buttons on HP Compaq notebook PCs are listed in Table 3. Descriptions of hardware-enabling operating system enhancements and fixes. Enables integrated modem devices select models. ...

Maintenance and Service Guide
Page 3
... 2-40 Removing the CPU Module ...2-44 Removing the RJ11/1394 Connector Module 2-48 Removing the Motherboard ...2-50 Replacing Components on a Bottom Case 2-59 Repairing the BIOS IC...2-61 Removing Other Components...2-63 Troubleshooting and Diagnostics 3-1 Support Service Partners...3-2 Troubleshooting ...3-3 Diagnostic Tools ...3-18 Replaceable Parts...4-1 Reference Information 5-1 Password Removal Policy...5-2 Hewlett-Packard...
... 2-40 Removing the CPU Module ...2-44 Removing the RJ11/1394 Connector Module 2-48 Removing the Motherboard ...2-50 Replacing Components on a Bottom Case 2-59 Repairing the BIOS IC...2-61 Removing Other Components...2-63 Troubleshooting and Diagnostics 3-1 Support Service Partners...3-2 Troubleshooting ...3-3 Diagnostic Tools ...3-18 Replaceable Parts...4-1 Reference Information 5-1 Password Removal Policy...5-2 Hewlett-Packard...
Maintenance and Service Guide
Page 5
... 1-25 Table 2-1. Replacing Small Parts ...2-12 Table 2-5. Replaceable Parts ...4-4 Table 4-2. ASP Support Options...3-2 Table 3-2. Example of notebook 1-15 Table 1-4. Main Status Lights (front of Serial Number Label 2-59 Figure 2-39. Removing Components...2-63 Table 3-1. POST Terminal-Error... Beep Codes 3-20 Table 3-5. BIOS Setup Menus and Parameters 3-28 Table 4-1. Scope of Diagnostic Tools...3-7 Table 3-3. POST Messages ...3-24 Table 3-6. Basic Troubleshooting Steps...
... 1-25 Table 2-1. Replacing Small Parts ...2-12 Table 2-5. Replaceable Parts ...4-4 Table 4-2. ASP Support Options...3-2 Table 3-2. Example of notebook 1-15 Table 1-4. Main Status Lights (front of Serial Number Label 2-59 Figure 2-39. Removing Components...2-63 Table 3-1. POST Terminal-Error... Beep Codes 3-20 Table 3-5. BIOS Setup Menus and Parameters 3-28 Table 4-1. Scope of Diagnostic Tools...3-7 Table 3-3. POST Messages ...3-24 Table 3-6. Basic Troubleshooting Steps...
Maintenance and Service Guide
Page 30
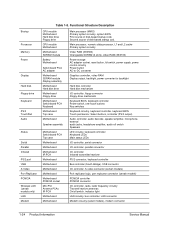
...backlight Hard disk controller Hard disk mechanism I/O controller, floppy connector Floppy drive mechanism Keyboard BIOS, keyboard controller Power switch, one-touch buttons Key switches Keyboard circuitry, keyboard controller, keyboard BIOS Touch pad sensor, Select buttons, controller (PS/2 output) Audio controller, audio decoder,... Motherboard PCMCIA socket Mini PCI Antenna PCAs IR PCA Motherboard Motherboard Main processor (MMO) Primary system circuitry, system BIOS First source of disk-based startup code Second source of disk-based startup cod. Bootup Processor Memory Power Display ...
...backlight Hard disk controller Hard disk mechanism I/O controller, floppy connector Floppy drive mechanism Keyboard BIOS, keyboard controller Power switch, one-touch buttons Key switches Keyboard circuitry, keyboard controller, keyboard BIOS Touch pad sensor, Select buttons, controller (PS/2 output) Audio controller, audio decoder,... Motherboard PCMCIA socket Mini PCI Antenna PCAs IR PCA Motherboard Motherboard Main processor (MMO) Primary system circuitry, system BIOS First source of disk-based startup code Second source of disk-based startup cod. Bootup Processor Memory Power Display ...

Maintenance and Service Guide
Page 86
..., press F1 to store the system data and display information in an AC adapter. 2. Plug in the EEPROM on page 2-50. Let the notebook reboot, and then go to it that can bend very easily. Remove the following components from the boot menu. 6. After installing a new motherboard...HP support center to boot. NOTE: Reprogramming the BIOS IC A new BIOS IC contains only enough basic programming to enable the notebook to do so: 1. Enter the serial number from the bottom of the notebook-you successfully stored system data on the notebook. 4. Turn on the floppy disk before removing ...
..., press F1 to store the system data and display information in an AC adapter. 2. Plug in the EEPROM on page 2-50. Let the notebook reboot, and then go to it that can bend very easily. Remove the following components from the boot menu. 6. After installing a new motherboard...HP support center to boot. NOTE: Reprogramming the BIOS IC A new BIOS IC contains only enough basic programming to enable the notebook to do so: 1. Enter the serial number from the bottom of the notebook-you successfully stored system data on the notebook. 4. Turn on the floppy disk before removing ...
Maintenance and Service Guide
Page 89
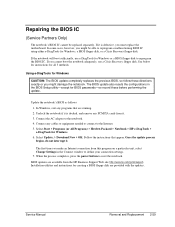
... a Crisis Recovery floppy disk. Select Update, > Download New > OK. Service Manual Removal and Replacement 2-59 Repairing the BIOS IC (Service Partners Only) The notebook's BIOS IC cannot be able to reprogram a malfunctioning BIOS IC using either e-DiagTools for Windows, a BIOS floppy disk, or a Crisis Recovery floppy disk. Select Start > Programs (or All Programs) > Hewlett-Packard...
... a Crisis Recovery floppy disk. Select Update, > Download New > OK. Service Manual Removal and Replacement 2-59 Repairing the BIOS IC (Service Partners Only) The notebook's BIOS IC cannot be able to reprogram a malfunctioning BIOS IC using either e-DiagTools for Windows, a BIOS floppy disk, or a Crisis Recovery floppy disk. Select Start > Programs (or All Programs) > Hewlett-Packard...

Maintenance and Service Guide
Page 90
...disk drive. 2. After the BIOS reprograms itself, check the BIOS version to make sure it to boot from the BIOS floppy disk: a. Insert the BIOS floppy disk in a boot block jumper, unplug it before the notebook automatically reboots. 4. Turn on at all, do not have a BIOS floppy disk, download the package... Library. The display goes blank for creating the BIOS floppy disk. CAUTION: Make sure to boot from the BIOS floppy disk. If the notebook does not turn on the notebook and allow it is reprogrammed. Release Fn+B. NOTE: If the notebook will not boot from the Partnership Web site (...
...disk drive. 2. After the BIOS reprograms itself, check the BIOS version to make sure it to boot from the BIOS floppy disk: a. Insert the BIOS floppy disk in a boot block jumper, unplug it before the notebook automatically reboots. 4. Turn on at all, do not have a BIOS floppy disk, download the package... Library. The display goes blank for creating the BIOS floppy disk. CAUTION: Make sure to boot from the BIOS floppy disk. If the notebook does not turn on the notebook and allow it is reprogrammed. Release Fn+B. NOTE: If the notebook will not boot from the Partnership Web site (...

Maintenance and Service Guide
Page 91
... (page 2-32) Motherboard (page 2-50) See page 2-32 Additional Steps Reassembly Notes: After replacing the CMOS battery, set the correct time and date using the BIOS Setup utility or Date/Time in the table below.
... (page 2-32) Motherboard (page 2-50) See page 2-32 Additional Steps Reassembly Notes: After replacing the CMOS battery, set the correct time and date using the BIOS Setup utility or Date/Time in the table below.

Maintenance and Service Guide
Page 93
3 Troubleshooting and Diagnostics This chapter includes troubleshooting and diagnostic information for testing the functionality of the notebook, and for identifying faulty components: • ASP support information • Troubleshooting information Checking for customer abuse (page 3-4) Troubleshooting the ...page 3-7) • Diagnostic tools e-Diagtools diagnostic program (page 3-18) Power-on self-test (page 3-20) Sycard PCCtest 450/460 PC card (page 3-26) Windows Management Instrumentation (page 3-27) BIOS Setup utility (page 3-27) Service Manual Troubleshooting and Diagnostics 3-1
3 Troubleshooting and Diagnostics This chapter includes troubleshooting and diagnostic information for testing the functionality of the notebook, and for identifying faulty components: • ASP support information • Troubleshooting information Checking for customer abuse (page 3-4) Troubleshooting the ...page 3-7) • Diagnostic tools e-Diagtools diagnostic program (page 3-18) Power-on self-test (page 3-20) Sycard PCCtest 450/460 PC card (page 3-26) Windows Management Instrumentation (page 3-27) BIOS Setup utility (page 3-27) Service Manual Troubleshooting and Diagnostics 3-1
Maintenance and Service Guide
Page 97
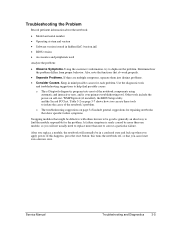
...suggestions to find possible causes. Determine how the problem differs from proper behavior. Keep in hidden fileC:\version.inf) • BIOS version • Accessories and peripherals used Analyze the problem: • Observe Symptoms. Using the customer's information, try to ... into distinct problems. • Consider Causes. Service Manual Troubleshooting and Diagnostics 3-5 Troubleshooting the Problem Record pertinent information about the notebook: • Model and serial number • Operating system and version • Software version (stored in mind possible causes for...
...suggestions to find possible causes. Determine how the problem differs from proper behavior. Keep in hidden fileC:\version.inf) • BIOS version • Accessories and peripherals used Analyze the problem: • Observe Symptoms. Using the customer's information, try to ... into distinct problems. • Consider Causes. Service Manual Troubleshooting and Diagnostics 3-5 Troubleshooting the Problem Record pertinent information about the notebook: • Model and serial number • Operating system and version • Software version (stored in mind possible causes for...
Maintenance and Service Guide
Page 99
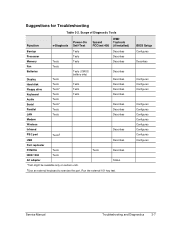
Run the external 101-key test. BIOS Setup Configures Describes Configures Configures Configures Configures Configures Configures Configures Configures Configures Configures Configures Service Manual Troubleshooting and Diagnostics 3-7 Suggestions for Troubleshooting Table 3-2. Scope of ...
Run the external 101-key test. BIOS Setup Configures Describes Configures Configures Configures Configures Configures Configures Configures Configures Configures Configures Configures Service Manual Troubleshooting and Diagnostics 3-7 Suggestions for Troubleshooting Table 3-2. Scope of ...

Maintenance and Service Guide
Page 100
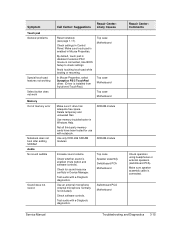
... drive. 3-8 Troubleshooting and Diagnostics Service Manual If power status light and display turn notebook off , try again. AC adapter SDRAM module. Startup Does not boot on , reprogram the BIOS, and replace the top case, replace the motherboard. Reinsert any PC cards, press the reset button to turn on page 1-25. If you cannot...
... drive. 3-8 Troubleshooting and Diagnostics Service Manual If power status light and display turn notebook off , try again. AC adapter SDRAM module. Startup Does not boot on , reprogram the BIOS, and replace the top case, replace the motherboard. Reinsert any PC cards, press the reset button to turn on page 1-25. If you cannot...

Maintenance and Service Guide
Page 101
... sure battery is bootable. Repair Center: Comments Make sure floppy drive is restricted to certain sites. Use BIOS Setup to check default boot order. Remove and reinstall hard drive. If notebook boots from CD in BIOS Setup. If available, try another battery. Check for corrupt files on battery LEDs. Check battery level on...
... sure battery is bootable. Repair Center: Comments Make sure floppy drive is restricted to certain sites. Use BIOS Setup to check default boot order. Remove and reinstall hard drive. If notebook boots from CD in BIOS Setup. If available, try another battery. Check for corrupt files on battery LEDs. Check battery level on...
Maintenance and Service Guide
Page 107
...Top case Motherboard Top case Motherboard Top case Motherboard Make sure C drive has adequate free space. Check software controls. Test audio with notebook. Test audio with e-Diagtools diagnostics. By default, touch pad is disabled if external PS/2 mouse is connected. Avoid touching touch ... No sound audible Sound does not record Call Center: Suggestions Repair Center: Likely Causes Reset notebook (see page 1-17). Make sure speaker assembly cable is connected, Use BIOS Setup to check settings. SDRAM module SDRAM module Increase sound volume. Delete temporary and unneeded ...
...Top case Motherboard Top case Motherboard Top case Motherboard Make sure C drive has adequate free space. Check software controls. Test audio with notebook. Test audio with e-Diagtools diagnostics. By default, touch pad is disabled if external PS/2 mouse is connected. Avoid touching touch ... No sound audible Sound does not record Call Center: Suggestions Repair Center: Likely Causes Reset notebook (see page 1-17). Make sure speaker assembly cable is connected, Use BIOS Setup to check settings. SDRAM module SDRAM module Increase sound volume. Delete temporary and unneeded ...


