Hard Drive White Paper
Page 5
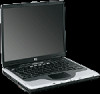
... Notebook Users • Install HP Notebook LidSwitch Policy, or as an alternative, place the notebook into Standby mode before transporting it from one location to another. • Upgrade to the latest system BIOS, as given in the "F10 Setup Hard Drive Self-Test" section. • Whenever possible, adjust power management settings (power schemes) in applications such as a word processor that executes primarily from electronic memory without having to access...
... Notebook Users • Install HP Notebook LidSwitch Policy, or as an alternative, place the notebook into Standby mode before transporting it from one location to another. • Upgrade to the latest system BIOS, as given in the "F10 Setup Hard Drive Self-Test" section. • Whenever possible, adjust power management settings (power schemes) in applications such as a word processor that executes primarily from electronic memory without having to access...
Installing Microsoft Windows XP Service Pack 2 on HP Compaq Business Notebooks
Page 4
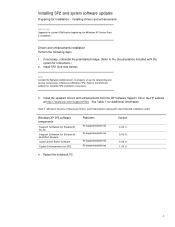
... with recommended installation order) Windows XP SP2 software components Support Software for Bluetooth by hp Support Software for Bluetooth MultiPort Module Quick Launch Button Software System Enhancements for instructions.) 2. Table 1 Minimum Versions of Microsoft Windows SP2. Install SP2 (See note below). See Table 1 for complete SP2 installation instructions. 3. Note Contact the Network Administrators to the Microsoft website for additional information. Restart the notebook PC. Install the updated drivers and enhancements from the HP Software Support CD or...
... with recommended installation order) Windows XP SP2 software components Support Software for Bluetooth by hp Support Software for Bluetooth MultiPort Module Quick Launch Button Software System Enhancements for instructions.) 2. Table 1 Minimum Versions of Microsoft Windows SP2. Install SP2 (See note below). See Table 1 for complete SP2 installation instructions. 3. Note Contact the Network Administrators to the Microsoft website for additional information. Restart the notebook PC. Install the updated drivers and enhancements from the HP Software Support CD or...

Maintenance and Service Guide
Page 3
... Operation...1-14 Specifications ...1-18 Internal Design...1-24 Removal and Replacement 2-1 Disassembly Flowchart ...2-3 Removing the Battery ...2-4 Removing an SDRAM Module...2-5 Removing the Wireless LAN Mini PCI Card 2-7 Removing the Hard Disk Drive...2-9 Recovering the Factory Software...2-11 Replacing Small Parts ...2-12 Removing the Keyboard Cover...2-13 Removing the Speaker Assembly ...2-15 Removing the Keyboard ...2-16 Removing the Switchboard PCA ...2-19 Removing the CD/DVD Drive...2-20 Removing the Display Assembly...2-23 Removing the Top Case ...2-26 Removing the Floppy Drive...
... Operation...1-14 Specifications ...1-18 Internal Design...1-24 Removal and Replacement 2-1 Disassembly Flowchart ...2-3 Removing the Battery ...2-4 Removing an SDRAM Module...2-5 Removing the Wireless LAN Mini PCI Card 2-7 Removing the Hard Disk Drive...2-9 Recovering the Factory Software...2-11 Replacing Small Parts ...2-12 Removing the Keyboard Cover...2-13 Removing the Speaker Assembly ...2-15 Removing the Keyboard ...2-16 Removing the Switchboard PCA ...2-19 Removing the CD/DVD Drive...2-20 Removing the Display Assembly...2-23 Removing the Top Case ...2-26 Removing the Floppy Drive...
Maintenance and Service Guide
Page 6
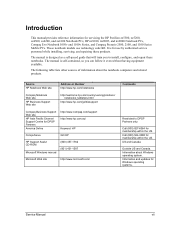
..., ze4400, ze4300, ze4200, and ze4100 Notebook PCs, HP Compaq nx9010, nx9008, nx9005, and nx9000 Notebook PCs, Compaq Evo Notebook 1050v and 1010v Series, and Compaq Presario 2500, 2100, and 1100 Series Mobile PCs. The following table lists other sources of information about Windows operating system. and Canada. The manual is self-contained, so you to DPSP Partners only. Introduction This manual provides reference information for use technology code KE.
..., ze4400, ze4300, ze4200, and ze4100 Notebook PCs, HP Compaq nx9010, nx9008, nx9005, and nx9000 Notebook PCs, Compaq Evo Notebook 1050v and 1010v Series, and Compaq Presario 2500, 2100, and 1100 Series Mobile PCs. The following table lists other sources of information about Windows operating system. and Canada. The manual is self-contained, so you to DPSP Partners only. Introduction This manual provides reference information for use technology code KE.
Maintenance and Service Guide
Page 89
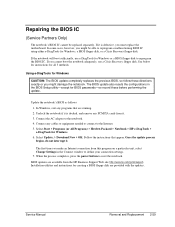
... BIOS IC using either e-DiagTools for BIOS passwords-so record these directions exactly or you must replace the motherboard. In Windows, exit any cables or equipment needed to connect to define your connection settings. 7. Follow the instructions that are provided with the updates. The first time you make an Internet connection from this program on a particular unit, select Change Settings in the BIOS Setup utility-except for Windows, a BIOS floppy disk, or a Crisis Recovery floppy disk. Service Manual Removal and Replacement...
... BIOS IC using either e-DiagTools for BIOS passwords-so record these directions exactly or you must replace the motherboard. In Windows, exit any cables or equipment needed to connect to define your connection settings. 7. Follow the instructions that are provided with the updates. The first time you make an Internet connection from this program on a particular unit, select Change Settings in the BIOS Setup utility-except for Windows, a BIOS floppy disk, or a Crisis Recovery floppy disk. Service Manual Removal and Replacement...
Maintenance and Service Guide
Page 103
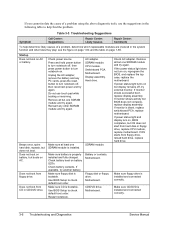
If problem appears after installing new software (including drivers), uninstall that software. Display cable connection SDRAM modules CPU module Display assembly Motherboard White display Adjust display brightness. Replace SDRAM modules. Service Manual Troubleshooting and Diagnostics 3-11 When hardware is installed. Check power supply. Make sure SDRAM modules are not set to Never. Try external monitor. Notebook can take a minute or longer to resume if network card is reinitialized, Windows desktop appears. Make sure hibernate support is loading and checking hardware...
If problem appears after installing new software (including drivers), uninstall that software. Display cable connection SDRAM modules CPU module Display assembly Motherboard White display Adjust display brightness. Replace SDRAM modules. Service Manual Troubleshooting and Diagnostics 3-11 When hardware is installed. Check power supply. Make sure SDRAM modules are not set to Never. Try external monitor. Notebook can take a minute or longer to resume if network card is reinitialized, Windows desktop appears. Make sure hibernate support is loading and checking hardware...
Maintenance and Service Guide
Page 107
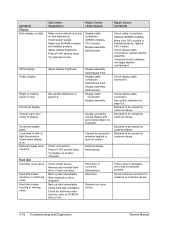
...PCA Motherboard Repair Center: Comments Check operation using headphones or external speakers (switchboard PCA). Check whether sound is installed from \hp\drivers\TouchPad.) Top case Motherboard Top case Motherboard Top case Motherboard Make sure C drive has adequate free space. SDRAM module SDRAM module Increase sound volume. Test audio with e-Diagtools diagnostics. Check settings in Windows Help. In Mouse Properties, select Synaptics PS/2 TouchPad driver. (Driver is enabled (mute button and software controls). Service Manual Troubleshooting and Diagnostics 3-15 Make sure...
...PCA Motherboard Repair Center: Comments Check operation using headphones or external speakers (switchboard PCA). Check whether sound is installed from \hp\drivers\TouchPad.) Top case Motherboard Top case Motherboard Top case Motherboard Make sure C drive has adequate free space. SDRAM module SDRAM module Increase sound volume. Test audio with e-Diagtools diagnostics. Check settings in Windows Help. In Mouse Properties, select Synaptics PS/2 TouchPad driver. (Driver is enabled (mute button and software controls). Service Manual Troubleshooting and Diagnostics 3-15 Make sure...
Maintenance and Service Guide
Page 115
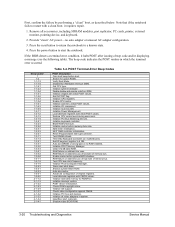
... Load alternate registers with CMOS values Initialize extended memory for ROMPilot Initialize interrupt vectors POST device initialization Check ROM copyright notice Initialize I20 support Check video configuration against CMOS Initialize PCI bus and devices Initialize all video adapters in system QuietBoot start shut down Shadow system BIOS ROM Auto size cache Advanced configuration of memory bus Enable cache before system BIOS shadow RAM failure on motherboard) Set ES segment register to...
... Load alternate registers with CMOS values Initialize extended memory for ROMPilot Initialize interrupt vectors POST device initialization Check ROM copyright notice Initialize I20 support Check video configuration against CMOS Initialize PCI bus and devices Initialize all video adapters in system QuietBoot start shut down Shadow system BIOS ROM Auto size cache Advanced configuration of memory bus Enable cache before system BIOS shadow RAM failure on motherboard) Set ES segment register to...
Maintenance and Service Guide
Page 122
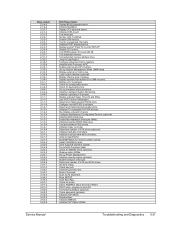
... to start the boot process or to enter BIOS Setup and change the settings Press to display the previous screen (usually an initialization error of an Option ROM, such as an add-on card) Write down and follow the information shown on the screen Optional message displayed during POST PS/2 mouse identified System BIOS copied to shadow RAM Displays the address nnnn of the upper limit of Upper Memory Blocks (UMB), indicating...
... to start the boot process or to enter BIOS Setup and change the settings Press to display the previous screen (usually an initialization error of an Option ROM, such as an add-on card) Write down and follow the information shown on the screen Optional message displayed during POST PS/2 mouse identified System BIOS copied to shadow RAM Displays the address nnnn of the upper limit of Upper Memory Blocks (UMB), indicating...
Service Manual
Page 6
... nx9000 Notebook PCs, Compaq Evo Notebook 1050v and 1010v Series, and Compaq Presario 2500, 2100, and 1100 Series Mobile PCs. These notebook models use by authorized service personnel while installing, servicing, and repairing these notebooks. It is self-contained, so you to DPSP Partners only. The following table lists other sources of information about Windows operating system. Information about the notebook computers and related products. Introduction This manual provides reference information for Windows operating...
... nx9000 Notebook PCs, Compaq Evo Notebook 1050v and 1010v Series, and Compaq Presario 2500, 2100, and 1100 Series Mobile PCs. These notebook models use by authorized service personnel while installing, servicing, and repairing these notebooks. It is self-contained, so you to DPSP Partners only. The following table lists other sources of information about Windows operating system. Information about the notebook computers and related products. Introduction This manual provides reference information for Windows operating...
Service Manual
Page 66
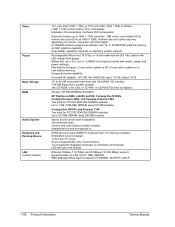
... function (Fn) keys. 5 user-programmable One-Touch buttons. Video Power Mass Storage RAM Audio System Keyboard and Pointing Device LAN (certain models) 14.1-inch XGA (1024 × 768), or 15.0-inch XGA (1024 × 768) or SXGA+ (1400 × 1050) active-matrix (TFT) LCD display. Dual display capability (depends on -off , 3 hours when system is on monitor, resolution, and color depth. At least 128 MB SDRAM preinstalled. Stereo sound...
... function (Fn) keys. 5 user-programmable One-Touch buttons. Video Power Mass Storage RAM Audio System Keyboard and Pointing Device LAN (certain models) 14.1-inch XGA (1024 × 768), or 15.0-inch XGA (1024 × 768) or SXGA+ (1400 × 1050) active-matrix (TFT) LCD display. Dual display capability (depends on -off , 3 hours when system is on monitor, resolution, and color depth. At least 128 MB SDRAM preinstalled. Stereo sound...
Service Manual
Page 132
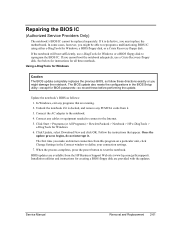
... for creating a BIOS floppy disk are running. 2. The BIOS update also resets the configurations in the Connect window to define your connection settings. 7. Update the notebook's BIOS as follows: 1. Follow the instructions that are provided with the updates. Installation utilities and instructions for Windows. 6. If the notebook will boot sufficiently, use a Crisis Recovery floppy disk. The first time you might damage the notebook. When the process completes, press the power button to the notebook. 4. If you might be replaced separately...
... for creating a BIOS floppy disk are running. 2. The BIOS update also resets the configurations in the Connect window to define your connection settings. 7. Update the notebook's BIOS as follows: 1. Follow the instructions that are provided with the updates. Installation utilities and instructions for Windows. 6. If the notebook will boot sufficiently, use a Crisis Recovery floppy disk. The first time you might damage the notebook. When the process completes, press the power button to the notebook. 4. If you might be replaced separately...
Service Manual
Page 141
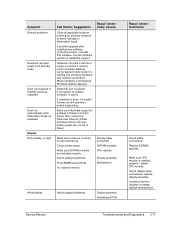
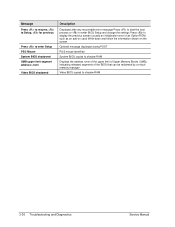
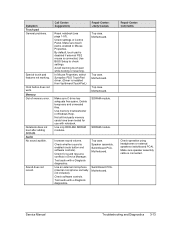
... monitor is properly installed and fully charged. Make sure floppy drive is installed and connected correctly. 3-6 Troubleshooting and Diagnostics Service Manual Check power source. Does not boot from hard disk or floppy drive, replace CPU module, replace motherboard. Use BIOS Setup to check default boot order. Troubleshooting Suggestions Symptom Call Center: Suggestions Repair Center: Likely Causes Repair Center: Comments To help find the problem. Hard drive. Check battery contacts. Restart notebook. If power status light turns on AC. Make sure CD/DVD is installed...
... monitor is properly installed and fully charged. Make sure floppy drive is installed and connected correctly. 3-6 Troubleshooting and Diagnostics Service Manual Check power source. Does not boot from hard disk or floppy drive, replace CPU module, replace motherboard. Use BIOS Setup to check default boot order. Troubleshooting Suggestions Symptom Call Center: Suggestions Repair Center: Likely Causes Repair Center: Comments To help find the problem. Hard drive. Check battery contacts. Restart notebook. If power status light turns on AC. Make sure CD/DVD is installed...
Service Manual
Page 145
.... 3-10 Troubleshooting and Diagnostics Service Manual Caused by customer abuse. Replace SDRAM modules. Make sure CPU module is damaged, drive may not operate properly. CPU module. Display assembly. Adjust display brightness. Motherboard. Display assembly. Local area of display. Check connections. Back up disk immediately. Was notebook or drive dropped? Hard drive. Repair Center: Comments Check cable connections. If external monitor displays no light. Check notebook and drive for alternate noise sources, such as PCMCIA drive or fan. Display cable...
.... 3-10 Troubleshooting and Diagnostics Service Manual Caused by customer abuse. Replace SDRAM modules. Make sure CPU module is damaged, drive may not operate properly. CPU module. Display assembly. Adjust display brightness. Motherboard. Display assembly. Local area of display. Check connections. Back up disk immediately. Was notebook or drive dropped? Hard drive. Repair Center: Comments Check cable connections. If external monitor displays no light. Check notebook and drive for alternate noise sources, such as PCMCIA drive or fan. Display cable...
Service Manual
Page 148
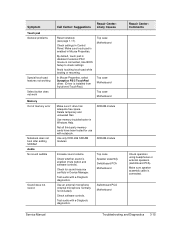
.... Click button does not work. Memory Out of memory error. Audio No sound audible. By default, touch pad is disabled if external PS/2 mouse is enabled (mute button and software controls). Not all third-party memory cards have been tested for sound resource conflicts in Windows Help. Test audio with notebook. Top case. Motherboard. Repair Center: Comments Check operation using headphones or external speakers (switchboard PCA). Increase sound volume. Test audio with e-Diagtools diagnostics. Call Center: Suggestions Repair Center: Likely Causes Reset notebook (see...
.... Click button does not work. Memory Out of memory error. Audio No sound audible. By default, touch pad is disabled if external PS/2 mouse is enabled (mute button and software controls). Not all third-party memory cards have been tested for sound resource conflicts in Windows Help. Test audio with notebook. Top case. Motherboard. Repair Center: Comments Check operation using headphones or external speakers (switchboard PCA). Increase sound volume. Test audio with e-Diagtools diagnostics. Call Center: Suggestions Repair Center: Likely Causes Reset notebook (see...
Service Manual
Page 154
... Change Settings in the Connect window and enter the settings recommended by a sequence of the notebook's components require service. The BIOS will not boot the notebook's operating system if the system memory, CPU, DMA, or interrupt controller fails the POST diagnostic tests. Optional: open the Support Ticket. To e-mail the Support Ticket to determine which of codes; Click View to exit and reboot. 12. The basic hardware test shows a recommended replacement part. e-Diagtools for Windows, use...
... Change Settings in the Connect window and enter the settings recommended by a sequence of the notebook's components require service. The BIOS will not boot the notebook's operating system if the system memory, CPU, DMA, or interrupt controller fails the POST diagnostic tests. Optional: open the Support Ticket. To e-mail the Support Ticket to determine which of codes; Click View to exit and reboot. 12. The basic hardware test shows a recommended replacement part. e-Diagtools for Windows, use...
Service Manual
Page 155
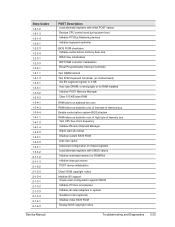
... notebook. POST Terminal-Error Beep Codes POST Description One short beep before system BIOS shadow. Search for ROMPilot. Initialize system hardware. Initialize CPU registers. Initialize local bus IDE. Initialize Power Management. or wrong type or no auto adapter or unusual AC adapter configuration. 3. RAM failure on motherboard). Enable cache before boot. Auto size cache. Initialize all accessories, including SDRAM modules, port replicator, PC cards, printer, external monitor, pointing device, and keyboard. 2. Press the power button to start (optional...
... notebook. POST Terminal-Error Beep Codes POST Description One short beep before system BIOS shadow. Search for ROMPilot. Initialize system hardware. Initialize CPU registers. Initialize local bus IDE. Initialize Power Management. or wrong type or no auto adapter or unusual AC adapter configuration. 3. RAM failure on motherboard). Enable cache before boot. Auto size cache. Initialize all accessories, including SDRAM modules, port replicator, PC cards, printer, external monitor, pointing device, and keyboard. 2. Press the power button to start (optional...
Service Manual
Page 156
... extended memory. Set up hardware interrupt vectors. Load custom defaults (optional). Display shadow-area message. Display error messages. Set up System Management Mode (SMM) area. Disable onboard Super I /O ports. Detect and install external parallel ports. Initialize BIOS Data Area. Initialize floppy controller. Initialize local-bus hard-disk controllers. Clear huge ES segment register. Initialize typematic rate. Enter SETUP. Inform ROMPilot about the end of day. Initialize ACPI BIOS. Enable USB devices. Test extended memory address lines. Jump to boot OS. Configure...
... extended memory. Set up hardware interrupt vectors. Load custom defaults (optional). Display shadow-area message. Display error messages. Set up System Management Mode (SMM) area. Disable onboard Super I /O ports. Detect and install external parallel ports. Initialize BIOS Data Area. Initialize floppy controller. Initialize local-bus hard-disk controllers. Clear huge ES segment register. Initialize typematic rate. Enter SETUP. Inform ROMPilot about the end of day. Initialize ACPI BIOS. Enable USB devices. Test extended memory address lines. Jump to boot OS. Configure...
Service Manual
Page 159
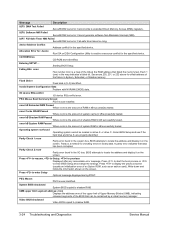
... RAM. 3-24 Troubleshooting and Diagnostics Service Manual Parity Check 2 nnnn Parity error found in the I /O device IRQ conflict error. CD ROM Drive CD-ROM drive identified. Entering SETUP ... I/O device IRQ conflict I /O bus. System BIOS shadowed System BIOS copied to Setup, for checking errors in the map indicates a failed bit. Press to locate the address and display it on drive A: or drive C:. Parity Check 1 nnnn Parity error found in the system bus. Invalid System Configuration Data Problem...
... RAM. 3-24 Troubleshooting and Diagnostics Service Manual Parity Check 2 nnnn Parity error found in the I /O device IRQ conflict error. CD ROM Drive CD-ROM drive identified. Entering SETUP ... I/O device IRQ conflict I /O bus. System BIOS shadowed System BIOS copied to Setup, for checking errors in the map indicates a failed bit. Press to locate the address and display it on drive A: or drive C:. Parity Check 1 nnnn Parity error found in the system bus. Invalid System Configuration Data Problem...
Reference Guide
Page 119
... BIOS password, 24 BIOS Setup utility Boot menu, 87 Exit menu, 87 external display settings, 86 Main menu, 85 Security menu, 86 using, 84 black list (modem), 37 blackout periods, modem, 37 Bluetooth business cards, 46 configuring, 45 sending files, 46 troubleshooting, 82 tuning on, 44 turning off, 45 wireless, 44 boot device order, 17, 87 Boot menu (BIOS), 87 brightness, adjusting, 19 business cards, 46 C Cable lock, 25 Caps Lock, 9 Cardbus cards, 48 cards, PCMCIA, 48 CD-ROM drive creating or copying CDs, 23 inserting CD, 20, 22 location, 2, 3 removing...
... BIOS password, 24 BIOS Setup utility Boot menu, 87 Exit menu, 87 external display settings, 86 Main menu, 85 Security menu, 86 using, 84 black list (modem), 37 blackout periods, modem, 37 Bluetooth business cards, 46 configuring, 45 sending files, 46 troubleshooting, 82 tuning on, 44 turning off, 45 wireless, 44 boot device order, 17, 87 Boot menu (BIOS), 87 brightness, adjusting, 19 business cards, 46 C Cable lock, 25 Caps Lock, 9 Cardbus cards, 48 cards, PCMCIA, 48 CD-ROM drive creating or copying CDs, 23 inserting CD, 20, 22 location, 2, 3 removing...


