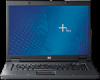
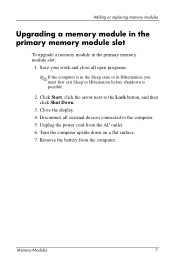
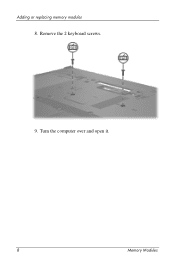
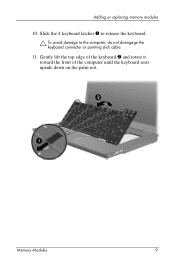
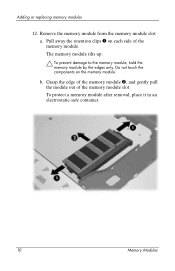
Memory Modules - Windows Vista
Page 1
Memory Modules Document Part Number: 419435-001 January 2007 This guide explains how to replace and upgrade memory in the computer.
Memory Modules - Windows Vista
Page 2
Contents Adding or replacing memory modules Adding a memory module to the expansion memory module slot 2 Upgrading a memory module in the primary memory module slot 7 Index Memory Modules ii
Memory Modules - Windows Vista
Page 3
... of the computer. The expansion memory module compartment is located under the keyboard. Memory Modules 1 Adding or replacing memory modules The computer has 2 memory module compartments. Before beginning any procedure, ensure that you are discharged of static electricity by replacing the existing memory module in the primary memory module slot or the expansion memory module slot. Å WARNING: To...
Memory Modules - Windows Vista
Page 4
... is possible. 2. Click Start, click the arrow next to the computer. 5. Unplug the power cord from the computer. 2 Memory Modules Adding or replacing memory modules Adding a memory module to the expansion memory module slot To replace or add a memory module in Hibernation, you must first exit Sleep or Hibernation before shutdown is in the Sleep state or...
Memory Modules - Windows Vista
Page 5
Loosen the memory module compartment cover screw 1. 9. Memory Modules 3 Lift the memory module compartment cover 2 away from the computer. Adding or replacing memory modules 8.
Memory Modules - Windows Vista
Page 6
Pull away the retention clips 1 on each side of the memory module. Do not touch the components of the memory module. Grasp the edge of the memory module 2, and gently pull the module out of the memory slot. Remove the memory module: a. b. To protect a memory module after removal, place it in an electrostatic-safe container. 4 Memory Modules The memory module tilts up. Ä To prevent damage to the memory module, hold the memory module by the edges only. Adding or replacing memory modules 10.
Memory Modules - Windows Vista
Page 7
... until it is seated. c. b. Adding or replacing memory modules 11. Insert a new memory module: a. Memory Modules 5 Align the notched edge 1 of the memory module compartment, press the memory module 2 into place. Do not touch the components on the memory module. Gently press the memory module 3 down, applying pressure to the memory module, hold the memory module by the edges only.
Memory Modules - Windows Vista
Page 8
Align the tabs 1 on the memory module compartment cover with the notches on the computer. Turn on the computer. 13. Reconnect external power and external devices. 17. Replace the battery. 16. Adding or replacing memory modules 12. If the computer displays a message indicating that the size or configuration of the memory has changed, press f1 to save the changes. 6 Memory Modules Close the cover 2. 14. Tighten the memory module compartment cover screw 3. 15.
Memory Modules - Windows Vista
Page 9
Adding or replacing memory modules Upgrading a memory module in the primary memory module slot To upgrade a memory module in Hibernation, you must first exit Sleep or Hibernation before shutdown is in the Sleep state or in the primary memory module slot: 1. Unplug the power cord from the computer....outlet. 6. Disconnect all open programs. ✎ If the computer is possible. 2. Turn the computer upside down on a flat surface. 7. Memory Modules 7 Close the display. 4. Save your work and close all external devices connected to the Lock button, and then click Shut Down. 3....
Memory Modules - Windows Vista
Page 10
Turn the computer over and open it. 8 Memory Modules Adding or replacing memory modules 8. Remove the 2 keyboard screws. 9.
Memory Modules - Windows Vista
Page 11
Slide the 4 keyboard latches 1 to release the keyboard. Ä To avoid damage to the computer, do not disengage the keyboard connector or pointing stick cable. 11. Adding or replacing memory modules 10. Memory Modules 9 Gently lift the top edge of the keyboard 2 and rotate it toward the front of the computer until the keyboard rests upside down on the palm rest.
Memory Modules - Windows Vista
Page 12
Do not touch the components on each side of the memory module slot. Pull away the retention clips 1 on the memory module. To protect a memory module after removal, place it in an electrostatic-safe container. 10 Memory Modules The memory module tilts up. Ä To prevent damage to the memory module, hold the memory module by the edges only. b. Grasp the edge of the memory module 2, and gently pull the module out of the memory module. Adding or replacing memory modules 12. Remove the memory module from the memory module slot: a.
Memory Modules - Windows Vista
Page 13
... 3 down, applying pressure to the memory module, hold the memory module by the edges only. b. To insert a memory module: a. Adding or replacing memory modules 13. Memory Modules 11 Do not touch the components on the memory module. With the memory module at a 45-degree angle from the surface of the memory module, until the retention clips snap into the...
Memory Modules - Windows Vista
Page 14
Return the keyboard to its previous position 1 and slide the 4 keyboard latches 2 to lock the keyboard. 12 Memory Modules Adding or replacing memory modules 14.
Memory Modules - Windows Vista
Page 15
Reconnect external power and external devices. 19. Adding or replacing memory modules 15. Replace the battery. 18. If the computer displays a message indicating that the size or configuration of the memory has changed, press f1 to save the changes. Memory Modules 13 Replace the keyboard screws. 17. Turn on a flat surface. 16. Turn the computer upside down on the computer.
HP Compaq nx7300 and nx7400 Notebook PC Maintenance and Service Guide
Page 6
Contents 5 Removal and Replacement Procedures 5.1 Serial Number 5-2 5.2 Disassembly Sequence Chart 5-3 5.3 Preparing the Computer for Disassembly 5-5 5.4 Hard Drive 5-7 5.5 Computer Feet 5-11 5.6 Optical Drive 5-12 5.7 External Memory Module 5-14 5.8 Bluetooth Module 5-17 5.9 Keyboard 5-19 5.10 Thermal Plate 5-23 5.11 Fan Assembly 5-24 ...5.12 Heat Sink 5-25 5.13 Processor 5-28 5.14 Mini Card Module 5-30 5.15 Internal Memory Module 5-33 5.16 RTC Battery 5-35 5.17 Switch Cover 5-36 5.18 Display Assembly 5-39 5.19 Top Cover 5-43 5.20 Modem ...
HP Compaq nx7300 and nx7400 Notebook PC Maintenance and Service Guide
Page 26
... Guide 1-19 Product Description The external components on the bottom of the computer are shown below and described in the battery bay. Memory module compartment Contains one memory slot that supports replaceable memory modules. Docking connector Connects the computer to cool internal components. Battery release latches (2) Secure the battery in Table 1-8. Exhaust vents Provides...
HP Compaq nx7300 and nx7400 Notebook PC Maintenance and Service Guide
Page 27
...20 Maintenance and Service Guide These conditions are affected by a temperature sensor and is designed to identify replacement parts, and Chapter 5, "Removal and Replacement Procedures," for ventilation. Exhaust air is controlled by high external temperatures, system power consumption, power management/...Intel Core Duo, Core Solo, Celeron, and Celeron M processors ■ Keyboard and TouchPad ■ Memory modules ■ Mini Card module ■ Modem module ■ Optical drive ■ PC Card ■ Smart Adapter AC adapter ■ Smart card Ä CAUTION: To properly ventilate ...
HP Compaq nx7300 and nx7400 Notebook PC Maintenance and Service Guide
Page 31
... security settings are not changed when you restore the factory settings.) Ignore changes and exit Cancel any changes entered during the current session. Restore defaults Replace the configuration settings in the system. ■ View specification information for the processor, cache and memory size, system ROM, video revision, and keyboard controller version.
HP Compaq nx7300 and nx7400 Notebook PC Maintenance and Service Guide
Page 96
...Replacement Procedures 5.2 Disassembly Sequence Chart Use the chart below to determine the section number to remove Bluetooth module 2 4 2 loosened 4 loosened Maintenance and Service Guide 5-3 Section 5.3 5.4 5.5 5.6 5.7 5.8 5.9 5.10 5.11 5.12 Disassembly Sequence Chart Description Preparing the Computer for Disassembly Battery Hard Drive Computer Feet Optical Drive External Memory... 2 to remove the optical drive bracket 1 loosened to remove the memory module compartment cover 1 loosened to remove the Bluetooth module cover 2 removed to be referenced when removing computer components.