
Hard Drive White Paper
Page 3
.... If no errors occur, the long test automatically runs. 2. Please visit the HP Web site at any time by pressing the esc key. The notebook must first be undocked or removed from a docking device or external power supply running on DC power. If a failure is accessible via the.../support.html to download the latest BIOS update. The short test runs. This enhancement allows the notebook to go into Standby mode when the display lid is closed while the notebook is operating from the internal battery pack, e.g., on DC power, away from AC power before the display lid is closed that...
.... If no errors occur, the long test automatically runs. 2. Please visit the HP Web site at any time by pressing the esc key. The notebook must first be undocked or removed from a docking device or external power supply running on DC power. If a failure is accessible via the.../support.html to download the latest BIOS update. The short test runs. This enhancement allows the notebook to go into Standby mode when the display lid is closed while the notebook is operating from the internal battery pack, e.g., on DC power, away from AC power before the display lid is closed that...
Lithium-ion battery technology: Getting the most from Smart Batteries
Page 6
... calibrated a minimum of capacity. Such aging occurs more than 2 weeks. • Remove the battery from the notebook if the notebook will run time and lifespan. Under normal usage, batteries should be plugged into AC power) for more rapidly as follows: • Store Li-Ion batteries between 20°C and 25°C (68°F and 77°...
... calibrated a minimum of capacity. Such aging occurs more than 2 weeks. • Remove the battery from the notebook if the notebook will run time and lifespan. Under normal usage, batteries should be plugged into AC power) for more rapidly as follows: • Store Li-Ion batteries between 20°C and 25°C (68°F and 77°...
Hardware Guide
Page 4
... Numeric Keypad 2-12 Using an External Keypad 2-14 3 Battery Packs Running the Notebook on Battery Power 3-1 Identifying Battery Packs 3-2 Inserting or Removing a Primary Battery Pack 3-3 Inserting or Removing a MultiBay Battery Pack 3-5 Charging a Battery Pack 3-7 Charging a New Battery Pack 3-8 Charging an In-Use Battery Pack 3-8 Charging a Primary and MultiBay Battery Pack . . . . 3-8 Monitoring the Charge in a Battery Pack 3-9 Obtaining Accurate Charge Information 3-9 Displaying Charge Information...
... Numeric Keypad 2-12 Using an External Keypad 2-14 3 Battery Packs Running the Notebook on Battery Power 3-1 Identifying Battery Packs 3-2 Inserting or Removing a Primary Battery Pack 3-3 Inserting or Removing a MultiBay Battery Pack 3-5 Charging a Battery Pack 3-7 Charging a New Battery Pack 3-8 Charging an In-Use Battery Pack 3-8 Charging a Primary and MultiBay Battery Pack . . . . 3-8 Monitoring the Charge in a Battery Pack 3-9 Obtaining Accurate Charge Information 3-9 Displaying Charge Information...
Hardware Guide
Page 20
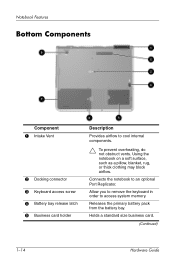
... Keyboard access screw 4 Battery bay release latch 5 Business card holder Description Provides airflow to an optional Port Replicator. Holds a standard size business card. (Continued) 1-14 Hardware Guide Releases the primary battery pack from the battery bay. Connects the notebook to cool internal components.... Ä To prevent overheating, do not obstruct vents. Using the notebook on a soft surface, such as a pillow, blanket, rug...
... Keyboard access screw 4 Battery bay release latch 5 Business card holder Description Provides airflow to an optional Port Replicator. Holds a standard size business card. (Continued) 1-14 Hardware Guide Releases the primary battery pack from the battery bay. Connects the notebook to cool internal components.... Ä To prevent overheating, do not obstruct vents. Using the notebook on a soft surface, such as a pillow, blanket, rug...
Hardware Guide
Page 40
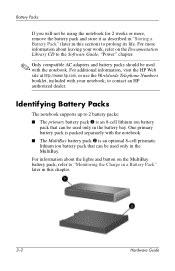
...; Only compatible AC adapters and battery packs should be used with the notebook. ■ The MultiBay battery pack 2 is packed separately with the notebook. One primary battery pack is an optional 8-cell prismatic lithium ion battery pack that can be used only in this chapter. 3-2 Hardware Guide For more , remove the battery pack and store it as described...
...; Only compatible AC adapters and battery packs should be used with the notebook. ■ The MultiBay battery pack 2 is packed separately with the notebook. One primary battery pack is an optional 8-cell prismatic lithium ion battery pack that can be used only in this chapter. 3-2 Hardware Guide For more , remove the battery pack and store it as described...

Hardware Guide
Page 41
Hardware Guide 3-3 Battery Packs Inserting or Removing a Primary Battery Pack Ä CAUTION: To prevent loss of work when removing a battery pack that is seated. To insert a battery pack, slide the battery pack into the battery bay until it is the sole power source, initiate Hibernation or turn off the notebook before removing the battery pack.
Hardware Guide 3-3 Battery Packs Inserting or Removing a Primary Battery Pack Ä CAUTION: To prevent loss of work when removing a battery pack that is seated. To insert a battery pack, slide the battery pack into the battery bay until it is the sole power source, initiate Hibernation or turn off the notebook before removing the battery pack.
Hardware Guide
Page 42
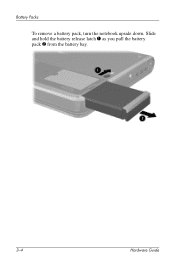
Battery Packs To remove a battery pack, turn the notebook upside down. Slide and hold the battery release latch 1 as you pull the battery pack 2 from the battery bay. 3-4 Hardware Guide
Battery Packs To remove a battery pack, turn the notebook upside down. Slide and hold the battery release latch 1 as you pull the battery pack 2 from the battery bay. 3-4 Hardware Guide
Hardware Guide
Page 43
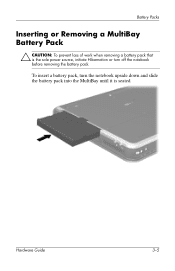
Hardware Guide 3-5 Battery Packs Inserting or Removing a MultiBay Battery Pack Ä CAUTION: To prevent loss of work when removing a battery pack that is the sole power source, initiate Hibernation or turn the notebook upside down and slide the battery pack into the MultiBay until it is seated. To insert a battery pack, turn off the notebook before removing the battery pack.
Hardware Guide 3-5 Battery Packs Inserting or Removing a MultiBay Battery Pack Ä CAUTION: To prevent loss of work when removing a battery pack that is the sole power source, initiate Hibernation or turn the notebook upside down and slide the battery pack into the MultiBay until it is seated. To insert a battery pack, turn off the notebook before removing the battery pack.
Hardware Guide
Page 44
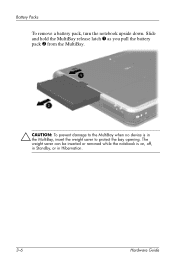
Battery Packs To remove a battery pack, turn the notebook upside down. Slide and hold the MultiBay release latch 1 as you pull the battery pack 2 from the MultiBay. Ä CAUTION: To prevent damage to protect the bay opening. The weight saver can be inserted or removed while the notebook is on, off, in Standby, or in the MultiBay, insert the weight saver to the MultiBay when no device is in Hibernation. 3-6 Hardware Guide
Battery Packs To remove a battery pack, turn the notebook upside down. Slide and hold the MultiBay release latch 1 as you pull the battery pack 2 from the MultiBay. Ä CAUTION: To prevent damage to protect the bay opening. The weight saver can be inserted or removed while the notebook is on, off, in Standby, or in the MultiBay, insert the weight saver to the MultiBay when no device is in Hibernation. 3-6 Hardware Guide
Hardware Guide
Page 56
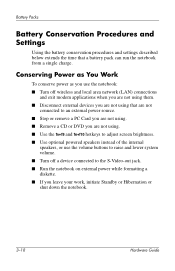
... Procedures and Settings Using the battery conservation procedures and settings described below extends the time that are not connected to an external power source. ■ Stop or remove a PC Card you are not using. ■ Remove a CD or DVD you are not using. ■ Use the fn+f9 and fn+f10 hotkeys to adjust... speakers, or use the volume buttons to raise and lower system volume. ■ Turn off a device connected to the S-Video-out jack. ■ Run the notebook on external power while formatting a diskette. ■ If you leave your work, initiate Standby or Hibernation or shut down the...
... Procedures and Settings Using the battery conservation procedures and settings described below extends the time that are not connected to an external power source. ■ Stop or remove a PC Card you are not using. ■ Remove a CD or DVD you are not using. ■ Use the fn+f9 and fn+f10 hotkeys to adjust... speakers, or use the volume buttons to raise and lower system volume. ■ Turn off a device connected to the S-Video-out jack. ■ Run the notebook on external power while formatting a diskette. ■ If you leave your work, initiate Standby or Hibernation or shut down the...
Hardware Guide
Page 58
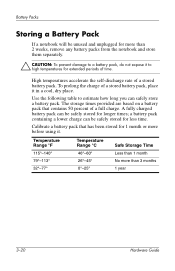
.... High temperatures accelerate the self-discharge rate of a full charge. The storage times provided are based on a battery pack that has been stored for 1 month or more before using it in a cool, dry place. Temperature Range °F Temperature Range °...No more than 2 weeks, remove any battery packs from the notebook and store them separately. Ä CAUTION: To prevent damage to a battery pack, do not expose it to estimate how long you can safely store a battery pack. To prolong the charge of time. Battery Packs Storing a Battery Pack If a notebook will be unused and unplugged ...
.... High temperatures accelerate the self-discharge rate of a full charge. The storage times provided are based on a battery pack that has been stored for 1 month or more before using it in a cool, dry place. Temperature Range °F Temperature Range °...No more than 2 weeks, remove any battery packs from the notebook and store them separately. Ä CAUTION: To prevent damage to a battery pack, do not expose it to estimate how long you can safely store a battery pack. To prolong the charge of time. Battery Packs Storing a Battery Pack If a notebook will be unused and unplugged ...
Hardware Guide
Page 62
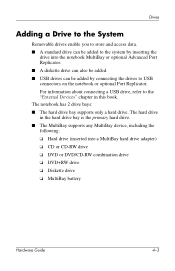
The notebook has 2 drive bays: ■ The hard drive bay supports only a hard drive. Drives Adding a Drive to the System Removable drives enable you to store and access data. ■ A standard drive can be added to the system by inserting the drive into a MultiBay ...❏ DVD or DVD/CD-RW combination drive ❏ DVD+RW drive ❏ Diskette drive ❏ MultiBay battery Hardware Guide 4-3 For information about connecting a USB drive, refer to USB connectors on the notebook or optional Port Replicator. The hard drive in the hard drive bay is the primary hard drive. ■...
The notebook has 2 drive bays: ■ The hard drive bay supports only a hard drive. Drives Adding a Drive to the System Removable drives enable you to store and access data. ■ A standard drive can be added to the system by inserting the drive into a MultiBay ...❏ DVD or DVD/CD-RW combination drive ❏ DVD+RW drive ❏ Diskette drive ❏ MultiBay battery Hardware Guide 4-3 For information about connecting a USB drive, refer to USB connectors on the notebook or optional Port Replicator. The hard drive in the hard drive bay is the primary hard drive. ■...
Hardware Guide
Page 100
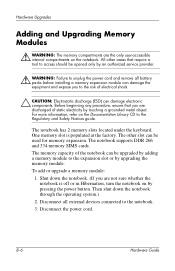
...upgrade a memory module: 1. Disconnect all battery packs before installing a memory expansion module can damage the equipment and expose you are the only user-accessible internal compartments on the notebook. One memory slot is off or in Hibernation, turn the notebook on by an authorized service provider. ...Å WARNING: Failure to unplug the power cord and remove all external devices connected to the Regulatory and Safety...
...upgrade a memory module: 1. Disconnect all battery packs before installing a memory expansion module can damage the equipment and expose you are the only user-accessible internal compartments on the notebook. One memory slot is off or in Hibernation, turn the notebook on by an authorized service provider. ...Å WARNING: Failure to unplug the power cord and remove all external devices connected to the Regulatory and Safety...
Hardware Guide
Page 101
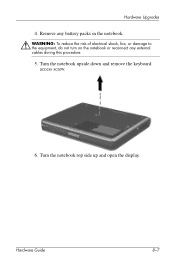
Turn the notebook top side up and open the display. Hardware Guide 8-7 Hardware Upgrades 4. Turn the notebook upside down and remove the keyboard access screw. 6. Remove any battery packs in the notebook. Å WARNING: To reduce the risk of electrical shock, fire, or damage to the equipment, do not turn on the notebook or reconnect any external cables during this procedure. 5.
Turn the notebook top side up and open the display. Hardware Guide 8-7 Hardware Upgrades 4. Turn the notebook upside down and remove the keyboard access screw. 6. Remove any battery packs in the notebook. Å WARNING: To reduce the risk of electrical shock, fire, or damage to the equipment, do not turn on the notebook or reconnect any external cables during this procedure. 5.
Hardware Guide
Page 110
... 6-3 Aircraft Power Adapter 1-12 connecting 3-13 tasks supported by 3-7 B battery bay device supported 3-2 inserting battery pack into 3-3 removing battery pack 3-3 battery bay, primary 1-8 battery charge information displays hotkey 2-6, 2-8 in Windows 3-9 increasing accuracy of 3-9 interpreting 3-10 battery light 1-6 battery packs calibrating 3-14 charging 3-7 discharge sequence 3-8 disposing of 3-21 inserting/removing primary 3-3 monitoring charge in MultiBay 4-18 Hardware Guide Index-1 Index...
... 6-3 Aircraft Power Adapter 1-12 connecting 3-13 tasks supported by 3-7 B battery bay device supported 3-2 inserting battery pack into 3-3 removing battery pack 3-3 battery bay, primary 1-8 battery charge information displays hotkey 2-6, 2-8 in Windows 3-9 increasing accuracy of 3-9 interpreting 3-10 battery light 1-6 battery packs calibrating 3-14 charging 3-7 discharge sequence 3-8 disposing of 3-21 inserting/removing primary 3-3 monitoring charge in MultiBay 4-18 Hardware Guide Index-1 Index...
Hardware Guide
Page 111
... also battery power battery power conserving 3-18 low-battery conditions 3-12, 3-13 running notebook on 3-1 switching to and from 3-1 See also battery packs bay(s) hard drive 1-15 primary battery 1-8 bay. hard drive bay; Bluetooth 1-10, 2-11 brightness, display 2-6 button(s) mute 2-11 PC Card ... network 6-4 security 7-5 calibration, battery 3-14 camcorder 5-4 cap, replacing pointing stick 2-3 caps lock light 1-5 CD displaying contents of 4-12 inserting 4-9 removing 4-10, 4-11 CD drive inserting CD into 4-9 inserting into MultiBay 4-17 locations supported 4-3 removing CD 4-10, 4-11 See also...
... also battery power battery power conserving 3-18 low-battery conditions 3-12, 3-13 running notebook on 3-1 switching to and from 3-1 See also battery packs bay(s) hard drive 1-15 primary battery 1-8 bay. hard drive bay; Bluetooth 1-10, 2-11 brightness, display 2-6 button(s) mute 2-11 PC Card ... network 6-4 security 7-5 calibration, battery 3-14 camcorder 5-4 cap, replacing pointing stick 2-3 caps lock light 1-5 CD displaying contents of 4-12 inserting 4-9 removing 4-10, 4-11 CD drive inserting CD into 4-9 inserting into MultiBay 4-17 locations supported 4-3 removing CD 4-10, 4-11 See also...
Hardware Guide
Page 112
... disk drive. See diskette drive fn key 1-3, 2-9 function keys 1-3 Hardware Guide Index-3 Index country-specific modem adapter 6-3 critical low-battery condition identifying 3-12 restoring from 2-6, 7-2 docking connector 1-14 drive(s) adding 4-3 affected by airport security 4-2 caring for 4-1 MultiBay 1-...10 optical disc 1-7 primary hard drive 1-15 replacing with weight saver 4-18 shipping 4-2 DVD displaying contents of 4-12 inserting 4-9 removing 4-10, 4-11 DVD drive inserting DVD 4-9 inserting into MultiBay 4-17 locations supported 4-3 See also drives display brightness 2-8 switching...
... disk drive. See diskette drive fn key 1-3, 2-9 function keys 1-3 Hardware Guide Index-3 Index country-specific modem adapter 6-3 critical low-battery condition identifying 3-12 restoring from 2-6, 7-2 docking connector 1-14 drive(s) adding 4-3 affected by airport security 4-2 caring for 4-1 MultiBay 1-...10 optical disc 1-7 primary hard drive 1-15 replacing with weight saver 4-18 shipping 4-2 DVD displaying contents of 4-12 inserting 4-9 removing 4-10, 4-11 DVD drive inserting DVD 4-9 inserting into MultiBay 4-17 locations supported 4-3 See also drives display brightness 2-8 switching...
Hardware Guide
Page 113
... screw 4-5 See also drives hard drive bay device 4-3 headphone jack 1-10 headphones, headset connecting 5-2 stereo speaker/headphone (line-out) jack 5-1 Hibernation and critical low-battery condition 3-12 and removing a hard drive 4-5 exiting 1-2, 3-13 file space requirements for 8-12 initiating 2-7 hotkeys defined 2-5 shortcut reference to commands 2-6 with external keyboards 2-9 hub, USB 7-3 I increasing RAM...
... screw 4-5 See also drives hard drive bay device 4-3 headphone jack 1-10 headphones, headset connecting 5-2 stereo speaker/headphone (line-out) jack 5-1 Hibernation and critical low-battery condition 3-12 and removing a hard drive 4-5 exiting 1-2, 3-13 file space requirements for 8-12 initiating 2-7 hotkeys defined 2-5 shortcut reference to commands 2-6 with external keyboards 2-9 hub, USB 7-3 I increasing RAM...

Hardware Guide
Page 114
...lock 1-5 hard drive activity 4-4 MultiBay 1-6 num lock 1-5 power/Standby 1-5 scroll lock 1-5 Wireless On/Off 1-5 location numbers in battery charge information displays 3-10 lock, security cable 7-5 low-battery conditions 3-12, 3-13 M memory adding memory expansion board 8-6 expansion compartment 8-6 primary slot 8-6 memory compartment, primary 1-4 microphone ... external connecting 7-1 using with other video devices 5-4 mouse, external 2-4 MultiBay 1-10 devices supported 3-2, 4-3 inserting battery pack 3-5 inserting drive 4-17 removing battery pack 3-5 MultiBay battery pack, defined 3-2 See also...
...lock 1-5 hard drive activity 4-4 MultiBay 1-6 num lock 1-5 power/Standby 1-5 scroll lock 1-5 Wireless On/Off 1-5 location numbers in battery charge information displays 3-10 lock, security cable 7-5 low-battery conditions 3-12, 3-13 M memory adding memory expansion board 8-6 expansion compartment 8-6 primary slot 8-6 memory compartment, primary 1-4 microphone ... external connecting 7-1 using with other video devices 5-4 mouse, external 2-4 MultiBay 1-10 devices supported 3-2, 4-3 inserting battery pack 3-5 inserting drive 4-17 removing battery pack 3-5 MultiBay battery pack, defined 3-2 See also...
Hardware Guide
Page 115
...display to or from 2-6, 7-2 using with other video devices 5-4 P parallel connector, identifying 1-12 PC Card eject button 8-3 inserting 8-2 slot 1-9 stopping and removing 8-3 types 8-1 using 8-1 zoomed video 8-1 peripherals, connecting and disconnecting 7-1 pointing device preferences 2-4 ...pointing stick buttons 2-1 cap, replacing 2-3 location 2-1 using 2-3 Port Replicator 2-4 port, infrared 1-9, 6-5 power switching between AC and battery 3-1 See also battery ...
...display to or from 2-6, 7-2 using with other video devices 5-4 P parallel connector, identifying 1-12 PC Card eject button 8-3 inserting 8-2 slot 1-9 stopping and removing 8-3 types 8-1 using 8-1 zoomed video 8-1 peripherals, connecting and disconnecting 7-1 pointing device preferences 2-4 ...pointing stick buttons 2-1 cap, replacing 2-3 location 2-1 using 2-3 Port Replicator 2-4 port, infrared 1-9, 6-5 power switching between AC and battery 3-1 See also battery ...


