
Wireless Setup Guide
Page 4
...accessing a Web site. 5 Connect and configure any additional wireless-enabled computers or other devices, including wired devices, that correspond with wireless notebooks and wired desktop PROGRESS CHECK If you 're working, select Start > Connect To > Wireless Network Connection. (The Wireless Network Connection ... is successful.) PROGRESS CHECK After step 1, the blue wireless light turns on. 1 Press the wireless on/off button on the screen. Important: If you lose your wireless connection while you successfully complete step 6, all computers on the taskbar when the reconnection is ...
...accessing a Web site. 5 Connect and configure any additional wireless-enabled computers or other devices, including wired devices, that correspond with wireless notebooks and wired desktop PROGRESS CHECK If you 're working, select Start > Connect To > Wireless Network Connection. (The Wireless Network Connection ... is successful.) PROGRESS CHECK After step 1, the blue wireless light turns on. 1 Press the wireless on/off button on the screen. Important: If you lose your wireless connection while you successfully complete step 6, all computers on the taskbar when the reconnection is ...

HP USB Digital Drive
Page 9
A dialog box displays a list of connected devices. 2. Select the Digital Drive and wait until the "Safe to remove the Digital Drive when the status light on its track for safe storage. 8 User Guide Select the "Safely Remove Hardware" icon on your taskbar. Gently unplug the Digital Drive from the USB port. ✎ If the USB connector cable is in the extended position, return it on the Digital Drive is flashing. 1. Disconnecting the Digital Drive ✎ Do not attempt to Remove Hardware" message appears on your screen. 3.
A dialog box displays a list of connected devices. 2. Select the Digital Drive and wait until the "Safe to remove the Digital Drive when the status light on its track for safe storage. 8 User Guide Select the "Safely Remove Hardware" icon on your taskbar. Gently unplug the Digital Drive from the USB port. ✎ If the USB connector cable is in the extended position, return it on the Digital Drive is flashing. 1. Disconnecting the Digital Drive ✎ Do not attempt to Remove Hardware" message appears on your screen. 3.

Backup and Recovery - Windows 7
Page 6
... will need high-quality DVD-R, DVD+R, BD-R (writable Blu-ray), or CD-R discs. Select Start > All Programs > Recovery Manager > Recovery Disc Creation. 2. Follow the on-screen instructions. 2 Chapter 2 Creating recovery discs Create these discs after setting up to continue the disc creation process. The next time you open Recovery Manager, you...
... will need high-quality DVD-R, DVD+R, BD-R (writable Blu-ray), or CD-R discs. Select Start > All Programs > Recovery Manager > Recovery Disc Creation. 2. Follow the on-screen instructions. 2 Chapter 2 Creating recovery discs Create these discs after setting up to continue the disc creation process. The next time you open Recovery Manager, you...

Backup and Recovery - Windows 7
Page 7
...or modify hardware or software Note the following types of discs (purchased separately): CD-R, CD-RW, DVD+R, DVD-R, or DVD±RW. The screen shot can back up your information to an optional external hard drive, a network drive, or discs. ● When backing up to reset your... feature, and periodically copy them for backup reduces the number of recovery discs required. ● When backing up to maintain a reasonably current backup. Display the screen. 2. Open a word-processing document, and then select Edit > Paste. 4. Save the document. ● You can be a time-saver if you have...
...or modify hardware or software Note the following types of discs (purchased separately): CD-R, CD-RW, DVD+R, DVD-R, or DVD±RW. The screen shot can back up your information to an optional external hard drive, a network drive, or discs. ● When backing up to reset your... feature, and periodically copy them for backup reduces the number of recovery discs required. ● When backing up to maintain a reasonably current backup. Display the screen. 2. Open a word-processing document, and then select Edit > Paste. 4. Save the document. ● You can be a time-saver if you have...
Backup and Recovery - Windows 7
Page 8
You may take over an hour, depending on -screen instructions to AC power before you start the backup process. Refer to improve the security of the computer. 1. NOTE: The backup process may be prompted ...
You may take over an hour, depending on -screen instructions to AC power before you start the backup process. Refer to improve the security of the computer. 1. NOTE: The backup process may be prompted ...

Backup and Recovery - Windows 7
Page 9
...drive at a previous date and time), when the computer was functioning optimally, follow these steps: 1. Create a system restore point 1. Follow the on -screen instructions. Select Start > Control Panel > System and Security > System. 2. Click Create. 6. NOTE: Recovering to a restore point (created at a specific... Under Protection Settings, select the disk for your system files and settings. Click the System Protection tab. 4. Follow the on -screen instructions. A system restore point allows you to your system, you can then recover back to that point if you want to create ...
...drive at a previous date and time), when the computer was functioning optimally, follow these steps: 1. Create a system restore point 1. Follow the on -screen instructions. Select Start > Control Panel > System and Security > System. 2. Click Create. 6. NOTE: Recovering to a restore point (created at a specific... Under Protection Settings, select the disk for your system files and settings. Click the System Protection tab. 4. Follow the on -screen instructions. A system restore point allows you to your system, you can then recover back to that point if you want to create ...

Backup and Recovery - Windows 7
Page 10
... computer. 3. Use these features, try them before using Recovery Manager. Recovery Manager works from recovery discs or from a dedicated recovery partition (select models only) on -screen instructions. 6 Chapter 4 Performing a recovery 4 Performing a recovery NOTE: You can recover only files that you have been included with this computer must be downloaded from the...
... computer. 3. Use these features, try them before using Recovery Manager. Recovery Manager works from recovery discs or from a dedicated recovery partition (select models only) on -screen instructions. 6 Chapter 4 Performing a recovery 4 Performing a recovery NOTE: You can recover only files that you have been included with this computer must be downloaded from the...

Backup and Recovery - Windows 7
Page 11
... in the Recovery Manager window. 3. Click System Recovery in either the Start button or f11. To restore the system from the partition on the screen. 2. Recovering from the dedicated recovery partition (select models only) 7 Use these steps: 1. Follow the on or restart the computer, and then... press esc while the "Press the ESC key for Startup Menu" message is displayed on the hard drive, accessed by pressing either of the screen. Then, press f11 while the "Press for computers that do not have a recovery partition, you can perform a recovery from the partition,...
... in the Recovery Manager window. 3. Click System Recovery in either the Start button or f11. To restore the system from the partition on the screen. 2. Recovering from the dedicated recovery partition (select models only) 7 Use these steps: 1. Follow the on or restart the computer, and then... press esc while the "Press the ESC key for Startup Menu" message is displayed on the hard drive, accessed by pressing either of the screen. Then, press f11 while the "Press for computers that do not have a recovery partition, you can perform a recovery from the partition,...

Drives - Windows 7
Page 11
... writing to burn data and audio files, including MP3 and WAV music files. Copying a CD or DVD 1. Click Copy at the bottom right of the screen. 4. Refer to the manufacturer's instructions that came with CyberLink Power2Go. ● Because some home and car stereos will not play CD-RWs, use software such...
... writing to burn data and audio files, including MP3 and WAV music files. Copying a CD or DVD 1. Click Copy at the bottom right of the screen. 4. Refer to the manufacturer's instructions that came with CyberLink Power2Go. ● Because some home and car stereos will not play CD-RWs, use software such...

Drives - Windows 7
Page 13
... Help and Support for your hard drive at any time. Select Start > All Programs > Accessories > System Tools > Disk Defragmenter. 2. Click Defragment disk. Follow the on-screen instructions.
... Help and Support for your hard drive at any time. Select Start > All Programs > Accessories > System Tools > Disk Defragmenter. 2. Click Defragment disk. Follow the on-screen instructions.

Drives - Windows 7
Page 19
... system color properties to the outer edge. ● Check the disc for scratches. Right-click anywhere on the desktop except an icon, and then select Screen resolution. 2. Wipe from the center of the disc to 16-bit color, as follows: 1. If this setting is not already selected. 4. Click OK. If you...
... system color properties to the outer edge. ● Check the disc for scratches. Right-click anywhere on the desktop except an icon, and then select Screen resolution. 2. Wipe from the center of the disc to 16-bit color, as follows: 1. If this setting is not already selected. 4. Click OK. If you...

Drives - Windows 7
Page 22
When prompted, click Save and then select a storage location on -screen instructions. 18 Chapter 5 Troubleshooting NOTE: If you have not previously set up Windows Update, you will be set to your hardware drivers, as well as ...
When prompted, click Save and then select a storage location on -screen instructions. 18 Chapter 5 Troubleshooting NOTE: If you have not previously set up Windows Update, you will be set to your hardware drivers, as well as ...

Notebook Tour - Windows 7
Page 8
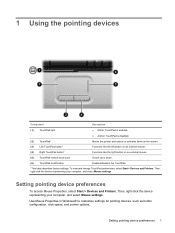
... Component Description (1) TouchPad light ● White: TouchPad is enabled. ● Amber: TouchPad is disabled. (2) TouchPad* Moves the pointer and selects or activates items on the screen. (3) Left TouchPad button* Functions like the left button on an external mouse. (4) Right TouchPad button* Functions like the right button on an external mouse. (5) TouchPad...
... Component Description (1) TouchPad light ● White: TouchPad is enabled. ● Amber: TouchPad is disabled. (2) TouchPad* Moves the pointer and selects or activates items on the screen. (3) Left TouchPad button* Functions like the left button on an external mouse. (4) Right TouchPad button* Functions like the right button on an external mouse. (5) TouchPad...

Notebook Tour - Windows 7
Page 18
... additional cleaning, use premoistened antistatic wipes or an antistatic screen cleaner. CAUTION: To prevent permanent damage to the computer, never spray water, cleaning fluids, or chemicals on the power button is visible only when the ...
... additional cleaning, use premoistened antistatic wipes or an antistatic screen cleaner. CAUTION: To prevent permanent damage to the computer, never spray water, cleaning fluids, or chemicals on the power button is visible only when the ...
Pointing Devices and Keyboard - Windows 7
Page 3
... Support (fn+f1 4 Opening the Print Options window (fn+f2 4 Opening a Web browser (fn+f3 5 Switching the screen image (fn+f4 5 Initiating Sleep (fn+f5) ...6 Initiating QuickLock (fn+f6 6 Decreasing screen brightness (fn+f7 6 Increasing screen brightness (fn+f8 6 Playing, pausing or resuming an audio CD or a DVD (fn+f9 6 Stopping an audio...
... Support (fn+f1 4 Opening the Print Options window (fn+f2 4 Opening a Web browser (fn+f3 5 Switching the screen image (fn+f4 5 Initiating Sleep (fn+f5) ...6 Initiating QuickLock (fn+f6 6 Decreasing screen brightness (fn+f7 6 Increasing screen brightness (fn+f8 6 Playing, pausing or resuming an audio CD or a DVD (fn+f9 6 Stopping an audio...
Pointing Devices and Keyboard - Windows 7
Page 5
... Component Description (1) TouchPad light ● White: TouchPad is enabled. ● Amber: TouchPad is disabled. (2) TouchPad* Moves the pointer and selects or activates items on the screen. (3) Left TouchPad button* Functions like the left button on an external mouse. (4) Right TouchPad button* Functions like the right button on an external mouse. (5) TouchPad...
... Component Description (1) TouchPad light ● White: TouchPad is enabled. ● Amber: TouchPad is disabled. (2) TouchPad* Moves the pointer and selects or activates items on the screen. (3) Left TouchPad button* Functions like the left button on an external mouse. (4) Right TouchPad button* Functions like the right button on an external mouse. (5) TouchPad...
Pointing Devices and Keyboard - Windows 7
Page 7
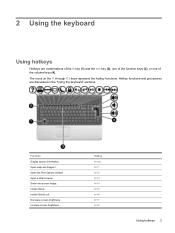
... key (1) and the esc key (2), one of the function keys (3), or one of the volume keys (4). Open the Print Options window. Switch the screen image. Initiate Sleep. Decrease screen brightness. Hotkey fn+esc fn+f1 fn+f2 fn+f3 fn+f4 fn+f5 fn+f6 fn+f7 fn+f8 Using hotkeys 3 Open... represent the hotkey functions. Initiate QuickLock. 2 Using the keyboard Using hotkeys Hotkeys are discussed in the "Using the keyboard" sections. Function Display system information. Increase screen brightness.
... key (1) and the esc key (2), one of the function keys (3), or one of the volume keys (4). Open the Print Options window. Switch the screen image. Initiate Sleep. Decrease screen brightness. Hotkey fn+esc fn+f1 fn+f2 fn+f3 fn+f4 fn+f5 fn+f6 fn+f7 fn+f8 Using hotkeys 3 Open... represent the hotkey functions. Initiate QuickLock. 2 Using the keyboard Using hotkeys Hotkeys are discussed in the "Using the keyboard" sections. Function Display system information. Increase screen brightness.

Pointing Devices and Keyboard - Windows 7
Page 9
For example, if a monitor is connected to the computer, pressing fn+f4 alternates the screen image from the computer using the external VGA video standard. The following video transmission types, with examples of devices that use them, are supported ... monitors) ● HDMI (televisions, camcorders, DVD players, VCRs, and video capture cards with HDMI ports) Using hotkeys 5 Switching the screen image (fn+f4) Press fn+f4 to switch the screen image among other devices receiving video information from the computer. After you can also alternate images among display devices connected to...
For example, if a monitor is connected to the computer, pressing fn+f4 alternates the screen image from the computer using the external VGA video standard. The following video transmission types, with examples of devices that use them, are supported ... monitors) ● HDMI (televisions, camcorders, DVD players, VCRs, and video capture cards with HDMI ports) Using hotkeys 5 Switching the screen image (fn+f4) Press fn+f4 to switch the screen image among other devices receiving video information from the computer. After you can also alternate images among display devices connected to...

Pointing Devices and Keyboard - Windows 7
Page 10
... 2 Using the keyboard Initiating QuickLock (fn+f6) Press fn+f6 to initiate Hibernation instead of Sleep. While the computer is saved to decrease screen brightness. The function of the fn+f5 hotkey can initiate Sleep. For example, you can be accessed until a Windows user password or a .... Initiating Sleep (fn+f5) CAUTION: To reduce the risk of information loss, save your information is stored in system memory, the screen is cleared, and power is conserved. Press fn+f5 to increase the brightness level incrementally. When Sleep is initiated, your work before ...
... 2 Using the keyboard Initiating QuickLock (fn+f6) Press fn+f6 to initiate Hibernation instead of Sleep. While the computer is saved to decrease screen brightness. The function of the fn+f5 hotkey can initiate Sleep. For example, you can be accessed until a Windows user password or a .... Initiating Sleep (fn+f5) CAUTION: To reduce the risk of information loss, save your information is stored in system memory, the screen is cleared, and power is conserved. Press fn+f5 to increase the brightness level incrementally. When Sleep is initiated, your work before ...
Pointing Devices and Keyboard - Windows 7
Page 14
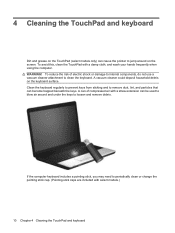
... shock or damage to internal components, do not use a vacuum cleaner attachment to clean the keyboard. WARNING! A vacuum cleaner could deposit household debris on the screen. Clean the keyboard regularly to prevent keys from sticking and to remove dust, lint, and particles that can be used to periodically clean or change...
... shock or damage to internal components, do not use a vacuum cleaner attachment to clean the keyboard. WARNING! A vacuum cleaner could deposit household debris on the screen. Clean the keyboard regularly to prevent keys from sticking and to remove dust, lint, and particles that can be used to periodically clean or change...


