
Setup Utility - Windows Vista and Windows 7
Page 10
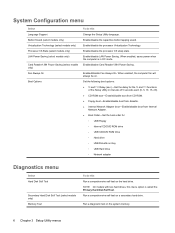
... boot―Enable/disable boot from CD-ROM. ● Floppy boot―Enable/disable boot from diskette. ● Internal Network Adapter boot―Enable/disable boot from Internal Network Adapter. ● Boot Order―Set the boot order for: ◦ USB Floppy ◦ Internal CD/DVD ROM drive ◦...; USB CD/DVD ROM drive ◦ Hard drive ◦ USB Diskette on Key ◦ USB Hard drive ◦ Network adapter Diagnostics menu Select Hard Disk Self Test Secondary Hard Disk Self Test (select models only) Memory Test To do this Change the Setup Utility language...
... boot―Enable/disable boot from CD-ROM. ● Floppy boot―Enable/disable boot from diskette. ● Internal Network Adapter boot―Enable/disable boot from Internal Network Adapter. ● Boot Order―Set the boot order for: ◦ USB Floppy ◦ Internal CD/DVD ROM drive ◦...; USB CD/DVD ROM drive ◦ Hard drive ◦ USB Diskette on Key ◦ USB Hard drive ◦ Network adapter Diagnostics menu Select Hard Disk Self Test Secondary Hard Disk Self Test (select models only) Memory Test To do this Change the Setup Utility language...

Software Update - Windows Vista and Windows 7
Page 6
... download. 3. Follow the instructions on or restarting the computer. To exit the Setup Utility, use the arrow keys to reliable external power using the AC adapter. During the download and installation, follow these instructions: Do not disconnect power from the AC outlet. When the Main menu is displayed. 3. Follow the instructions...
... download. 3. Follow the instructions on or restarting the computer. To exit the Setup Utility, use the arrow keys to reliable external power using the AC adapter. During the download and installation, follow these instructions: Do not disconnect power from the AC outlet. When the Main menu is displayed. 3. Follow the instructions...
Modem and Local Area Network - Windows 7
Page 3
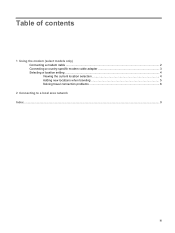
Table of contents 1 Using the modem (select models only) Connecting a modem cable ...2 Connecting a country-specific modem cable adapter 3 Selecting a location setting ...4 Viewing the current location selection 4 Adding new locations when traveling 5 Solving travel connection problems 6 2 Connecting to a local area network Index ...9 iii
Table of contents 1 Using the modem (select models only) Connecting a modem cable ...2 Connecting a country-specific modem cable adapter 3 Selecting a location setting ...4 Viewing the current location selection 4 Adding new locations when traveling 5 Solving travel connection problems 6 2 Connecting to a local area network Index ...9 iii
Modem and Local Area Network - Windows 7
Page 5
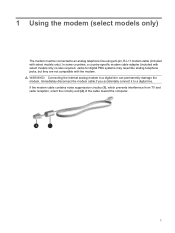
... connect it to an analog telephone line using a 6-pin, RJ-11 modem cable (included with select models only). In some countries, a country-specific modem cable adapter (included with the modem. If the modem cable contains noise suppression circuitry (1), which prevents interference from TV and radio reception, orient the circuitry end (2) of...
... connect it to an analog telephone line using a 6-pin, RJ-11 modem cable (included with select models only). In some countries, a country-specific modem cable adapter (included with the modem. If the modem cable contains noise suppression circuitry (1), which prevents interference from TV and radio reception, orient the circuitry end (2) of...
Modem and Local Area Network - Windows 7
Page 7
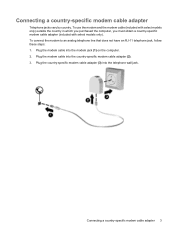
... and the modem cable (included with select models only) outside the country in which you purchased the computer, you must obtain a country-specific modem cable adapter (included with select models only). Plug the modem cable into the modem jack (1) on the computer. 2. To connect the modem to an analog telephone line... that does not have an RJ-11 telephone jack, follow these steps: 1. Connecting a country-specific modem cable adapter 3 Connecting a country-specific modem cable adapter Telephone jacks vary by country.
... and the modem cable (included with select models only) outside the country in which you purchased the computer, you must obtain a country-specific modem cable adapter (included with select models only). Plug the modem cable into the modem jack (1) on the computer. 2. To connect the modem to an analog telephone line... that does not have an RJ-11 telephone jack, follow these steps: 1. Connecting a country-specific modem cable adapter 3 Connecting a country-specific modem cable adapter Telephone jacks vary by country.

Modem and Local Area Network - Windows 7
Page 13
Index C cable LAN 8 modem 2 country-specific modem cable adapter 3 L local area network (LAN) cable required 8 connecting cable 8 M modem cable connecting 2 country-specific cable adapter 3 noise suppression circuitry 1 modem software setting/adding location 4 travel connection problems 6 N network cable connecting 8 noise suppression circuitry 8 noise suppression circuitry modem cable 1 network cable 8 T troubleshooting modem 6 W wireless network (WLAN) 8 Index 9
Index C cable LAN 8 modem 2 country-specific modem cable adapter 3 L local area network (LAN) cable required 8 connecting cable 8 M modem cable connecting 2 country-specific cable adapter 3 noise suppression circuitry 1 modem software setting/adding location 4 travel connection problems 6 N network cable connecting 8 noise suppression circuitry 8 noise suppression circuitry modem cable 1 network cable 8 T troubleshooting modem 6 W wireless network (WLAN) 8 Index 9
Drives - Windows 7
Page 17
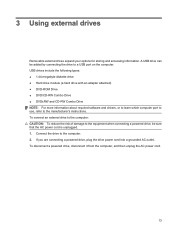
USB drives include the following types: ● 1.44-megabyte diskette drive ● Hard drive module (a hard drive with an adapter attached) ● DVD-ROM Drive ● DVD/CD-RW Combo Drive ● DVD±RW and CD-RW Combo Drive NOTE: For more information about ...
USB drives include the following types: ● 1.44-megabyte diskette drive ● Hard drive module (a hard drive with an adapter attached) ● DVD-ROM Drive ● DVD/CD-RW Combo Drive ● DVD±RW and CD-RW Combo Drive NOTE: For more information about ...

External Media Cards - Windows 7
Page 6
Inserting a digital card CAUTION: To avoid damaging the digital card or the computer, do not insert any type of options may be displayed. 2 Chapter 1 Using Digital Media Slot cards Hold the digital card label-side up, with the connectors facing the computer. 2. You will hear a sound when the device has been detected, and a menu of adapter into the Digital Media Slot, and then push in on the card until it is firmly seated. CAUTION: To prevent damage to the digital card connectors, use minimal force to insert a digital card. 1. Insert the card into the Digital Media Slot.
Inserting a digital card CAUTION: To avoid damaging the digital card or the computer, do not insert any type of options may be displayed. 2 Chapter 1 Using Digital Media Slot cards Hold the digital card label-side up, with the connectors facing the computer. 2. You will hear a sound when the device has been detected, and a menu of adapter into the Digital Media Slot, and then push in on the card until it is firmly seated. CAUTION: To prevent damage to the digital card connectors, use minimal force to insert a digital card. 1. Insert the card into the Digital Media Slot.

Notebook Tour - Windows 7
Page 3
Use the computer only on your lap or obstruct the computer air vents. The computer and the AC adapter comply with the user-accessible surface temperature limits defined by the International Standard for Safety of overheating the computer, do not allow another hard surface, ... or rugs or clothing, to contact the skin or a soft surface, such as pillows or rugs or clothing, during operation. Do not allow the AC adapter to block airflow. iii Safety warning notice WARNING! Also, do not place the computer directly on a hard, flat surface. To reduce the possibility of heat...
Use the computer only on your lap or obstruct the computer air vents. The computer and the AC adapter comply with the user-accessible surface temperature limits defined by the International Standard for Safety of overheating the computer, do not allow another hard surface, ... or rugs or clothing, to contact the skin or a soft surface, such as pillows or rugs or clothing, during operation. Do not allow the AC adapter to block airflow. iii Safety warning notice WARNING! Also, do not place the computer directly on a hard, flat surface. To reduce the possibility of heat...

Notebook Tour - Windows 7
Page 16
... optical drive is normal for the internal fan to cycle on select models, also writes to optical discs. Connect optional USB devices. Connects an AC adapter. 10 Chapter 2 Components Right-side components NOTE: Your computer may look slightly different from the illustration in this section. Reads optical discs and, on and...
... optical drive is normal for the internal fan to cycle on select models, also writes to optical discs. Connect optional USB devices. Connects an AC adapter. 10 Chapter 2 Components Right-side components NOTE: Your computer may look slightly different from the illustration in this section. Reads optical discs and, on and...
Notebook Tour - Windows 7
Page 20
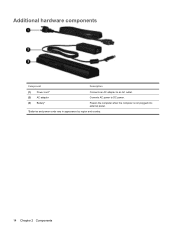
Additional hardware components Component Description (1) Power cord* Connects an AC adapter to an AC outlet. (2) AC adapter Converts AC power to DC power. (3) Battery* Powers the computer when the computer is not plugged into external power. *Batteries and power cords vary in appearance by region and country. 14 Chapter 2 Components
Additional hardware components Component Description (1) Power cord* Connects an AC adapter to an AC outlet. (2) AC adapter Converts AC power to DC power. (3) Battery* Powers the computer when the computer is not plugged into external power. *Batteries and power cords vary in appearance by region and country. 14 Chapter 2 Components
Notebook Tour - Windows 7
Page 23
Index A AC adapter, identifying 14 applications key, Windows 7 audio-in (microphone) jack, identifying 9 audio-out (headphone) jack, identifying 9 B battery bay, identifying 12 battery light, identifying 3, 9 battery release latch, ...
Index A AC adapter, identifying 14 applications key, Windows 7 audio-in (microphone) jack, identifying 9 audio-out (headphone) jack, identifying 9 B battery bay, identifying 12 battery light, identifying 3, 9 battery release latch, ...
Wireless (Select Models Only) - Windows 7
Page 23
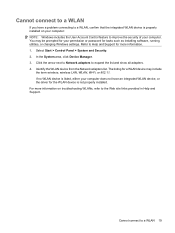
... an integrated WLAN device, or the driver for the WLAN device is properly installed on troubleshooting WLANs, refer to expand the list and show all adapters. 4. Select Start > Control Panel > System and Security. 2. In the System area, click Device Manager. 3. The listing for a WLAN...site links provided in Help and Support. If no WLAN device is listed, either your computer. Identify the WLAN device from the Network adapters list. For more information. 1. Cannot connect to Help and Support for tasks such as installing software, running utilities, or changing Windows ...
... an integrated WLAN device, or the driver for the WLAN device is properly installed on troubleshooting WLANs, refer to expand the list and show all adapters. 4. Select Start > Control Panel > System and Security. 2. In the System area, click Device Manager. 3. The listing for a WLAN...site links provided in Help and Support. If no WLAN device is listed, either your computer. Identify the WLAN device from the Network adapters list. For more information. 1. Cannot connect to Help and Support for tasks such as installing software, running utilities, or changing Windows ...
Power Management - Windows 7
Page 5
... plans ...4 Viewing the current power plan 4 Selecting a different power plan 4 Customizing power plans ...4 Setting password protection on wakeup 5 2 Using external AC power Connecting the AC adapter ...7 3 Using battery power Finding battery information in Help and Support 9 Using Battery Check ...10 Displaying the remaining battery charge 11 Inserting or removing the battery...
... plans ...4 Viewing the current power plan 4 Selecting a different power plan 4 Customizing power plans ...4 Setting password protection on wakeup 5 2 Using external AC power Connecting the AC adapter ...7 3 Using battery power Finding battery information in Help and Support 9 Using Battery Check ...10 Displaying the remaining battery charge 11 Inserting or removing the battery...

Power Management - Windows 7
Page 12
... area changes appearance. To reduce potential safety issues, use only the AC adapter provided with the computer, a replacement AC adapter provided by HP, or a compatible AC adapter purchased from HP. ● Approved AC adapter ● Optional docking device or expansion product Connect the computer to save ...power is supplied through one of the following conditions: WARNING! To increase display brightness, press the fn+f8 hotkey or reconnect the AC adapter. 6 Chapter 2 Using external AC power Do not charge the computer battery while you are onboard aircraft. ● When you are ...
... area changes appearance. To reduce potential safety issues, use only the AC adapter provided with the computer, a replacement AC adapter provided by HP, or a compatible AC adapter purchased from HP. ● Approved AC adapter ● Optional docking device or expansion product Connect the computer to save ...power is supplied through one of the following conditions: WARNING! To increase display brightness, press the fn+f8 hotkey or reconnect the AC adapter. 6 Chapter 2 Using external AC power Do not charge the computer battery while you are onboard aircraft. ● When you are ...

Power Management - Windows 7
Page 13
... from the computer by unplugging the power cord from the AC outlet (not by attaching a 2-pin adapter. If provided with a 3-pin attachment plug on the computer. 2. To connect the computer to the.... Plug the other end of electric shock or damage to external AC power: 1. Plug the AC adapter into the power connector (1) on the power cord, plug the cord into an AC outlet that is an... important safety feature. Connecting the AC adapter 7 Do not disable the power cord grounding pin, for example, by unplugging the power cord from ...
... from the computer by unplugging the power cord from the AC outlet (not by attaching a 2-pin adapter. If provided with a 3-pin attachment plug on the computer. 2. To connect the computer to the.... Plug the other end of electric shock or damage to external AC power: 1. Plug the AC adapter into the power connector (1) on the power cord, plug the cord into an AC outlet that is an... important safety feature. Connecting the AC adapter 7 Do not disable the power cord grounding pin, for example, by unplugging the power cord from ...

Power Management - Windows 7
Page 14
... the computer whenever the computer is plugged into external power, the computer runs on external AC power supplied through the AC adapter, the computer switches to battery power if the AC adapter is disconnected from external power. WARNING! However, a battery in the computer slowly discharges when the computer is off and unplugged... save battery life when you work in case of a power outage. To reduce potential safety issues, use the fn+f8 hotkey or reconnect the AC adapter. When the computer is running on AC power.
... the computer whenever the computer is plugged into external power, the computer runs on external AC power supplied through the AC adapter, the computer switches to battery power if the AC adapter is disconnected from external power. WARNING! However, a battery in the computer slowly discharges when the computer is off and unplugged... save battery life when you work in case of a power outage. To reduce potential safety issues, use the fn+f8 hotkey or reconnect the AC adapter. When the computer is running on AC power.

Power Management - Windows 7
Page 16
Connect the AC adapter to function properly. 2. Using Battery Check Battery Check, a part of the Total Care Advisor, provides information on the status of the examination. 10 Chapter 3 Using battery power Select Start > Help and Support > Troubleshooting tools > Battery Check. To run Battery Check: 1. NOTE: The computer must be connected to external power for Battery Check to the computer. Battery Check examines the battery and its cells to see if they are functioning properly, and then reports the results of the battery installed in the computer.
Connect the AC adapter to function properly. 2. Using Battery Check Battery Check, a part of the Total Care Advisor, provides information on the status of the examination. 10 Chapter 3 Using battery power Select Start > Help and Support > Troubleshooting tools > Battery Check. To run Battery Check: 1. NOTE: The computer must be connected to external power for Battery Check to the computer. Battery Check examines the battery and its cells to see if they are functioning properly, and then reports the results of the battery installed in the computer.

Power Management - Windows 7
Page 19
... not charging. ● Off: The battery is fully charged. ● Allow the battery to discharge below 5 percent of a full charge through an AC adapter, an optional power adapter, an optional expansion product, or an optional docking device. Do not charge the computer battery while you are onboard aircraft. Charging a battery 13 Charging...
... not charging. ● Off: The battery is fully charged. ● Allow the battery to discharge below 5 percent of a full charge through an AC adapter, an optional power adapter, an optional expansion product, or an optional docking device. Do not charge the computer battery while you are onboard aircraft. Charging a battery 13 Charging...

Power Management - Windows 7
Page 22
... and shut down the computer. Resolving a low battery level CAUTION: To reduce the risk of the following devices: ● AC adapter ● Optional expansion product or docking device ● Optional power adapter Resolving a low battery level when a charged battery is available 1. Resolving a low battery level when no power source is available ▲...
... and shut down the computer. Resolving a low battery level CAUTION: To reduce the risk of the following devices: ● AC adapter ● Optional expansion product or docking device ● Optional power adapter Resolving a low battery level when a charged battery is available 1. Resolving a low battery level when no power source is available ▲...


