

HP Mini and Compaq Mini Getting Started - Windows 7
Page 6
... Removing the battery ...30 Removing or replacing the vanity cover 31 Removing the vanity cover 31 Replacing the vanity cover 31 Replacing the hard drive ...33 Removing the hard drive ...33 Installing a hard drive ...33 Replacing the memory module ...34 Updating programs and drivers ...37 Routine care ...37 Cleaning the display ...37 Cleaning the TouchPad and...
... Removing the battery ...30 Removing or replacing the vanity cover 31 Removing the vanity cover 31 Replacing the vanity cover 31 Replacing the hard drive ...33 Removing the hard drive ...33 Installing a hard drive ...33 Replacing the memory module ...34 Updating programs and drivers ...37 Routine care ...37 Cleaning the display ...37 Cleaning the TouchPad and...

HP Mini and Compaq Mini Getting Started - Windows 7
Page 17
...internal components. It is normal for the internal fan to cycle on and off during routine operation. ● Blinking white: The hard drive is connected to the jack, the computer speakers are disabled. Connects optional powered stereo speakers, headphones, earbuds, a headset, or ...is fully charged. Connects an optional USB device. Left side Component (1) Power connector (2) AC/battery light (3) External monitor port (4) Vent (5) Drive light (6) USB port (7) Audio-out (headphone) jack/Audio-in (microphone) jack Description Connects an AC adapter. ● Off: The computer ...
...internal components. It is normal for the internal fan to cycle on and off during routine operation. ● Blinking white: The hard drive is connected to the jack, the computer speakers are disabled. Connects optional powered stereo speakers, headphones, earbuds, a headset, or ...is fully charged. Connects an optional USB device. Left side Component (1) Power connector (2) AC/battery light (3) External monitor port (4) Vent (5) Drive light (6) USB port (7) Audio-out (headphone) jack/Audio-in (microphone) jack Description Connects an AC adapter. ● Off: The computer ...

HP Mini and Compaq Mini Getting Started - Windows 7
Page 23
...the Network dialog box. Use the Settings panel to safely remove the device. Identifying the QuickWeb notification icons Icon Function When a USB drive is connected. Click the USB icon to open the File Manager window. Indicates that the network is disconnected. Indicates that the network...Launches Photo Viewer. Supports .jpg, .png, .gif, .tiff, and .raw formats (select .raw formats only). Browse photos stored on your hard drive or external drive. Select and play music stored on your hard drive, external drives, or external media. Icon Function Launches Music Player.
...the Network dialog box. Use the Settings panel to safely remove the device. Identifying the QuickWeb notification icons Icon Function When a USB drive is connected. Click the USB icon to open the File Manager window. Indicates that the network is disconnected. Indicates that the network...Launches Photo Viewer. Supports .jpg, .png, .gif, .tiff, and .raw formats (select .raw formats only). Browse photos stored on your hard drive or external drive. Select and play music stored on your hard drive, external drives, or external media. Icon Function Launches Music Player.

HP Mini and Compaq Mini Getting Started - Windows 7
Page 36
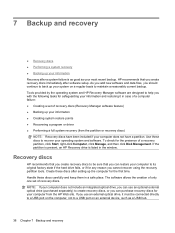
6 Maintenance ● Replacing the battery ● Removing or replacing the vanity cover ● Replacing the hard drive ● Replacing the memory module ● Updating programs and drivers ● Routine care 28 Chapter 6 Maintenance
6 Maintenance ● Replacing the battery ● Removing or replacing the vanity cover ● Replacing the hard drive ● Replacing the memory module ● Updating programs and drivers ● Routine care 28 Chapter 6 Maintenance
HP Mini and Compaq Mini Getting Started - Windows 7
Page 39
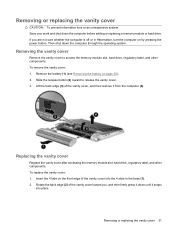
To remove the vanity cover: 1. Slide the release button (2) inward to access the memory module slot, hard drive, regulatory label, and other components. Replacing the vanity cover Replace the vanity cover after accessing the memory module slot, hard drive, regulatory label, and other components. Rotate the back edge (2) of the vanity cover toward you are... cover CAUTION: To prevent information loss or an unresponsive system: Save your work and shut down the computer before adding or replacing a memory module or hard drive.
To remove the vanity cover: 1. Slide the release button (2) inward to access the memory module slot, hard drive, regulatory label, and other components. Replacing the vanity cover Replace the vanity cover after accessing the memory module slot, hard drive, regulatory label, and other components. Rotate the back edge (2) of the vanity cover toward you are... cover CAUTION: To prevent information loss or an unresponsive system: Save your work and shut down the computer before adding or replacing a memory module or hard drive.

HP Mini and Compaq Mini Getting Started - Windows 7
Page 41
... board. 7. Grasp the tab on the hard drive, and lower the hard drive into the cable routing channel. Grasp the tab on the hard drive, and lift the hard drive (3) out of the hard drive bay. Installing a hard drive 1. Replacing the hard drive 33 Replace the 3 hard drive screws (2). 3. Insert the hard drive cable into the hard drive bay (1). 2. Replacing the hard drive Removing the hard drive 1. Remove the 3 hard drive screws (2). 9. Save your work and...
... board. 7. Grasp the tab on the hard drive, and lower the hard drive into the cable routing channel. Grasp the tab on the hard drive, and lift the hard drive (3) out of the hard drive bay. Installing a hard drive 1. Replacing the hard drive 33 Replace the 3 hard drive screws (2). 3. Insert the hard drive cable into the hard drive bay (1). 2. Replacing the hard drive Removing the hard drive 1. Remove the 3 hard drive screws (2). 9. Save your work and...

HP Mini and Compaq Mini Getting Started - Windows 7
Page 42
... the memory module. To replace a memory module: 1. Remove the battery (see Removing the vanity cover on page 31). 3. Turn on the hard drive cable connector (3), and then carefully press the hard drive cable connector onto the system board until it snaps into place. 5. WARNING! Grasp the tab on the computer. CAUTION: Electrostatic discharge (ESD...
... the memory module. To replace a memory module: 1. Remove the battery (see Removing the vanity cover on page 31). 3. Turn on the hard drive cable connector (3), and then carefully press the hard drive cable connector onto the system board until it snaps into place. 5. WARNING! Grasp the tab on the computer. CAUTION: Electrostatic discharge (ESD...
HP Mini and Compaq Mini Getting Started - Windows 7
Page 46
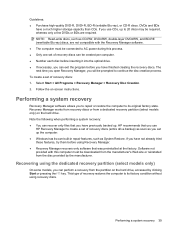
... carefully and keep them in the window. Handle these discs to a USB port on a regular basis to its original factory state if the hard drive fails, or if for your computer from the partition or recovery discs) NOTE: Recovery discs have been included if your computer does not have ... the operating system and HP Recovery Manager software are designed to help you can purchase recovery discs for any reason you use an external optical drive, it in case of a computer failure: ● Creating a set of a recovery partition, click Start, right-click Computer, click Manage, and then click ...
... carefully and keep them in the window. Handle these discs to a USB port on a regular basis to its original factory state if the hard drive fails, or if for your computer from the partition or recovery discs) NOTE: Recovery discs have been included if your computer does not have ... the operating system and HP Recovery Manager software are designed to help you can purchase recovery discs for any reason you use an external optical drive, it in case of a computer failure: ● Creating a set of a recovery partition, click Start, right-click Computer, click Manage, and then click ...
HP Mini and Compaq Mini Getting Started - Windows 7
Page 47
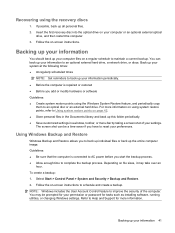
... discs can be downloaded from the manufacturer's Web site or reinstalled from a dedicated recovery partition (select models only) on the hard drive. DVDs and BDs have finished creating the recovery discs. Performing a system recovery Recovery Manager software allows you to repair or restore...to create a set of recovery discs: 1. HP recommends that you use CDs, up . Recovering using recovery discs. Follow the on the hard drive, accessed by the manufacturer. Note the following when performing a system recovery: ● You can perform a recovery from the partition on -screen...
... discs can be downloaded from the manufacturer's Web site or reinstalled from a dedicated recovery partition (select models only) on the hard drive. DVDs and BDs have finished creating the recovery discs. Performing a system recovery Recovery Manager software allows you to repair or restore...to create a set of recovery discs: 1. HP recommends that you use CDs, up . Recovering using recovery discs. Follow the on the hard drive, accessed by the manufacturer. Note the following when performing a system recovery: ● You can perform a recovery from the partition on -screen...
HP Mini and Compaq Mini Getting Started - Windows 7
Page 49
...; Create system restore points using the Windows System Restore feature, and periodically copy them to reset your computer or an optional external optical drive, and then restart the computer. 3. NOTE: Windows includes the User Account Control feature to back up individual files or back up the...discs 1. Guidelines: ● Be sure that the computer is repaired or restored ● Before you have to an optical disc or an external hard drive. If possible, back up your information You should back up this folder periodically. ● Save customized settings in a window, toolbar, or ...
...; Create system restore points using the Windows System Restore feature, and periodically copy them to reset your computer or an optional external optical drive, and then restart the computer. 3. NOTE: Windows includes the User Account Control feature to back up individual files or back up the...discs 1. Guidelines: ● Be sure that the computer is repaired or restored ● Before you have to an optical disc or an external hard drive. If possible, back up your information You should back up this folder periodically. ● Save customized settings in a window, toolbar, or ...

HP Mini and Compaq Mini Getting Started - Windows 7
Page 50
... optimally NOTE: If you revert to a restore point and then change your mind, you can create additional restore points to provide increased protection for your hard drive at a previous date and time), when the computer was functioning optimally, follow these steps: 1. In the left pane, click System Protection. 3. In the left pane...
... optimally NOTE: If you revert to a restore point and then change your mind, you can create additional restore points to provide increased protection for your hard drive at a previous date and time), when the computer was functioning optimally, follow these steps: 1. In the left pane, click System Protection. 3. In the left pane...
HP Mini and Compaq Mini Getting Started - Windows 7
Page 55
...9 drivers and programs, updating 37 E esc key, identifying 6 external monitor, identifying 9 F f11 40 fn key, identifying 6, 21 full system recovery 38 H hard drive installing 33 removing 33 hard drive, replacing 33 headphone (audio-out) jack 9 Help and Support action key 22 hotkeys description 21 C caps lock light, identifying 5 care of the computer 37 Certificate... Authenticity 44 regulatory 44 serial number 44 SIM 44 wireless certification 44 WLAN 44 latch, battery release 11 lights AC/battery light 9 caps lock 5 drive 9 mute 5 power 7 webcam 10 wireless 5 M media controls, keys 22 Index 47
...9 drivers and programs, updating 37 E esc key, identifying 6 external monitor, identifying 9 F f11 40 fn key, identifying 6, 21 full system recovery 38 H hard drive installing 33 removing 33 hard drive, replacing 33 headphone (audio-out) jack 9 Help and Support action key 22 hotkeys description 21 C caps lock light, identifying 5 care of the computer 37 Certificate... Authenticity 44 regulatory 44 serial number 44 SIM 44 wireless certification 44 WLAN 44 latch, battery release 11 lights AC/battery light 9 caps lock 5 drive 9 mute 5 power 7 webcam 10 wireless 5 M media controls, keys 22 Index 47
HP Notebook Reference Guide - Windows 7
Page 7
... a digital card ...29 Removing a digital card ...29 Using PC Cards (select models only 30 Configuring a PC Card ...30 Inserting a PC Card ...30 Removing a PC Card ...32 Using ExpressCards (select models only 32 Configuring an ...Drives ...41 Handling drives ...41 Using hard drives ...41 Improving hard drive performance 41 Using Disk Defragmenter 41 Using Disk Cleanup 42 Using HP ProtectSmart Hard Drive Protection in Windows 7 (select models only 42 Identifying HP ProtectSmart Hard Drive Protection status 43 Managing power with a parked hard drive 43 Using HP ProtectSmart Hard Drive...
... a digital card ...29 Removing a digital card ...29 Using PC Cards (select models only 30 Configuring a PC Card ...30 Inserting a PC Card ...30 Removing a PC Card ...32 Using ExpressCards (select models only 32 Configuring an ...Drives ...41 Handling drives ...41 Using hard drives ...41 Improving hard drive performance 41 Using Disk Defragmenter 41 Using Disk Cleanup 42 Using HP ProtectSmart Hard Drive Protection in Windows 7 (select models only 42 Identifying HP ProtectSmart Hard Drive Protection status 43 Managing power with a parked hard drive 43 Using HP ProtectSmart Hard Drive...
HP Notebook Reference Guide - Windows 7
Page 11
... new computer The following user guides and reference material are provided with your computer, either in print, on the computer hard drive, or on an optical disc or SD Card: ● Quick Setup poster-Guides you through setting up your computer and... Support-Contains information about the operating system, drivers, troubleshooting tools, and technical support. 1 Introduction This guide contains general information about HP and Compaq notebook computers, including connecting to a wireless network, multimedia, power management, security, and so on -screen instructions. ● Safety & Comfort...
... new computer The following user guides and reference material are provided with your computer, either in print, on the computer hard drive, or on an optical disc or SD Card: ● Quick Setup poster-Guides you through setting up your computer and... Support-Contains information about the operating system, drivers, troubleshooting tools, and technical support. 1 Introduction This guide contains general information about HP and Compaq notebook computers, including connecting to a wireless network, multimedia, power management, security, and so on -screen instructions. ● Safety & Comfort...
HP Notebook Reference Guide - Windows 7
Page 31
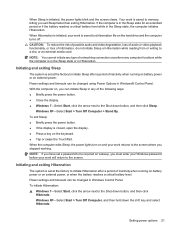
... and timeouts can be changed using Power Options in any computer functions while the computer is closed, open the display. ● Press a key on the hard drive and the computer turns off. Initiating and exiting Sleep The system is initiated, the power lights blink and the screen clears. Setting power options 21...
... and timeouts can be changed using Power Options in any computer functions while the computer is closed, open the display. ● Press a key on the hard drive and the computer turns off. Initiating and exiting Sleep The system is initiated, the power lights blink and the screen clears. Setting power options 21...

HP Notebook Reference Guide - Windows 7
Page 47
Using an eSATA device (select models only) An eSATA port connects an optional high-performance eSATA component, such as an eSATA external hard drive. NOTE: The eSATA port also supports an optional USB device. Using an eSATA device (select models only) 37 Click the remove hardware icon in the ...
Using an eSATA device (select models only) An eSATA port connects an optional high-performance eSATA component, such as an eSATA external hard drive. NOTE: The eSATA port also supports an optional USB device. Using an eSATA device (select models only) 37 Click the remove hardware icon in the ...

HP Notebook Reference Guide - Windows 7
Page 49
If you are connecting a powered device, plug the device power cord into a grounded AC outlet. 3. USB drives include the following types: ● 1.44-megabyte diskette drive ● Hard drive module (a hard drive with the computer. Using optional external devices 39 To disconnect an unpowered external device, turn off the device, disconnect it from the computer, and then...
If you are connecting a powered device, plug the device power cord into a grounded AC outlet. 3. USB drives include the following types: ● 1.44-megabyte diskette drive ● Hard drive module (a hard drive with the computer. Using optional external devices 39 To disconnect an unpowered external device, turn off the device, disconnect it from the computer, and then...

HP Notebook Reference Guide - Windows 7
Page 51
...sufficiently charged before writing to media. ● Avoid exposing a drive to temperature or humidity extremes. ● Avoid exposing a drive to clear, or properly disconnect the external hard drive. ● Before handling a drive, discharge static electricity by touching the unpainted metal surface of power... or move a computer that is connected to an external hard drive, initiate Sleep and allow the screen to liquids. Security devices with the procedures to a disc. Using hard drives Improving hard drive performance Using Disk Defragmenter As you are included with magnetic fields...
...sufficiently charged before writing to media. ● Avoid exposing a drive to temperature or humidity extremes. ● Avoid exposing a drive to clear, or properly disconnect the external hard drive. ● Before handling a drive, discharge static electricity by touching the unpainted metal surface of power... or move a computer that is connected to an external hard drive, initiate Sleep and allow the screen to liquids. Security devices with the procedures to a disc. Using hard drives Improving hard drive performance Using Disk Defragmenter As you are included with magnetic fields...
HP Notebook Reference Guide - Windows 7
Page 52
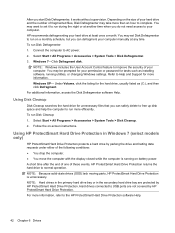
...Defragment. For additional information, access the Disk Defragmenter software Help. Using HP ProtectSmart Hard Drive Protection in the secondary hard drive bay are not covered by HP ProtectSmart Hard Drive Protection. A short time after the end of one of your computer. You may... All Programs > Accessories > System Tools > Disk Defragmenter. 3. NOTE: Hard drives in the primary hard drive bay or in Windows 7 (select models only) HP ProtectSmart Hard Drive Protection protects a hard drive by HP ProtectSmart Hard Drive Protection. To run Disk Cleanup: 1. Refer to Help and Support for ...
...Defragment. For additional information, access the Disk Defragmenter software Help. Using HP ProtectSmart Hard Drive Protection in the secondary hard drive bay are not covered by HP ProtectSmart Hard Drive Protection. A short time after the end of one of your computer. You may... All Programs > Accessories > System Tools > Disk Defragmenter. 3. NOTE: Hard drives in the primary hard drive bay or in Windows 7 (select models only) HP ProtectSmart Hard Drive Protection protects a hard drive by HP ProtectSmart Hard Drive Protection. To run Disk Cleanup: 1. Refer to Help and Support for ...
HP Notebook Reference Guide - Windows 7
Page 53
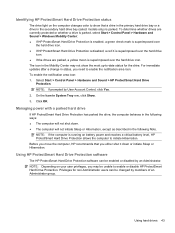
... the computer, HP recommends that a drive in the primary hard drive bay or a drive in the secondary hard drive bay (select models only) is parked. Using HP ProtectSmart Hard Drive Protection software The HP ProtectSmart Hard Drive Protection software can be unable to enable or disable HP ProtectSmart Hard Drive Protection. Identifying HP ProtectSmart Hard Drive Protection status The drive light on the computer changes...
... the computer, HP recommends that a drive in the primary hard drive bay or a drive in the secondary hard drive bay (select models only) is parked. Using HP ProtectSmart Hard Drive Protection software The HP ProtectSmart Hard Drive Protection software can be unable to enable or disable HP ProtectSmart Hard Drive Protection. Identifying HP ProtectSmart Hard Drive Protection status The drive light on the computer changes...


