HP Client Manager 6.1
Page 3
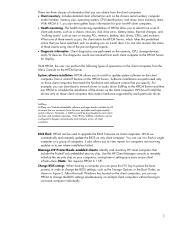
...initialize the security chip on your non-HP client computers. • Health monitoring: The health monitoring capabilities of HPCM allow you to upgrade the BIOS firmware on the HPCM Server. HPCM will install the drivers only on any client computer. BIOS Flash: HPCM can automatically ... client-side events, such as a chassis intrusion, disk drive error, battery status, thermal changes, and "walking assets" such as new or missing PCs, memory, battery, disk drives, CPUs, and monitors. For example, you can also monitor the status of these events occurs, the client alerts the HPCM Server...
...initialize the security chip on your non-HP client computers. • Health monitoring: The health monitoring capabilities of HPCM allow you to upgrade the BIOS firmware on the HPCM Server. HPCM will install the drivers only on any client computer. BIOS Flash: HPCM can automatically ... client-side events, such as a chassis intrusion, disk drive error, battery status, thermal changes, and "walking assets" such as new or missing PCs, memory, battery, disk drives, CPUs, and monitors. For example, you can also monitor the status of these events occurs, the client alerts the HPCM Server...
Hard Drive White Paper
Page 5
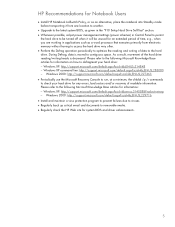
... of data to check your hard drive: - HP Recommendations for Notebook Users • Install HP Notebook LidSwitch Policy, or as an alternative, place the notebook into Standby mode before transporting it from one location to another. • Upgrade to the latest system BIOS, as given in the "F10 Setup... for an extended period of time, e.g., when you are working in applications such as a word processor that executes primarily from electronic memory without having to access the hard drive very often. • Perform the Defrag operation periodically to optimize the reading and writing of readable ...
... of data to check your hard drive: - HP Recommendations for Notebook Users • Install HP Notebook LidSwitch Policy, or as an alternative, place the notebook into Standby mode before transporting it from one location to another. • Upgrade to the latest system BIOS, as given in the "F10 Setup... for an extended period of time, e.g., when you are working in applications such as a word processor that executes primarily from electronic memory without having to access the hard drive very often. • Perform the Defrag operation periodically to optimize the reading and writing of readable ...
Hardware Guide, Compaq Notebook Series
Page 98
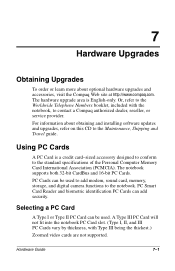
..., sound card, memory, storage, and digital camera functions to the notebook. The hardware upgrade area is a credit card-sized accessory designed to conform to contact a Compaq authorized dealer, reseller, or service provider. A Type III PC Card will not fit into the notebook PC Card slot. (Type I or Type II PC Card can be used . 7 Hardware Upgrades Obtaining Upgrades To order...
..., sound card, memory, storage, and digital camera functions to the notebook. The hardware upgrade area is a credit card-sized accessory designed to conform to contact a Compaq authorized dealer, reseller, or service provider. A Type III PC Card will not fit into the notebook PC Card slot. (Type I or Type II PC Card can be used . 7 Hardware Upgrades Obtaining Upgrades To order...

Hardware Guide, Compaq Notebook Series
Page 101
... Hardware Upgrades Increasing Memory You can increase the amount of RAM (random access memory) in the notebook with an optional PC Card or with Hibernation after increasing RAM, verify that your hard drive has enough free space for the hibernation file. Displaying Memory Information ...; To display the amount of space required by the hibernation file: ❏ In Windows 2000 Professional, select Start > Settings > Control Panel > Compaq Power > Hibernation tab. ❏ In Windows XP Home or Windows XP Professional, select Start > Control Panel > Performance and Maintenance > Power Options...
... Hardware Upgrades Increasing Memory You can increase the amount of RAM (random access memory) in the notebook with an optional PC Card or with Hibernation after increasing RAM, verify that your hard drive has enough free space for the hibernation file. Displaying Memory Information ...; To display the amount of space required by the hibernation file: ❏ In Windows 2000 Professional, select Start > Settings > Control Panel > Compaq Power > Hibernation tab. ❏ In Windows XP Home or Windows XP Professional, select Start > Control Panel > Performance and Maintenance > Power Options...
Hardware Guide, Compaq Notebook Series
Page 102
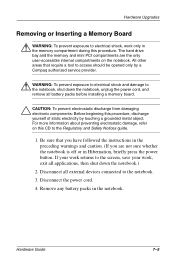
... object. Be sure that require a tool to access should be opened only by a Compaq authorized service provider. Å WARNING: To prevent exposure to electrical shock and damage to the notebook, shut down the notebook.) 2. Hardware Guide 7-5 Hardware Upgrades Removing or Inserting a Memory Board Å WARNING: To prevent exposure to electrical shock, work , exit all applications...
... object. Be sure that require a tool to access should be opened only by a Compaq authorized service provider. Å WARNING: To prevent exposure to electrical shock and damage to the notebook, shut down the notebook.) 2. Hardware Guide 7-5 Hardware Upgrades Removing or Inserting a Memory Board Å WARNING: To prevent exposure to electrical shock, work , exit all applications...
Hardware Guide, Compaq Notebook Series
Page 103
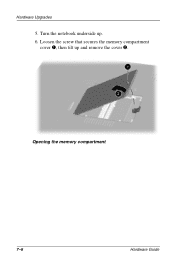
Hardware Upgrades 5. Turn the notebook underside up and remove the cover 2. Loosen the screw that secures the memory compartment cover 1, then tilt up . 6. Opening the memory compartment 7-6 Hardware Guide
Hardware Upgrades 5. Turn the notebook underside up and remove the cover 2. Loosen the screw that secures the memory compartment cover 1, then tilt up . 6. Opening the memory compartment 7-6 Hardware Guide
Hardware Guide, Compaq Notebook Series
Page 104
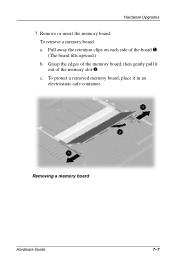
c. Removing a memory board Hardware Guide 7-7 Remove or insert the memory board. Pull away the retention clips on each side of the memory slot 2. Grasp the edges of the memory board, then gently pull it in an electrostatic-safe container. To protect a removed memory board, place it out of the board 1. (The board tilts upward.) b. To remove a memory board: a. Hardware Upgrades 7.
c. Removing a memory board Hardware Guide 7-7 Remove or insert the memory board. Pull away the retention clips on each side of the memory slot 2. Grasp the edges of the memory board, then gently pull it in an electrostatic-safe container. To protect a removed memory board, place it out of the board 1. (The board tilts upward.) b. To remove a memory board: a. Hardware Upgrades 7.
Hardware Guide, Compaq Notebook Series
Page 105
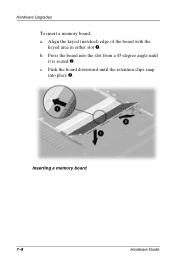
Press the board into place 3. Push the board downward until the retention clips snap into the slot from a 45-degree angle until it is seated 2. b. Inserting a memory board 7-8 Hardware Guide c. Hardware Upgrades To insert a memory board: a. Align the keyed (notched) edge of the board with the keyed area in either slot 1.
Press the board into place 3. Push the board downward until the retention clips snap into the slot from a 45-degree angle until it is seated 2. b. Inserting a memory board 7-8 Hardware Guide c. Hardware Upgrades To insert a memory board: a. Align the keyed (notched) edge of the board with the keyed area in either slot 1.

Hardware Guide, Compaq Notebook Series
Page 106
Align the tabs on the memory compartment cover with the cover slots on the notebook 1. 9. Tighten the screw that secures the cover to the notebook 3. Hardware Upgrades 8. Closing the memory compartment Hardware Guide 7-9 Tilt the cover downward until it is seated 2. 10.
Align the tabs on the memory compartment cover with the cover slots on the notebook 1. 9. Tighten the screw that secures the cover to the notebook 3. Hardware Upgrades 8. Closing the memory compartment Hardware Guide 7-9 Tilt the cover downward until it is seated 2. 10.

