
Maintenance and Service Guide Compaq Evo N160 Series
Page 35
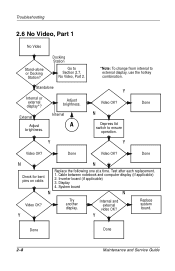
... after each replacement. 1. Internal A Y Video OK? N Depress lid switch to external display, use the hotkey combination. Cable between notebook and computer display (if applicable) 2. Troubleshooting 2.6 No Video, Part 1 No Video Stand-alone or Docking Station? Done N N Check... Station Go to Section 2.7, No Video, Part 2. *Note: To change from internal to ensure operation. Display 4. External Adjust brightness. Inverter board (if applicable) 3. Y Try another display. Standalone Internal or external display*? Done Video OK? Y Replace system board. N Replace...
... after each replacement. 1. Internal A Y Video OK? N Depress lid switch to external display, use the hotkey combination. Cable between notebook and computer display (if applicable) 2. Troubleshooting 2.6 No Video, Part 1 No Video Stand-alone or Docking Station? Done N N Check... Station Go to Section 2.7, No Video, Part 2. *Note: To change from internal to ensure operation. Display 4. External Adjust brightness. Inverter board (if applicable) 3. Y Try another display. Standalone Internal or external display*? Done Video OK? Y Replace system board. N Replace...
Maintenance and Service Guide Compaq Evo N160 Series
Page 89
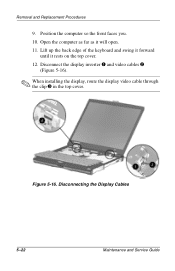
Lift up the back edge of the keyboard and swing it forward until it will open. 11. Disconnecting the Display Cables 5-22 Maintenance and Service Guide Open the computer as far as it rests on the top cover. 12. Figure 5-16. Removal and Replacement Procedures 9. Disconnect the display inverter 1 and video cables 2 (Figure 5-16). ✎ When installing the display, route the display video cable through the clip 3 in the top cover. Position the computer so the front faces you. 10.
Lift up the back edge of the keyboard and swing it forward until it will open. 11. Disconnecting the Display Cables 5-22 Maintenance and Service Guide Open the computer as far as it rests on the top cover. 12. Figure 5-16. Removal and Replacement Procedures 9. Disconnect the display inverter 1 and video cables 2 (Figure 5-16). ✎ When installing the display, route the display video cable through the clip 3 in the top cover. Position the computer so the front faces you. 10.
