
Wireless Setup Guide
Page 4
... site, contact your router manufacturer or your ISP for technical assistance. Highlight your network name in the "My Router Security Level" table on the screen. PROGRESS CHECK If you want to add to your network. Wireless Router Security Level Disable (no security) WEP WPA-PSK On the Wireless Network ...Connection screen: 1 Select the check box for this network. 2 Type the WEP encryption key in the Network key field. (You recorded this key in the ...
... site, contact your router manufacturer or your ISP for technical assistance. Highlight your network name in the "My Router Security Level" table on the screen. PROGRESS CHECK If you want to add to your network. Wireless Router Security Level Disable (no security) WEP WPA-PSK On the Wireless Network ...Connection screen: 1 Select the check box for this network. 2 Type the WEP encryption key in the Network key field. (You recorded this key in the ...

HP USB Digital Drive
Page 9
Select the Digital Drive and wait until the "Safe to remove the Digital Drive when the status light on the Digital Drive is in the extended position, return it on its track for safe storage. 8 User Guide A dialog box displays a list of connected devices. 2. Gently unplug the Digital Drive from the USB port. ✎ If the USB connector cable is flashing. 1. Select the "Safely Remove Hardware" icon on your screen. 3. Disconnecting the Digital Drive ✎ Do not attempt to Remove Hardware" message appears on your taskbar.
Select the Digital Drive and wait until the "Safe to remove the Digital Drive when the status light on the Digital Drive is in the extended position, return it on its track for safe storage. 8 User Guide A dialog box displays a list of connected devices. 2. Gently unplug the Digital Drive from the USB port. ✎ If the USB connector cable is flashing. 1. Select the "Safely Remove Hardware" icon on your screen. 3. Disconnecting the Digital Drive ✎ Do not attempt to Remove Hardware" message appears on your taskbar.
Bluetooth Wireless Technology Basics
Page 6
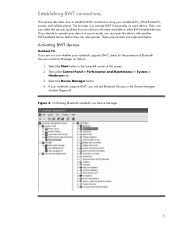
... are not sure whether your device in secure mode, you will make available to operate your notebook supports BWT, check for the presence of the screen. 2. Establishing BWT connections This section describes how to activate BWT functionality on each device. Then, you are explained below. Activating BWT devices Notebook PCs If...
... are not sure whether your device in secure mode, you will make available to operate your notebook supports BWT, check for the presence of the screen. 2. Establishing BWT connections This section describes how to activate BWT functionality on each device. Then, you are explained below. Activating BWT devices Notebook PCs If...
Bluetooth Wireless Technology Basics
Page 7
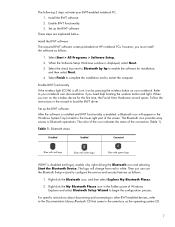
... by pressing the wireless button on the wireless device for installation, and then select Next. 4. The color of the icon indicates the status of the screen. Bluetooth status Disabled Enabled Connected Blue with red logo Blue with white logo Blue with green logo If BWT is displayed, select Next. 3. Right-click...
... by pressing the wireless button on the wireless device for installation, and then select Next. 4. The color of the icon indicates the status of the screen. Bluetooth status Disabled Enabled Connected Blue with red logo Blue with white logo Blue with green logo If BWT is displayed, select Next. 3. Right-click...
Bluetooth Wireless Technology Basics
Page 8
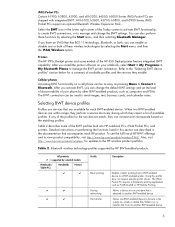
... notebook PCs, iPAQ Pocket PCs, and printers. Cellular phones Activating BWT functionality on performing the functions listed in the lower right corner of the Today screen to activate BWT functionality, to create BWT connections, or to manage and change the default BWT settings and set the level of discoverability of your...
... notebook PCs, iPAQ Pocket PCs, and printers. Cellular phones Activating BWT functionality on performing the functions listed in the lower right corner of the Today screen to activate BWT functionality, to create BWT connections, or to manage and change the default BWT settings and set the level of discoverability of your...
Backup and Recovery - Windows Vista
Page 6
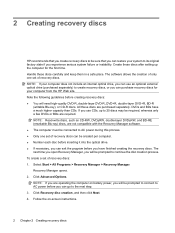
... it into the optical drive. ● If necessary, you can purchase recovery discs for the first time. Handle these discs are operating the computer on -screen instructions. 2 Chapter 2 Creating recovery discs NOTE: If your computer does not include an internal optical drive, you can use CDs, up the computer for your...
... it into the optical drive. ● If necessary, you can purchase recovery discs for the first time. Handle these discs are operating the computer on -screen instructions. 2 Chapter 2 Creating recovery discs NOTE: If your computer does not include an internal optical drive, you can use CDs, up the computer for your...

Backup and Recovery - Windows Vista
Page 9
...System Restore feature, and periodically copy them to reset your settings. b. To copy the entire screen, press fn+prt sc. Open a word-processing document, and then select Edit > Paste. Backup suggestions 5 Display the screen. c. The screen shot can be a time-saver if you have to disc. ● Store personal files .... ● Back up templates stored in their associated programs. ● Save customized settings in a window, toolbar, or menu bar by taking a screen shot of your preferences. Copy the screen: To copy only the active window, press alt+fn+prt sc. To copy the...
...System Restore feature, and periodically copy them to reset your settings. b. To copy the entire screen, press fn+prt sc. Open a word-processing document, and then select Edit > Paste. Backup suggestions 5 Display the screen. c. The screen shot can be a time-saver if you have to disc. ● Store personal files .... ● Back up templates stored in their associated programs. ● Save customized settings in a window, toolbar, or menu bar by taking a screen shot of your preferences. Copy the screen: To copy only the active window, press alt+fn+prt sc. To copy the...
Backup and Recovery - Windows Vista
Page 10
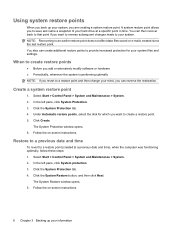
... the restoration. In the left pane, click System protection. 3. The System Protection window opens. 6. Select Start > Control Panel > System and Maintenance > System. 2. Follow the on -screen instructions. 6 Chapter 3 Backing up your system, you are creating a system restore point. Using system restore points When you back up your information Restore to a previous... name a snapshot of your system files and settings. Click the System Restore button, and then click Next. The System Restore window opens. 5. Follow the on -screen instructions.
... the restoration. In the left pane, click System protection. 3. The System Protection window opens. 6. Select Start > Control Panel > System and Maintenance > System. 2. Follow the on -screen instructions. 6 Chapter 3 Backing up your system, you are creating a system restore point. Using system restore points When you back up your information Restore to a previous... name a snapshot of your system files and settings. Click the System Restore button, and then click Next. The System Restore window opens. 5. Follow the on -screen instructions.
Backup and Recovery - Windows Vista
Page 11
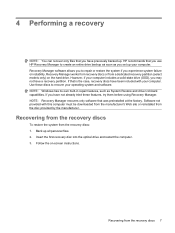
... not have been included with this computer must be downloaded from the manufacturer's Web site or reinstalled from a dedicated recovery partition (select models only) on -screen instructions. Insert the first recovery disc into the optical drive and restart the computer. 3. Follow the on the hard drive. Recovering from the recovery discs...
... not have been included with this computer must be downloaded from the manufacturer's Web site or reinstalled from a dedicated recovery partition (select models only) on -screen instructions. Insert the first recovery disc into the optical drive and restart the computer. 3. Follow the on the hard drive. Recovering from the recovery discs...
Backup and Recovery - Windows Vista
Page 12
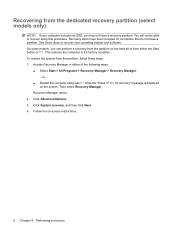
... Restart the computer and press f11 while the "Press for computers that do not have a partition. Recovery Manager opens. 2. Follow the on the screen. To restore the system from either of the following ways: ● Select Start > All Programs > Recovery Manager > Recovery Manager. - Then ...Click System recovery, and then click Next. 4. On some models, you may not have been included for recovery" message is displayed on -screen instructions. 8 Chapter 4 Performing a recovery Recovery discs have a recovery partition. You will not be able to it's factory condition. This ...
... Restart the computer and press f11 while the "Press for computers that do not have a partition. Recovery Manager opens. 2. Follow the on the screen. To restore the system from either of the following ways: ● Select Start > All Programs > Recovery Manager > Recovery Manager. - Then ...Click System recovery, and then click Next. 4. On some models, you may not have been included for recovery" message is displayed on -screen instructions. 8 Chapter 4 Performing a recovery Recovery discs have a recovery partition. You will not be able to it's factory condition. This ...

Drives - Windows Vista
Page 10
... of region changes remaining is displayed on the DVD drive. NOTE: Windows includes the User Account Control feature to improve the security of the computer screen is a criminal offense, under applicable copyright laws, to change settings. 6. Right-click the DVD drive for all media and devices check box at the upper...
... of region changes remaining is displayed on the DVD drive. NOTE: Windows includes the User Account Control feature to improve the security of the computer screen is a criminal offense, under applicable copyright laws, to change settings. 6. Right-click the DVD drive for all media and devices check box at the upper...

Drives - Windows Vista
Page 11
...: You cannot create an audio DVD with the computer, refer to vibration. NOTE: For details about using . Click Copy at the bottom right of the screen. 4. After the information is sensitive to the software manufacturer's instructions, which may be changed . ● DVD players used in the software Help, or on disc...
...: You cannot create an audio DVD with the computer, refer to vibration. NOTE: For details about using . Click Copy at the bottom right of the screen. 4. After the information is sensitive to the software manufacturer's instructions, which may be changed . ● DVD players used in the software Help, or on disc...
Drives - Windows Vista
Page 13
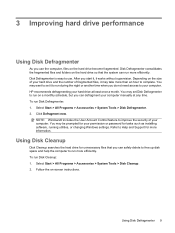
... > Accessories > System Tools > Disk Defragmenter. 2. Click Defragment now. After you start it, it works without supervision. Disk Defragmenter consolidates the fragmented files and folders on -screen instructions. Using Disk Defragmenter 9 Disk Defragmenter is easy to your computer. 3 Improving hard drive performance Using Disk Defragmenter As you use .
... > Accessories > System Tools > Disk Defragmenter. 2. Click Defragment now. After you start it, it works without supervision. Disk Defragmenter consolidates the fragmented files and folders on -screen instructions. Using Disk Defragmenter 9 Disk Defragmenter is easy to your computer. 3 Improving hard drive performance Using Disk Defragmenter As you use .
Drives - Windows Vista
Page 21
.... Windows scans your system for installed hardware and installs default drivers for software and driver downloads, type your country or region. 2. On the HP Welcome screen, click Settings and select how often the utility should check for example, DVD/CD-ROMs, Modems, and so on the Web. 3. In Device Manager, click...
.... Windows scans your system for installed hardware and installs default drivers for software and driver downloads, type your country or region. 2. On the HP Welcome screen, click Settings and select how often the utility should check for example, DVD/CD-ROMs, Modems, and so on the Web. 3. In Device Manager, click...
Drives - Windows Vista
Page 22
... device. Click Download only to save the file to your hard drive. Click your computer. When prompted, click Save and then select a storage location on -screen instructions to install the updated driver without downloading the file. -
... device. Click Download only to save the file to your hard drive. Click your computer. When prompted, click Save and then select a storage location on -screen instructions to install the updated driver without downloading the file. -
Notebook Tour - Windows Vista
Page 8
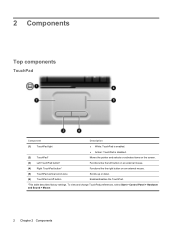
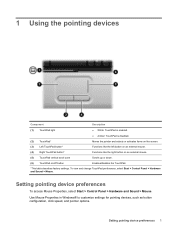
... Component Description (1) TouchPad light ● White: TouchPad is enabled. ● Amber: TouchPad is disabled. (2) TouchPad* Moves the pointer and selects or activates items on the screen. (3) Left TouchPad button* Functions like the left button on an external mouse. (4) Right TouchPad button* Functions like the right button on an external mouse. (5) TouchPad...
... Component Description (1) TouchPad light ● White: TouchPad is enabled. ● Amber: TouchPad is disabled. (2) TouchPad* Moves the pointer and selects or activates items on the screen. (3) Left TouchPad button* Functions like the left button on an external mouse. (4) Right TouchPad button* Functions like the right button on an external mouse. (5) TouchPad...

Notebook Tour - Windows Vista
Page 18
Cleaning the display To remove smudges and lint, frequently clean the display with a soft, damp, lint-free cloth. If the screen requires additional cleaning, use premoistened antistatic wipes or an antistatic screen cleaner. CAUTION: To prevent permanent damage to the computer, never spray water, cleaning fluids, or chemicals on the front of the...
Cleaning the display To remove smudges and lint, frequently clean the display with a soft, damp, lint-free cloth. If the screen requires additional cleaning, use premoistened antistatic wipes or an antistatic screen cleaner. CAUTION: To prevent permanent damage to the computer, never spray water, cleaning fluids, or chemicals on the front of the...
Pointing Devices and Keyboard - Windows Vista
Page 3
... Support (fn+f1 4 Opening the Print Options window (fn+f2 4 Opening a Web browser (fn+f3 5 Switching the screen image (fn+f4 5 Initiating Hibernation (fn+f5 6 Initiating QuickLock (fn+f6 6 Decreasing screen brightness (fn+f7 6 Increasing screen brightness (fn+f8 6 Playing, pausing or resuming an audio CD or a DVD (fn+f9 6 Stopping an audio...
... Support (fn+f1 4 Opening the Print Options window (fn+f2 4 Opening a Web browser (fn+f3 5 Switching the screen image (fn+f4 5 Initiating Hibernation (fn+f5 6 Initiating QuickLock (fn+f6 6 Decreasing screen brightness (fn+f7 6 Increasing screen brightness (fn+f8 6 Playing, pausing or resuming an audio CD or a DVD (fn+f9 6 Stopping an audio...
Pointing Devices and Keyboard - Windows Vista
Page 5
... Component Description (1) TouchPad light ● White: TouchPad is enabled. ● Amber: TouchPad is disabled. (2) TouchPad* Moves the pointer and selects or activates items on the screen. (3) Left TouchPad button* Functions like the left button on an external mouse. (4) Right TouchPad button* Functions like the right button on an external mouse. (5) TouchPad...
... Component Description (1) TouchPad light ● White: TouchPad is enabled. ● Amber: TouchPad is disabled. (2) TouchPad* Moves the pointer and selects or activates items on the screen. (3) Left TouchPad button* Functions like the left button on an external mouse. (4) Right TouchPad button* Functions like the right button on an external mouse. (5) TouchPad...

Pointing Devices and Keyboard - Windows Vista
Page 7
The icons on the f1 through f12 keys represent the hotkey functions. Switch the screen image. Initiate Hibernation. Open Help and Support. 2 Using the keyboard Using hotkeys Hotkeys are discussed in the "Using the keyboard" sections. Open a Web browser. Hotkey ...functions and procedures are combinations of the fn key (1) and the esc key (2), one of the function keys (3), or one of the volume keys (4). Increase screen brightness. Hotkey fn+esc fn+f1 fn+f2 fn+f3 fn+f4 fn+f5 fn+f6 fn+f7 fn+f8 Using hotkeys 3 Function Display system...
The icons on the f1 through f12 keys represent the hotkey functions. Switch the screen image. Initiate Hibernation. Open Help and Support. 2 Using the keyboard Using hotkeys Hotkeys are discussed in the "Using the keyboard" sections. Open a Web browser. Hotkey ...functions and procedures are combinations of the fn key (1) and the esc key (2), one of the function keys (3), or one of the volume keys (4). Increase screen brightness. Hotkey fn+esc fn+f1 fn+f2 fn+f3 fn+f4 fn+f5 fn+f6 fn+f7 fn+f8 Using hotkeys 3 Function Display system...


