Limited Warranty and Support Guide - Refurbished
Page 4
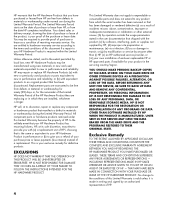
... product; (c) by software, interfacing, parts or supplies not supplied by anyone other than (i) HP, (ii) an HP authorized service provider, or (iii) your own installation of HP. EXCLUSIONS HP DOES NOT WARRANT THAT THE OPERATION OF THIS PRODUCT WILL BE UNINTERRUPTED OR ERROR-FREE. BEFORE RETURNING ANY UNIT FOR SERVICE, BE SURE TO BACK UP DATA AND REMOVE ANY CONFIDENTIAL, PROPRIETARY...
... product; (c) by software, interfacing, parts or supplies not supplied by anyone other than (i) HP, (ii) an HP authorized service provider, or (iii) your own installation of HP. EXCLUSIONS HP DOES NOT WARRANT THAT THE OPERATION OF THIS PRODUCT WILL BE UNINTERRUPTED OR ERROR-FREE. BEFORE RETURNING ANY UNIT FOR SERVICE, BE SURE TO BACK UP DATA AND REMOVE ANY CONFIDENTIAL, PROPRIETARY...
Limited Warranty and Support Guide - Refurbished
Page 6
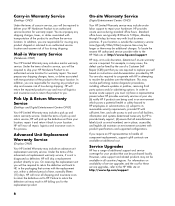
... sufficient, free, and safe access to and use of a Customer Self Repair (CSR) part that you are responsible for insuring any product shipped or returned to an authorized service location and assume risk of the product to you must: (a) have a representative present when HP provides warranty services at your HP Hardware Product to your product that all component replacements, support uplift...
... sufficient, free, and safe access to and use of a Customer Self Repair (CSR) part that you are responsible for insuring any product shipped or returned to an authorized service location and assume risk of the product to you must: (a) have a representative present when HP provides warranty services at your HP Hardware Product to your product that all component replacements, support uplift...
Warranty
Page 7
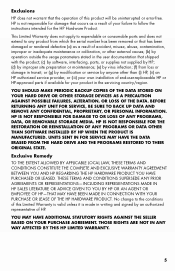
... PROGRAMS RESTORED TO THEIR ORIGINAL STATE. No change to the conditions of this product will be uninterrupted or error-free. HP IS NOT RESPONSIBLE FOR DAMAGE TO OR LOSS OF ANY PROGRAMS, DATA, OR REMOVABLE STORAGE MEDIA. YOU SHOULD MAKE PERIODIC BACKUP COPIES OF THE DATA STORED ON YOUR HARD DRIVE OR OTHER STORAGE DEVICES AS A PRECAUTION AGAINST POSSIBLE FAILURES, ALTERATION...
... PROGRAMS RESTORED TO THEIR ORIGINAL STATE. No change to the conditions of this product will be uninterrupted or error-free. HP IS NOT RESPONSIBLE FOR DAMAGE TO OR LOSS OF ANY PROGRAMS, DATA, OR REMOVABLE STORAGE MEDIA. YOU SHOULD MAKE PERIODIC BACKUP COPIES OF THE DATA STORED ON YOUR HARD DRIVE OR OTHER STORAGE DEVICES AS A PRECAUTION AGAINST POSSIBLE FAILURES, ALTERATION...
Warranty
Page 23
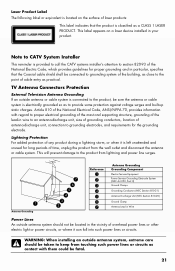
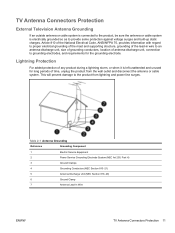
...label indicates that the Coaxial cable shield shall be connected to grounding system of the building, as close to the point of cable entry as practical. Laser Product Label The following label or equivalent is located on a laser device installed in Wire Power Lines An outside antenna ... antenna or cable system. Lightning Protection For added protection of the National Electrical Code, ANSI/NFPA 70, provides information with them could be fatal. 21 TV Antenna Connectors Protection External Television Antenna Grounding If an outside antenna or cable system is connected to the product...
...label indicates that the Coaxial cable shield shall be connected to grounding system of the building, as close to the point of cable entry as practical. Laser Product Label The following label or equivalent is located on a laser device installed in Wire Power Lines An outside antenna ... antenna or cable system. Lightning Protection For added protection of the National Electrical Code, ANSI/NFPA 70, provides information with them could be fatal. 21 TV Antenna Connectors Protection External Television Antenna Grounding If an outside antenna or cable system is connected to the product...
Getting Started
Page 5
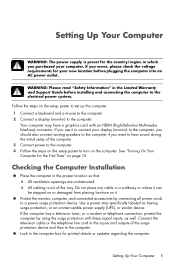
.... 3 Connect power to the computer. 4 Follow the steps on the setup poster to turn on the setup poster to set up the computer: 1 Connect a keyboard and a mouse to the computer. 2 Connect a display (monitor) to connect your computer. See "Turning On Your Computer for printed details or updates regarding the computer. Protect the monitor, computer, and connected accessories by using the surge protection with an HDMI (High-Definition Multimedia Interface) connector. Setting...
.... 3 Connect power to the computer. 4 Follow the steps on the setup poster to turn on the setup poster to set up the computer: 1 Connect a keyboard and a mouse to the computer. 2 Connect a display (monitor) to connect your computer. See "Turning On Your Computer for printed details or updates regarding the computer. Protect the monitor, computer, and connected accessories by using the surge protection with an HDMI (High-Definition Multimedia Interface) connector. Setting...
Getting Started
Page 11
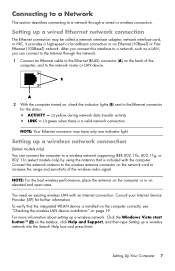
... with an Internet connection. You need an existing wireless LAN with the computer. Consult your Internet Service Provider (ISP) for the status: ACTIVITY - For more information about setting up a wireless network: Click the Windows Vista start button™ on the taskbar, click Help and Support, and then type Setting up a wired Ethernet network connection The Ethernet connection may have only one indicator light. Lit yellow during network data transfer activity LINK - Setting up a wireless network connection (Select models only) You...
... with an Internet connection. You need an existing wireless LAN with the computer. Consult your Internet Service Provider (ISP) for the status: ACTIVITY - For more information about setting up a wireless network: Click the Windows Vista start button™ on the taskbar, click Help and Support, and then type Setting up a wired Ethernet network connection The Ethernet connection may have only one indicator light. Lit yellow during network data transfer activity LINK - Setting up a wireless network connection (Select models only) You...

Getting Started
Page 23
... by using Online Services: a Click the Windows Vista start button on the desktop, and then log in. 4 Open your ISP. most computers have issues connecting to open the Device Manager window. 3 Click Network adapters. To open the Network and Sharing Center window. 6 Click Connect to a network, and then follow the instructions provided by using the Windows Vista operating system Device Manager: 1 Click the Windows Vista start button on page 49. Checking the wireless LAN device installation You can use any Web browser; Turning On Your Computer for Internet service during...
... by using Online Services: a Click the Windows Vista start button on the desktop, and then log in. 4 Open your ISP. most computers have issues connecting to open the Device Manager window. 3 Click Network adapters. To open the Network and Sharing Center window. 6 Click Connect to a network, and then follow the instructions provided by using the Windows Vista operating system Device Manager: 1 Click the Windows Vista start button on page 49. Checking the wireless LAN device installation You can use any Web browser; Turning On Your Computer for Internet service during...

Getting Started
Page 26
... program Windows Vista updates Unauthorized access to Setup Utility, BIOS settings, and other system identification information Administrator password Ongoing or future threats to the computer Windows Vista critical security updates from Microsoft Using passwords A password is essential to record each password you want to control access to secure the computer information. Because passwords are set in a secure place. For information on Windows Vista passwords: Click the Windows Vista start button on the computer. Antivirus software. Firewall software. A password set .
... program Windows Vista updates Unauthorized access to Setup Utility, BIOS settings, and other system identification information Administrator password Ongoing or future threats to the computer Windows Vista critical security updates from Microsoft Using passwords A password is essential to record each password you want to control access to secure the computer information. Because passwords are set in a secure place. For information on Windows Vista passwords: Click the Windows Vista start button on the computer. Antivirus software. Firewall software. A password set .

Getting Started
Page 27
.... When you are available. Turning On Your Computer for e-mail, network, or Internet access, unauthorized persons may be able to gain access to date by using and updating the antivirus software, and for Automatic Microsoft Software Updates Microsoft continually updates the Windows Vista operating system. See "Using the Onscreen Help and Support Center" on a network, or block authorized e-mail attachments. To solve the problem temporarily, disable the firewall, perform the...
.... When you are available. Turning On Your Computer for e-mail, network, or Internet access, unauthorized persons may be able to gain access to date by using and updating the antivirus software, and for Automatic Microsoft Software Updates Microsoft continually updates the Windows Vista operating system. See "Using the Onscreen Help and Support Center" on a network, or block authorized e-mail attachments. To solve the problem temporarily, disable the firewall, perform the...

Getting Started
Page 48
... solution Wireless keyboard or mouse does not work or is not in the keyboard and mouse; Also clean the rollers on the number key pad. Replace the batteries in Suspend mode, which the ball moves. Ensure the mouse is not detected. Click the left mouse button to turn off the battery cover, remove the old batteries, and insert new alkaline batteries, and then turn the mouse off, take off the Num Lock light. Use a mouse pad...
... solution Wireless keyboard or mouse does not work or is not in the keyboard and mouse; Also clean the rollers on the number key pad. Replace the batteries in Suspend mode, which the ball moves. Ensure the mouse is not detected. Click the left mouse button to turn off the battery cover, remove the old batteries, and insert new alkaline batteries, and then turn the mouse off, take off the Num Lock light. Use a mouse pad...
Getting Started
Page 51
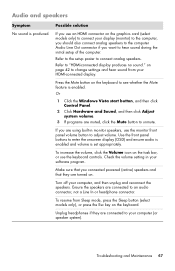
... to change settings and hear sound from Sleep mode, press the Sleep button (select models only), or press the Esc key on the task bar, or use the monitor front panel volume button to unmute. Or 1 Click the Windows Vista start button, and then click Control Panel. 2 Click Hardware and Sound, and then click Adjust system volume. 3 If programs are turned on the keyboard to "HDMI-connected display produces no sound." Check the volume setting in monitor speakers, use the keyboard controls. Audio and speakers...
... to change settings and hear sound from Sleep mode, press the Sleep button (select models only), or press the Esc key on the task bar, or use the monitor front panel volume button to unmute. Or 1 Click the Windows Vista start button, and then click Control Panel. 2 Click Hardware and Sound, and then click Adjust system volume. 3 If programs are turned on the keyboard to "HDMI-connected display produces no sound." Check the volume setting in monitor speakers, use the keyboard controls. Audio and speakers...
Getting Started
Page 54
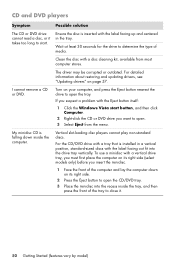
... button itself: 1 Click the Windows Vista start . Turn on your computer, and press the Eject button nearest the drive to open the tray. If you suspect a problem with a disc cleaning kit, available from the menu. To use a minidisc with the label facing up and centered in a vertical position, standard-sized discs with the label facing out fit into the recess inside the computer. Vertical slot-loading disc...
... button itself: 1 Click the Windows Vista start . Turn on your computer, and press the Eject button nearest the drive to open the tray. If you suspect a problem with a disc cleaning kit, available from the menu. To use a minidisc with the label facing up and centered in a vertical position, standard-sized discs with the label facing out fit into the recess inside the computer. Vertical slot-loading disc...

Getting Started
Page 57
... instructions for an update. Possible solution Install the device driver from the device manufacturer Web site. For details, refer to resolve the resource conflict. Disable the automatic settings in the operating system for Windows Vista. If you must be logged in the cable or connector are properly and securely connected and that does not cause a resource conflict. Troubleshooting and Maintenance 53 You may need to switch users, click the Windows Vista start button...
... instructions for an update. Possible solution Install the device driver from the device manufacturer Web site. For details, refer to resolve the resource conflict. Disable the automatic settings in the operating system for Windows Vista. If you must be logged in the cable or connector are properly and securely connected and that does not cause a resource conflict. Troubleshooting and Maintenance 53 You may need to switch users, click the Windows Vista start button...
Getting Started
Page 61
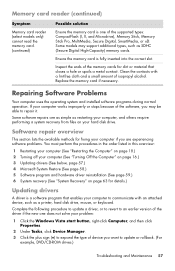
... material that enables your computer to communicate with a lint-free cloth and a small amount of the software, you may support additional types, such as a printer, hard disk drive, mouse, or keyboard. Clean the contacts with an attached device, such as SDHC (Secure Digital High-Capacity) memory cards. Replace the memory card if necessary. Some models may be able to repair it. Complete the following procedure to update a driver, or to...
... material that enables your computer to communicate with a lint-free cloth and a small amount of the software, you may support additional types, such as a printer, hard disk drive, mouse, or keyboard. Clean the contacts with an attached device, such as SDHC (Secure Digital High-Capacity) memory cards. Replace the memory card if necessary. Some models may be able to repair it. Complete the following procedure to update a driver, or to...

Getting Started
Page 62
... the onscreen instructions. You can also set restore points manually. To manually add restore points: 1 Close all open programs. 2 Click the Windows Vista start button, and then Control Panel. 3 Click System and Maintenance, and then System. 4 Click System protection. 5 Under Automatic Restore Points, select the disk for example, HP DVD Writer 640b). 5 Click the Driver tab. 6 To update a driver, click Update Driver, and then follow the onscreen instructions. NOTE: Always use this by model) 4 Double-click...
... the onscreen instructions. You can also set restore points manually. To manually add restore points: 1 Close all open programs. 2 Click the Windows Vista start button, and then Control Panel. 3 Click System and Maintenance, and then System. 4 Click System protection. 5 Under Automatic Restore Points, select the disk for example, HP DVD Writer 640b). 5 Click the Driver tab. 6 To update a driver, click Update Driver, and then follow the onscreen instructions. NOTE: Always use this by model) 4 Double-click...
Safety and Regulatory Information Desktops, Thin Clients, and Personal Workstations
Page 17
..., Part H) 3 Ground Clamps 4 Grounding Conductors (NEC Section 810-21) 5 Antenna Discharge Unit (NEC Section 810-20) 6 Ground Clamp 7 Antenna Lead-in wire to an antenna-discharge unit, size of grounding conductors, location of antenna-discharge unit, connection to the product from the wall outlet and disconnect the antenna or cable system. TV Antenna Connectors Protection External Television...
..., Part H) 3 Ground Clamps 4 Grounding Conductors (NEC Section 810-21) 5 Antenna Discharge Unit (NEC Section 810-20) 6 Ground Clamp 7 Antenna Lead-in wire to an antenna-discharge unit, size of grounding conductors, location of antenna-discharge unit, connection to the product from the wall outlet and disconnect the antenna or cable system. TV Antenna Connectors Protection External Television...
Upgrading and Servicing Guide
Page 12
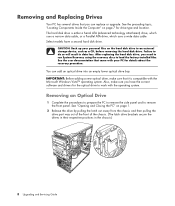
... factory-installed files. Select models have the correct software and drivers for details about the recovery procedure. After replacing the hard disk drive, you can add an optical drive into an empty lower optical drive bay. See "Opening and Closing the PC" on page 7 for drive type and location. You can replace or upgrade. The hard disk drive is compatible with the operating system. IMPORTANT: Before adding a new optical drive, make sure you have a second hard disk drive. See the preceding topic, "Locating Components Inside...
... factory-installed files. Select models have the correct software and drivers for details about the recovery procedure. After replacing the hard disk drive, you can add an optical drive into an empty lower optical drive bay. See "Opening and Closing the PC" on page 7 for drive type and location. You can replace or upgrade. The hard disk drive is compatible with the operating system. IMPORTANT: Before adding a new optical drive, make sure you have a second hard disk drive. See the preceding topic, "Locating Components Inside...

Upgrading and Servicing Guide
Page 18
A B MASTER C SLAVE To CPU A - See "Opening and Closing the PC" on page 1. 14 Upgrading and Servicing Guide Connect to the back of the HP Pocket Media, diskette (floppy), or hard disk drive. C - 4 Connect the power and data cables to a secondary hard disk drive (select models only). Connect to replace the front panel, replace the side panel, and close the PC. B - Connect to the PC motherboard. 5 Complete the procedures to a primary hard disk drive.
A B MASTER C SLAVE To CPU A - See "Opening and Closing the PC" on page 1. 14 Upgrading and Servicing Guide Connect to the back of the HP Pocket Media, diskette (floppy), or hard disk drive. C - 4 Connect the power and data cables to a secondary hard disk drive (select models only). Connect to replace the front panel, replace the side panel, and close the PC. B - Connect to the PC motherboard. 5 Complete the procedures to a primary hard disk drive.

Upgrading and Servicing Guide
Page 28
... configurations vary by installing add-in cards that draw excessive current. NOTE: A power supply upgrade may be used to add components to remove, replace, or add an add-in the computer. Removing or Installing an Add-in Card An add-in a fully loaded system (one with the graphics card supplier for more information about power supply requirements. 24 Upgrading and Servicing Guide The total +5 Vv current draw in card is a circuit board, such as a PCI or an AGP card...
... configurations vary by installing add-in cards that draw excessive current. NOTE: A power supply upgrade may be used to add components to remove, replace, or add an add-in the computer. Removing or Installing an Add-in Card An add-in a fully loaded system (one with the graphics card supplier for more information about power supply requirements. 24 Upgrading and Servicing Guide The total +5 Vv current draw in card is a circuit board, such as a PCI or an AGP card...

Upgrading and Servicing Guide
Page 30
... the card manufacturer's installation instructions and recheck all connections, including those to replace the side panel, and close the PC. See "Opening and Closing the PC" on the chassis and gently but firmly press the card straight down into the add-in card slots, and then install the screw. 3 Set the chassis upright. 4 Complete the procedures to the card, power supply, keyboard, and monitor. 26 Upgrading and Servicing Guide Installing an Add-in Card...
... the card manufacturer's installation instructions and recheck all connections, including those to replace the side panel, and close the PC. See "Opening and Closing the PC" on the chassis and gently but firmly press the card straight down into the add-in card slots, and then install the screw. 3 Set the chassis upright. 4 Complete the procedures to the card, power supply, keyboard, and monitor. 26 Upgrading and Servicing Guide Installing an Add-in Card...


