
Compaq ArmadaStation EM Maintenance and Service Guide
Page 9
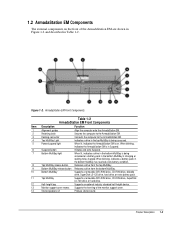
...Align the computer onto the ArmadaStation EM. Initiates and exits Suspend. Figure 1-2. Indicates a drive in the top MultiBay is being accessed or a battery pack in the bottom MultiBay is on the front of the monitor support cover. 14 Stereo speakers (2) Produce stereo sound. When blinking, indicates the...MultiBay. 10 Bottom MultiBay Supports a removable DVD-ROM drive, CD-ROM drive, diskette drive, SuperDisk LS-120 drive, hard drive, or extra battery pack. 11 Top MultiBay Supports a removable DVD-ROM drive, CD-ROM drive, SuperDisk LS-120 drive, or hard drive. 12 Half-height ...
...Align the computer onto the ArmadaStation EM. Initiates and exits Suspend. Figure 1-2. Indicates a drive in the top MultiBay is being accessed or a battery pack in the bottom MultiBay is on the front of the monitor support cover. 14 Stereo speakers (2) Produce stereo sound. When blinking, indicates the...MultiBay. 10 Bottom MultiBay Supports a removable DVD-ROM drive, CD-ROM drive, diskette drive, SuperDisk LS-120 drive, hard drive, or extra battery pack. 11 Top MultiBay Supports a removable DVD-ROM drive, CD-ROM drive, SuperDisk LS-120 drive, or hard drive. 12 Half-height ...
Compaq ArmadaStation EM Maintenance and Service Guide
Page 12
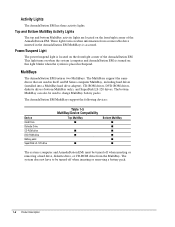
... Description These lights turn on the front/right corner of the ArmadaStation EM. The system does not have to charge MultiBay battery packs. This light turns on when the system (computer and ArmadaStation EM) is turned on the front/right corner of the... ArmadaStation EM has three activity lights. The ArmadaStation EM MultiBays support the following devices: Device Hard Drive Diskette Drive CD-ROM drive DVD-ROM drive Battery pack SuperDisk LS-120 drive Table 1-5 MultiBay/Device Compatibility Top MultiBay s s s s Bottom MultiBay s s s s s s The system (computer and ArmadaStation ...
... Description These lights turn on the front/right corner of the ArmadaStation EM. The system does not have to charge MultiBay battery packs. This light turns on when the system (computer and ArmadaStation EM) is turned on the front/right corner of the... ArmadaStation EM has three activity lights. The ArmadaStation EM MultiBays support the following devices: Device Hard Drive Diskette Drive CD-ROM drive DVD-ROM drive Battery pack SuperDisk LS-120 drive Table 1-5 MultiBay/Device Compatibility Top MultiBay s s s s Bottom MultiBay s s s s s s The system (computer and ArmadaStation ...
Installing Microsoft Windows Millennium Edition on Compaq Armada E700, M700, E500, V300, and M300
Page 8
... network adapter on Compaq Armada E700, M700, E500, V300, and M300 8 A. SoftPaq Descriptions These Internet resources are available for installation support for the touchpad pointing device Provides users with an easy to install compilation of hardware-enabling operating system enhancements and fixes System Firmware Allows homologation of the PC to maximize battery life and set...
... network adapter on Compaq Armada E700, M700, E500, V300, and M300 8 A. SoftPaq Descriptions These Internet resources are available for installation support for the touchpad pointing device Provides users with an easy to install compilation of hardware-enabling operating system enhancements and fixes System Firmware Allows homologation of the PC to maximize battery life and set...

Armada E500 Series Quick Reference Guide
Page 2
... 2-3 Navigating with the Pointing-Stick 2-4 Setting Pointing-Stick Preferences 2-5 Using Hotkeys 2-6 Switching the Image 2-7 Adjusting System Volume 2-7 Initiating Quick Controls 2-8 Setting a Power Conservation Level 2-8 Viewing Battery Status 2-8 Adjusting Panel Contrast 2-8 Adjusting Brightness 2-9 Displaying System Information 2-9 Stretching Text 2-9 Using the Embedded Numeric Keypad 2-10 Toggling the Keypad On and Off 2-10 Operating...
... 2-3 Navigating with the Pointing-Stick 2-4 Setting Pointing-Stick Preferences 2-5 Using Hotkeys 2-6 Switching the Image 2-7 Adjusting System Volume 2-7 Initiating Quick Controls 2-8 Setting a Power Conservation Level 2-8 Viewing Battery Status 2-8 Adjusting Panel Contrast 2-8 Adjusting Brightness 2-9 Displaying System Information 2-9 Stretching Text 2-9 Using the Embedded Numeric Keypad 2-10 Toggling the Keypad On and Off 2-10 Operating...

Armada E500 Series Quick Reference Guide
Page 3
... External Keyboard Internet Buttons 2-15 chapter 3 USING BATTERY PACKS Learning About Battery Packs 3-1 Using a New Battery Pack 3-2 Charging Battery Packs 3-2 Inserting and Removing the Primary Battery Pack 3-3 Removing the Primary Battery Pack 3-3 Inserting the Primary Battery Pack 3-4 Storing a Battery Pack 3-5 Maximizing Battery Pack Life 3-5 Recycling Used Battery Packs 3-6 System Beeps 3-6 Beeps with a Blinking Battery Charge Light 3-6 Beeps with a Blinking Power/Suspend...
... External Keyboard Internet Buttons 2-15 chapter 3 USING BATTERY PACKS Learning About Battery Packs 3-1 Using a New Battery Pack 3-2 Charging Battery Packs 3-2 Inserting and Removing the Primary Battery Pack 3-3 Removing the Primary Battery Pack 3-3 Inserting the Primary Battery Pack 3-4 Storing a Battery Pack 3-5 Maximizing Battery Pack Life 3-5 Recycling Used Battery Packs 3-6 System Beeps 3-6 Beeps with a Blinking Battery Charge Light 3-6 Beeps with a Blinking Power/Suspend...
Armada E500 Series Quick Reference Guide
Page 4
... DEVICE BAYS Bay Configuration 5-1 Caring for Removable Drives 5-2 Changing the Startup Sequence with MultiBoot 5-3 Selecting Diskettes 5-4 DualBay Devices 5-4 Inserting a DualBay Device 5-4 Removing a DualBay Device 5-5 Second Battery Pack 5-5 MultiBay Devices 5-6 Inserting a MultiBay Device 5-6 Removing a MultiBay Device 5-7 Using the CD or DVD Drive 5-8 Manually Ejecting a CD or DVD 5-9 Using the LS-120 Drive...
... DEVICE BAYS Bay Configuration 5-1 Caring for Removable Drives 5-2 Changing the Startup Sequence with MultiBoot 5-3 Selecting Diskettes 5-4 DualBay Devices 5-4 Inserting a DualBay Device 5-4 Removing a DualBay Device 5-5 Second Battery Pack 5-5 MultiBay Devices 5-6 Inserting a MultiBay Device 5-6 Removing a MultiBay Device 5-7 Using the CD or DVD Drive 5-8 Manually Ejecting a CD or DVD 5-9 Using the LS-120 Drive...

Armada E500 Series Quick Reference Guide
Page 11
... 1-2 Taking a Look at the Computer Accepts a CD drive, DVD drive, SuperDisk LS-120 drive, second hard drive, third battery pack, or a weight saver. Function like the left -click and rightclick buttons of an external mouse. Allows direct access to predefined...Provides integrated pointing device functions. Used with the TouchPad, the TouchPad button drags and highlights. Top Components Continued Component 3 Stereo speakers 4 Battery light 5 Power/Suspend light 6 Volume Control buttons 7 MultiBay 8 Speaker ports 9 TouchPad Left and right TouchPad buttons or Function Built-in...
... 1-2 Taking a Look at the Computer Accepts a CD drive, DVD drive, SuperDisk LS-120 drive, second hard drive, third battery pack, or a weight saver. Function like the left -click and rightclick buttons of an external mouse. Allows direct access to predefined...Provides integrated pointing device functions. Used with the TouchPad, the TouchPad button drags and highlights. Top Components Continued Component 3 Stereo speakers 4 Battery light 5 Power/Suspend light 6 Volume Control buttons 7 MultiBay 8 Speaker ports 9 TouchPad Left and right TouchPad buttons or Function Built-in...

Armada E500 Series Quick Reference Guide
Page 12
Taking a Look at the Computer 1-3 Left Side Components Component 1 Tilt foot 2 Battery bay Left Side Components Function Retractable feet on the rear base of the computer that open and lock into place in order to angle the keyboard to a more comfortable position. Holds the primary battery pack.
Taking a Look at the Computer 1-3 Left Side Components Component 1 Tilt foot 2 Battery bay Left Side Components Function Retractable feet on the rear base of the computer that open and lock into place in order to angle the keyboard to a more comfortable position. Holds the primary battery pack.

Armada E500 Series Quick Reference Guide
Page 15
... external keyboard or mouse. 1-6 Taking a Look at the Computer A 176-pin expansion bus connector that connects the computer to an AC adapter when the battery or charge battery are not operating. Connects an optional external serial device such as an external CRT monitor. Rear Components Rear Components Component 1 Power connector 2 USB connector...
... external keyboard or mouse. 1-6 Taking a Look at the Computer A 176-pin expansion bus connector that connects the computer to an AC adapter when the battery or charge battery are not operating. Connects an optional external serial device such as an external CRT monitor. Rear Components Rear Components Component 1 Power connector 2 USB connector...
Armada E500 Series Quick Reference Guide
Page 16
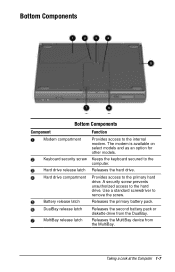
... models. Releases the MultiBay device from the DualBay. Taking a Look at the Computer 1-7 Releases the primary battery pack. Bottom Components Bottom Components Component 1 Modem compartment 2 Keyboard security screw 3 Hard drive release latch 4 Hard drive compartment 5 Battery release latch 6 DualBay release latch 7 MultiBay release latch Function Provides access to remove the screw. Keeps...
... models. Releases the MultiBay device from the DualBay. Taking a Look at the Computer 1-7 Releases the primary battery pack. Bottom Components Bottom Components Component 1 Modem compartment 2 Keyboard security screw 3 Hard drive release latch 4 Hard drive compartment 5 Battery release latch 6 DualBay release latch 7 MultiBay release latch Function Provides access to remove the screw. Keeps...

Armada E500 Series Quick Reference Guide
Page 24
...+M or s Press Fn+F5, then select or clear the Mute check box. Hotkeys Quick Reference Continued Task Initiate Quick Controls Set a power conservation level View battery status Adjust panel contrast Adjust screen brightness Display system information Stretch text Hotkeys Fn+F6 Fn+F7 Fn+F8 FN+F9 Fn+F10 Fn+Esc...
...+M or s Press Fn+F5, then select or clear the Mute check box. Hotkeys Quick Reference Continued Task Initiate Quick Controls Set a power conservation level View battery status Adjust panel contrast Adjust screen brightness Display system information Stretch text Hotkeys Fn+F6 Fn+F7 Fn+F8 FN+F9 Fn+F10 Fn+Esc...

Armada E500 Series Quick Reference Guide
Page 25
... initiate Quick Controls, press Fn+F6. s None (Drain)-Runs the computer at full power. s A lightning bolt icon beside a battery icon indicates that the battery pack in that can use Quick Controls, set a power-on -screen slide button or with an on password and enable Quick Control .... Setting a Power Conservation Level In Windows 2000 Professional press Fn+F7 to Chapter 13. s To display the location of all installed batteries. Adjusting Panel Contrast Press Fn+F9 to select models. 2-8 Using the Keyboard Before you can disable the keyboard and pointing device and ...
... initiate Quick Controls, press Fn+F6. s None (Drain)-Runs the computer at full power. s A lightning bolt icon beside a battery icon indicates that the battery pack in that can use Quick Controls, set a power-on -screen slide button or with an on password and enable Quick Control .... Setting a Power Conservation Level In Windows 2000 Professional press Fn+F7 to Chapter 13. s To display the location of all installed batteries. Adjusting Panel Contrast Press Fn+F9 to select models. 2-8 Using the Keyboard Before you can disable the keyboard and pointing device and ...
Armada E500 Series Quick Reference Guide
Page 34
... supported in the: s Battery bay in the computer (primary battery pack) s DualBay in the computer (secondary battery pack) s MultiBay in the computer (third battery pack) With the computer turned off the computer or initiate Hibernation before removing a battery, or connect to a fully charged battery pack or AC power source. Replace only with the Compaq spare designated for...
... supported in the: s Battery bay in the computer (primary battery pack) s DualBay in the computer (secondary battery pack) s MultiBay in the computer (third battery pack) With the computer turned off the computer or initiate Hibernation before removing a battery, or connect to a fully charged battery pack or AC power source. Replace only with the Compaq spare designated for...

Armada E500 Series Quick Reference Guide
Page 35
... to forward them to two battery packs in the computer MultiBay Battery packs are charging. 3-2 Using Battery Packs Using a New Battery Pack Charge the battery pack in the computer's battery bay, a DualBay, or a MultiBay while connected to Compaq, your authorized Compaq Partners, or other battery is used for the MultiBay. A third battery pack in the optional battery charger. Therefore, you want...
... to forward them to two battery packs in the computer MultiBay Battery packs are charging. 3-2 Using Battery Packs Using a New Battery Pack Charge the battery pack in the computer's battery bay, a DualBay, or a MultiBay while connected to Compaq, your authorized Compaq Partners, or other battery is used for the MultiBay. A third battery pack in the optional battery charger. Therefore, you want...

Armada E500 Series Quick Reference Guide
Page 36
... remove is the only source of the computer. It blinks in the battery bay, DualBay, or MultiBay) is charging. Pull forward on the primary battery release latch to release the battery pack. 2. NOTE: The battery charge light is the right light on the front edge of power to... the computer, initiate Hibernation or connect the computer to external power before removing the battery. 1. Inserting and Removing the Primary Battery Pack Removing the Primary Battery Pack CAUTION: If the battery pack you are fully charged. When the battery charge light turns off when fully charged. Remove the...
... remove is the only source of the computer. It blinks in the battery bay, DualBay, or MultiBay) is charging. Pull forward on the primary battery release latch to release the battery pack. 2. NOTE: The battery charge light is the right light on the front edge of power to... the computer, initiate Hibernation or connect the computer to external power before removing the battery. 1. Inserting and Removing the Primary Battery Pack Removing the Primary Battery Pack CAUTION: If the battery pack you are fully charged. When the battery charge light turns off when fully charged. Remove the...

Armada E500 Series Quick Reference Guide
Page 37
Push the battery pack into the battery bay with the large label on the battery pack facing up and the battery contacts facing in. NOTE: See Chapter 5 to insert and remove battery packs to external power before removing the battery. Inserting the Primary Battery Pack CAUTION: If the battery pack you are about to remove is firmly seated. Insert a battery pack into the battery bay until it is the only source of power to the computer, initiate Hibernation or connect the computer to and from the DualBay and MultiBay. 3-4 Using Battery Packs
Push the battery pack into the battery bay with the large label on the battery pack facing up and the battery contacts facing in. NOTE: See Chapter 5 to insert and remove battery packs to external power before removing the battery. Inserting the Primary Battery Pack CAUTION: If the battery pack you are about to remove is firmly seated. Insert a battery pack into the battery bay until it is the only source of power to the computer, initiate Hibernation or connect the computer to and from the DualBay and MultiBay. 3-4 Using Battery Packs

Armada E500 Series Quick Reference Guide
Page 38
...Storage Temperatures Storage Time Temperature Range °F Temperature Range °C Less than 1 month No more than two weeks, remove and store the battery packs. Using Battery Packs 3-5 See Chapter 4 for more than 3 months Unlimited 32°-122° 32°-104° 32°- 86° 0&#... used by the computer and the energy stored in a cool, dry place within the following guidelines: s Select the High level of battery power. s Reduce the display brightness and select a shorter screen save timeout. NOTE: The display, processor, and drive components use the following temperature...
...Storage Temperatures Storage Time Temperature Range °F Temperature Range °C Less than 1 month No more than two weeks, remove and store the battery packs. Using Battery Packs 3-5 See Chapter 4 for more than 3 months Unlimited 32°-122° 32°-104° 32°- 86° 0&#... used by the computer and the energy stored in a cool, dry place within the following guidelines: s Select the High level of battery power. s Reduce the display brightness and select a shorter screen save timeout. NOTE: The display, processor, and drive components use the following temperature...

Armada E500 Series Quick Reference Guide
Page 39
...PC Card when you are not using them separately to avoid being alerted with system beeps. 3-6 Using Battery Packs High temperatures cause a battery pack to resolve the low battery condition. System Beeps Beeps with a Blinking Battery Charge Light When the computer beeps while the battery charge light is not listed for more than two weeks, remove battery...not have its charge more quickly and reduce battery pack life. See "Turning Beeps On or Off" in Appendix A. s Format diskettes while using it is available in your Compaq authorized dealer, reseller, or service provider....
...PC Card when you are not using them separately to avoid being alerted with system beeps. 3-6 Using Battery Packs High temperatures cause a battery pack to resolve the low battery condition. System Beeps Beeps with a Blinking Battery Charge Light When the computer beeps while the battery charge light is not listed for more than two weeks, remove battery...not have its charge more quickly and reduce battery pack life. See "Turning Beeps On or Off" in Appendix A. s Format diskettes while using it is available in your Compaq authorized dealer, reseller, or service provider....

Armada E500 Series Quick Reference Guide
Page 40
... light is available. See the following : s To enable or disable PC Card beeps, click Control PanelÅ double-click PC Card iconÅGlobal Settings tab, then click the Disable PC Card Sound Effects box. Then click the Warning Beeps Off button. Using Battery Packs 3-7 Connect the computer to be controlled through the application...
... light is available. See the following : s To enable or disable PC Card beeps, click Control PanelÅ double-click PC Card iconÅGlobal Settings tab, then click the Disable PC Card Sound Effects box. Then click the Warning Beeps Off button. Using Battery Packs 3-7 Connect the computer to be controlled through the application...
Armada E500 Series Quick Reference Guide
Page 41
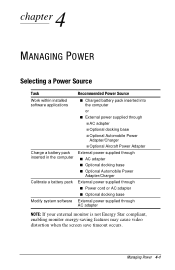
...Power Source Work within installed software applications s Charged battery pack inserted into the computer or s External power supplied through s AC adapter s Optional docking base s Optional Automobile Power Adapter/Charger s Optional Aircraft Power Adapter Charge a battery pack External power supplied through inserted in the ...computer s AC adapter s Optional docking base s Optional Automobile Power Adapter/Charger Calibrate a battery pack External power supplied through s Power cord or AC adapter s Optional docking base Modify system software External ...
...Power Source Work within installed software applications s Charged battery pack inserted into the computer or s External power supplied through s AC adapter s Optional docking base s Optional Automobile Power Adapter/Charger s Optional Aircraft Power Adapter Charge a battery pack External power supplied through inserted in the ...computer s AC adapter s Optional docking base s Optional Automobile Power Adapter/Charger Calibrate a battery pack External power supplied through s Power cord or AC adapter s Optional docking base Modify system software External ...

