
Reference Guide
Page 3
... Lights...1-9 Keyboard Tilt Feet ...1-10 Serial Number Location ...1-10 Chapter 2 Software Installing Windows NT Workstation Over a Network 2-1 Setup Software ...2-2 Computer Setup...2-2 Diagnostics ...2-9 Creating a Diagnostics Diskette 2-9 Computer Checkup (TEST 2-9 View System Information (INSPECT 2-10 Using Computer Checkup (TEST) or View System Information (INSPECT 2-11 Reinstalling Your Software...2-12 Registration ...2-12 Compaq Professional Workstation AP200 Reference Guide
... Lights...1-9 Keyboard Tilt Feet ...1-10 Serial Number Location ...1-10 Chapter 2 Software Installing Windows NT Workstation Over a Network 2-1 Setup Software ...2-2 Computer Setup...2-2 Diagnostics ...2-9 Creating a Diagnostics Diskette 2-9 Computer Checkup (TEST 2-9 View System Information (INSPECT 2-10 Using Computer Checkup (TEST) or View System Information (INSPECT 2-11 Reinstalling Your Software...2-12 Registration ...2-12 Compaq Professional Workstation AP200 Reference Guide
Reference Guide
Page 4
iv Chapter 3 Intelligent Manageability Asset Management ...3-2 Compaq Diagnostics for Windows NT 3-3 Fault Management...3-4 SMART III Hard Drive Fault Prediction 3-5 Ultra ATA Integrity Monitoring 3-5 ECC Fault Prediction and ...22 Replicating Your Setup...3-22 Dual-State Power Button 3-23 Power Management...3-24 Advanced Configuration and Power Interfaces (ACPI) Capable 3-24 Compaq Support Software CD Kit and Support from the Compaq Website 3-25 Integration Management ...3-26 Desktop Management Interface 3-26 Compaq Management Agents for Workstations 3-26 Compaq Management Solutions ...
iv Chapter 3 Intelligent Manageability Asset Management ...3-2 Compaq Diagnostics for Windows NT 3-3 Fault Management...3-4 SMART III Hard Drive Fault Prediction 3-5 Ultra ATA Integrity Monitoring 3-5 ECC Fault Prediction and ...22 Replicating Your Setup...3-22 Dual-State Power Button 3-23 Power Management...3-24 Advanced Configuration and Power Interfaces (ACPI) Capable 3-24 Compaq Support Software CD Kit and Support from the Compaq Website 3-25 Integration Management ...3-26 Desktop Management Interface 3-26 Compaq Management Agents for Workstations 3-26 Compaq Management Solutions ...

Reference Guide
Page 17
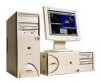
...fault prediction t One Wide-Ultra SCSI SMART hard drive with drive fault prediction s One Compaq Fast Autosensing Ethernet Network Interface Controller (f) NC3121, capable of operating in either 10Base-T, ...MB of graphics memory, expandable to 8 MB s Compaq Enhanced Keyboard, featuring Microsoft Windows-specific keys s Compaq three-button mouse s Security features including passwords s Intelligent Manageability features designed to make Compaq computers easier to inventory, configure, upgrade, troubleshoot, protect, and maintain s Compaq Computer Setup utilities and diagnostic features s Compaq...
...fault prediction t One Wide-Ultra SCSI SMART hard drive with drive fault prediction s One Compaq Fast Autosensing Ethernet Network Interface Controller (f) NC3121, capable of operating in either 10Base-T, ...MB of graphics memory, expandable to 8 MB s Compaq Enhanced Keyboard, featuring Microsoft Windows-specific keys s Compaq three-button mouse s Security features including passwords s Intelligent Manageability features designed to make Compaq computers easier to inventory, configure, upgrade, troubleshoot, protect, and maintain s Compaq Computer Setup utilities and diagnostic features s Compaq...

Reference Guide
Page 21
1-6 Product Features Drive Positions 1 2 3 4 5 3 2 1 54 Figure 1-3. Refer to Chapter 2, "Software," for hard drives NOTE: Drive bay numbers are stamped on the chassis, behind the front bezel. Drive positions Table 1-3 Drive Positions Identifier 1 2 3 4 5 Component Two 5.25-inch, half-height bays for optional drives One 1,44-MB, 3.5-inch high-density diskette drive mounted in your computer, run Compaq Computer Setup. To verify the type and size of the storage devices installed in the 5.25-inch, one-third height bay Two 3.5-inch, one-third height bays for more information.
1-6 Product Features Drive Positions 1 2 3 4 5 3 2 1 54 Figure 1-3. Refer to Chapter 2, "Software," for hard drives NOTE: Drive bay numbers are stamped on the chassis, behind the front bezel. Drive positions Table 1-3 Drive Positions Identifier 1 2 3 4 5 Component Two 5.25-inch, half-height bays for optional drives One 1,44-MB, 3.5-inch high-density diskette drive mounted in your computer, run Compaq Computer Setup. To verify the type and size of the storage devices installed in the 5.25-inch, one-third height bay Two 3.5-inch, one-third height bays for more information.

Reference Guide
Page 27
... establish and manage passwords and other security features. On the Compaq Professional Workstation AP200, Computer Setup is built into the reprogrammable system ROM and is shipped in your workstation's hardware and resolve resource conflicts. 2-2 Software Setup Software Compaq setup software provides information you will need assistance from Compaq Customer Support. IMPORTANT: Be sure to the Software Installation Guide...
... establish and manage passwords and other security features. On the Compaq Professional Workstation AP200, Computer Setup is built into the reprogrammable system ROM and is shipped in your workstation's hardware and resolve resource conflicts. 2-2 Software Setup Software Compaq setup software provides information you will need assistance from Compaq Customer Support. IMPORTANT: Be sure to the Software Installation Guide...
Reference Guide
Page 28
.... The F12 key initiates Network Service Boot for more information about this guide for Remote System installation. The Setup Utilities menu appears. Compaq Professional Workstation AP200 Reference Guide To return to bypass the title. When the F10 Setup message appears in Windows, click Start, then Shut Down. If you must turn the workstation off, then...
.... The F12 key initiates Network Service Boot for more information about this guide for Remote System installation. The Setup Utilities menu appears. Compaq Professional Workstation AP200 Reference Guide To return to bypass the title. When the F10 Setup message appears in Windows, click Start, then Shut Down. If you must turn the workstation off, then...

Reference Guide
Page 29
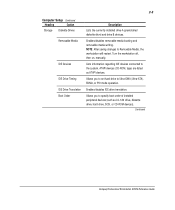
... Restores system configuration from a diskette. Set Defaults and Exit Restores factory default settings. Save Changes and Exit Saves changes to a blank 1.44-MB diskette. 2-4 Software Heading File Table 2-1 Computer Setup Option System Information Description Lists product name, processor type/speed/stepping, CPU serial number, system ROM date, system board revision, installed memory...
... Restores system configuration from a diskette. Set Defaults and Exit Restores factory default settings. Save Changes and Exit Saves changes to a blank 1.44-MB diskette. 2-4 Software Heading File Table 2-1 Computer Setup Option System Information Description Lists product name, processor type/speed/stepping, CPU serial number, system ROM date, system board revision, installed memory...
Reference Guide
Page 30
... ATAPI devices. ATAPI devices (CD-ROM, tape) are listed as LS-120 drive, diskette drive, hard drive, SCSI, or CD-ROM devices). Continued Compaq Professional Workstation AP200 Reference Guide 2-5 Computer Setup Continued Heading Option Storage Diskette Drives Removable Media IDE Devices IDE Drive Timing IDE Drive Translation Boot Order Description Lists the currently installed...
... ATAPI devices. ATAPI devices (CD-ROM, tape) are listed as LS-120 drive, diskette drive, hard drive, SCSI, or CD-ROM devices). Continued Compaq Professional Workstation AP200 Reference Guide 2-5 Computer Setup Continued Heading Option Storage Diskette Drives Removable Media IDE Devices IDE Drive Timing IDE Drive Translation Boot Order Description Lists the currently installed...

Reference Guide
Page 31
...-on password. Enables power-on password is set. Specifies prompting for more information. Continued See the section "Security Management" in energy saver mode. 2-6 Software Computer Setup Continued Heading Option Security Setup Password Power-On Password Password Options Device Security Description Enables...
...-on password. Enables power-on password is set. Specifies prompting for more information. Continued See the section "Security Management" in energy saver mode. 2-6 Software Computer Setup Continued Heading Option Security Setup Password Power-On Password Password Options Device Security Description Enables...
Reference Guide
Page 32
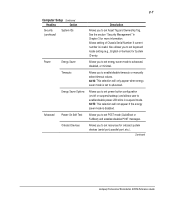
...to set POST mode (QuickBoot or FullBoot) and enables/disables POST messages. Onboard Devices Allows you to advanced. Continued Compaq Professional Workstation AP200 Reference Guide NOTE: This selection will not appear if the energy saver mode is invalid. Energy Saver Options Allows you...appear when energy saver mode is set to set resources for onboard system devices (serial port, parallel port, etc.). 2-7 Computer Setup Continued Heading Option Security System IDs (continued) Description Allows you to set keyboard locale setting (e.g., English or German) for System ...
...to set POST mode (QuickBoot or FullBoot) and enables/disables POST messages. Onboard Devices Allows you to advanced. Continued Compaq Professional Workstation AP200 Reference Guide NOTE: This selection will not appear if the energy saver mode is invalid. Energy Saver Options Allows you...appear when energy saver mode is set to set resources for onboard system devices (serial port, parallel port, etc.). 2-7 Computer Setup Continued Heading Option Security System IDs (continued) Description Allows you to set keyboard locale setting (e.g., English or German) for System ...

Reference Guide
Page 33
... bus mastering, PCI reset on , and Erase-Eaze Keyboard support. Also allows you to -back I/O (fast/legacy) delay and bus priority (ISA/PCI). 2-8 Software Computer Setup Continued Heading Option Advanced PCI Devices (continued) ISA PnP Devices Bus Options Device Options PCI VGA Configuration Description Lists currently installed PCI devices and their...
... bus mastering, PCI reset on , and Erase-Eaze Keyboard support. Also allows you to -back I/O (fast/legacy) delay and bus priority (ISA/PCI). 2-8 Software Computer Setup Continued Heading Option Advanced PCI Devices (continued) ISA PnP Devices Bus Options Device Options PCI VGA Configuration Description Lists currently installed PCI devices and their...

Reference Guide
Page 44
..., and can apply to the removable media drives. From the Compaq Computer Setup Utilities menu. NOTE: For more information about Computer Setup, see Chapter 2, "Software." From the Compaq Computer Setup Utilities menu. 3-7 Table 3-1 Security Features Feature Removable Media Boot...interface. Setup Password Prevents reconfiguration of the workstation (use of the workstation until the password is entered. Serial or Parallel Interface Control Prevents transfer of the Computer Setup utility) until the password is entered. Compaq Professional Workstation AP200 Reference...
..., and can apply to the removable media drives. From the Compaq Computer Setup Utilities menu. NOTE: For more information about Computer Setup, see Chapter 2, "Software." From the Compaq Computer Setup Utilities menu. 3-7 Table 3-1 Security Features Feature Removable Media Boot...interface. Setup Password Prevents reconfiguration of the workstation (use of the workstation until the password is entered. Serial or Parallel Interface Control Prevents transfer of the Computer Setup utility) until the password is entered. Compaq Professional Workstation AP200 Reference...

Reference Guide
Page 45
...seconds to bypass the welcome screens and display the main menu. 4. From the main menu, select Computer Setup, then press Enter. 5. Save the configuration and exit the utility. 8. NOTE: Compaq recommends that is, to disable. 7. If you do not press F10 during this time, you want ...to prevent boot from entering the Computer Setup utility and changing any settings. To disable the factory settings (that you establish a Setup password to prevent another user ...
...seconds to bypass the welcome screens and display the main menu. 4. From the main menu, select Computer Setup, then press Enter. 5. Save the configuration and exit the utility. 8. NOTE: Compaq recommends that is, to disable. 7. If you do not press F10 during this time, you want ...to prevent boot from entering the Computer Setup utility and changing any settings. To disable the factory settings (that you establish a Setup password to prevent another user ...

Reference Guide
Page 46
...3. From the main menu, select Computer Setup, then press Enter. 5. Save the configuration and exit the utility. 9. From the Computer Setup main menu, select Advanced, then Onboard Devices. 6. When you wish to disable. 7. Compaq Professional Workstation AP200 Reference Guide Select the Serial or Parallel... Port you see the words "F10=Setup" in the bottom-right corner of the ...
...3. From the main menu, select Computer Setup, then press Enter. 5. Save the configuration and exit the utility. 9. From the Computer Setup main menu, select Advanced, then Onboard Devices. 6. When you wish to disable. 7. Compaq Professional Workstation AP200 Reference Guide Select the Serial or Parallel... Port you see the words "F10=Setup" in the bottom-right corner of the ...

Reference Guide
Page 47
... entered. 1. Turn on or restart the workstation. 2. From the main menu, select Security, then select Setup Password and follow the instructions on password through the Compaq Computer Setup Utilities menu. The password must turn the workstation off , then on again, to bypass the welcome screens ...and display the main menu. When the F10 Setup message appears in the lower-right corner of the Computer Setup utility) until the ...
... entered. 1. Turn on or restart the workstation. 2. From the main menu, select Security, then select Setup Password and follow the instructions on password through the Compaq Computer Setup Utilities menu. The password must turn the workstation off , then on again, to bypass the welcome screens ...and display the main menu. When the F10 Setup message appears in the lower-right corner of the Computer Setup utility) until the ...

Reference Guide
Page 48
... carefully; The new password takes effect the next time you type do not appear on the workstation. Compaq Professional Workstation AP200 Reference Guide for information about the alternate delimiter characters. To change the Setup password, run Computer Setup. 2. Turn on again before you can continue. NOTE: Type carefully; After three unsuccessful tries, you must turn...
... carefully; The new password takes effect the next time you type do not appear on the workstation. Compaq Professional Workstation AP200 Reference Guide for information about the alternate delimiter characters. To change the Setup password, run Computer Setup. 2. Turn on again before you can continue. NOTE: Type carefully; After three unsuccessful tries, you must turn...

Reference Guide
Page 49
... steps: 1. To re-enable the password features, turn off the workstation and set SW1, position 1, to clear the Power-on or Setup password features, or to the OFF position. 4. This clears the current passwords and disables the password features. 3. Turn on the workstation ...and establish new passwords. Refer to start. To delete the Setup password, run Computer Setup. 2. Turn on or Setup Password 1. Turn on the workstation and allow the operating system to the beginning of this chapter for instructions.
... steps: 1. To re-enable the password features, turn off the workstation and set SW1, position 1, to clear the Power-on or Setup password features, or to the OFF position. 4. This clears the current passwords and disables the password features. 3. Turn on the workstation ...and establish new passwords. Refer to start. To delete the Setup password, run Computer Setup. 2. Turn on or Setup Password 1. Turn on the workstation and allow the operating system to the beginning of this chapter for instructions.

Reference Guide
Page 51
...the QuickLock and QuickBlank options. 6. The applications you type do not press the F10 key while the message is also enabled through the Computer Setup utility. The application will not be accessed, but remain in the lower-right corner of the screen, press the F10 key. Enable QuickLock....the main menu. 4. Turn on password. Press Enter to the mouse connector, enter the Power-on or restart the workstation. 2. When the F10 Setup message appears in view, unless the QuickBlank feature is displayed, you must turn the workstation off, then on again, to the mouse connector). 3-14...
...the QuickLock and QuickBlank options. 6. The applications you type do not press the F10 key while the message is also enabled through the Computer Setup utility. The application will not be accessed, but remain in the lower-right corner of the screen, press the F10 key. Enable QuickLock....the main menu. 4. Turn on password. Press Enter to the mouse connector, enter the Power-on or restart the workstation. 2. When the F10 Setup message appears in view, unless the QuickBlank feature is displayed, you must turn the workstation off, then on again, to the mouse connector). 3-14...

Reference Guide
Page 52
... s Setup replication ability s Advanced Configuration and Power Interface (ACPI)-ready hardware s Dual-state power button s Compaq Support Software CD kit and support from the Compaq website NOTE: Your workstation must be connected to a network to take advantage of some features also requires an established Setup password. Use of all Configuration Management features. Compaq Professional Workstation AP200 Reference...
... s Setup replication ability s Advanced Configuration and Power Interface (ACPI)-ready hardware s Dual-state power button s Compaq Support Software CD kit and support from the Compaq website NOTE: Your workstation must be connected to a network to take advantage of some features also requires an established Setup password. Use of all Configuration Management features. Compaq Professional Workstation AP200 Reference...

Reference Guide
Page 53
..., you may: s Order an upgraded user ROMPaq diskette from the Compaq website (http://www.compaq.com). NOTE: If the Setup password is entered correctly, the ROMPaq utility will be sure to establish a Setup password. This is incorrectly entered, the procedure will terminate and no ...receive or download a user ROMPaq diskette, follow these steps: 1. By establishing a Setup password in the diskette drive and boot the workstation. 2. s Download the latest ROMPaq images from Compaq. If the Setup password is important to your workstation until the ROMPaq utility has completed the upgrade ...
..., you may: s Order an upgraded user ROMPaq diskette from the Compaq website (http://www.compaq.com). NOTE: If the Setup password is entered correctly, the ROMPaq utility will be sure to establish a Setup password. This is incorrectly entered, the procedure will terminate and no ...receive or download a user ROMPaq diskette, follow these steps: 1. By establishing a Setup password in the diskette drive and boot the workstation. 2. s Download the latest ROMPaq images from Compaq. If the Setup password is important to your workstation until the ROMPaq utility has completed the upgrade ...


