Reference Guide
Page 5
...Board 4-16 Upgrading Graphics Capabilities 4-17 Customizing the Monitor Display 4-19 Installing Additional Drives ...4-19 Using the Cable-Select Feature with IDE Ultra ATA Devices 4-21 Installing Optional SCSI Devices 4-22 Installing an IDE CD-ROM or Tape Drive 4-25 Installing a 3.5-Inch Drive into the Third-height, 5.25-Inch Drive Bay 4-27 Removing a Drive from a Drive Bay 4-31 Replacing the Battery ...4-33 Chapter 5 Network Communications Connecting to an Ethernet Network 5-2 Attaching a Network Cable to the RJ-45 Connector 5-2 Installing the Network Driver 5-3 Compaq Professional...
...Board 4-16 Upgrading Graphics Capabilities 4-17 Customizing the Monitor Display 4-19 Installing Additional Drives ...4-19 Using the Cable-Select Feature with IDE Ultra ATA Devices 4-21 Installing Optional SCSI Devices 4-22 Installing an IDE CD-ROM or Tape Drive 4-25 Installing a 3.5-Inch Drive into the Third-height, 5.25-Inch Drive Bay 4-27 Removing a Drive from a Drive Bay 4-31 Replacing the Battery ...4-33 Chapter 5 Network Communications Connecting to an Ethernet Network 5-2 Attaching a Network Cable to the RJ-45 Connector 5-2 Installing the Network Driver 5-3 Compaq Professional...

Reference Guide
Page 17
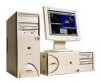
... Ethernet Network Interface Controller (f) NC3121, capable of operating in either 10Base-T, 10Base-2 or 100Base-TX environments s One IDE 32X CD-ROM drive s One PremierSound 16-bit audio board and enhanced speaker s One Accelerated Graphics Port (AGP) graphics controller installed in the AGP slot, with 4 MB of graphics memory, expandable to 8 MB s Compaq Enhanced Keyboard, featuring Microsoft Windows-specific keys s Compaq three-button mouse s Security features including passwords s Intelligent Manageability features designed to make Compaq computers easier to inventory, configure, upgrade...
... Ethernet Network Interface Controller (f) NC3121, capable of operating in either 10Base-T, 10Base-2 or 100Base-TX environments s One IDE 32X CD-ROM drive s One PremierSound 16-bit audio board and enhanced speaker s One Accelerated Graphics Port (AGP) graphics controller installed in the AGP slot, with 4 MB of graphics memory, expandable to 8 MB s Compaq Enhanced Keyboard, featuring Microsoft Windows-specific keys s Compaq three-button mouse s Security features including passwords s Intelligent Manageability features designed to make Compaq computers easier to inventory, configure, upgrade...

Reference Guide
Page 27
... be necessary when you need about the operating environment of the devices installed on the workstation are recognized by the Setup utility. s To determine information about the workstation if you add or remove hardware. Computer Setup Computer Setup allows you to configure new options and drivers in English only. These tools can also be used: s To change factory default settings, and to the Software Installation Guide. 2-2 Software Setup Software Compaq setup software provides information you will need assistance from Compaq Customer Support.
... be necessary when you need about the operating environment of the devices installed on the workstation are recognized by the Setup utility. s To determine information about the workstation if you add or remove hardware. Computer Setup Computer Setup allows you to configure new options and drivers in English only. These tools can also be used: s To change factory default settings, and to the Software Installation Guide. 2-2 Software Setup Software Compaq setup software provides information you will need assistance from Compaq Customer Support.
Reference Guide
Page 30
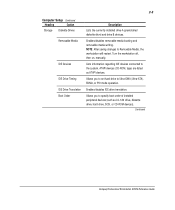
...set hard drive to specify boot order of installed peripheral devices (such as ATAPI devices. Continued Compaq Professional Workstation AP200 Reference Guide 2-5 Computer Setup Continued Heading Option Storage Diskette Drives Removable Media IDE Devices IDE Drive Timing IDE Drive Translation Boot Order Description Lists the currently installed drive A (preinstalled diskette drive) and drive B devices. ATAPI devices (CD-ROM, tape) are listed as LS-120 drive, diskette drive, hard drive, SCSI, or CD-ROM devices). Enables/disables removable media booting and removable media...
...set hard drive to specify boot order of installed peripheral devices (such as ATAPI devices. Continued Compaq Professional Workstation AP200 Reference Guide 2-5 Computer Setup Continued Heading Option Storage Diskette Drives Removable Media IDE Devices IDE Drive Timing IDE Drive Translation Boot Order Description Lists the currently installed drive A (preinstalled diskette drive) and drive B devices. ATAPI devices (CD-ROM, tape) are listed as LS-120 drive, diskette drive, hard drive, SCSI, or CD-ROM devices). Enables/disables removable media booting and removable media...

Reference Guide
Page 39
..., key components, and monitors. These features: s Provide detailed inventory information about various components, including: t Manufacturer, model, and serial number of Compaq workstations, monitors, hard drives, and dual inline memory modules (DIMMs) t Asset Tag t System board and ROM revision level s Allow you to view, print, or electronically save this data and other system configuration details, using: t Compaq Diagnostics for Windows NT t System management products from the Compaq Management Solutions Partners t Management software products supporting the Desktop Management...
..., key components, and monitors. These features: s Provide detailed inventory information about various components, including: t Manufacturer, model, and serial number of Compaq workstations, monitors, hard drives, and dual inline memory modules (DIMMs) t Asset Tag t System board and ROM revision level s Allow you to view, print, or electronically save this data and other system configuration details, using: t Compaq Diagnostics for Windows NT t System management products from the Compaq Management Solutions Partners t Management software products supporting the Desktop Management...

Reference Guide
Page 51
... welcome screens and display the main menu. 4. 3-14 Intelligent Manageability QuickLock/QuickBlank QuickLock/QuickBlank disables the keyboard and mouse interface, and can blank the screen, without exiting open applications. NOTE: If you type do not press the F10 key while the message is also enabled through the Computer Setup utility. Save the configuration and exit the utility. Enabling the Keyboard and Mouse Interface To enable the keyboard and input device connected to access the utility...
... welcome screens and display the main menu. 4. 3-14 Intelligent Manageability QuickLock/QuickBlank QuickLock/QuickBlank disables the keyboard and mouse interface, and can blank the screen, without exiting open applications. NOTE: If you type do not press the F10 key while the message is also enabled through the Computer Setup utility. Save the configuration and exit the utility. Enabling the Keyboard and Mouse Interface To enable the keyboard and input device connected to access the utility...

Reference Guide
Page 61
... workstation. Since the Compaq Professional Workstation AP200 ships standard with the ACPI hardware, you will be able to automatically turn on the Windows Desktop, then choose Properties. 3-24 Intelligent Manageability Power Management Use the Timeouts option under the Power menu in Computer Setup to avoid potential conflicts. NOTE: When using a power-managed system, disable monitor timeouts in Computer Setup first, then establish the settings in the operating system, to enable, customize, or disable standby timeouts.
... workstation. Since the Compaq Professional Workstation AP200 ships standard with the ACPI hardware, you will be able to automatically turn on the Windows Desktop, then choose Properties. 3-24 Intelligent Manageability Power Management Use the Timeouts option under the Power menu in Computer Setup to avoid potential conflicts. NOTE: When using a power-managed system, disable monitor timeouts in Computer Setup first, then establish the settings in the operating system, to enable, customize, or disable standby timeouts.

Reference Guide
Page 65
... the newly installed hardware. Compaq Professional Workstation AP200 Reference Guide If the workstation is very important that it off and disconnect the power cord from the wall outlet. 2. Disconnect the keyboard, monitor, network cable, and other external equipment connected to the equipment, do not plug telecommunications/telephone connectors into the network interface controller (NIC) receptacles. IMPORTANT: Compaq recommends that you finish the setup procedures for the preinstalled software before you...
... the newly installed hardware. Compaq Professional Workstation AP200 Reference Guide If the workstation is very important that it off and disconnect the power cord from the wall outlet. 2. Disconnect the keyboard, monitor, network cable, and other external equipment connected to the equipment, do not plug telecommunications/telephone connectors into the network interface controller (NIC) receptacles. IMPORTANT: Compaq recommends that you finish the setup procedures for the preinstalled software before you...

Reference Guide
Page 66
.... 3. Turn on the monitor, workstation, and other external devices. 7. Reconfigure the workstation, if necessary. When you add or remove optional devices, you complete the installation. See Appendix B for instructions. 4. Open the workstation by running Computer Setup in Windows NT, use Control Panel and configure your specific option. For instructions, see the applicable sections of the workstation or optional equipment. Before beginning these procedures, ensure that make up a system. Install any optional equipment. Run the Computer Setup utility after...
.... 3. Turn on the monitor, workstation, and other external devices. 7. Reconfigure the workstation, if necessary. When you add or remove optional devices, you complete the installation. See Appendix B for instructions. 4. Open the workstation by running Computer Setup in Windows NT, use Control Panel and configure your specific option. For instructions, see the applicable sections of the workstation or optional equipment. Before beginning these procedures, ensure that make up a system. Install any optional equipment. Run the Computer Setup utility after...

Reference Guide
Page 82
... with the upgraded memory. Replace the workstation access panel. 7. Plug the network cable back into the grounded AC outlet. Reconfigure the workstation, if necessary. See the "When to take advantage of the additional display modes now available with the tab in this chapter. 9. See the following section, "Customizing the Monitor Display," for more information. 4-18 Hardware Upgrades 4. Reinstall the graphics board into the same slot and secure...
... with the upgraded memory. Replace the workstation access panel. 7. Plug the network cable back into the grounded AC outlet. Reconfigure the workstation, if necessary. See the "When to take advantage of the additional display modes now available with the tab in this chapter. 9. See the following section, "Customizing the Monitor Display," for more information. 4-18 Hardware Upgrades 4. Reinstall the graphics board into the same slot and secure...

Reference Guide
Page 83
... Yes if the test bitmap was properly displayed. 9. Compaq Professional Workstation AP200 Reference Guide Installing Additional Drives The workstation supports up to take effect. 7. Click Start, then click Settings. 2. Select List All Modes and choose a mode from the list of colors you can manually select or change the monitor brand, model, refresh rates, color, resolution, and power management settings. To customize the display using Windows NT Workstation 4.0, complete the following steps: 1. In the Desktop Area box...
... Yes if the test bitmap was properly displayed. 9. Compaq Professional Workstation AP200 Reference Guide Installing Additional Drives The workstation supports up to take effect. 7. Click Start, then click Settings. 2. Select List All Modes and choose a mode from the list of colors you can manually select or change the monitor brand, model, refresh rates, color, resolution, and power management settings. To customize the display using Windows NT Workstation 4.0, complete the following steps: 1. In the Desktop Area box...

Reference Guide
Page 89
...: On a power-managed system, the power cord MUST be used for more information, refer to the documentation that you are multiple screw holes on the sides of the drives, use M3 metric hardware, such as in the 5.25-inch, onehalf height external bay. Extra guide screws are black. Disconnect the network cable and any external devices. Compaq Professional Workstation AP200 Reference Guide See Appendix B for installing a SCSI device. NOTE: These...
...: On a power-managed system, the power cord MUST be used for more information, refer to the documentation that you are multiple screw holes on the sides of the drives, use M3 metric hardware, such as in the 5.25-inch, onehalf height external bay. Extra guide screws are black. Disconnect the network cable and any external devices. Compaq Professional Workstation AP200 Reference Guide See Appendix B for installing a SCSI device. NOTE: These...

Reference Guide
Page 104
... monitor are using a printer, you need a printer driver). s Take out all cable connections for example, if you are plugged into a working grounded AC outlet. 6-2 Troubleshooting Helpful Hints If you encounter some minor problem with your system. s Check that all switch settings have been installed (for loose connections or incorrect connections. s Turn up the brightness and contrast controls of general suggestions before you turn on . s If necessary, reconfigure your keyboard...
... monitor are using a printer, you need a printer driver). s Take out all cable connections for example, if you are plugged into a working grounded AC outlet. 6-2 Troubleshooting Helpful Hints If you encounter some minor problem with your system. s Check that all switch settings have been installed (for loose connections or incorrect connections. s Turn up the brightness and contrast controls of general suggestions before you turn on . s If necessary, reconfigure your keyboard...

Reference Guide
Page 112
... type password. workstation. 2. 6-10 Troubleshooting Solving Display Problems Continued Problem Cause Solution Dim characters (continued) The RGB switch on the back of Set the RGB switch (and sync the monitor is incorrectly set If the graphics controller was upgraded, the correct display drivers may not be loaded. In a 2-monitor system or if another monitor is up, or it rolls, jitters, or be incomplete or the monitor securely connected to the blinks...
... type password. workstation. 2. 6-10 Troubleshooting Solving Display Problems Continued Problem Cause Solution Dim characters (continued) The RGB switch on the back of Set the RGB switch (and sync the monitor is incorrectly set If the graphics controller was upgraded, the correct display drivers may not be loaded. In a 2-monitor system or if another monitor is up, or it rolls, jitters, or be incomplete or the monitor securely connected to the blinks...

Reference Guide
Page 118
... cable is not configured properly. Run Computer Setup and modify the Embedded NIC Settings. The files containing the network driver are corrupted. 6-16 Troubleshooting Solving Network Problems Continued Problem Cause Diagnostics passes, but the workstation does not communicate with an expansion board. Cannot connect to network server when attempting Remote System Installation The network controller is securely attached to the network connector and that the cable is securely attached to the correct device. Network controller stopped working...
... cable is not configured properly. Run Computer Setup and modify the Embedded NIC Settings. The files containing the network driver are corrupted. 6-16 Troubleshooting Solving Network Problems Continued Problem Cause Diagnostics passes, but the workstation does not communicate with an expansion board. Cannot connect to network server when attempting Remote System Installation The network controller is securely attached to the network connector and that the cable is securely attached to the correct device. Network controller stopped working...

Reference Guide
Page 121
... properly loaded terminated. 6-19 Solving CD-ROM Problems If you encounter CD-ROM problems, refer to the common causes and solutions listed in the following : s The application was not allocated correctly. Compaq Professional Workstation AP200 Reference Guide Table 6-9 Solving CD-ROM Problems Problem Cause Solution System will not boot from The CD-ROM boot is not enabled Run the Computer Setup utility CD-ROM drive through the Computer Setup and set the drive priorities.
... properly loaded terminated. 6-19 Solving CD-ROM Problems If you encounter CD-ROM problems, refer to the common causes and solutions listed in the following : s The application was not allocated correctly. Compaq Professional Workstation AP200 Reference Guide Table 6-9 Solving CD-ROM Problems Problem Cause Solution System will not boot from The CD-ROM boot is not enabled Run the Computer Setup utility CD-ROM drive through the Computer Setup and set the drive priorities.

Reference Guide
Page 151
... workstation's configuration memory becomes corrupted, it is usually due to software or hardware that you are discharged of personal injury from the grounded AC outlet. 2. Disconnect the keyboard, monitor, network cable and any external devices, and disconnect the power cord from electrical shock and/or hot surfaces, be corrupted. Compaq Professional Workstation AP200 Reference Guide When this guide for more information. 3. See the "Removing the Workstation Access Panel" section...
... workstation's configuration memory becomes corrupted, it is usually due to software or hardware that you are discharged of personal injury from the grounded AC outlet. 2. Disconnect the keyboard, monitor, network cable and any external devices, and disconnect the power cord from electrical shock and/or hot surfaces, be corrupted. Compaq Professional Workstation AP200 Reference Guide When this guide for more information. 3. See the "Removing the Workstation Access Panel" section...

Reference Guide
Page 158
... installing over network 2-1 optional hardware installation overview 4-1 P parallel connector 1-1, 1-5 parallel interface control 3-7 parallel interface, disabling 3-9 passwords 3-7 changing 3-11 clearing 3-12 entering 3-11 establishing 3-10 power-on 3-10 setup 3-10 phone numbers of Authorized Resellers xii POST 6-1, E-1-E-10 power button 1-3 configuring for suspend 3-23 power cord connector 1-5 power cord set requirements C-1 Power Management 3-24 power supply 1-1, 4-11 surge tolerance 3-6 power-on light 1-3 power-on password 3-7, 3-10 Power-On Self-Test See POST Power-On Self-Test messages...
... installing over network 2-1 optional hardware installation overview 4-1 P parallel connector 1-1, 1-5 parallel interface control 3-7 parallel interface, disabling 3-9 passwords 3-7 changing 3-11 clearing 3-12 entering 3-11 establishing 3-10 power-on 3-10 setup 3-10 phone numbers of Authorized Resellers xii POST 6-1, E-1-E-10 power button 1-3 configuring for suspend 3-23 power cord connector 1-5 power cord set requirements C-1 Power Management 3-24 power supply 1-1, 4-11 surge tolerance 3-6 power-on light 1-3 power-on password 3-7, 3-10 Power-On Self-Test See POST Power-On Self-Test messages...

Reference Guide
Page 159
...ROM flash 3-17 Remote Security Management 3-20 Remote System Installation 3-22 Remote Wakeup and Remote Shutdown 3-21, 5-2 removable media boot control 3-7 write control 3-7 Index-7 replicating your setup 3-22 RJ-45 connector connecting to 50-pin 4-23 SCSI cable, illustrated 4-23 SCSI connector 1-5 SCSI controller 4-10, 4-11 SCSI devices 68- to network 5-2 illustrated 5-2 ROM upgrade local 3-16 recovery from ROM upgrade failure 3-18 remote 3-17 ROMPaq diskette 3-16 upgrading ROM BIOS 3-16 S screws identifying, illustrated 4-20 SCSI adapter, 68- to 50-pin adapter 4-23 cabling 4-23 hard drive...
...ROM flash 3-17 Remote Security Management 3-20 Remote System Installation 3-22 Remote Wakeup and Remote Shutdown 3-21, 5-2 removable media boot control 3-7 write control 3-7 Index-7 replicating your setup 3-22 RJ-45 connector connecting to 50-pin 4-23 SCSI cable, illustrated 4-23 SCSI connector 1-5 SCSI controller 4-10, 4-11 SCSI devices 68- to network 5-2 illustrated 5-2 ROM upgrade local 3-16 recovery from ROM upgrade failure 3-18 remote 3-17 ROMPaq diskette 3-16 upgrading ROM BIOS 3-16 S screws identifying, illustrated 4-20 SCSI adapter, 68- to 50-pin adapter 4-23 cabling 4-23 hard drive...

Reference Guide
Page 160
... control 3-7 serial interface, disabling 3-9 serial number 1-10 serial, second connector 1-5 setup replicating 3-22 setup password 3-7, 3-10 setup utilities See Computer Setup utilities shipment preparation D-3 Simple Network Management Protocol See SNMP slots, expansion 4-10 SMART III Hard Drive Fault Prediction 3-5 SNMP 3-4, 3-26 software reinstalling 2-12 support 3-25 Software Installation Guide 2-1, 2-12, 4-1, 5-1, 5-3 software problems, solving 6-19 speaker 1-2 special function keys 1-7 illustrated 1-7 specifications F-1 subpanel, removing 4-5 support software 1-2, 3-25 Support Software...
... control 3-7 serial interface, disabling 3-9 serial number 1-10 serial, second connector 1-5 setup replicating 3-22 setup password 3-7, 3-10 setup utilities See Computer Setup utilities shipment preparation D-3 Simple Network Management Protocol See SNMP slots, expansion 4-10 SMART III Hard Drive Fault Prediction 3-5 SNMP 3-4, 3-26 software reinstalling 2-12 support 3-25 Software Installation Guide 2-1, 2-12, 4-1, 5-1, 5-3 software problems, solving 6-19 speaker 1-2 special function keys 1-7 illustrated 1-7 specifications F-1 subpanel, removing 4-5 support software 1-2, 3-25 Support Software...


