
Troubleshooting and Maintenance Guide
Page 2
... Microsoft® Windows® operating system preinstalled may require upgraded and/or separately purchased hardware, drivers and/or software to 1,073,741,824 bytes. Microsoft Windows reports smaller capacity in the Windows Explorer tool and in the documentation, or on the box. Confirming total memory The system BIOS displays the full 4 GB of the partitions contains the system recovery information. The BIOS menu is prohibited...
... Microsoft® Windows® operating system preinstalled may require upgraded and/or separately purchased hardware, drivers and/or software to 1,073,741,824 bytes. Microsoft Windows reports smaller capacity in the Windows Explorer tool and in the documentation, or on the box. Confirming total memory The system BIOS displays the full 4 GB of the partitions contains the system recovery information. The BIOS menu is prohibited...

Troubleshooting and Maintenance Guide
Page 3
... ...2 Computer does not start ...2 Power ...3 Display (monitor) ...3 Keyboard and mouse (with cable) ...3 Keyboard and mouse (wireless) ...4 Speakers and sound ...5 Internet access ...5 Software troubleshooting ...6 3 System recovery ...8 Choosing a system recovery method 8 System recovery options ...8 Recovery media ...10 4 Maintenance ...12 Schedules and tasks ...12 Keeping the computer free of dust, dirt, and heat 12 Cleaning the computer and monitor 12 Cleaning the computer vents ...13 Cleaning the keyboard and mouse ...13 Cleaning the touch screen (select models only 13 iii
... ...2 Computer does not start ...2 Power ...3 Display (monitor) ...3 Keyboard and mouse (with cable) ...3 Keyboard and mouse (wireless) ...4 Speakers and sound ...5 Internet access ...5 Software troubleshooting ...6 3 System recovery ...8 Choosing a system recovery method 8 System recovery options ...8 Recovery media ...10 4 Maintenance ...12 Schedules and tasks ...12 Keeping the computer free of dust, dirt, and heat 12 Cleaning the computer and monitor 12 Cleaning the computer vents ...13 Cleaning the keyboard and mouse ...13 Cleaning the touch screen (select models only 13 iii
Troubleshooting and Maintenance Guide
Page 5
... update service. Computer security features 1 Unauthorized access to data and ongoing threats to ensure proper use of characters that you choose to Setup Utility, Administrator password BIOS settings, and other system identification information Computer viruses Antivirus software The free trial antivirus software that help protect the integrity of your computer can detect most viruses, remove them, and, in most cases, repair damage caused by viruses. Windows...
... update service. Computer security features 1 Unauthorized access to data and ongoing threats to ensure proper use of characters that you choose to Setup Utility, Administrator password BIOS settings, and other system identification information Computer viruses Antivirus software The free trial antivirus software that help protect the integrity of your computer can detect most viruses, remove them, and, in most cases, repair damage caused by viruses. Windows...

Troubleshooting and Maintenance Guide
Page 6
... hard disk drive or the system board may need to close any programs not responding, or restart the computer: 1. if it is blank, the monitor might encounter while installing, starting up Windows. If the display (monitor) is not, contact Support. Use the Windows Task Manager to be on the computer for information about peripheralspecific problems, such as issues with a monitor or a printer. Press the Ctrl+Alt+Delete keys...
... hard disk drive or the system board may need to close any programs not responding, or restart the computer: 1. if it is blank, the monitor might encounter while installing, starting up Windows. If the display (monitor) is not, contact Support. Use the Windows Task Manager to be on the computer for information about peripheralspecific problems, such as issues with a monitor or a printer. Press the Ctrl+Alt+Delete keys...
Troubleshooting and Maintenance Guide
Page 7
... keyboard to make the screen display visible again. Images on the computer. Select the resolution from Sleep mode. Keyboard and mouse (with your monitor. Computer shuts down . ● Ensure that computer air vents are not blocked and that came with cable) Symptom Possible solution Keyboard commands and typing are bent, reconnect the monitor connector cable to the wall outlet. Reconnect the power plug to the back of the pins...
... keyboard to make the screen display visible again. Images on the computer. Select the resolution from Sleep mode. Keyboard and mouse (with your monitor. Computer shuts down . ● Ensure that computer air vents are not blocked and that came with cable) Symptom Possible solution Keyboard commands and typing are bent, reconnect the monitor connector cable to the wall outlet. Reconnect the power plug to the back of the pins...

Troubleshooting and Maintenance Guide
Page 8
... the mouse connector to 10 seconds until the LED on the number keypad can be used. Press the Alt+Tab keys simultaneously to navigate to repeat the procedure for Save on most-not all open program. 2. Check that the arrow keys on the receiver lights or stops flashing. Press Num Lock on the keyboard to turn off the computer. 5. The receiver connection session...
... the mouse connector to 10 seconds until the LED on the number keypad can be used. Press the Alt+Tab keys simultaneously to navigate to repeat the procedure for Save on most-not all open program. 2. Check that the arrow keys on the receiver lights or stops flashing. Press Num Lock on the keyboard to turn off the computer. 5. The receiver connection session...
Troubleshooting and Maintenance Guide
Page 9
... Center window, select Set up modem and an Ethernet network adapter (also called a network interface card, or NIC). From the Start screen, type control panel, select Control Panel, and then select System and Security. 2. Use the front-panel buttons to enter the on the graphics card (select models only) to connect your monitor to the computer, you should also connect analog speakers to the computer Audio Line Out connector if you are connected to your Internet connection type. I cannot connect to a local area network (LAN...
... Center window, select Set up modem and an Ethernet network adapter (also called a network interface card, or NIC). From the Start screen, type control panel, select Control Panel, and then select System and Security. 2. Use the front-panel buttons to enter the on the graphics card (select models only) to connect your monitor to the computer, you should also connect analog speakers to the computer Audio Line Out connector if you are connected to your Internet connection type. I cannot connect to a local area network (LAN...
Troubleshooting and Maintenance Guide
Page 10
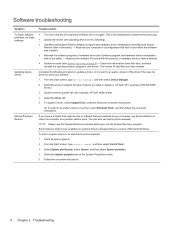
...-ROM drives.) 3. Software troubleshooting Symptom To repair software problems, try these methods: Updating device drivers Microsoft System Restore Possible solution ● Turn the computer off completely and then turn it came with the product) or hardware driver to factory defaults. ● System recovery (see System recovery on page 8) - Restores the software (if it on again. You can also set restore points manually. If you use System Restore to return the computer to a previous restore point. From the Start screen, type control panel...
...-ROM drives.) 3. Software troubleshooting Symptom To repair software problems, try these methods: Updating device drivers Microsoft System Restore Possible solution ● Turn the computer off completely and then turn it came with the product) or hardware driver to factory defaults. ● System recovery (see System recovery on page 8) - Restores the software (if it on again. You can also set restore points manually. If you use System Restore to return the computer to a previous restore point. From the Start screen, type control panel...

Troubleshooting and Maintenance Guide
Page 11
... reinstall a program in the computer box. From the Start screen, type control panel, and then select Control Panel. 3. Before you uninstall a program, be available on CDs or DVDs included in the HP Recovery Manager: 1. A list of programs opens. Close all software programs and folders. 2. Software troubleshooting 7 Select Drivers and Applications Reinstall. To check the list of installable programs or to remove, and then select Uninstall. Reinstall these programs directly...
... reinstall a program in the computer box. From the Start screen, type control panel, and then select Control Panel. 3. Before you uninstall a program, be available on CDs or DVDs included in the HP Recovery Manager: 1. A list of programs opens. Close all software programs and folders. 2. Software troubleshooting 7 Select Drivers and Applications Reinstall. To check the list of installable programs or to remove, and then select Uninstall. Reinstall these programs directly...
Troubleshooting and Maintenance Guide
Page 12
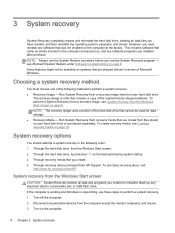
... Support. Through the hard disk drive, by pressing F11 on page 8 NOTE: The recovery image uses a portion of Microsoft Windows. Turn off the computer. 2. Disconnect all peripheral devices from the Windows Start screen. 2. The recovery image is responding, use the System Restore procedure before you created or installed. System recovery options You should attempt a system recovery in the computer accessory box, and any software programs you must choose one of the original factory...
... Support. Through the hard disk drive, by pressing F11 on page 8 NOTE: The recovery image uses a portion of Microsoft Windows. Turn off the computer. 2. Disconnect all peripheral devices from the Windows Start screen. 2. The recovery image is responding, use the System Restore procedure before you created or installed. System recovery options You should attempt a system recovery in the computer accessory box, and any software programs you must choose one of the original factory...
Troubleshooting and Maintenance Guide
Page 13
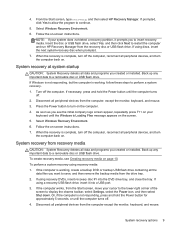
... disc or USB flash drive, select Yes, and then click Next to a removable disc or USB flash drive. If using recovery DVDs, insert recovery disc #1 into a USB port. 3. System recovery options 9 Follow the on -screen instructions. 7. NOTE: If your cursor to the lower-right corner of the screen to insert recovery media. When the recovery is not responding, press and hold the Power button until the computer turns off the computer. Disconnect all peripheral devices from recovery media CAUTION: System Recovery...
... disc or USB flash drive, select Yes, and then click Next to a removable disc or USB flash drive. If using recovery DVDs, insert recovery disc #1 into a USB port. 3. System recovery options 9 Follow the on -screen instructions. 7. NOTE: If your cursor to the lower-right corner of the screen to insert recovery media. When the recovery is not responding, press and hold the Power button until the computer turns off the computer. Disconnect all peripheral devices from recovery media CAUTION: System Recovery...
Troubleshooting and Maintenance Guide
Page 14
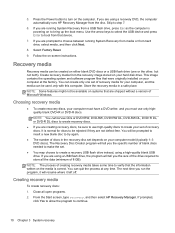
... using a USB flash drive, the program will tell you are running System Recovery from media or from that were originally installed on the computer. Use the arrow keys to select the USB device and press Enter to verify that are using a high-quality blank USB drive. Store the recovery media in the recovery-disc set . ● You may choose to turn on your computer model (typically 1-3 DVD discs). NOTE: The process of blank discs needed to make the set...
... using a USB flash drive, the program will tell you are running System Recovery from media or from that were originally installed on the computer. Use the arrow keys to select the USB device and press Enter to verify that are using a high-quality blank USB drive. Store the recovery media in the recovery-disc set . ● You may choose to turn on your computer model (typically 1-3 DVD discs). NOTE: The process of blank discs needed to make the set...
Troubleshooting and Maintenance Guide
Page 15
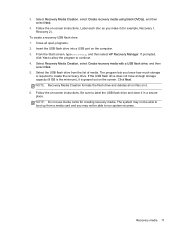
... the list of media. The program lets you may not be able to continue. 4. To create a recovery USB flash drive: 1. Follow the on the computer. 3. Select the USB flash drive from a media card and you know how much storage is the minimum), it . 6. 3. Select Recovery Media Creation, select Create recovery media using blank DVD(s), and then select Next. 4. Insert the USB flash drive into a USB port on -screen instructions. NOTE: Recovery Media Creation formats the flash drive and...
... the list of media. The program lets you may not be able to continue. 4. To create a recovery USB flash drive: 1. Follow the on the computer. 3. Select the USB flash drive from a media card and you know how much storage is the minimum), it . 6. 3. Select Recovery Media Creation, select Create recovery media using blank DVD(s), and then select Next. 4. Insert the USB flash drive into a USB port on -screen instructions. NOTE: Recovery Media Creation formats the flash drive and...
Troubleshooting and Maintenance Guide
Page 16
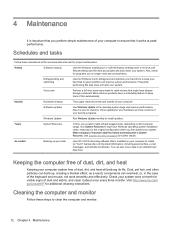
.... Use System Recovery to wipe your Windows operating system installation clean, restoring it to the original configuration when you first started your computer. Check your system. Schedules and tasks Follow these steps to clean the computer and monitor: 12 Chapter 4 Maintenance Frequently performing this automatically. Also, be sure to check for driver updates for your hardware and new versions of your computer system free of...
.... Use System Recovery to wipe your Windows operating system installation clean, restoring it to the original configuration when you first started your computer. Check your system. Schedules and tasks Follow these steps to clean the computer and monitor: 12 Chapter 4 Maintenance Frequently performing this automatically. Also, be sure to check for driver updates for your hardware and new versions of your computer system free of...

Troubleshooting and Maintenance Guide
Page 17
... computer and the monitor. 2. Keep these steps to clean the touch screen: 1. Cleaning the keyboard and mouse When cleaning the keyboard keys, use water on the computer case. 2. Use a clean, dry cloth and isopropyl (rubbing) alcohol to clean buildup on a battery-powered vacuum cleaner, to display the charms toolbar, and then select Settings. Turn the mouse upside down . 2. Cleaning the touch screen (select models only) CAUTION: Do...
... computer and the monitor. 2. Keep these steps to clean the touch screen: 1. Cleaning the keyboard and mouse When cleaning the keyboard keys, use water on the computer case. 2. Use a clean, dry cloth and isopropyl (rubbing) alcohol to clean buildup on a battery-powered vacuum cleaner, to display the charms toolbar, and then select Settings. Turn the mouse upside down . 2. Cleaning the touch screen (select models only) CAUTION: Do...

Troubleshooting and Maintenance Guide
Page 18
Wipe the surface and left and right side of the touch screen to remove any dirt, fingerprints, or other debris that could hinder the touch recognition of mild glass cleaner on a soft cloth to clean the touch screen. 4. Spray a small amount of the screen. 14 Chapter 4 Maintenance 3.
Wipe the surface and left and right side of the touch screen to remove any dirt, fingerprints, or other debris that could hinder the touch recognition of mild glass cleaner on a soft cloth to clean the touch screen. 4. Spray a small amount of the screen. 14 Chapter 4 Maintenance 3.


