
Instruction Manual
Page 9
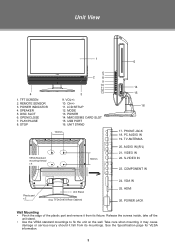
... IN 25. Release the screws inside, take off the unit stand. •• Use the VESA standard mountings to fix the unit on the wall. TV ANTENNA 20. COMPONENT IN 24. See the Specification page for VESA information. 3 Unit View 1 4 1. OPEN/CLOSE 7. PC AUDIO IN 19. POWER JACK Wall Mounting &#...mountings. TFT SCREEN 2. MMC/SD/MS CARD SLOT 15. Take care when mounting, it may cause damage or serious injury should it from its fixture. LCD SETUP 12. USB PORT 16. POWER 14. S-VIDEO IN 23. HDMI 26. STOP 6 2 7 8 9 10 11 12 3 13 9. REMOTE SENSOR 3. VIDEO IN...
... IN 25. Release the screws inside, take off the unit stand. •• Use the VESA standard mountings to fix the unit on the wall. TV ANTENNA 20. COMPONENT IN 24. See the Specification page for VESA information. 3 Unit View 1 4 1. OPEN/CLOSE 7. PC AUDIO IN 19. POWER JACK Wall Mounting &#...mountings. TFT SCREEN 2. MMC/SD/MS CARD SLOT 15. Take care when mounting, it may cause damage or serious injury should it from its fixture. LCD SETUP 12. USB PORT 16. POWER 14. S-VIDEO IN 23. HDMI 26. STOP 6 2 7 8 9 10 11 12 3 13 9. REMOTE SENSOR 3. VIDEO IN...
Instruction Manual
Page 10
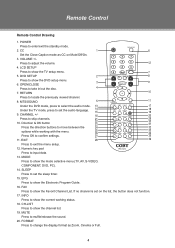
...to change the display format as CC on the list, the button does not function. 17. FORMAT Press to show the channel list. 19. LCD SETUP Press to confirm settings. 25 33 26 PROGRAM GOTO ZOOM REPEAT 34 27 35 11. MTS/SOUND 5 11 DVD SETUP EXIT Under the DVD... to move between the 24 F.BWD F.FWD PREV NEXT 32 options while working status. 18. Press OK to show the TV setup menu. 5. Direction & OK button 21 29 22 PLAY/PAUSE STOP SLOW/STEP 30 23 31 Press the direction buttons to set the sleep timer. 15. POWER Press to locate...
...to change the display format as CC on the list, the button does not function. 17. FORMAT Press to show the channel list. 19. LCD SETUP Press to confirm settings. 25 33 26 PROGRAM GOTO ZOOM REPEAT 34 27 35 11. MTS/SOUND 5 11 DVD SETUP EXIT Under the DVD... to move between the 24 F.BWD F.FWD PREV NEXT 32 options while working status. 18. Press OK to show the TV setup menu. 5. Direction & OK button 21 29 22 PLAY/PAUSE STOP SLOW/STEP 30 23 31 Press the direction buttons to set the sleep timer. 15. POWER Press to locate...


