Instruction Manual
Page 2
... that all the connections have been properly made. •• If the unit will not be used for a long time, disconnect the plug from the remote. Caution: These servicing instructions are qualified to do not perform any servicing other end to persons. Retain this information for servicing instructions. If the unit...
... that all the connections have been properly made. •• If the unit will not be used for a long time, disconnect the plug from the remote. Caution: These servicing instructions are qualified to do not perform any servicing other end to persons. Retain this information for servicing instructions. If the unit...
Instruction Manual
Page 8
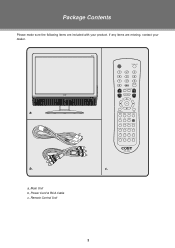
C.C MTS/SOUND DVD SETUP EXIT MODE SLEEP CH-LIST INFO EPG FAV FORMAT TITLE ANGLE SUBTITLE MENU PLAY/PAUSE STOP SLOW/STEP F.BWD F.FWD PREV NEXT PROGRAM GOTO ZOOM REPEAT b. a, Main Unit b, Power Cord & RCA Cable c, Remote Control Unit 2 OPEN/CLOSE a. Package Contents Please make sure the following items are missing, contact your product. c. If any items are included with your dealer.
C.C MTS/SOUND DVD SETUP EXIT MODE SLEEP CH-LIST INFO EPG FAV FORMAT TITLE ANGLE SUBTITLE MENU PLAY/PAUSE STOP SLOW/STEP F.BWD F.FWD PREV NEXT PROGRAM GOTO ZOOM REPEAT b. a, Main Unit b, Power Cord & RCA Cable c, Remote Control Unit 2 OPEN/CLOSE a. Package Contents Please make sure the following items are missing, contact your product. c. If any items are included with your dealer.
Instruction Manual
Page 9
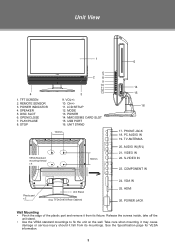
... 5. PLAY/PAUSE 8. UNIT STAND 100mm < > > VESA Standard mounting thread x 4 < 100mm > Plastic part x 2 Unit Stand (e.g. TV ANTENNA 20. S-VIDEO IN 23. OPEN/CLOSE 7. STOP 6 2 7 8 9 10 11 12 3 13 9. PHONE JACK 18. POWER ...the unit stand. •• Use the VESA standard mountings to fix the unit on the wall. LCD SETUP 12. USB PORT 16. Unit View 1 4 1. TFT SCREEN 2. DISC SLOT 6. VOL+/10.... AUDIO IN((R/L) 21. VGA IN 25. HDMI 26. MMC/SD/MS CARD SLOT 15. VIDEO IN 22. PC AUDIO IN 19. TFDVD1973 Rear Cabinet) 5 14 15 16 17. POWER 14. Take care when...
... 5. PLAY/PAUSE 8. UNIT STAND 100mm < > > VESA Standard mounting thread x 4 < 100mm > Plastic part x 2 Unit Stand (e.g. TV ANTENNA 20. S-VIDEO IN 23. OPEN/CLOSE 7. STOP 6 2 7 8 9 10 11 12 3 13 9. PHONE JACK 18. POWER ...the unit stand. •• Use the VESA standard mountings to fix the unit on the wall. LCD SETUP 12. USB PORT 16. Unit View 1 4 1. TFT SCREEN 2. DISC SLOT 6. VOL+/10.... AUDIO IN((R/L) 21. VGA IN 25. HDMI 26. MMC/SD/MS CARD SLOT 15. VIDEO IN 22. PC AUDIO IN 19. TFDVD1973 Rear Cabinet) 5 14 15 16 17. POWER 14. Take care when...
Instruction Manual
Page 10
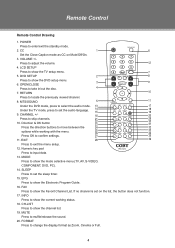
.... 19. CH-LIST Press to show the mode selective menu (TV, AV, S-VIDEO, COMPONENT, DVD, PC). 14. LCD SETUP Press to show the Favorit Channel List. MODE Press to ...PREV NEXT 32 options while working status. 18. Direction & OK button 21 29 22 PLAY/PAUSE STOP SLOW/STEP 30 23 31 Press the direction buttons to set on... exit the menu setup. 12. EXIT 28 36 Press to adjust the volume. 12 4. Remote Control Remote Control Drawing 1. RETURN 10 Press to enter/exit the standby mode. 2. POWER Press to ...
.... 19. CH-LIST Press to show the mode selective menu (TV, AV, S-VIDEO, COMPONENT, DVD, PC). 14. LCD SETUP Press to show the Favorit Channel List. MODE Press to ...PREV NEXT 32 options while working status. 18. Direction & OK button 21 29 22 PLAY/PAUSE STOP SLOW/STEP 30 23 31 Press the direction buttons to set on... exit the menu setup. 12. EXIT 28 36 Press to adjust the volume. 12 4. Remote Control Remote Control Drawing 1. RETURN 10 Press to enter/exit the standby mode. 2. POWER Press to ...
Instruction Manual
Page 11
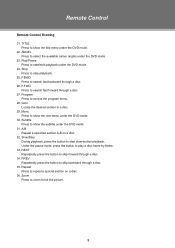
.... Zoom Press to search fast backward through a disc. 35. ANGEL Press to access the program menu. 28. F.BWD Press to zoom in a disc. 29. Remote Control Remote Control Drawing 21. Goto Locate the desired section in /out the picture. 5 Subtitle Press to skip backward through a disc. 26. Program Press to select the... show the title menu under the DVD mode. 31. A-B Repeat a specified section A-B on a disc. 36. TITLE Press to show the subtitle under the DVD mode. 22.
.... Zoom Press to search fast backward through a disc. 35. ANGEL Press to access the program menu. 28. F.BWD Press to zoom in a disc. 29. Remote Control Remote Control Drawing 21. Goto Locate the desired section in /out the picture. 5 Subtitle Press to skip backward through a disc. 26. Program Press to select the... show the title menu under the DVD mode. 31. A-B Repeat a specified section A-B on a disc. 36. TITLE Press to show the subtitle under the DVD mode. 22.

Instruction Manual
Page 12
..., making sure to match their polarities (+/-) to the markings on the brightness around. Notes: 111 Do not point bright lights directly at the remote sensor within 20 feet , by an angle of ±30 degrees. 7 s OPEN/CLOSE RETURN The operating distance may present a fire or... chemical burn if mistreated. Replace the cover. •• Batteries in this remote control unit while simultaneously operating the remote control unit of the compartment. Do not recharge, disassemble, incinerate, or heat the battery (~212ºF). Using the...
..., making sure to match their polarities (+/-) to the markings on the brightness around. Notes: 111 Do not point bright lights directly at the remote sensor within 20 feet , by an angle of ±30 degrees. 7 s OPEN/CLOSE RETURN The operating distance may present a fire or... chemical burn if mistreated. Replace the cover. •• Batteries in this remote control unit while simultaneously operating the remote control unit of the compartment. Do not recharge, disassemble, incinerate, or heat the battery (~212ºF). Using the...
Instruction Manual
Page 16
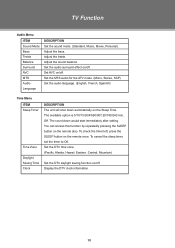
Adjust the treble. Set the audio surround effect on the remote also. You can access this function by repeatedly pressing the SLEEP button on /off. Display the DTV clock information. 10 Set the MTS audio for ..., Eastern, Central, Mountain) Set the DTV daylight saving function on /off . To cancel the sleep timer, set the timer to Off. Set AVC on /off . TV Function Audio Menu ITEM Sound Mode Bass Treble Balance Surround AVC MTS Audio Language DESCRIPTION Set the sound mode. (Standard, Music, Movie, Personal). Adjust the...
Adjust the treble. Set the audio surround effect on the remote also. You can access this function by repeatedly pressing the SLEEP button on /off. Display the DTV clock information. 10 Set the MTS audio for ..., Eastern, Central, Mountain) Set the DTV daylight saving function on /off . To cancel the sleep timer, set the timer to Off. Set AVC on /off . TV Function Audio Menu ITEM Sound Mode Bass Treble Balance Surround AVC MTS Audio Language DESCRIPTION Set the sound mode. (Standard, Music, Movie, Personal). Adjust the...
Instruction Manual
Page 23
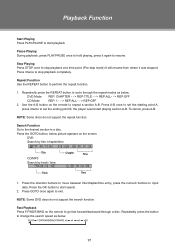
... once to stop playback at a time point. (Pre-stop playback completely. Fast Playback Press F.FWD/F.BWD on the remote to go fast forward/backward through the repeat modes as below picture appears on the remote to resume. NOTE: Some discs do not support the search function. Press the GOTO button, below . 17...
... once to stop playback at a time point. (Pre-stop playback completely. Fast Playback Press F.FWD/F.BWD on the remote to go fast forward/backward through the repeat modes as below picture appears on the remote to resume. NOTE: Some discs do not support the search function. Press the GOTO button, below . 17...
Instruction Manual
Page 25
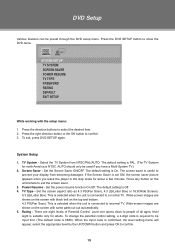
...the player in the stop mode for north America is connected to confirm. 19 The default setting is Off. 444 TV Type - Set the screen aspect ratio as 4:3 PS(Pan Scan), 4:3 LB(Letter Box) or 16:9(Wide ...by the UP/DOWN button and press OK to a normal TV. Set the power resume function On.Off. Wide-screen images are shown on the unit/remote to show the DVD menu. When the input code is ...set ON, the screen saver picture appears when you have a Multi-System TV). 222 Screen Saver - System Setup 111 TV System - Set the...
...the player in the stop mode for north America is connected to confirm. 19 The default setting is Off. 444 TV Type - Set the screen aspect ratio as 4:3 PS(Pan Scan), 4:3 LB(Letter Box) or 16:9(Wide ...by the UP/DOWN button and press OK to a normal TV. Set the power resume function On.Off. Wide-screen images are shown on the unit/remote to show the DVD menu. When the input code is ...set ON, the screen saver picture appears when you have a Multi-System TV). 222 Screen Saver - System Setup 111 TV System - Set the...
Instruction Manual
Page 27
... with correct polarities. •• Replace the batteries of the remote control have a problem with this device, please read the troubleshooting guide section and check our website at www.cobyusa.com for 30 minutes. Address COBY Electronics Technical Support 56-65 Rust Street Maspeth, NY 11378 Email ... has been properly connected to the power outlet. •• Check if the main power has been switched on. •• Try another TV channel •• Check if the system connection is proper and secure. •• Check if the connection cables are damaged. ••...
... with correct polarities. •• Replace the batteries of the remote control have a problem with this device, please read the troubleshooting guide section and check our website at www.cobyusa.com for 30 minutes. Address COBY Electronics Technical Support 56-65 Rust Street Maspeth, NY 11378 Email ... has been properly connected to the power outlet. •• Check if the main power has been switched on. •• Try another TV channel •• Check if the system connection is proper and secure. •• Check if the connection cables are damaged. ••...


