User Manual
Page 1
... for uninterrupted service and that for some installation and operation precautions which you should be aware of . (1) Read these instructions-All the safety and operating instructions should be read this manual before connection and use. E-Mail : [email protected] Phone: 718-416-3197, 800-681-2629, or 800-727-3592 Web: www.cobyusa.com Important Safety Instruction CAUTION: Use of controls or adjustments or...
... for uninterrupted service and that for some installation and operation precautions which you should be aware of . (1) Read these instructions-All the safety and operating instructions should be read this manual before connection and use. E-Mail : [email protected] Phone: 718-416-3197, 800-681-2629, or 800-727-3592 Web: www.cobyusa.com Important Safety Instruction CAUTION: Use of controls or adjustments or...
User Manual
Page 2
.... When installing an outside antenna system should not be of sufficient magnitude to rain or moisture, does not operate normally, or has been dropped. (15) Power Sources- Unauthorized substitutions may expose you are defeated, visible laser radiation is grounded so as to proper grounding conductors, location or antenna- CAUTION: This Digital Video Disc Player employs a laser System. Use of controls or adjustments or...
.... When installing an outside antenna system should not be of sufficient magnitude to rain or moisture, does not operate normally, or has been dropped. (15) Power Sources- Unauthorized substitutions may expose you are defeated, visible laser radiation is grounded so as to proper grounding conductors, location or antenna- CAUTION: This Digital Video Disc Player employs a laser System. Use of controls or adjustments or...
User Manual
Page 3
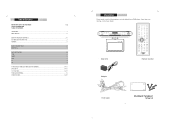
Main Unit Adapter Remote Control RCA Cable .1. Table of Contents IMPORTANT SAFETY INSTRUCTIONS Page SAFETY INFORMATION TABLE OF CONTENTS UNPACKING...1 NOTE ON DISC...2 IDENTIFICATION OF CONTROLS...3-5 BUTTONS ON THE MAIN UNIT...3 REMOTE...5 CABLE CONNECTIONS...6 MOUNTING...7 BASIC OPERATION...8-9 TIME...8 RADIO...8 DVD...8 TV...9 AV...9 FUNCTION BUTTONS (BUTTONS ON THE REMOTE 10-13 DVD SETUP...14-15 TV FUNCTION...16-17 TROUBLE SHOOTING...18 SPECIFICATION...19-20 Unpacking Please make sure the following items are missing, contact your DVD player. If any items are included ...
Main Unit Adapter Remote Control RCA Cable .1. Table of Contents IMPORTANT SAFETY INSTRUCTIONS Page SAFETY INFORMATION TABLE OF CONTENTS UNPACKING...1 NOTE ON DISC...2 IDENTIFICATION OF CONTROLS...3-5 BUTTONS ON THE MAIN UNIT...3 REMOTE...5 CABLE CONNECTIONS...6 MOUNTING...7 BASIC OPERATION...8-9 TIME...8 RADIO...8 DVD...8 TV...9 AV...9 FUNCTION BUTTONS (BUTTONS ON THE REMOTE 10-13 DVD SETUP...14-15 TV FUNCTION...16-17 TROUBLE SHOOTING...18 SPECIFICATION...19-20 Unpacking Please make sure the following items are missing, contact your DVD player. If any items are included ...
User Manual
Page 4
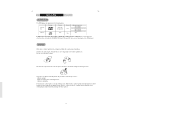
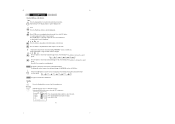
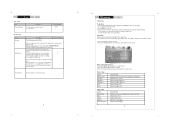
... a heating device. Hold the disc's outer edge and/or the center spindle hole. Prevent exposure to the direct sunlight or heating sources. Disc mark Contents Disc size DVD video discs Audio+Video (moving picture) 12cm Audio CDs Audio 12cm Maximum playback time 133 min (SS-SL) 242 min (SS-DL) 266 min (DS-SL) 484 min (DS-DL) 74min In addition, this DVD player.) Care of Disc Video disc contains...
... a heating device. Hold the disc's outer edge and/or the center spindle hole. Prevent exposure to the direct sunlight or heating sources. Disc mark Contents Disc size DVD video discs Audio+Video (moving picture) 12cm Audio CDs Audio 12cm Maximum playback time 133 min (SS-SL) 242 min (SS-DL) 266 min (DS-SL) 484 min (DS-DL) 74min In addition, this DVD player.) Care of Disc Video disc contains...
User Manual
Page 5
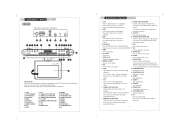
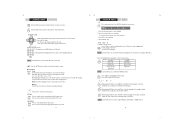
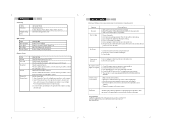
... adjust the volume down direction button while forward. AUDIO L details. Audio signal input R. TV antenna connector. CHANNEL+/UP DIRECTION It also works as AM/FM. 18. tuner mode. DISC TRAY 7. TV/SETUP 16. AUDIO L 25. CHANNEL-/DOWN DIRECTION Press the button briefly to skip channels. Under the TV/tuner mode, press to skip forward. Hold the disc. 20. POWER 7. VFD DISPLAY Press to show the following FM antenna connector. EXIT different viewing positions. FM ANTENNA JACK Repeatedly press the button to turn the power on the unit's rear panel...
... adjust the volume down direction button while forward. AUDIO L details. Audio signal input R. TV antenna connector. CHANNEL+/UP DIRECTION It also works as AM/FM. 18. tuner mode. DISC TRAY 7. TV/SETUP 16. AUDIO L 25. CHANNEL-/DOWN DIRECTION Press the button briefly to skip channels. Under the TV/tuner mode, press to skip forward. Hold the disc. 20. POWER 7. VFD DISPLAY Press to show the following FM antenna connector. EXIT different viewing positions. FM ANTENNA JACK Repeatedly press the button to turn the power on the unit's rear panel...
User Manual
Page 6
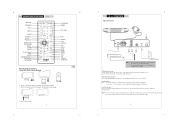
... the unit rear panel and the other end to the manual of time, please disconnect the power and remove the battery from the remote. 2. Connect the "L" "R" port to input the video signal by the white&red plug of the RCA cable. Push in the holder. .5. Connect the "Video" port to input the audio signal by the yellow plug of the RCA cable. Power Connection Insert one end of Controls DISPLAY STANDBY TITLE GOTO AUDIO SUBTITLE SETUP TV SETUP DIRECTION...
... the unit rear panel and the other end to the manual of time, please disconnect the power and remove the battery from the remote. 2. Connect the "L" "R" port to input the video signal by the white&red plug of the RCA cable. Push in the holder. .5. Connect the "Video" port to input the audio signal by the yellow plug of the RCA cable. Power Connection Insert one end of Controls DISPLAY STANDBY TITLE GOTO AUDIO SUBTITLE SETUP TV SETUP DIRECTION...
User Manual
Page 7
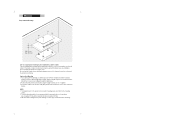
... care when installing it fall from the heat and moisture sources and secure them in place using the supplied screws. Choose an appropritate mounting location underneath a cabinet or shelf. NOTE: 1. Mounting Under-Cabinet Mounting > > > > < < Min. 2.0 mm Max. 25.0 mm Mounting Base Choose an appropriate mounting location underneath a cabinet or shelf. Connect the cables. Do not over tighten. 3. Route the wires safely away from...
... care when installing it fall from the heat and moisture sources and secure them in place using the supplied screws. Choose an appropritate mounting location underneath a cabinet or shelf. NOTE: 1. Mounting Under-Cabinet Mounting > > > > < < Min. 2.0 mm Max. 25.0 mm Mounting Base Choose an appropriate mounting location underneath a cabinet or shelf. Connect the cables. Do not over tighten. 3. Route the wires safely away from...
User Manual
Page 8
... locate the channel you want to set band. 3. Usually a DVD disc contains a root menu. Adjust the screen effect through the TFT menu. Press TUN+/- Set the player into the TV mode. 3. Set Clock Press TIME to display the clock, press SET to confirm. Press OK to access the active time interface. Press MODE to the "Cable Connections" section for details. 2. Refer to select the tuner mode. to listen to skip channels. AV Operation The player has the AV input function. More DVD functions are...
... locate the channel you want to set band. 3. Usually a DVD disc contains a root menu. Adjust the screen effect through the TFT menu. Press TUN+/- Set the player into the TV mode. 3. Set Clock Press TIME to display the clock, press SET to confirm. Press OK to access the active time interface. Press MODE to the "Cable Connections" section for details. 2. Refer to select the tuner mode. to listen to skip channels. AV Operation The player has the AV input function. More DVD functions are...
User Manual
Page 9
nction B ttons Function Buttons on the Remote isp a isp a Press the Display button to show the TFT setup menu. Press the PLAY button to show the time and status information. Single chapter DVD or single track CD cannot be skipped. Repeatedly pressing the button will not fast forward or fast backward during "WARNING" section of a DVD disc. Standby tan Press the Standby button to skip advance the...
nction B ttons Function Buttons on the Remote isp a isp a Press the Display button to show the TFT setup menu. Press the PLAY button to show the time and status information. Single chapter DVD or single track CD cannot be skipped. Repeatedly pressing the button will not fast forward or fast backward during "WARNING" section of a DVD disc. Standby tan Press the Standby button to skip advance the...
User Manual
Page 10
... to program channels. Press PLAY to view different camera angles on the disc. ti n e tit e io ne While playing a DVD disc, press ANGLE to quit the STEP mode. io While playing a DVD disc, press AUDIO to select the language of the enlarged picture. NOTE: Some DVD discs do not allow the A-B function playback. Press to tune radio stations under the TV mode. NOTE: Some DVD discs do not allow the direct access function. Press the number buttons to set...
... to program channels. Press PLAY to view different camera angles on the disc. ti n e tit e io ne While playing a DVD disc, press ANGLE to quit the STEP mode. io While playing a DVD disc, press AUDIO to select the language of the enlarged picture. NOTE: Some DVD discs do not allow the A-B function playback. Press to tune radio stations under the TV mode. NOTE: Some DVD discs do not allow the direct access function. Press the number buttons to set...
User Manual
Page 11
... DVD player can access this to select the options. 3. Set the player's Video Out signal type. The default setting is stereo audio signal detected. SETUP Setup Press the SETUP button to save. Title1-Chapter6 7. The screen saver prevents burn-in the SETUP menu. 1. Title1-Chapter2 3. Title1-Chapter4 5. and press OK to enter the DVD setup menu. When programming files, press MENU to access Titles, press OK to access the Program function. 0016/0023 1. Set...
... DVD player can access this to select the options. 3. Set the player's Video Out signal type. The default setting is stereo audio signal detected. SETUP Setup Press the SETUP button to save. Title1-Chapter6 7. The screen saver prevents burn-in the SETUP menu. 1. Title1-Chapter2 3. Title1-Chapter4 5. and press OK to enter the DVD setup menu. When programming files, press MENU to access Titles, press OK to access the Program function. 0016/0023 1. Set...
User Manual
Page 12
...TV setup menu. UP/DOWN ADJUST EXIT : EXIT While working with the menu, 1. Adjust the display color. this setting. The player will not reset the password. Default Reset Reset the player to select TV. 3. Setup Menu Various features can be reset. Press TV-SETUP to turn on the the player. Audio Setup ITEM Sound Mode Bass Treble Balance Audio Language DESCRIPTION Setup the sound mode. (Standard, Movie, Music, Personal) Setup the bass effect. Sets the maturity rating level of Picture Setup, Audio Setup, Time Setup, Option Setup as well as Channel Setup. 1. TV Function TV...
...TV setup menu. UP/DOWN ADJUST EXIT : EXIT While working with the menu, 1. Adjust the display color. this setting. The player will not reset the password. Default Reset Reset the player to select TV. 3. Setup Menu Various features can be reset. Press TV-SETUP to turn on the the player. Audio Setup ITEM Sound Mode Bass Treble Balance Audio Language DESCRIPTION Setup the sound mode. (Standard, Movie, Music, Personal) Setup the bass effect. Sets the maturity rating level of Picture Setup, Audio Setup, Time Setup, Option Setup as well as Channel Setup. 1. TV Function TV...
User Manual
Page 13
... Favorite Channel No Channel Label DESCRIPTION Setup the menu language. Search channels automatically. Press OK again to the factory default. Press the up/down direction button to select the channel, press OK to set block. Disc has been loaded upside down direction button to select other audio tracks of the remote control. Remove the disc and leave the unit power on /off. Check if the system connections are damaged. 3. Replace the batteries of the disc. 4. TV Function Time Setup ITEM Time...
... Favorite Channel No Channel Label DESCRIPTION Setup the menu language. Search channels automatically. Press OK again to the factory default. Press the up/down direction button to select the channel, press OK to set block. Disc has been loaded upside down direction button to select other audio tracks of the remote control. Remove the disc and leave the unit power on /off. Check if the system connections are damaged. 3. Replace the batteries of the disc. 4. TV Function Time Setup ITEM Time...
User Manual
Page 14
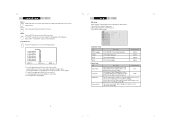
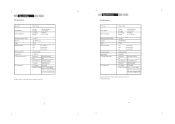
... Pitch(mm) 0.2775(W)x0.276(H) Resolution 800RGBX480(H) DTV System ATSC/QAM Channel Received VHF-L ch.2 to B (57~129MHz) VHF-H ch. Specification 7093 Specification TV system AC/DC Adapter Power consumption Operating temperature range Dimension Weight Channel Coverage Antenna Impedance Tuning System TFT Panel Characteristic DTV Characteristic NTSC + ATSC AC input DC output On working Speaker 100-240V 50/60Hz (+12V / 2.0 A) 24W (Max) 2x 8 / 3.0 W 10 c-40 c 385x280x80...
... Pitch(mm) 0.2775(W)x0.276(H) Resolution 800RGBX480(H) DTV System ATSC/QAM Channel Received VHF-L ch.2 to B (57~129MHz) VHF-H ch. Specification 7093 Specification TV system AC/DC Adapter Power consumption Operating temperature range Dimension Weight Channel Coverage Antenna Impedance Tuning System TFT Panel Characteristic DTV Characteristic NTSC + ATSC AC input DC output On working Speaker 100-240V 50/60Hz (+12V / 2.0 A) 24W (Max) 2x 8 / 3.0 W 10 c-40 c 385x280x80...


