
User Manual
Page 2
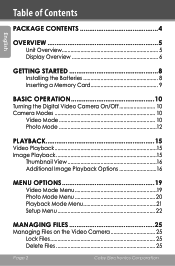
... 20 Playback Mode Menu 21 Setup Menu 22 Managing Files 25 Managing Files on the Video Camera 25 Lock Files 25 Delete Files 25 Page 2 Coby Electronics Corporation
... 20 Playback Mode Menu 21 Setup Menu 22 Managing Files 25 Managing Files on the Video Camera 25 Lock Files 25 Delete Files 25 Page 2 Coby Electronics Corporation
User Manual
Page 4
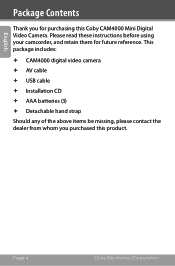
Page 4 Coby Electronics Corporation Please read these instructions before using your camcorder, and retain them for purchasing this product. This package includes: CAM4000 digital video camera AV cable USB cable Installation CD AAA batteries (3) Detachable hand strap Should any of the above items be missing, please contact the dealer from whom you for future reference. English Package Contents Thank you purchased this Coby CAM4000 Mini Digital Video Camera.
Page 4 Coby Electronics Corporation Please read these instructions before using your camcorder, and retain them for purchasing this product. This package includes: CAM4000 digital video camera AV cable USB cable Installation CD AAA batteries (3) Detachable hand strap Should any of the above items be missing, please contact the dealer from whom you for future reference. English Package Contents Thank you purchased this Coby CAM4000 Mini Digital Video Camera.
User Manual
Page 6
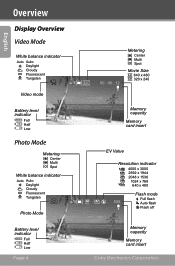
... 1024 x 768 640 x 480 Flash mode Full flash 558 Auto flash Flash off Battery level indicator Full Half Low Page 6 Memory capacity Memory card insert Coby Electronics Corporation
... 1024 x 768 640 x 480 Flash mode Full flash 558 Auto flash Flash off Battery level indicator Full Half Low Page 6 Memory capacity Memory card insert Coby Electronics Corporation
User Manual
Page 8
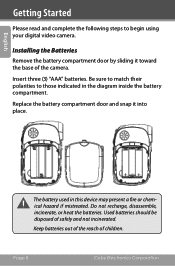
... Remove the battery compartment door by sliding it into place. Replace the battery compartment door and snap it toward the base of the camera. Page 8 Coby Electronics Corporation Keep batteries out of the reach of safely and not incinerated. Do not recharge, disassemble, incinerate, or heat the batteries. English Getting Started Please...
... Remove the battery compartment door by sliding it into place. Replace the battery compartment door and snap it toward the base of the camera. Page 8 Coby Electronics Corporation Keep batteries out of the reach of safely and not incinerated. Do not recharge, disassemble, incinerate, or heat the batteries. English Getting Started Please...
User Manual
Page 10
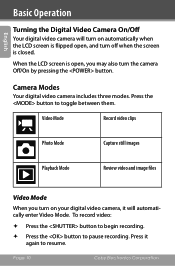
Press it will turn on your digital video camera, it again to resume. Page 10 Coby Electronics Corporation To record video: Press the button to begin recording. Press the button to toggle between them. Press the button to ...
Press it will turn on your digital video camera, it again to resume. Page 10 Coby Electronics Corporation To record video: Press the button to begin recording. Press the button to toggle between them. Press the button to ...
User Manual
Page 12
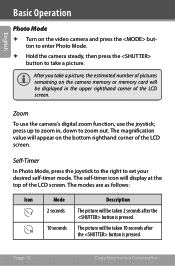
..., the estimated number of pictures remaining on the camera memory or memory card will appear on the video camera and press the but- Page 12 Coby Electronics Corporation The magnification value will be taken 2 seconds after 10 the button is pressed. After you take a picture. English Basic Operation Photo Mode ...
..., the estimated number of pictures remaining on the camera memory or memory card will appear on the video camera and press the but- Page 12 Coby Electronics Corporation The magnification value will be taken 2 seconds after 10 the button is pressed. After you take a picture. English Basic Operation Photo Mode ...

User Manual
Page 14
The LCD screen will not work if the camera's battery power is low. Do not attempt to fully charge. Page 14 Coby Electronics Corporation English Basic Operation The flash will go temporarily dark when the flash is charging. If this occurs, wait a few seconds for the flash to take a photo while the flash is charging.
The LCD screen will not work if the camera's battery power is low. Do not attempt to fully charge. Page 14 Coby Electronics Corporation English Basic Operation The flash will go temporarily dark when the flash is charging. If this occurs, wait a few seconds for the flash to take a photo while the flash is charging.

User Manual
Page 16
... of all available files, push the display button. Playback English To return the image to full screen view, press the button. Page 16 Coby Electronics Corporation
... of all available files, push the display button. Playback English To return the image to full screen view, press the button. Page 16 Coby Electronics Corporation
User Manual
Page 18
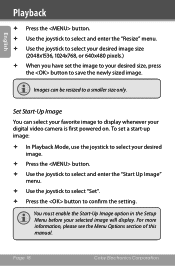
... enable the Start-Up Image option in the Setup Menu before your desired size, press the button to your selected image will display. Page 18 Coby Electronics Corporation To set the image to save the newly sized image. For more information, please see the Menu Options section of this manual. Set Start...
... enable the Start-Up Image option in the Setup Menu before your desired size, press the button to your selected image will display. Page 18 Coby Electronics Corporation To set the image to save the newly sized image. For more information, please see the Menu Options section of this manual. Set Start...
User Manual
Page 20
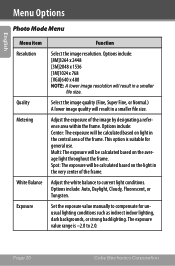
... frame. Adjust the white balance to current light conditions. Multi: The exposure will be calculated based on the light in a smaller file size. Page 20 Coby Electronics Corporation English Menu Options Photo Mode Menu Menu item Resolution Quality Metering White Balance Exposure Function Select the image resolution. Spot: The exposure will be...
... frame. Adjust the white balance to current light conditions. Multi: The exposure will be calculated based on the light in a smaller file size. Page 20 Coby Electronics Corporation English Menu Options Photo Mode Menu Menu item Resolution Quality Metering White Balance Exposure Function Select the image resolution. Spot: The exposure will be...
User Manual
Page 22
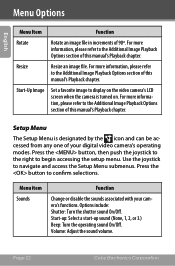
... to navigate and access the Setup Menu submenus. Use the joystick to confirm selections. Options include: Shutter: Turn the shutter sound On/Off. Page 22 Coby Electronics Corporation Volume: Adjust the sound volume. For more information, please refer to the Additional Image Playback Options section of 90º. Menu item Sounds Function...
... to navigate and access the Setup Menu submenus. Use the joystick to confirm selections. Options include: Shutter: Turn the shutter sound On/Off. Page 22 Coby Electronics Corporation Volume: Adjust the sound volume. For more information, please refer to the Additional Image Playback Options section of 90º. Menu item Sounds Function...
User Manual
Page 24
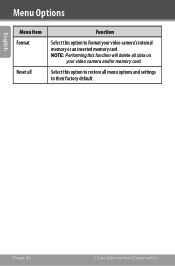
Page 24 Coby Electronics Corporation Select this option to restore all menu options and settings to format your video camera and/or memory card. English Menu Options Menu item Format Reset all Function Select this option to their factory default. NOTE: Performing this function will delete all data on your video camera's internal memory or an inserted memory card.
Page 24 Coby Electronics Corporation Select this option to restore all menu options and settings to format your video camera and/or memory card. English Menu Options Menu item Format Reset all Function Select this option to their factory default. NOTE: Performing this function will delete all data on your video camera's internal memory or an inserted memory card.
User Manual
Page 26
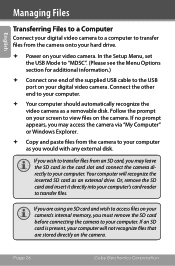
... camera. If no prompt appears, you may leave the SD card in the card slot and connect the camera directly to your computer. Page 26 Coby Electronics Corporation Or, remove the SD card and insert it directly into your digital video camera. Connect the other end to your computer. Your...
... camera. If no prompt appears, you may leave the SD card in the card slot and connect the camera directly to your computer. Page 26 Coby Electronics Corporation Or, remove the SD card and insert it directly into your digital video camera. Connect the other end to your computer. Your...
User Manual
Page 28
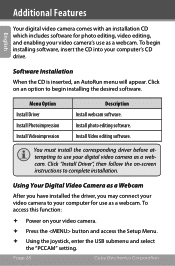
... begin installing software, insert the CD into your computer's CD drive. Menu Option Install Driver Install Photoimpression Install Videoimpression Description Install webcam software. Page 28 Coby Electronics Corporation To access this function: Power on -screen instructions to use your video camera. Press the button and access the Setup...
... begin installing software, insert the CD into your computer's CD drive. Menu Option Install Driver Install Photoimpression Install Videoimpression Description Install webcam software. Page 28 Coby Electronics Corporation To access this function: Power on -screen instructions to use your video camera. Press the button and access the Setup...
User Manual
Page 30
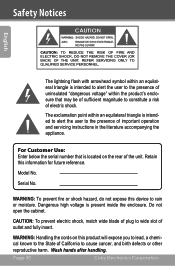
... unit. Wash hands after handling. Serial No. The exclamation point within the product's enclosure that is located on this information for future reference. Page 30 Coby Electronics Corporation CAUTION: To prevent electric shock, match wide blade of plug to wide slot of electric shock. Safety Notices English The lightning flash with arrowhead...
... unit. Wash hands after handling. Serial No. The exclamation point within the product's enclosure that is located on this information for future reference. Page 30 Coby Electronics Corporation CAUTION: To prevent electric shock, match wide blade of plug to wide slot of electric shock. Safety Notices English The lightning flash with arrowhead...

User Manual
Page 31
Safety Notices For recycling or disposal information about this product, please contact your local authorities or the Electronics Industries Alliance: www.eiae.org. English www.cobyusa.com Page 31
Safety Notices For recycling or disposal information about this product, please contact your local authorities or the Electronics Industries Alliance: www.eiae.org. English www.cobyusa.com Page 31
User Manual
Page 32
... used in accordance with Class B limits in a particular installation. This equipment generates, uses and can be required to stop operation of the equipment. Page 32 Coby Electronics Corporation Operation is subject to the following measures: • Reorient or relocate the receiving antenna. • Increase the separation between the equipment and receiver. •...
... used in accordance with Class B limits in a particular installation. This equipment generates, uses and can be required to stop operation of the equipment. Page 32 Coby Electronics Corporation Operation is subject to the following measures: • Reorient or relocate the receiving antenna. • Increase the separation between the equipment and receiver. •...
User Manual
Page 34
... product exhibits a distinct change in proper operating condition. 16. Safety Check: Upon completion of other products (including amplifiers) that the product is damaged; Page 34 Coby Electronics Corporation e) if the product has been dropped or damaged in any service or repairs to this product, ask the service technician to perform safety checks...
... product exhibits a distinct change in proper operating condition. 16. Safety Check: Upon completion of other products (including amplifiers) that the product is damaged; Page 34 Coby Electronics Corporation e) if the product has been dropped or damaged in any service or repairs to this product, ask the service technician to perform safety checks...
User Manual
Page 35
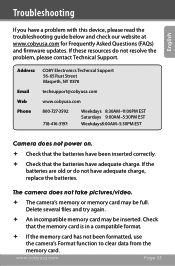
... the problem, please contact Technical Support. Delete several files and try again. An incompatible memory card may be inserted. Address Email Web Phone COBY Electronics Technical Support 56-65 Rust Street Maspeth, NY 11378 [email protected] www.cobyusa.com 800-727-3592: 718-416-3197: Weekdays 8:30AM-11:00PM...
... the problem, please contact Technical Support. Delete several files and try again. An incompatible memory card may be inserted. Address Email Web Phone COBY Electronics Technical Support 56-65 Rust Street Maspeth, NY 11378 [email protected] www.cobyusa.com 800-727-3592: 718-416-3197: Weekdays 8:30AM-11:00PM...

User Manual
Page 36
..., they will not display. Be sure to allow adequate time for the image to MSDC. (See the Menu Options section for more information.) Page 36 Coby Electronics Corporation Check the format of focus. Blurry images or video may result when the camera is turned off before turning off the video...
..., they will not display. Be sure to allow adequate time for the image to MSDC. (See the Menu Options section for more information.) Page 36 Coby Electronics Corporation Check the format of focus. Blurry images or video may result when the camera is turned off before turning off the video...