User Manual
Page 2
...Package Contents 4 English Overview 5 Unit Overview 5 Display Overview 6 Getting Started 8 Installing the Batteries 8 Inserting a Memory Card 9 Basic Operation 10 Turning the Digital Video Camera On/Off 10 Camera Modes 10 Video Mode 10 Photo Mode 12 Playback 15 Video Playback 15 Image Playback 15 Thumbnail View 16 Additional Image Playback Options 16 Menu Options 19 Video Mode Menu 19 Photo Mode Menu 20 Playback Mode Menu 21 Setup Menu 22 Managing Files 25 Managing Files on the Video Camera 25 Lock Files 25 Delete Files 25 Page 2 Coby Electronics Corporation
...Package Contents 4 English Overview 5 Unit Overview 5 Display Overview 6 Getting Started 8 Installing the Batteries 8 Inserting a Memory Card 9 Basic Operation 10 Turning the Digital Video Camera On/Off 10 Camera Modes 10 Video Mode 10 Photo Mode 12 Playback 15 Video Playback 15 Image Playback 15 Thumbnail View 16 Additional Image Playback Options 16 Menu Options 19 Video Mode Menu 19 Photo Mode Menu 20 Playback Mode Menu 21 Setup Menu 22 Managing Files 25 Managing Files on the Video Camera 25 Lock Files 25 Delete Files 25 Page 2 Coby Electronics Corporation
User Manual
Page 4
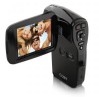
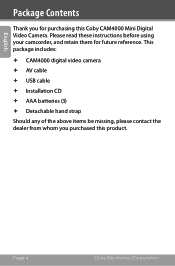
Please read these instructions before using your camcorder, and retain them for purchasing this product. This package includes: CAM4000 digital video camera AV cable USB cable Installation CD AAA batteries (3) Detachable hand strap Should any of the above items be missing, please contact the dealer from whom you for future reference. Page 4 Coby Electronics Corporation English Package Contents Thank you purchased this Coby CAM4000 Mini Digital Video Camera.
Please read these instructions before using your camcorder, and retain them for purchasing this product. This package includes: CAM4000 digital video camera AV cable USB cable Installation CD AAA batteries (3) Detachable hand strap Should any of the above items be missing, please contact the dealer from whom you for future reference. Page 4 Coby Electronics Corporation English Package Contents Thank you purchased this Coby CAM4000 Mini Digital Video Camera.
User Manual
Page 6
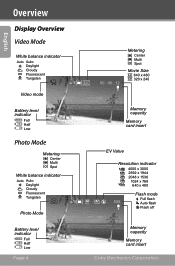
English Overview Display Overview Video Mode White balance indicator Auto Auto Daylight Cloudy Fluorescent Tungsten AUTO 320 Video mode 00 : 06 : 12 Metering Center Multi Spot Movie Size 640 640 x 480 320 320 x 240 Battery level indicator Full Half Low Photo Mode Metering Center Multi Spot White balance indicator Auto Auto Daylight Cloudy Fluorescent Tungsten AUTO Photo Mode Memory capacity Memory card insert EV Value Resolution indicator 4000 x 3000 2592 x 1944 2048 x 1536 1024 x 768 640 x 480 Flash mode Full...
English Overview Display Overview Video Mode White balance indicator Auto Auto Daylight Cloudy Fluorescent Tungsten AUTO 320 Video mode 00 : 06 : 12 Metering Center Multi Spot Movie Size 640 640 x 480 320 320 x 240 Battery level indicator Full Half Low Photo Mode Metering Center Multi Spot White balance indicator Auto Auto Daylight Cloudy Fluorescent Tungsten AUTO Photo Mode Memory capacity Memory card insert EV Value Resolution indicator 4000 x 3000 2592 x 1944 2048 x 1536 1024 x 768 640 x 480 Flash mode Full...
User Manual
Page 8
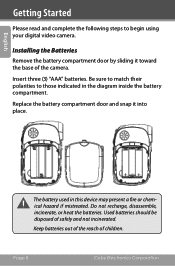
... mistreated. Used batteries should be disposed of children. Replace the battery compartment door and snap it toward the base of the camera. Do not recharge, disassemble, incinerate, or heat the batteries. Keep batteries out of the reach of safely and not incinerated. Page 8 Coby Electronics Corporation Insert three (3) "AAA" batteries. Be sure to match their polarities to begin using your digital video camera.
... mistreated. Used batteries should be disposed of children. Replace the battery compartment door and snap it toward the base of the camera. Do not recharge, disassemble, incinerate, or heat the batteries. Keep batteries out of the reach of safely and not incinerated. Page 8 Coby Electronics Corporation Insert three (3) "AAA" batteries. Be sure to match their polarities to begin using your digital video camera.
User Manual
Page 9
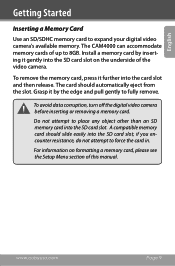
... memory card into the SD card slot; www.cobyusa.com Page 9 To avoid data corruption, turn off the digital video camera before inserting or removing a memory card. A compatible memory card should automatically eject from the slot. Install a memory card by the edge and pull gently to expand your digital video camera's available memory. For information on the underside of up to force the card in. English Getting Started Inserting a Memory Card Use an SD/SDHC memory card to fully remove...
... memory card into the SD card slot; www.cobyusa.com Page 9 To avoid data corruption, turn off the digital video camera before inserting or removing a memory card. A compatible memory card should automatically eject from the slot. Install a memory card by the edge and pull gently to expand your digital video camera's available memory. For information on the underside of up to force the card in. English Getting Started Inserting a Memory Card Use an SD/SDHC memory card to fully remove...
User Manual
Page 10
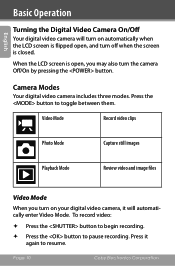
.... Video Mode Record video clips Photo Mode Capture still images Playback Mode Review video and image files Video Mode When you may also turn on your digital video camera, it again to resume. Page 10 Coby Electronics Corporation Press it will turn on automatically when the LCD screen is flipped open, and turn off when the screen is open, you turn the camera Off/On by pressing the button. Press the button to pause recording. English Basic Operation Turning the Digital Video Camera On/Off Your digital video camera will automatically enter Video Mode. Camera Modes...
.... Video Mode Record video clips Photo Mode Capture still images Playback Mode Review video and image files Video Mode When you may also turn on your digital video camera, it again to resume. Page 10 Coby Electronics Corporation Press it will turn on automatically when the LCD screen is flipped open, and turn off when the screen is open, you turn the camera Off/On by pressing the button. Press the button to pause recording. English Basic Operation Turning the Digital Video Camera On/Off Your digital video camera will automatically enter Video Mode. Camera Modes...
User Manual
Page 11
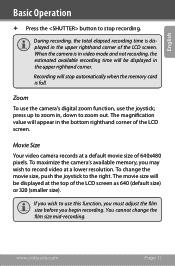
... the LCD screen as 640 (default size) or 320 (smaller size). Movie Size Your video camera records at a lower resolution. Zoom To use the camera's digital zoom function, use this function, you must adjust the film size before you begin recording. To maximize the camera's available memory, you wish to use the joystick; You cannot change the movie size, push the joystick to stop automatically when the memory card is displayed in video mode and not recording, the estimated available recording time will stop recording. During recording, the...
... the LCD screen as 640 (default size) or 320 (smaller size). Movie Size Your video camera records at a lower resolution. Zoom To use the camera's digital zoom function, use this function, you must adjust the film size before you begin recording. To maximize the camera's available memory, you wish to use the joystick; You cannot change the movie size, push the joystick to stop automatically when the memory card is displayed in video mode and not recording, the estimated available recording time will stop recording. During recording, the...
User Manual
Page 12
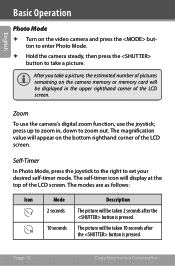
... of the LCD screen. English Basic Operation Photo Mode Turn on the camera memory or memory card will be displayed in , down to set your desired self-timer mode. The modes are as follows: Icon Mode Description 2 2 seconds The picture will be taken 2 seconds after the button is pressed. 10 seconds The picture will be taken 10 seconds after 10 the button is pressed. Zoom To use the camera's digital zoom function, use the joystick...
... of the LCD screen. English Basic Operation Photo Mode Turn on the camera memory or memory card will be displayed in , down to set your desired self-timer mode. The modes are as follows: Icon Mode Description 2 2 seconds The picture will be taken 2 seconds after the button is pressed. 10 seconds The picture will be taken 10 seconds after 10 the button is pressed. Zoom To use the camera's digital zoom function, use the joystick...
User Manual
Page 15
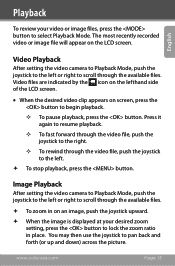
... back and forth (or up and down) across the picture. Playback To review your desired zoom setting, press the button to lock the zoom ratio in on an image, push the joystick upward. When the image is displayed at your video or image files, press the button to select Playback Mode. The most recently recorded video or image file will appear on the LCD screen. www.cobyusa.com Page 15
... back and forth (or up and down) across the picture. Playback To review your desired zoom setting, press the button to lock the zoom ratio in on an image, push the joystick upward. When the image is displayed at your video or image files, press the button to select Playback Mode. The most recently recorded video or image file will appear on the LCD screen. www.cobyusa.com Page 15
User Manual
Page 18
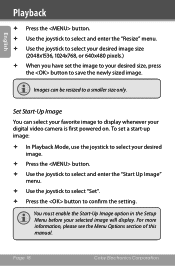
... to a smaller size only. Page 18 Coby Electronics Corporation You must enable the Start-Up Image option in the Setup Menu before your digital video camera is first powered on. To set the image to your desired size, press the button to save the newly sized image. For more information, please see the Menu Options section of this manual. English Playback Press the button. Use the joystick to...
... to a smaller size only. Page 18 Coby Electronics Corporation You must enable the Start-Up Image option in the Setup Menu before your digital video camera is first powered on. To set the image to your desired size, press the button to save the newly sized image. For more information, please see the Menu Options section of this manual. English Playback Press the button. Use the joystick to...

User Manual
Page 19
... this manual's Basic Operation chapter. Options include: Auto, Daylight, Cloudy, Fluorescent, or Tungsten. English Menu Options You can access a variety of additional options by designating a reference area within the frame. Use the joystick to confirm a setting. www.cobyusa.com Page 19 Video Mode Menu Menu item Movie Size Frame Rate Metering White Balance Function Choose a film size (640x480 pixels/320X240 pixels.) Select the smaller film size to current light conditions...
... this manual's Basic Operation chapter. Options include: Auto, Daylight, Cloudy, Fluorescent, or Tungsten. English Menu Options You can access a variety of additional options by designating a reference area within the frame. Use the joystick to confirm a setting. www.cobyusa.com Page 19 Video Mode Menu Menu item Movie Size Frame Rate Metering White Balance Function Choose a film size (640x480 pixels/320X240 pixels.) Select the smaller film size to current light conditions...
User Manual
Page 21
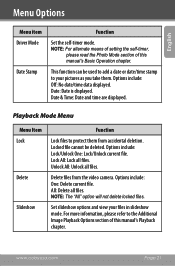
Options include: Off: No date/time data displayed. Lock All: Lock all files. Delete files from accidental deletion. All: Delete all files. Set slideshow options and view your pictures as you take them from the video camera. www.cobyusa.com Page 21 Date: Date is displayed. Locked file cannot be used to add a date or date/time stamp to the Additional Image Playback Options section of this manual's Playback chapter. Options include: Lock/Unlock One: Lock/Unlock current...
Options include: Off: No date/time data displayed. Lock All: Lock all files. Delete files from accidental deletion. All: Delete all files. Set slideshow options and view your pictures as you take them from the video camera. www.cobyusa.com Page 21 Date: Date is displayed. Locked file cannot be used to add a date or date/time stamp to the Additional Image Playback Options section of this manual's Playback chapter. Options include: Lock/Unlock One: Lock/Unlock current...
User Manual
Page 22
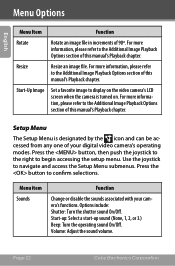
... to navigate and access the Setup Menu submenus. Options include: Shutter: Turn the shutter sound On/Off. Page 22 Coby Electronics Corporation For more information, please refer to the Additional Image Playback Options section of this manual's Playback chapter. Press the button to the Additional Image Playback Options section of 90º. Volume: Adjust the sound volume. Setup Menu The Setup Menu is turned on. Menu item Sounds Function Change or disable the sounds associated with your digital video camera's operating modes. For more information...
... to navigate and access the Setup Menu submenus. Options include: Shutter: Turn the shutter sound On/Off. Page 22 Coby Electronics Corporation For more information, please refer to the Additional Image Playback Options section of this manual's Playback chapter. Press the button to the Additional Image Playback Options section of 90º. Volume: Adjust the sound volume. Setup Menu The Setup Menu is turned on. Menu item Sounds Function Change or disable the sounds associated with your digital video camera's operating modes. For more information...
User Manual
Page 23
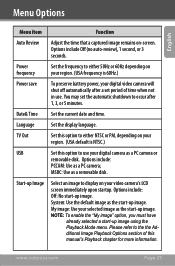
... is 60Hz.) Power save To preserve battery power, your digital video camera will shut off automatically after 1, 3, or 5 minutes. www.cobyusa.com Page 23 Language Set the display language. Please refer to occur after a set the automatic shutdown to the the Additional Image Playback Options section of time when not in use your digital camera as a PC camera or removable disk. English Menu Options Menu item Function Auto Review Adjust the time that a captured image remains on your video camera's LCD screen immediately upon startup...
... is 60Hz.) Power save To preserve battery power, your digital video camera will shut off automatically after 1, 3, or 5 minutes. www.cobyusa.com Page 23 Language Set the display language. Please refer to occur after a set the automatic shutdown to the the Additional Image Playback Options section of time when not in use your digital camera as a PC camera or removable disk. English Menu Options Menu item Function Auto Review Adjust the time that a captured image remains on your video camera's LCD screen immediately upon startup...
User Manual
Page 24
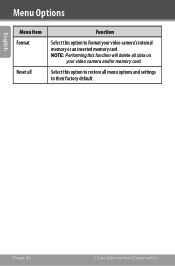
Select this option to restore all menu options and settings to format your video camera and/or memory card. Page 24 Coby Electronics Corporation English Menu Options Menu item Format Reset all Function Select this option to their factory default. NOTE: Performing this function will delete all data on your video camera's internal memory or an inserted memory card.
Select this option to restore all menu options and settings to format your video camera and/or memory card. Page 24 Coby Electronics Corporation English Menu Options Menu item Format Reset all Function Select this option to their factory default. NOTE: Performing this function will delete all data on your video camera's internal memory or an inserted memory card.
User Manual
Page 26
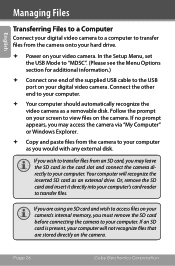
In the Setup Menu, set the USB Mode to "MDSC". (Please see the Menu Options section for additional information.) Connect one end of the supplied USB cable to the USB port on your computer. If you wish to transfer files from an SD card, you may access the camera via "My Computer" or Windows Explorer. Copy and paste files from the camera onto your hard drive. ...
In the Setup Menu, set the USB Mode to "MDSC". (Please see the Menu Options section for additional information.) Connect one end of the supplied USB cable to the USB port on your computer. If you wish to transfer files from an SD card, you may access the camera via "My Computer" or Windows Explorer. Copy and paste files from the camera onto your hard drive. ...
User Manual
Page 27
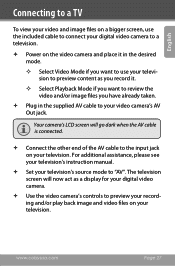
... video and image files on a bigger screen, use the included cable to connect your digital video camera to a television. Power on the video camera and place it in the desired mode. —— Select Video Mode if you want to review the video and/or image files you want to use your television to preview content as a display for your digital video camera. Use the video camera's controls to preview your recording and/or play back image and video files...
... video and image files on a bigger screen, use the included cable to connect your digital video camera to a television. Power on the video camera and place it in the desired mode. —— Select Video Mode if you want to review the video and/or image files you want to use your television to preview content as a display for your digital video camera. Use the video camera's controls to preview your recording and/or play back image and video files...
User Manual
Page 28
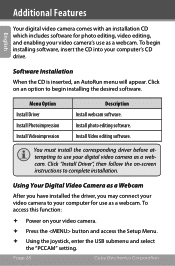
... Option Install Driver Install Photoimpression Install Videoimpression Description Install webcam software. Install photo editing software. To access this function: Power on an option to use your digital video camera as a webcam. Software Installation When the CD is inserted, an AutoRun menu will appear. Click "Install Driver", then follow the on-screen instructions to your computer for photo editing, video editing, and enabling your video camera's use as a webcam. Using Your Digital Video Camera as a webcam. Additional Features English Your digital video camera...
... Option Install Driver Install Photoimpression Install Videoimpression Description Install webcam software. Install photo editing software. To access this function: Power on an option to use your digital video camera as a webcam. Software Installation When the CD is inserted, an AutoRun menu will appear. Click "Install Driver", then follow the on-screen instructions to your computer for photo editing, video editing, and enabling your video camera's use as a webcam. Using Your Digital Video Camera as a webcam. Additional Features English Your digital video camera...
User Manual
Page 29
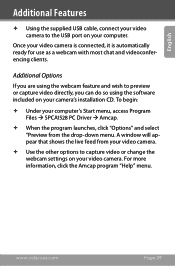
... menu, access Program Files SPCA1528 PC Driver Amcap. When the program launches, click "Options" and select "Preview from your video camera. Use the other options to the USB port on your computer. English Additional Features Using the supplied USB cable, connect your video camera to capture video or change the webcam settings on your video camera. For more information, click the Amcap program "Help" menu...
... menu, access Program Files SPCA1528 PC Driver Amcap. When the program launches, click "Options" and select "Preview from your video camera. Use the other options to the USB port on your computer. English Additional Features Using the supplied USB cable, connect your video camera to capture video or change the webcam settings on your video camera. For more information, click the Amcap program "Help" menu...

User Manual
Page 36
... Coby Electronics Corporation Memory card images are not saved in the following format: SUNP####.jpg. I cannot access the pictures on my camera or memory card from my computer. Ensure that have inserted a memory card containing images in another format or filename structure, they will only display JPG images that the camera's USB mode is set to save if the camera is turned off the video camera. English Troubleshooting Image is blurry or out of the images on the LCD screen...
... Coby Electronics Corporation Memory card images are not saved in the following format: SUNP####.jpg. I cannot access the pictures on my camera or memory card from my computer. Ensure that have inserted a memory card containing images in another format or filename structure, they will only display JPG images that the camera's USB mode is set to save if the camera is turned off the video camera. English Troubleshooting Image is blurry or out of the images on the LCD screen...


