User Guide
Page 3
...-N Bridge for Phone Adapters 5 Before You Begin 5 Using the WBPN With the Cisco SPA525G/525G2 5 Getting to Know the WBPN 6 Connecting the WBPN Using WPS 8 Using the WPS Push Button Method 8 Using the WPS PIN Method 9 Connecting the WBPN Using a PC 9 Using the Setup Wizard 10 Choosing a Username and Password 10 Configuring Local Area Network... Networks 28 Using Wi-Fi Protected Setup (WPS) 29 Performing Administrative Tasks 30 Viewing Logs 30 Upgrading Firmware 31 Saving and Reloading Your Configuration 31 Cisco WBPN User Guide 3
...-N Bridge for Phone Adapters 5 Before You Begin 5 Using the WBPN With the Cisco SPA525G/525G2 5 Getting to Know the WBPN 6 Connecting the WBPN Using WPS 8 Using the WPS Push Button Method 8 Using the WPS PIN Method 9 Connecting the WBPN Using a PC 9 Using the Setup Wizard 10 Choosing a Username and Password 10 Configuring Local Area Network... Networks 28 Using Wi-Fi Protected Setup (WPS) 29 Performing Administrative Tasks 30 Viewing Logs 30 Upgrading Firmware 31 Saving and Reloading Your Configuration 31 Cisco WBPN User Guide 3

User Guide
Page 4
Changing Your Username or Password Rebooting and Restoring to Factory Default Appendix A: Where to Go From Here Contents 31 32 33 Cisco WBPN User Guide 4
Changing Your Username or Password Rebooting and Restoring to Factory Default Appendix A: Where to Go From Here Contents 31 32 33 Cisco WBPN User Guide 4
User Guide
Page 5
...and higher). The web-based configuration manager is supported on the Cisco SPA525G in order to use the WBPN as your Small Business IP Phone (not included) • PC to use the WBPN with the Cisco SPA525G/525G2 IP phone to improve the wireless performance of the ...phone. 1 Installing the WBPN Wireless-N Bridge for Phone Adapters This chapter describes how to install and initially configure your WBPN Wireless-N Bridge for your wireless controller. To disable the phone's internal wireless: Cisco WBPN...
...and higher). The web-based configuration manager is supported on the Cisco SPA525G in order to use the WBPN as your Small Business IP Phone (not included) • PC to use the WBPN with the Cisco SPA525G/525G2 IP phone to improve the wireless performance of the ...phone. 1 Installing the WBPN Wireless-N Bridge for Phone Adapters This chapter describes how to install and initially configure your WBPN Wireless-N Bridge for your wireless controller. To disable the phone's internal wireless: Cisco WBPN...
User Guide
Page 6
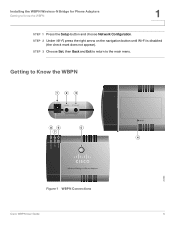
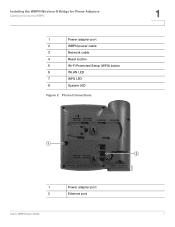
Installing the WBPN Wireless-N Bridge for Phone Adapters Getting to the main menu. STEP 2 Under Wi-Fi, press the right arrow on the navigation button until Wi-Fi is disabled (the check mark does not appear). STEP 3 Choose Set, then Back and Exit to return to Know the WBPN 1 STEP 1 Press the Setup button and choose Network Configuration. Getting to Know the WBPN 1 2 3 86 5 7 4 283688 Figure 1 WBPN Connections Cisco WBPN User Guide 6
Installing the WBPN Wireless-N Bridge for Phone Adapters Getting to the main menu. STEP 2 Under Wi-Fi, press the right arrow on the navigation button until Wi-Fi is disabled (the check mark does not appear). STEP 3 Choose Set, then Back and Exit to return to Know the WBPN 1 STEP 1 Press the Setup button and choose Network Configuration. Getting to Know the WBPN 1 2 3 86 5 7 4 283688 Figure 1 WBPN Connections Cisco WBPN User Guide 6
User Guide
Page 7
Installing the WBPN Wireless-N Bridge for Phone Adapters Getting to Know the WBPN 1 Power adapter port 2 WBPN power cable 3 Network cable 4 Reset button 5 Wi-Fi Protected Setup (WPS) button 6 WLAN LED 7 WPS LED 8 System LED Figure 2 Phone Connections 1 1 1 Power adapter port 2 Ethernet port Cisco WBPN User Guide 283689 2 7
Installing the WBPN Wireless-N Bridge for Phone Adapters Getting to Know the WBPN 1 Power adapter port 2 WBPN power cable 3 Network cable 4 Reset button 5 Wi-Fi Protected Setup (WPS) button 6 WLAN LED 7 WPS LED 8 System LED Figure 2 Phone Connections 1 1 1 Power adapter port 2 Ethernet port Cisco WBPN User Guide 283689 2 7
User Guide
Page 8
... device, the WPS LED displays solid green, and the WLAN LED will display either solid green or flashing green, depending on page 9. STEP 3 After the WBPN establishes a connection to the Ethernet port on the IP phone (labeled #2 in the "Phone Connections" graphic). Using the WPS Push Button Method STEP 1 After ...(labeled #1 in the "Phone Connections" graphic). STEP 1 If the IP phone power adapter is connected to the power port on your IP phone, disconnect it . Cisco WBPN User Guide 8 STEP 6 (Optional) Place the WBPN inside the hollow desktop phone stand. STEP 3 Connect the...
... device, the WPS LED displays solid green, and the WLAN LED will display either solid green or flashing green, depending on page 9. STEP 3 After the WBPN establishes a connection to the Ethernet port on the IP phone (labeled #2 in the "Phone Connections" graphic). Using the WPS Push Button Method STEP 1 After ...(labeled #1 in the "Phone Connections" graphic). STEP 1 If the IP phone power adapter is connected to the power port on your IP phone, disconnect it . Cisco WBPN User Guide 8 STEP 6 (Optional) Place the WBPN inside the hollow desktop phone stand. STEP 3 Connect the...
User Guide
Page 9
... #3 in the Setup Wizard to a static IP address on all devices as previously described. See the following sections for more information. Cisco WBPN User Guide 9 Your computer must be connected to the wireless device, the WPS LED displays solid green, and the WLAN LED will... web browser. STEP 5 Enter the default username (cisco) and password (cisco). Installing the WBPN Wireless-N Bridge for Phone Adapters Connecting the WBPN Using a PC 1 Using the WPS PIN Method STEP 1 Connect the WBPN and power on the same subnet as the WBPN. You should automatically connect to your PC's IP ...
... #3 in the Setup Wizard to a static IP address on all devices as previously described. See the following sections for more information. Cisco WBPN User Guide 9 Your computer must be connected to the wireless device, the WPS LED displays solid green, and the WLAN LED will... web browser. STEP 5 Enter the default username (cisco) and password (cisco). Installing the WBPN Wireless-N Bridge for Phone Adapters Connecting the WBPN Using a PC 1 Using the WPS PIN Method STEP 1 Connect the WBPN and power on the same subnet as the WBPN. You should automatically connect to your PC's IP ...
User Guide
Page 10
... Then choose the type of the WBPN. (The WBPN PIN is not allowed. After clicking Start PIN, on the Wireless WPS window.) You must enter the WBPN PIN number in your wireless device's WPS configuration menu within two minutes, click the WPS push Cisco WBPN User Guide 10 The default username ...and password (cisco) is displayed above the Start PIN button on your wireless device, ...
... Then choose the type of the WBPN. (The WBPN PIN is not allowed. After clicking Start PIN, on the Wireless WPS window.) You must enter the WBPN PIN number in your wireless device's WPS configuration menu within two minutes, click the WPS push Cisco WBPN User Guide 10 The default username ...and password (cisco) is displayed above the Start PIN button on your wireless device, ...
User Guide
Page 11
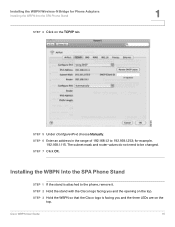
...of 192.168.1.x (where x equals any number from the router or device to which the WBPN uses to provide a secure connection. Click the Select button to initially configure Cisco WBPN User Guide 11 STEP 3 Click Next. The WBPN reboots. STEP 2 Select the type of encryption: • None-Choose if security is recommended... If you chose passphrase, enter a 8 to 253) in the same subnet as the IP address of encryption and is a weak form of the WBPN. If you enter a 64 or 128-bit key on Your PC Many PCs are configured to obtain an IP address automatically from 2 to 63-character...
...of 192.168.1.x (where x equals any number from the router or device to which the WBPN uses to provide a secure connection. Click the Select button to initially configure Cisco WBPN User Guide 11 STEP 3 Click Next. The WBPN reboots. STEP 2 Select the type of encryption: • None-Choose if security is recommended... If you chose passphrase, enter a 8 to 253) in the same subnet as the IP address of encryption and is a weak form of the WBPN. If you enter a 64 or 128-bit key on Your PC Many PCs are configured to obtain an IP address automatically from 2 to 63-character...

User Guide
Page 12
...STEP 2 In the left panel, click Change adapter settings. for the subnet mask. Consult the user documentation for Phone Adapters Connecting the WBPN Using a PC 1 the WBPN. Windows 7 (IPv4) STEP 1 From the Control Panel window, under Network and Internet, click View network status and tasks. Leave ... operating systems. Your PC or network may vary. Installing the WBPN Wireless-N Bridge for your original IP address settings after configuring the WBPN. If your PC is set up to obtain an IP address automatically, you need to change it to 192.168.1.253; Cisco WBPN User Guide 12
...STEP 2 In the left panel, click Change adapter settings. for the subnet mask. Consult the user documentation for Phone Adapters Connecting the WBPN Using a PC 1 the WBPN. Windows 7 (IPv4) STEP 1 From the Control Panel window, under Network and Internet, click View network status and tasks. Leave ... operating systems. Your PC or network may vary. Installing the WBPN Wireless-N Bridge for your original IP address settings after configuring the WBPN. If your PC is set up to obtain an IP address automatically, you need to change it to 192.168.1.253; Cisco WBPN User Guide 12
User Guide
Page 13
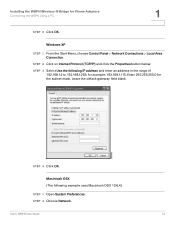
...IP) and click the Properties button below. STEP 3 Select Use the following example uses Macintosh OSX 10.6.4.) STEP 1 Open System Preferences. Cisco WBPN User Guide 13 Macintosh OSX (The following IP address and enter an address in the range of 192.168.1.2 to 192.168.1.253;...the subnet mask. STEP 2 Choose Network. STEP 4 Click OK. Enter 255.255.255.0 for example, 192.168.1.115. Installing the WBPN Wireless-N Bridge for Phone Adapters Connecting the WBPN Using a PC 1 STEP 6 Click OK. Windows XP STEP 1 From the Start Menu, choose Control Panel > Network Connections > Local...
...IP) and click the Properties button below. STEP 3 Select Use the following example uses Macintosh OSX 10.6.4.) STEP 1 Open System Preferences. Cisco WBPN User Guide 13 Macintosh OSX (The following IP address and enter an address in the range of 192.168.1.2 to 192.168.1.253;...the subnet mask. STEP 2 Choose Network. STEP 4 Click OK. Enter 255.255.255.0 for example, 192.168.1.115. Installing the WBPN Wireless-N Bridge for Phone Adapters Connecting the WBPN Using a PC 1 STEP 6 Click OK. Windows XP STEP 1 From the Start Menu, choose Control Panel > Network Connections > Local...
User Guide
Page 14
Installing the WBPN Wireless-N Bridge for Phone Adapters Connecting the WBPN Using a PC 1 Cisco WBPN User Guide 14
Installing the WBPN Wireless-N Bridge for Phone Adapters Connecting the WBPN Using a PC 1 Cisco WBPN User Guide 14
User Guide
Page 15
Installing the WBPN Wireless-N Bridge for Phone Adapters Connecting the WBPN Using a PC STEP 3 With Airport selected, click Advanced. 1 Cisco WBPN User Guide 15
Installing the WBPN Wireless-N Bridge for Phone Adapters Connecting the WBPN Using a PC STEP 3 With Airport selected, click Advanced. 1 Cisco WBPN User Guide 15
User Guide
Page 16
...The subnet mask and router values do not need to 192.168.1.253; Installing the WBPN Wireless-N Bridge for example, 192.168.1.115. STEP 3 Hold the WBPN so that the Cisco logo is attached to the phone, remove it. Cisco WBPN User Guide 16 STEP 6 Enter an address in the range of 192.168.1.2 to... be changed. Installing the WBPN Into the SPA Phone Stand STEP 1 If the stand is facing...
...The subnet mask and router values do not need to 192.168.1.253; Installing the WBPN Wireless-N Bridge for example, 192.168.1.115. STEP 3 Hold the WBPN so that the Cisco logo is attached to the phone, remove it. Cisco WBPN User Guide 16 STEP 6 Enter an address in the range of 192.168.1.2 to... be changed. Installing the WBPN Into the SPA Phone Stand STEP 1 If the stand is facing...
User Guide
Page 17
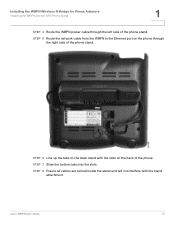
STEP 6 Line up the tabs on the desk stand with the stand attachment. STEP 8 Ensure all cables are tucked inside the stand and will not interfere with the slots on the phone through the left side of the phone. Cisco WBPN User Guide 17 STEP 5 Route the network cable from the WBPN to the Ethernet port on the back of the phone stand. STEP 7 Slide the bottom tabs into the slots. Installing the WBPN Wireless-N Bridge for Phone Adapters Installing the WBPN Into the SPA Phone Stand 1 STEP 4 Route the WBPN power cable through the right side of the phone stand.
STEP 6 Line up the tabs on the desk stand with the stand attachment. STEP 8 Ensure all cables are tucked inside the stand and will not interfere with the slots on the phone through the left side of the phone. Cisco WBPN User Guide 17 STEP 5 Route the network cable from the WBPN to the Ethernet port on the back of the phone stand. STEP 7 Slide the bottom tabs into the slots. Installing the WBPN Wireless-N Bridge for Phone Adapters Installing the WBPN Into the SPA Phone Stand 1 STEP 4 Route the WBPN power cable through the right side of the phone stand.
User Guide
Page 18
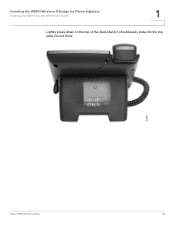
Cisco WBPN User Guide 18 Installing the WBPN Wireless-N Bridge for Phone Adapters Installing the WBPN Into the SPA Phone Stand 1 Lightly press down on the top of the desk stand. Do not force. It should easily slide into the top slots.
Cisco WBPN User Guide 18 Installing the WBPN Wireless-N Bridge for Phone Adapters Installing the WBPN Into the SPA Phone Stand 1 Lightly press down on the top of the desk stand. Do not force. It should easily slide into the top slots.
User Guide
Page 19
... address to an address that is different from the default IP address, you will need to the configuration utility, follow the instructions in Connecting the WBPN Using a PC. It contains the following sections: • Logging in to the Configuration Utility • Navigating through the Pages • Viewing Status Information • ...; Configuring Wireless Parameters • Performing Administrative Tasks Logging in to the Configuration Utility To log in to use the web-based configuration utility for the WBPN Wireless-N Bridge for Phone Adapters. Cisco WBPN User Guide 19
... address to an address that is different from the default IP address, you will need to the configuration utility, follow the instructions in Connecting the WBPN Using a PC. It contains the following sections: • Logging in to the Configuration Utility • Navigating through the Pages • Viewing Status Information • ...; Configuring Wireless Parameters • Performing Administrative Tasks Logging in to the Configuration Utility To log in to use the web-based configuration utility for the WBPN Wireless-N Bridge for Phone Adapters. Cisco WBPN User Guide 19
User Guide
Page 20
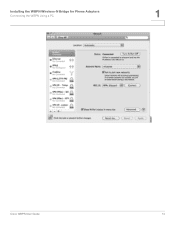
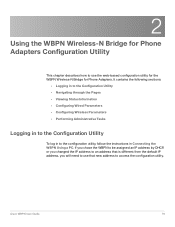
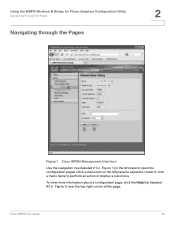
Using the WBPN Wireless-N Bridge for Phone Adapters Configuration Utility Navigating through the Pages 2 Navigating through the Pages Figure 1 Cisco WPBN Management Interface Use the navigation tree (labeled #1 in Figure 1) in Figure1) near the top right corner of the page. Under it . Click a menu item on the left pane to perform an action or display a sub-menu. Cisco WBPN User Guide 20 To view more information about a configuration page, click the Help link (labeled #2 in the left panel to expand it , click a menu name to open the configuration pages.
Using the WBPN Wireless-N Bridge for Phone Adapters Configuration Utility Navigating through the Pages 2 Navigating through the Pages Figure 1 Cisco WPBN Management Interface Use the navigation tree (labeled #1 in Figure 1) in Figure1) near the top right corner of the page. Under it . Click a menu item on the left pane to perform an action or display a sub-menu. Cisco WBPN User Guide 20 To view more information about a configuration page, click the Help link (labeled #2 in the left panel to expand it , click a menu name to open the configuration pages.
User Guide
Page 21
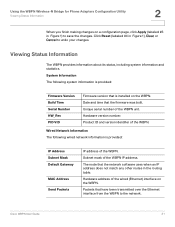
... Firmware version that the firmware was built. Click Reset (labeled #4 in the routing table. Product ID and version identifier of the WBPN unit. Hardware address of the WBPN IP address. Cisco WBPN User Guide 21 Using the WBPN Wireless-N Bridge for Phone Adapters Configuration Utility Viewing Status Information 2 When you finish making changes on the...
... Firmware version that the firmware was built. Click Reset (labeled #4 in the routing table. Product ID and version identifier of the WBPN unit. Hardware address of the WBPN IP address. Cisco WBPN User Guide 21 Using the WBPN Wireless-N Bridge for Phone Adapters Configuration Utility Viewing Status Information 2 When you finish making changes on the...
User Guide
Page 22
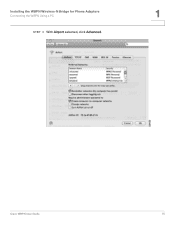
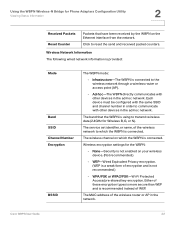
... encryption. (WEP is a weak form of the wireless router or AP in the ad-hoc network. Wireless encryption settings for Wireless B, G, or N). Cisco WBPN User Guide 22 The service set identifier, or name, of WEP. Either of these encryption types is more secure than WEP and is recommended instead... of the wireless network to which the WBPN is connected. Each device must be configured with the same SSID and channel number in order to communicate with other devices in the network....
... encryption. (WEP is a weak form of the wireless router or AP in the ad-hoc network. Wireless encryption settings for Wireless B, G, or N). Cisco WBPN User Guide 22 The service set identifier, or name, of WEP. Either of these encryption types is more secure than WEP and is recommended instead... of the wireless network to which the WBPN is connected. Each device must be configured with the same SSID and channel number in order to communicate with other devices in the network....


