User Guide
Page 3
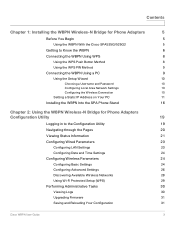
... 5 Using the WBPN With the Cisco SPA525G/525G2 5 Getting to Know the WBPN 6 Connecting the WBPN Using WPS 8 Using the WPS Push Button Method 8 Using the WPS PIN Method 9 Connecting the WBPN Using a PC 9 Using the Setup Wizard 10 Choosing a Username and Password 10 Configuring Local Area Network Settings 10 Configuring the Wireless Connection 10 Setting a Static IP Address on Your PC 11 Installing the WBPN Into the SPA Phone Stand 16 Chapter 2: Using the WBPN Wireless-N Bridge for Phone Adapters Configuration Utility 19 Logging in to the Configuration Utility 19...
... 5 Using the WBPN With the Cisco SPA525G/525G2 5 Getting to Know the WBPN 6 Connecting the WBPN Using WPS 8 Using the WPS Push Button Method 8 Using the WPS PIN Method 9 Connecting the WBPN Using a PC 9 Using the Setup Wizard 10 Choosing a Username and Password 10 Configuring Local Area Network Settings 10 Configuring the Wireless Connection 10 Setting a Static IP Address on Your PC 11 Installing the WBPN Into the SPA Phone Stand 16 Chapter 2: Using the WBPN Wireless-N Bridge for Phone Adapters Configuration Utility 19 Logging in to the Configuration Utility 19...
User Guide
Page 5
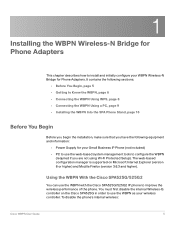
...; Power Supply for your Small Business IP Phone (not included) • PC to use the WBPN with the Cisco SPA525G/525G2 IP phone to improve the wireless performance of the phone. You must first disable the internal Wireless-G controller on Microsoft Internet Explorer (version 8 or higher) and Mozilla Firefox (version 3.6.3 and higher). The web-based configuration manager is supported on the Cisco SPA525G in order to use the WBPN...
...; Power Supply for your Small Business IP Phone (not included) • PC to use the WBPN with the Cisco SPA525G/525G2 IP phone to improve the wireless performance of the phone. You must first disable the internal Wireless-G controller on Microsoft Internet Explorer (version 8 or higher) and Mozilla Firefox (version 3.6.3 and higher). The web-based configuration manager is supported on the Cisco SPA525G in order to use the WBPN...
User Guide
Page 6
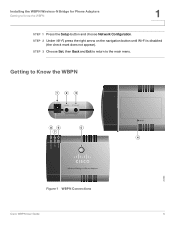
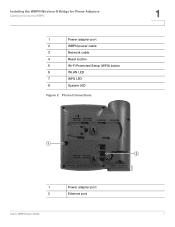
STEP 3 Choose Set, then Back and Exit to return to Know the WBPN 1 2 3 86 5 7 4 283688 Figure 1 WBPN Connections Cisco WBPN User Guide 6 Getting to the main menu. STEP 2 Under Wi-Fi, press the right arrow on the navigation button until Wi-Fi is disabled (the check mark does not appear). Installing the WBPN Wireless-N Bridge for Phone Adapters Getting to Know the WBPN 1 STEP 1 Press the Setup button and choose Network Configuration.
STEP 3 Choose Set, then Back and Exit to return to Know the WBPN 1 2 3 86 5 7 4 283688 Figure 1 WBPN Connections Cisco WBPN User Guide 6 Getting to the main menu. STEP 2 Under Wi-Fi, press the right arrow on the navigation button until Wi-Fi is disabled (the check mark does not appear). Installing the WBPN Wireless-N Bridge for Phone Adapters Getting to Know the WBPN 1 STEP 1 Press the Setup button and choose Network Configuration.
User Guide
Page 7
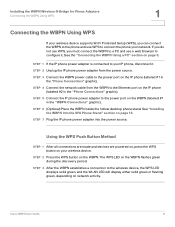
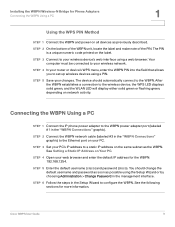
Installing the WBPN Wireless-N Bridge for Phone Adapters Getting to Know the WBPN 1 Power adapter port 2 WBPN power cable 3 Network cable 4 Reset button 5 Wi-Fi Protected Setup (WPS) button 6 WLAN LED 7 WPS LED 8 System LED Figure 2 Phone Connections 1 1 1 Power adapter port 2 Ethernet port Cisco WBPN User Guide 283689 2 7
Installing the WBPN Wireless-N Bridge for Phone Adapters Getting to Know the WBPN 1 Power adapter port 2 WBPN power cable 3 Network cable 4 Reset button 5 Wi-Fi Protected Setup (WPS) button 6 WLAN LED 7 WPS LED 8 System LED Figure 2 Phone Connections 1 1 1 Power adapter port 2 Ethernet port Cisco WBPN User Guide 283689 2 7
User Guide
Page 8
... "Connecting the WBPN Using a PC" section on the WBPN (labeled #1 in the "WBPN Connections" graphic). STEP 3 Connect the WBPN power cable to the power port on page 9. Cisco WBPN User Guide 8 STEP 2 Unplug the IP phone power adapter from the WBPN to the wireless device, the WPS LED displays solid green, and the WLAN LED will display either solid green or flashing green, depending on the WBPN flashes green during the discovery period. STEP 5 Connect the IP phone power adapter to the power port on your network. See "Installing...
... "Connecting the WBPN Using a PC" section on the WBPN (labeled #1 in the "WBPN Connections" graphic). STEP 3 Connect the WBPN power cable to the power port on page 9. Cisco WBPN User Guide 8 STEP 2 Unplug the IP phone power adapter from the WBPN to the wireless device, the WPS LED displays solid green, and the WLAN LED will display either solid green or flashing green, depending on the WBPN flashes green during the discovery period. STEP 5 Connect the IP phone power adapter to the power port on your network. See "Installing...
User Guide
Page 9
.... Cisco WBPN User Guide 9 Installing the WBPN Wireless-N Bridge for Phone Adapters Connecting the WBPN Using a PC 1 Using the WPS PIN Method STEP 1 Connect the WBPN and power on your PC. STEP 2 Connect the WBPN network cable (labeled #3 in the "WBPN Connections" graphic) to your changes. Your computer must be connected to your router or device's WPS menu, enter the WBPN PIN into the field that allows you to the WBPN. See Setting a Static IP Address on the same subnet as possible using a PIN. STEP 5 Enter the default username (cisco) and password (cisco...
.... Cisco WBPN User Guide 9 Installing the WBPN Wireless-N Bridge for Phone Adapters Connecting the WBPN Using a PC 1 Using the WPS PIN Method STEP 1 Connect the WBPN and power on your PC. STEP 2 Connect the WBPN network cable (labeled #3 in the "WBPN Connections" graphic) to your changes. Your computer must be connected to your router or device's WPS menu, enter the WBPN PIN into the field that allows you to the WBPN. See Setting a Static IP Address on the same subnet as possible using a PIN. STEP 5 Enter the default username (cisco) and password (cisco...
User Guide
Page 10
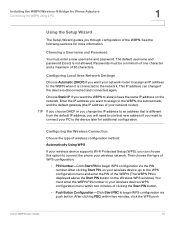
... sections for more information. Installing the WBPN Wireless-N Bridge for Phone Adapters Connecting the WBPN Using a PC 1 Using the Setup Wizard The Setup Wizard guides you want the WBPN to always have the same IP address on the Wireless WPS window.) You must enter the WBPN PIN number in your wireless device's WPS configuration menu within two minutes, click the WPS push Cisco WBPN User Guide 10 Choose Static IP if you through configuration of clicking the Start PIN button. • Push Button Configuration-Click Start PBC to connect the phone your wireless network.
... sections for more information. Installing the WBPN Wireless-N Bridge for Phone Adapters Connecting the WBPN Using a PC 1 Using the Setup Wizard The Setup Wizard guides you want the WBPN to always have the same IP address on the Wireless WPS window.) You must enter the WBPN PIN number in your wireless device's WPS configuration menu within two minutes, click the WPS push Cisco WBPN User Guide 10 Choose Static IP if you through configuration of clicking the Start PIN button. • Push Button Configuration-Click Start PBC to connect the phone your wireless network.
User Guide
Page 11
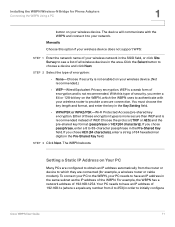
... provide a secure connection. Manually Choose this type of 192.168.1.x (where x equals any number from the router or device to which the WBPN uses to authenticate with the WBPN and connect it to your network. With this option if your wireless device does not support WPS: STEP 1 Enter the network name of these encryption types is more secure than WEP and is not recommended. Your PC needs to initially configure Cisco WBPN User Guide 11 Either of your wireless network in...
... provide a secure connection. Manually Choose this type of 192.168.1.x (where x equals any number from the router or device to which the WBPN uses to authenticate with the WBPN and connect it to your network. With this option if your wireless device does not support WPS: STEP 1 Enter the network name of these encryption types is more secure than WEP and is not recommended. Your PC needs to initially configure Cisco WBPN User Guide 11 Either of your wireless network in...

User Guide
Page 12
... Properties button below. Enter 255.255.255.0 for Phone Adapters Connecting the WBPN Using a PC 1 the WBPN. Leave the default gateway field blank. The following IP address and enter an address in the range of 192.168.1.2 to have a static IP address. You should revert to your PC is set up to obtain an IP address automatically, you need to change it to 192.168.1.253; Installing the WBPN Wireless-N Bridge for the subnet...
... Properties button below. Enter 255.255.255.0 for Phone Adapters Connecting the WBPN Using a PC 1 the WBPN. Leave the default gateway field blank. The following IP address and enter an address in the range of 192.168.1.2 to have a static IP address. You should revert to your PC is set up to obtain an IP address automatically, you need to change it to 192.168.1.253; Installing the WBPN Wireless-N Bridge for the subnet...
User Guide
Page 19
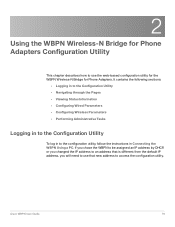
Cisco WBPN User Guide 19 If you chose the WBPN to be assigned an IP address by DHCP, or you changed the IP address to an address that is different from the default IP address, you will need to use the web-based configuration utility for the WBPN Wireless-N Bridge for Phone Adapters. It contains the following sections: • Logging in to the Configuration Utility • Navigating through the Pages • Viewing Status Information • Configuring Wired Parameters...
Cisco WBPN User Guide 19 If you chose the WBPN to be assigned an IP address by DHCP, or you changed the IP address to an address that is different from the default IP address, you will need to use the web-based configuration utility for the WBPN Wireless-N Bridge for Phone Adapters. It contains the following sections: • Logging in to the Configuration Utility • Navigating through the Pages • Viewing Status Information • Configuring Wired Parameters...
User Guide
Page 21
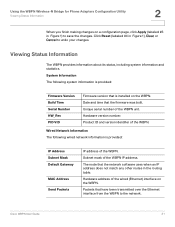
... provided: IP Address Subnet Mask Default Gateway MAC Address Send Packets IP address of the WBPN. Using the WBPN Wireless-N Bridge for Phone Adapters Configuration Utility Viewing Status Information 2 When you finish making changes on a configuration page, click Apply (labeled #3 in Figure1) to undo your changes. Hardware version number. Cisco WBPN User Guide 21 Click Reset (labeled #4 in the routing table. Packets that the firmware was built. Subnet mask of the WBPN unit. Viewing Status Information The WBPN provides information about its status, including system...
... provided: IP Address Subnet Mask Default Gateway MAC Address Send Packets IP address of the WBPN. Using the WBPN Wireless-N Bridge for Phone Adapters Configuration Utility Viewing Status Information 2 When you finish making changes on a configuration page, click Apply (labeled #3 in Figure1) to undo your changes. Hardware version number. Cisco WBPN User Guide 21 Click Reset (labeled #4 in the routing table. Packets that the firmware was built. Subnet mask of the WBPN unit. Viewing Status Information The WBPN provides information about its status, including system...
User Guide
Page 22
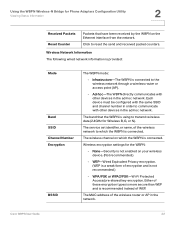
... by the WBPN on the Ethernet interface from the network. The MAC address of the wireless network to transmit wireless data (2.4GHz for the WBPN: • None-Security is not enabled on which the WBPN is connected. Wireless encryption settings for Wireless B, G, or N). Cisco WBPN User Guide 22 The wireless channel on your wireless device. (Not recommended.) • WEP-Wired Equivalent Privacy encryption. (WEP is connected to reset the send and received packet counters. Click to the wireless network through a wireless router or access point (AP). •...
... by the WBPN on the Ethernet interface from the network. The MAC address of the wireless network to transmit wireless data (2.4GHz for the WBPN: • None-Security is not enabled on which the WBPN is connected. Wireless encryption settings for Wireless B, G, or N). Cisco WBPN User Guide 22 The wireless channel on your wireless device. (Not recommended.) • WEP-Wired Equivalent Privacy encryption. (WEP is connected to reset the send and received packet counters. Click to the wireless network through a wireless router or access point (AP). •...
User Guide
Page 23
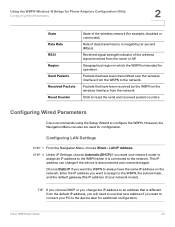
... the WBPN on the network. Cisco WBPN User Guide 23 Using the WBPN Wireless-N Bridge for Phone Adapters Configuration Utility Configuring Wired Parameters 2 State Data Rate RSSI Region Send Packets Received Packets Reset Counter State of your network router). Rate of the wireless signal received from the default IP address, you change if the device is connected to an address that have been transmitted over the wireless interface from the network. Packets that is intended for operation. Configuring LAN Settings STEP...
... the WBPN on the network. Cisco WBPN User Guide 23 Using the WBPN Wireless-N Bridge for Phone Adapters Configuration Utility Configuring Wired Parameters 2 State Data Rate RSSI Region Send Packets Received Packets Reset Counter State of your network router). Rate of the wireless signal received from the default IP address, you change if the device is connected to an address that have been transmitted over the wireless interface from the network. Packets that is intended for operation. Configuring LAN Settings STEP...
User Guide
Page 24
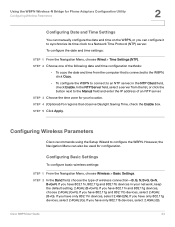
... and time from the list, or click the button next to a Network Time Protocol (NTP) server. Configuring Wireless Parameters Cisco recommends using the Setup Wizard to an NTP server, in your location. However, the Navigation Menu can configure it to synchronize its time clock to the Manual field and enter the IP address of wireless connection-B, G, N, B+G, G+N, B+G+N. If you have 802.11n, 802.11g and 802.11b devices in the NTP Client field, check Enable...
... and time from the list, or click the button next to a Network Time Protocol (NTP) server. Configuring Wireless Parameters Cisco recommends using the Setup Wizard to an NTP server, in your location. However, the Navigation Menu can configure it to synchronize its time clock to the Manual field and enter the IP address of wireless connection-B, G, N, B+G, G+N, B+G+N. If you have 802.11n, 802.11g and 802.11b devices in the NTP Client field, check Enable...
User Guide
Page 25
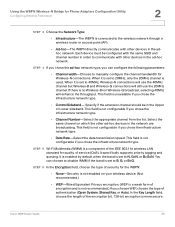
... to manually configure the channel bandwidth for Wireless-N connections. Specify if the extension channel should be configured with the same SSID and channel number in order to communicate with other devices in the Upper or Lower sideband. It is enabled by default when the band is set to N, G+N, or B+G+N. Using the WBPN Wireless-N Bridge for Phone Adapters Configuration Utility Configuring Wireless Parameters 2 STEP 3 Choose the Network Type: • Infrastructure-The WBPN is connected to the wireless network through a wireless router or access point (AP...
... to manually configure the channel bandwidth for Wireless-N connections. Specify if the extension channel should be configured with the same SSID and channel number in order to communicate with other devices in the Upper or Lower sideband. It is enabled by default when the band is set to N, G+N, or B+G+N. Using the WBPN Wireless-N Bridge for Phone Adapters Configuration Utility Configuring Wireless Parameters 2 STEP 3 Choose the Network Type: • Infrastructure-The WBPN is connected to the wireless network through a wireless router or access point (AP...
User Guide
Page 26
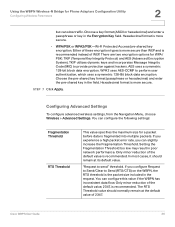
... utilizes dynamic keys and incorporates Message Integrity Code (MIC) to perform user authentication, which uses a symmetric 128-Bit block data encryption. Hexadecimal format is recommended. If you experience a high packet error rate, you configure Request to Send/Clear to send" threshold. Only minor reduction of 2347. Hexadecimal format is fragmented into multiple packets. WPA2 uses AES-CCMP to provide protection against hackers. Cisco WBPN User Guide 26...
... utilizes dynamic keys and incorporates Message Integrity Code (MIC) to perform user authentication, which uses a symmetric 128-Bit block data encryption. Hexadecimal format is recommended. If you experience a high packet error rate, you configure Request to Send/Clear to send" threshold. Only minor reduction of 2347. Hexadecimal format is fragmented into multiple packets. WPA2 uses AES-CCMP to provide protection against hackers. Cisco WBPN User Guide 26...
User Guide
Page 28
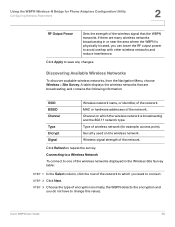
... want to change this value). Type of wireless network (for Phone Adapters Configuration Utility Configuring Wireless Parameters 2 RF Output Power Sets the strength of the wireless signal that are many wireless networks broadcasting in the Wireless Site Survey table: STEP 1 In the Select column, click the row of the network. Cisco WBPN User Guide 28 MAC or hardware addresses of the network to avoid overlap with other wireless networks and reduce interference. STEP 2 Click Next. Using the WBPN Wireless-N Bridge for example, access point).
... want to change this value). Type of wireless network (for Phone Adapters Configuration Utility Configuring Wireless Parameters 2 RF Output Power Sets the strength of the wireless signal that are many wireless networks broadcasting in the Wireless Site Survey table: STEP 1 In the Select column, click the row of the network. Cisco WBPN User Guide 28 MAC or hardware addresses of the network to avoid overlap with other wireless networks and reduce interference. STEP 2 Click Next. Using the WBPN Wireless-N Bridge for example, access point).
User Guide
Page 29
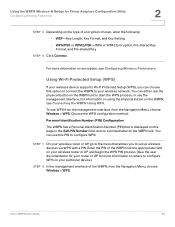
...choose Wireless > WPS. To use the management interface. Using the WBPN Wireless-N Bridge for Phone Adapters Configuration Utility Configuring Wireless Parameters 2 STEP 4 Depending on the WBPN unit to start the WPS process, or use WPS from the management interface, from the Navigation Menu, choose Wireless > WPS. For more information on where to set up wireless devices via WPS with a PIN. For information on using the physical button on your wireless network. Using Wi-Fi Protected Setup (WPS) If your router or AP for your wireless device supports Wi-Fi Protected Setup (WPS...
...choose Wireless > WPS. To use the management interface. Using the WBPN Wireless-N Bridge for Phone Adapters Configuration Utility Configuring Wireless Parameters 2 STEP 4 Depending on the WBPN unit to start the WPS process, or use WPS from the management interface, from the Navigation Menu, choose Wireless > WPS. For more information on where to set up wireless devices via WPS with a PIN. For information on using the physical button on your wireless network. Using Wi-Fi Protected Setup (WPS) If your router or AP for your wireless device supports Wi-Fi Protected Setup (WPS...
User Guide
Page 31
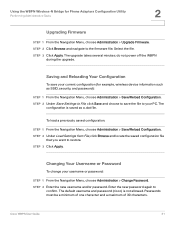
... new username and/or password. Passwords must be a minimum of one character and a maximum of 30 characters. STEP 2 Click Browse and navigate to your username or password: STEP 1 From the Navigation Menu, choose Administration > Change Password. do not power off the WBPN during the upgrade. Using the WBPN Wireless-N Bridge for example, wireless device information such as a .dat file. Cisco WBPN User Guide 31 Saving and Reloading Your Configuration To save the file to the firmware file. Changing Your Username...
... new username and/or password. Passwords must be a minimum of one character and a maximum of 30 characters. STEP 2 Click Browse and navigate to your username or password: STEP 1 From the Navigation Menu, choose Administration > Change Password. do not power off the WBPN during the upgrade. Using the WBPN Wireless-N Bridge for example, wireless device information such as a .dat file. Cisco WBPN User Guide 31 Saving and Reloading Your Configuration To save the file to the firmware file. Changing Your Username...
User Guide
Page 32
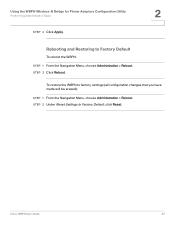
Using the WBPN Wireless-N Bridge for Phone Adapters Configuration Utility Performing Administrative Tasks STEP 3 Click Apply. 2 Rebooting and Restoring to Factory Default, click Reset. STEP 2 Under Reset Settings to Factory Default To reboot the WBPN: STEP 1 From the Navigation Menu, choose Administration > Reboot. Cisco WBPN User Guide 32 To restore the WBPN to factory settings (all configuration changes that you have made will be erased): STEP 1 From the Navigation Menu, choose Administration > Reboot. STEP 2 Click Reboot.
Using the WBPN Wireless-N Bridge for Phone Adapters Configuration Utility Performing Administrative Tasks STEP 3 Click Apply. 2 Rebooting and Restoring to Factory Default, click Reset. STEP 2 Under Reset Settings to Factory Default To reboot the WBPN: STEP 1 From the Navigation Menu, choose Administration > Reboot. Cisco WBPN User Guide 32 To restore the WBPN to factory settings (all configuration changes that you have made will be erased): STEP 1 From the Navigation Menu, choose Administration > Reboot. STEP 2 Click Reboot.


