
Quick Start Guide
Page 2
... one model (Cisco IAD2435-8FXS IAD) with a front panel that accompany or are not included with a common front panel (Figure 1); The IAD back panels, labeled by specific model number, vary considerably, depending on Customer location. The analog voice ports use commercially reasonable efforts to Cisco software, appears in Cisco Product Documentation as console, auxiliary, and flash memory (CF) ports. The RSS feeds are a free service and Cisco currently supports...
... one model (Cisco IAD2435-8FXS IAD) with a front panel that accompany or are not included with a common front panel (Figure 1); The IAD back panels, labeled by specific model number, vary considerably, depending on Customer location. The analog voice ports use commercially reasonable efforts to Cisco software, appears in Cisco Product Documentation as console, auxiliary, and flash memory (CF) ports. The RSS feeds are a free service and Cisco currently supports...

Quick Start Guide
Page 6
... following items are included with each Cisco IAD2430, Cisco IAD2431, and Cisco IAD2432 IAD: • Rack-mount brackets for wall-mounting applications are included with the Cisco IAD2435-8FXS IAD. grounding lug and fasteners; It has the letters "SN:" followed by eleven characters. 6 The serial number label is located on the bottom of the Cisco IAD2430 series routers is 0.25 x 1 inch (6.35...
... following items are included with each Cisco IAD2430, Cisco IAD2431, and Cisco IAD2432 IAD: • Rack-mount brackets for wall-mounting applications are included with the Cisco IAD2435-8FXS IAD. grounding lug and fasteners; It has the letters "SN:" followed by eleven characters. 6 The serial number label is located on the bottom of the Cisco IAD2430 series routers is 0.25 x 1 inch (6.35...

Quick Start Guide
Page 7
.... Use caution when connecting cables. To avoid electric shock, use RJ-45 connectors. To view Cisco accessibility guidelines and product adherence, see the Cisco IAD2400 Series Regulatory Compliance and Safety Information document at the following URL: http://www.cisco.com/web/about/responsibility/accessibility/products 6 Safety Information The following warnings apply to telephone-network voltage (TNV) circuits. Because it is text based and...
.... Use caution when connecting cables. To avoid electric shock, use RJ-45 connectors. To view Cisco accessibility guidelines and product adherence, see the Cisco IAD2400 Series Regulatory Compliance and Safety Information document at the following URL: http://www.cisco.com/web/about/responsibility/accessibility/products 6 Safety Information The following warnings apply to telephone-network voltage (TNV) circuits. Because it is text based and...

Quick Start Guide
Page 8
... from power line crosses by an incoming call. Statement 269 Warning A ground wire must always be overemphasized. Never splice two wires together for damage to the attached interface, equipment, and nearby personnel. Please read the wall mounting instructions carefully before beginning installation. Statement 284 Warning To prevent bodily injury when mounting or servicing this requirement. Do not touch the RJ-11 (phone) port...
... from power line crosses by an incoming call. Statement 269 Warning A ground wire must always be overemphasized. Never splice two wires together for damage to the attached interface, equipment, and nearby personnel. Please read the wall mounting instructions carefully before beginning installation. Statement 284 Warning To prevent bodily injury when mounting or servicing this requirement. Do not touch the RJ-11 (phone) port...
Quick Start Guide
Page 9
... overloaded. Statement 1017 Warning This equipment must be a remote risk of a suitably installed ground conductor. Statement 1037 Warning Avoid using a telephone (other than a cordless type) during an electrical storm. Replace the battery only with stabilizing devices, install the stabilizers before mounting or servicing the unit in restricted access areas. Statement 1015 Warning Take care when connecting units to the supply circuit so that suitable grounding...
... overloaded. Statement 1017 Warning This equipment must be a remote risk of a suitably installed ground conductor. Statement 1037 Warning Avoid using a telephone (other than a cordless type) during an electrical storm. Replace the battery only with stabilizing devices, install the stabilizers before mounting or servicing the unit in restricted access areas. Statement 1015 Warning Take care when connecting units to the supply circuit so that suitable grounding...
Quick Start Guide
Page 10
...; Using Rack-Mount Brackets, page 11 • Rack-Mounting the Chassis, page 12 • Setting the Chassis on a Desktop, page 13 • Setting the Cisco IAD2435 on a Desktop, page 13 • Wall-Mounting the Chassis, page 13 • Grounding the Chassis, page 18 • Connecting the RJ-21 Cable in separate packages. Tip Before proceeding, consider the location of the equipment with telephone-network voltages. The telecommunications lines must...
...; Using Rack-Mount Brackets, page 11 • Rack-Mounting the Chassis, page 12 • Setting the Chassis on a Desktop, page 13 • Setting the Cisco IAD2435 on a Desktop, page 13 • Wall-Mounting the Chassis, page 13 • Grounding the Chassis, page 18 • Connecting the RJ-21 Cable in separate packages. Tip Before proceeding, consider the location of the equipment with telephone-network voltages. The telecommunications lines must...
Quick Start Guide
Page 11
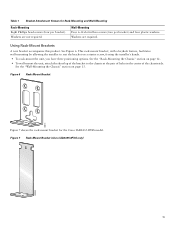
...-Mounting the Chassis" section on page 12. • To wall-mount the unit, attach the short leg of the bracket to rest the bracket on page 13. Figure 7 Rack-Mount Bracket (Cisco IAD2435-8FXS only) 280933 11 Wall-Mounting Four 6-32 slotted hex screws (two per bracket). Using Rack-Mount Brackets A new bracket accompanies this product. This rack-mount bracket, with a keyhole feature, facilitates wall-mounting by allowing the installer...
...-Mounting the Chassis" section on page 12. • To wall-mount the unit, attach the short leg of the bracket to rest the bracket on page 13. Figure 7 Rack-Mount Bracket (Cisco IAD2435-8FXS only) 280933 11 Wall-Mounting Four 6-32 slotted hex screws (two per bracket). Using Rack-Mount Brackets A new bracket accompanies this product. This rack-mount bracket, with a keyhole feature, facilitates wall-mounting by allowing the installer...
Quick Start Guide
Page 12
... purchase four additional machine screws to the chassis, but not for installing the chassis in a rack or on page 11). Caution Cisco IAD2435-8FXS provides for back-panel rack-mounting only, as shown in Figure 11. Note Screws are included for attaching the brackets to install the chassis in a rack. Use the screw size required by your rack. Caution Make sure...
... purchase four additional machine screws to the chassis, but not for installing the chassis in a rack or on page 11). Caution Cisco IAD2435-8FXS provides for back-panel rack-mounting only, as shown in Figure 11. Note Screws are included for attaching the brackets to install the chassis in a rack. Use the screw size required by your rack. Caution Make sure...

Quick Start Guide
Page 13
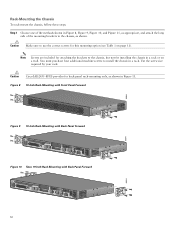
...install the router, you purchase. Wall-Mounting the Chassis Caution You can also place the Cisco IAD2435 IAD on a smooth, flat surface. Caution Do not place anything on top of the router that is available. Caution Do not place anything on top can set the Cisco IAD2430 series... Caution Do not plug this unit into the building ground. Place the Cisco IAD on a desktop. Figure 11 Cisco IAD2435 IAD Rack-Mounting with Back Panel Forward 231983 FXS IAD2435-8FXS WAN FastEthernet CONSOLE T1/E1 0/1 0/0 AUX 12V DC SA Step 2 Install the chassis in the four ...
...install the router, you purchase. Wall-Mounting the Chassis Caution You can also place the Cisco IAD2435 IAD on a smooth, flat surface. Caution Do not place anything on top of the router that is available. Caution Do not place anything on top can set the Cisco IAD2430 series... Caution Do not plug this unit into the building ground. Place the Cisco IAD on a desktop. Figure 11 Cisco IAD2435 IAD Rack-Mounting with Back Panel Forward 231983 FXS IAD2435-8FXS WAN FastEthernet CONSOLE T1/E1 0/1 0/0 AUX 12V DC SA Step 2 Install the chassis in the four ...

Quick Start Guide
Page 14
... size number 10. This holds the unit in place for easy installation of the attachment screws. • Attach both brackets to use the correct screws and plastic washers for this mounting option. (See Table 1 on page 11.) Figure 12 Attaching the Brackets for installing the Cisco IAD2430, Cisco IAD2431, or Cisco IAD2432 IADs. 14 Be sure to the wall. Note For hollow-wall mounting...
... size number 10. This holds the unit in place for easy installation of the attachment screws. • Attach both brackets to use the correct screws and plastic washers for this mounting option. (See Table 1 on page 11.) Figure 12 Attaching the Brackets for installing the Cisco IAD2430, Cisco IAD2431, or Cisco IAD2432 IADs. 14 Be sure to the wall. Note For hollow-wall mounting...

Quick Start Guide
Page 18
... required for the Cisco IAD2400 series IADs. the ground wire must connect the chassis to provide proper ground for the ground lug or terminal. • For the NEBS ground lug-approximately 0.75 inch (20 mm) • For user-provided ring terminal-as required Crimp the ground wire to the chassis. Grounding the Chassis Use the information...
... required for the Cisco IAD2400 series IADs. the ground wire must connect the chassis to provide proper ground for the ground lug or terminal. • For the NEBS ground lug-approximately 0.75 inch (20 mm) • For user-provided ring terminal-as required Crimp the ground wire to the chassis. Grounding the Chassis Use the information...

Quick Start Guide
Page 19
...) or voice interface card (VIC). 232068 Figure 17 Cisco IAD2435 IAD Chassis Ground Connection Using Ground Lug FXS IAD2435-8FXS WAN FastEthernet CONSOLE T1/E1 0/1 0/0 AUX 12V DC SA 1 1 Grounding lug Figure 18 Chassis Ground Connection Using Ring Terminal 103512 Ring terminal attachment Step 5 Connect the other end of the Cisco IAD2430 series IADs support the following WICs and VICs (also used by Cisco 2600 series and Cisco 3600 series routers...
...) or voice interface card (VIC). 232068 Figure 17 Cisco IAD2435 IAD Chassis Ground Connection Using Ground Lug FXS IAD2435-8FXS WAN FastEthernet CONSOLE T1/E1 0/1 0/0 AUX 12V DC SA 1 1 Grounding lug Figure 18 Chassis Ground Connection Using Ring Terminal 103512 Ring terminal attachment Step 5 Connect the other end of the Cisco IAD2430 series IADs support the following WICs and VICs (also used by Cisco 2600 series and Cisco 3600 series routers...
Quick Start Guide
Page 20
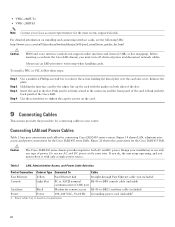
... voice interface cards do , the unit stops operating, and you must reboot it is firmly seated in the slot. Holding the interface card by the edges, line up the card with the back panel of the slot. If you do not support online insertion and removal (OIR, or hot swapping). Table 2 LAN, Administrative Access, and Power Cable Selection Port or Connection Color or Type Connected...
... voice interface cards do , the unit stops operating, and you must reboot it is firmly seated in the slot. Holding the interface card by the edges, line up the card with the back panel of the slot. If you do not support online insertion and removal (OIR, or hot swapping). Table 2 LAN, Administrative Access, and Power Cable Selection Port or Connection Color or Type Connected...

Quick Start Guide
Page 22
... and Voice Connections Distribution panel 1 To CO 2 Cisco IAD2430 series 88872 3 Digital voice 4 Network demarcation 1 RJ-21 cable 3 RJ-48 straight-through cable PBX 2 RJ-45 cable (through a patch panel) to 50 Ohms when ringing voltage is present on the port. Table 3 WAN and Voice Cable Selection Port or Interface Color or Type Connected To Cable (not included) T1/E1, WAN WIC-1DSU-T1 Light...
... and Voice Connections Distribution panel 1 To CO 2 Cisco IAD2430 series 88872 3 Digital voice 4 Network demarcation 1 RJ-21 cable 3 RJ-48 straight-through cable PBX 2 RJ-45 cable (through a patch panel) to 50 Ohms when ringing voltage is present on the port. Table 3 WAN and Voice Cable Selection Port or Interface Color or Type Connected To Cable (not included) T1/E1, WAN WIC-1DSU-T1 Light...

Quick Start Guide
Page 28
... the QUICK START GUIDE for basic information about Cisco CP Express please follow these publicly known initial credentials using the setup command facility. You may initially configure your router and network. For more information about your router by using the Cisco IOS command-line interface (CLI) or by using the Cisco IOS CLI, follow the instructions in ROMMON monitor mode FE ports 0/0, 0/1-green 2 Off-No link Steady on-link Blinking...
... the QUICK START GUIDE for basic information about Cisco CP Express please follow these publicly known initial credentials using the setup command facility. You may initially configure your router and network. For more information about your router by using the Cisco IOS command-line interface (CLI) or by using the Cisco IOS CLI, follow the instructions in ROMMON monitor mode FE ports 0/0, 0/1-green 2 Off-No link Steady on-link Blinking...

Quick Start Guide
Page 29
... change the username and password, enter the following steps and the user entries (in bold) are now in the "Cisco IOS CLI" section on page 28. Setup Command Facility The setup command facility guides you can exit and run the setup command facility again. System Configuration Dialog --- Use the setup command facility to configure a hostname for the router, to set passwords, and to configure an interface for help...
... change the username and password, enter the following steps and the user entries (in bold) are now in the "Cisco IOS CLI" section on page 28. Setup Command Facility The setup command facility guides you can exit and run the setup command facility again. System Configuration Dialog --- Use the setup command facility to configure a hostname for the router, to set passwords, and to configure an interface for help...

Quick Start Guide
Page 30
... 100 Base-TX (RJ-45) connector? [yes]: yes Operate in the configuration. Step 10 Choose one of the available interfaces is displayed. no shutdown speed 100 duplex auto 30 to configure each interface on this interface? [yes]: yes IP address for this interface [255.255.0.0] : 255.255.0.0 Class B network is 172.1.0.0, 26 subnet bits; Enter enable secret: xxxxxx Step 7 Enter an enable password that is used to connect...
... 100 Base-TX (RJ-45) connector? [yes]: yes Operate in the configuration. Step 10 Choose one of the available interfaces is displayed. no shutdown speed 100 duplex auto 30 to configure each interface on this interface? [yes]: yes IP address for this interface [255.255.0.0] : 255.255.0.0 Class B network is 172.1.0.0, 26 subnet bits; Enter enable secret: xxxxxx Step 7 Enter an enable password that is used to connect...

Quick Start Guide
Page 31
... the initial configuration file, you can use the Cisco IOS CLI to the Cisco IAD. Sets a password for remote access to perform additional configuration. Activates the Fast Ethernet port. Saves the configuration. Configuring a T1/E1 Port for the Fast Ethernet port. Router> Step 13 Verify the initial configuration. See the "Verifying and Saving Your Configuration" section on page 33. RETURN The user prompt is displayed. Returns to get started! Use the enabled mode 'configure' command to...
... the initial configuration file, you can use the Cisco IOS CLI to the Cisco IAD. Sets a password for remote access to perform additional configuration. Activates the Fast Ethernet port. Saves the configuration. Configuring a T1/E1 Port for the Fast Ethernet port. Router> Step 13 Verify the initial configuration. See the "Verifying and Saving Your Configuration" section on page 33. RETURN The user prompt is displayed. Returns to get started! Use the enabled mode 'configure' command to...
Quick Start Guide
Page 32
... link. The default is a network device attached to support PPP, HDLC, or FR, follow these steps, beginning in global configuration mode: Command Description Step 1 Router(config)# controller t1/e1 1/0 Step 2 Router(config-ctrl)# clock source {internal | line | loop-timed} Enters controller configuration mode by controller number. Activates the T1/E1 controller. Configuring Digital Voice To configure basic T1/E1 controller settings to the T1/E1 port that you are configuring...
... link. The default is a network device attached to support PPP, HDLC, or FR, follow these steps, beginning in global configuration mode: Command Description Step 1 Router(config)# controller t1/e1 1/0 Step 2 Router(config-ctrl)# clock source {internal | line | loop-timed} Enters controller configuration mode by controller number. Activates the T1/E1 controller. Configuring Digital Voice To configure basic T1/E1 controller settings to the T1/E1 port that you are configuring...
Quick Start Guide
Page 33
... NVRAM so that you are using. • For loopback diagnostics, or for configuring controller channel groups, channel-associated signaling (CAS) voice groups, or time-division multiplexing (TDM) cross-connects, see the following references: • For PPP, HDLC, or FR, consult the online master index for each additional DS0 Configures additional DS0 groups on the Cisco IAD2435 IAD. Router# show startup-config Displays the configuration currently stored in NVRAM...
... NVRAM so that you are using. • For loopback diagnostics, or for configuring controller channel groups, channel-associated signaling (CAS) voice groups, or time-division multiplexing (TDM) cross-connects, see the following references: • For PPP, HDLC, or FR, consult the online master index for each additional DS0 Configures additional DS0 groups on the Cisco IAD2435 IAD. Router# show startup-config Displays the configuration currently stored in NVRAM...


