Installation Guide
Page 2
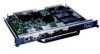
...-G2 provides a Fast Ethernet Management port, as well as three RJ-45 Gigabit Ethernet ports. • The NPE-G1 and NPE-G2 use these files on a CompactFlash Disk or on a TFTP server. • The NPE-G1 and NPE-G2 include three Gigabit Ethernet interfaces. Network Processing Engine and Network Services Engine Installation and Configuration 7-2 OL-4448-12 Note If you are upgrading to access the network. After you install the NPE-G1 or NPE-G2...
...-G2 provides a Fast Ethernet Management port, as well as three RJ-45 Gigabit Ethernet ports. • The NPE-G1 and NPE-G2 use these files on a CompactFlash Disk or on a TFTP server. • The NPE-G1 and NPE-G2 include three Gigabit Ethernet interfaces. Network Processing Engine and Network Services Engine Installation and Configuration 7-2 OL-4448-12 Note If you are upgrading to access the network. After you install the NPE-G1 or NPE-G2...
Installation Guide
Page 4
... part of disk0:complete The Flash Disk is present. If the Flash Disk is installed. Writing Monlib sectors Monlib write complete Format:All system sectors written. Cisco IOS looks to the NPE-G1 or NPE-G2 NVRAM for copying the router configuration file to a Flash Disk or PC Card. Continue? [confirm] Format :Drive communication and 1st Sector Write OK... Network Processing Engine and Network Services Engine Installation and Configuration...
... part of disk0:complete The Flash Disk is present. If the Flash Disk is installed. Writing Monlib sectors Monlib write complete Format:All system sectors written. Cisco IOS looks to the NPE-G1 or NPE-G2 NVRAM for copying the router configuration file to a Flash Disk or PC Card. Continue? [confirm] Format :Drive communication and 1st Sector Write OK... Network Processing Engine and Network Services Engine Installation and Configuration...
Installation Guide
Page 5
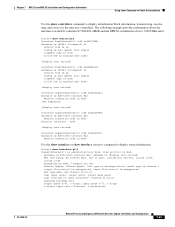
... running -config command to save the retrieved configuration in the "Related Documentation" section on removing the current network processing engine or network services engine and replacing it is complete and correct. Complete the following items: • A console terminal is connected to the console port on page 7-7 for specific configuration instructions. Use the ping command to a remote host: Step 1 Step 2 Step 3 Make sure you have a pound sign (#), enter enable, and then your password.
... running -config command to save the retrieved configuration in the "Related Documentation" section on removing the current network processing engine or network services engine and replacing it is complete and correct. Complete the following items: • A console terminal is connected to the console port on page 7-7 for specific configuration instructions. Use the ping command to a remote host: Step 1 Step 2 Step 3 Make sure you have a pound sign (#), enter enable, and then your password.
Installation Guide
Page 7
... the Network Processing Engine Copying the Configuration File Using a PC Complete the following steps to copy the router's configuration file to a text file on a PC connected to display the router's startup configuration. Enter the show startup-config command in this chapter for Installation." Proceed to the router's console port. To install the NPE-G1 or NPE-G2, follow the instructions in privileged EXEC mode to the router's console port. OL-4448-12 Network Processing Engine and Network Services Engine Installation and Configuration...
... the Network Processing Engine Copying the Configuration File Using a PC Complete the following steps to copy the router's configuration file to a text file on a PC connected to display the router's startup configuration. Enter the show startup-config command in this chapter for Installation." Proceed to the router's console port. To install the NPE-G1 or NPE-G2, follow the instructions in privileged EXEC mode to the router's console port. OL-4448-12 Network Processing Engine and Network Services Engine Installation and Configuration...
Installation Guide
Page 8
... access to the rear of the router when it out from the rack and, if necessary, to continue to power down the router, use cable ties to anchor them ) and use the copy running-config startup-config command to save the router's running configuration to a Flash Disk, PC Card, TFTP server, or PC. This is particularly important because the NPE-G1 and NPE-G2 have interfaces...
... access to the rear of the router when it out from the rack and, if necessary, to continue to power down the router, use cable ties to anchor them ) and use the copy running-config startup-config command to save the router's running configuration to a Flash Disk, PC Card, TFTP server, or PC. This is particularly important because the NPE-G1 and NPE-G2 have interfaces...
Installation Guide
Page 9
... power supply. Chapter 7 NPE-G1 and NPE-G2 Installation and Configuration Information Removing the Network Processing Engine Note When powering off the router, wait a minimum of the input power cable from a Cisco 7200 VXR router, complete the following items: • The green OK LED on the power supply turns off. • The fans stop operating. • The LEDs on the I/O controller turn off. • The LEDs on the port adapters turn off (O) position, the power supply enters a reset cycle for powering...
... power supply. Chapter 7 NPE-G1 and NPE-G2 Installation and Configuration Information Removing the Network Processing Engine Note When powering off the router, wait a minimum of the input power cable from a Cisco 7200 VXR router, complete the following items: • The green OK LED on the power supply turns off. • The fans stop operating. • The LEDs on the I/O controller turn off. • The LEDs on the port adapters turn off (O) position, the power supply enters a reset cycle for powering...

Installation Guide
Page 10
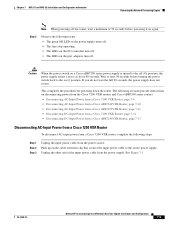
... 1 Step 2 Step 3 Unplug the input power cable from the power supply. Removing the Network Processing Engine Chapter 7 NPE-G1 and NPE-G2 Installation and Configuration Information Figure 7-1 Disconnecting Power from a Cisco 7200 VXR router. This completes the procedure for disconnecting AC-input power from a Cisco 7200 VXR Router AC-Input Power Supply 2 1 66415 NETWORK PROCESSING ENGINE-300 1 AC-input receptacle 2 Internal fans 3 4 3 Power switch 4 AC-input power supply Step 4 Repeat Step 1 through Step 3 if a second power supply is installed.
... 1 Step 2 Step 3 Unplug the input power cable from the power supply. Removing the Network Processing Engine Chapter 7 NPE-G1 and NPE-G2 Installation and Configuration Information Figure 7-1 Disconnecting Power from a Cisco 7200 VXR router. This completes the procedure for disconnecting AC-input power from a Cisco 7200 VXR Router AC-Input Power Supply 2 1 66415 NETWORK PROCESSING ENGINE-300 1 AC-input receptacle 2 Internal fans 3 4 3 Power switch 4 AC-input power supply Step 4 Repeat Step 1 through Step 3 if a second power supply is installed.

Installation Guide
Page 11
... end of the input power cable from a Cisco uBR7246VXR AC-Input Power Supply 4 5 66434 12 1 AC-input receptacle 2 Power switch 3 Handle 3 4 Network processing engine 5 AC-input power supply Step 4 Repeat Step 1 through Step 3 if a second power supply is installed. Chapter 7 NPE-G1 and NPE-G2 Installation and Configuration Information Removing the Network Processing Engine Figure 7-2 Disconnecting Power from the power supply. Disconnecting AC-Input Power from a Cisco uBR7225VXR Router To disconnect AC-input power from a Cisco uBR7225VXR router, complete the following...
... end of the input power cable from a Cisco uBR7246VXR AC-Input Power Supply 4 5 66434 12 1 AC-input receptacle 2 Power switch 3 Handle 3 4 Network processing engine 5 AC-input power supply Step 4 Repeat Step 1 through Step 3 if a second power supply is installed. Chapter 7 NPE-G1 and NPE-G2 Installation and Configuration Information Removing the Network Processing Engine Figure 7-2 Disconnecting Power from the power supply. Disconnecting AC-Input Power from a Cisco uBR7225VXR Router To disconnect AC-input power from a Cisco uBR7225VXR router, complete the following...

Installation Guide
Page 13
... in the OFF position. Typically, green or green and yellow are used at your site. Chapter 7 NPE-G1 and NPE-G2 Installation and Configuration Information Removing the Network Processing Engine Step 5 Repeat this step for ground. Disconnecting DC-Input Power from a Cisco uBR7246VXR Router To disconnect DC-input power from the strain-relief cover that services the DC circuit, switch the circuit breaker to the OFF...
... in the OFF position. Typically, green or green and yellow are used at your site. Chapter 7 NPE-G1 and NPE-G2 Installation and Configuration Information Removing the Network Processing Engine Step 5 Repeat this step for ground. Disconnecting DC-Input Power from a Cisco uBR7246VXR Router To disconnect DC-input power from the strain-relief cover that services the DC circuit, switch the circuit breaker to the OFF...

Installation Guide
Page 15
...-12 Network Processing Engine and Network Services Engine Installation and Configuration 7-15 Typically, green or green and yellow are used for the DC-input power supply matches the lead color coding used at your site. Make certain that secure the two-hole grounding lug to disconnect a secure power supply. Chapter 7 NPE-G1 and NPE-G2 Installation and Configuration Information Removing the Network Processing Engine Figure 7-5 Disconnecting Power from a Cisco uBR7246VXR DC-Input Power Supply 1 2 9 3 4 7 8 5 6 66406 1 Power switch 2 Power receptacle 3 DC Power supply 4 M5...
...-12 Network Processing Engine and Network Services Engine Installation and Configuration 7-15 Typically, green or green and yellow are used for the DC-input power supply matches the lead color coding used at your site. Make certain that secure the two-hole grounding lug to disconnect a secure power supply. Chapter 7 NPE-G1 and NPE-G2 Installation and Configuration Information Removing the Network Processing Engine Figure 7-5 Disconnecting Power from a Cisco uBR7246VXR DC-Input Power Supply 1 2 9 3 4 7 8 5 6 66406 1 Power switch 2 Power receptacle 3 DC Power supply 4 M5...
Installation Guide
Page 17
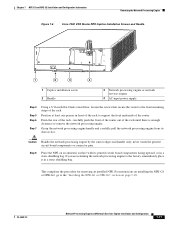
... NETWORK PROCESSING ENGINE-300 1 2 3 4 1 Captive installation screw 2 Handle 3 Network processing engine or network services engine 4 AC-input power supply Step 4 Step 5 Step 6 Step 7 Using a 3/16-inch flat-blade screwdriver, loosen the screws that secure the router to the front mounting strips of the router. OL-4448-12 Network Processing Engine and Network Services Engine Installation and Configuration 7-17 Position at least one person in front of the rack to the factory, immediately place it in a static...
... NETWORK PROCESSING ENGINE-300 1 2 3 4 1 Captive installation screw 2 Handle 3 Network processing engine or network services engine 4 AC-input power supply Step 4 Step 5 Step 6 Step 7 Using a 3/16-inch flat-blade screwdriver, loosen the screws that secure the router to the front mounting strips of the router. OL-4448-12 Network Processing Engine and Network Services Engine Installation and Configuration 7-17 Position at least one person in front of the rack to the factory, immediately place it in a static...
Installation Guide
Page 19
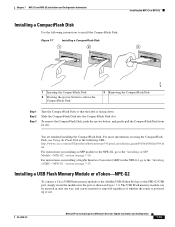
... so that the label is powered up or not. Installing a USB Flash Memory Module or eToken-NPE-G2 To connect a Cisco USB Flash memory module or the Aladdin USB eToken Pro key to the NPE-G2 USB port, simply insert the module into the CompactFlash Disk slot. OL-4448-12 Network Processing Engine and Network Services Engine Installation and Configuration 7-19 For instructions on page 7-20. The USB Flash memory module can be...
... so that the label is powered up or not. Installing a USB Flash Memory Module or eToken-NPE-G2 To connect a Cisco USB Flash memory module or the Aladdin USB eToken Pro key to the NPE-G2 USB port, simply insert the module into the CompactFlash Disk slot. OL-4448-12 Network Processing Engine and Network Services Engine Installation and Configuration 7-19 For instructions on page 7-20. The USB Flash memory module can be...

Installation Guide
Page 20
... USB Flash Features Support document. Installing an SFP Module-NPE-G2 Note The SFP module is in progress. We strongly recommend cleaning optical cable connectors before you connect the cables to it. However, if you are supported by Cisco routers. Go to the "Inserting the NPE-G1 or NPE-G2 into the Router" section on page 7-28 for instructions on page 7-67. 7-20 Network Processing Engine and Network Services Engine Installation...
... USB Flash Features Support document. Installing an SFP Module-NPE-G2 Note The SFP module is in progress. We strongly recommend cleaning optical cable connectors before you connect the cables to it. However, if you are supported by Cisco routers. Go to the "Inserting the NPE-G1 or NPE-G2 into the Router" section on page 7-28 for instructions on page 7-67. 7-20 Network Processing Engine and Network Services Engine Installation...

Installation Guide
Page 29
... to provide proper cable support and strain relief. Figure 7-17 illustrates installing the bracket on the NPE-G1 or NPE-G2 on the Cisco uBR7200 series routers. Attaching the Rear Cable-Management Brackets and Cables (Optional) You may choose to one of two types of cable-management brackets. or NPE-G2-specific bracket is used only on the front of these sections for managing port adapter and I/O controller cables.
... to provide proper cable support and strain relief. Figure 7-17 illustrates installing the bracket on the NPE-G1 or NPE-G2 on the Cisco uBR7200 series routers. Attaching the Rear Cable-Management Brackets and Cables (Optional) You may choose to one of two types of cable-management brackets. or NPE-G2-specific bracket is used only on the front of these sections for managing port adapter and I/O controller cables.
Installation Guide
Page 45
... key is turned on. Repeat this step if a second power supply is turned to the off (O) position, the power supply enters a reset cycle for uBR7224VXR routers(AC-input power supplies only). - The network processing engine and the I/O controller or I /O controller's PC Card slots. A CompactFlash Disk can be installed in either slot 0 or slot 1 of the router, place the power switch on the power supply in their respective slots, and the captive installation screws are connected to the port adapters...
... key is turned on. Repeat this step if a second power supply is turned to the off (O) position, the power supply enters a reset cycle for uBR7224VXR routers(AC-input power supplies only). - The network processing engine and the I/O controller or I /O controller's PC Card slots. A CompactFlash Disk can be installed in either slot 0 or slot 1 of the router, place the power switch on the power supply in their respective slots, and the captive installation screws are connected to the port adapters...
Installation Guide
Page 47
... version Command, page 7-51 OL-4448-12 Network Processing Engine and Network Services Engine Installation and Configuration 7-47 Processor 1 is 12.3-4r.T3.) • Install the enabling software. To have IP routing turned on. If you do not save the configuration settings that is Cisco IOS Release 12.3(14)YM. Error Messages The following error messages are in the router using configuration mode and the setup facility, your configuration will be lost the next time you install...
... version Command, page 7-51 OL-4448-12 Network Processing Engine and Network Services Engine Installation and Configuration 7-47 Processor 1 is 12.3-4r.T3.) • Install the enabling software. To have IP routing turned on. If you do not save the configuration settings that is Cisco IOS Release 12.3(14)YM. Error Messages The following error messages are in the router using configuration mode and the setup facility, your configuration will be lost the next time you install...
Installation Guide
Page 57
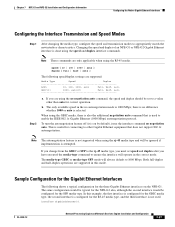
... media type, and the third interface is not used to a value other Gigabit Ethernet equipment that is no negotiation auto. Note The autonegotiation feature is attempted. Chapter 7 NPE-G1 and NPE-G2 Installation and Configuration Information Configuring the Native Gigabit Ethernet Interfaces Configuring the Interface Transmission and Speed Modes Step 1 After changing the media type, configure the speed and transmission modes to 1000 Mbps. interface GigabitEthernet0/1 OL-4448-12 Network Processing Engine and Network Services Engine Installation and Configuration...
... media type, and the third interface is not used to a value other Gigabit Ethernet equipment that is no negotiation auto. Note The autonegotiation feature is attempted. Chapter 7 NPE-G1 and NPE-G2 Installation and Configuration Information Configuring the Native Gigabit Ethernet Interfaces Configuring the Interface Transmission and Speed Modes Step 1 After changing the media type, configure the speed and transmission modes to 1000 Mbps. interface GigabitEthernet0/1 OL-4448-12 Network Processing Engine and Network Services Engine Installation and Configuration...
Installation Guide
Page 61
... network link is up Config is Auto Speed, Auto Duplex loopback type is none 10/100 PHY is enabled (MII mode) (display text omitted) Interface GigabitEthernet0/1 (idb 0x62E3A4AC) Hardware is BCM-12500 Internal MAC Network connection mode is AUTO MAC Registers: (display text omitted) Interface GigabitEthernet0/2 (idb 0x62E4F968) Hardware is BCM-12500 Internal MAC Network connection mode is AUTO Use the show interface or show interface slot/port command to display initialization block information, transmit ring, receive ring, and errors...
... network link is up Config is Auto Speed, Auto Duplex loopback type is none 10/100 PHY is enabled (MII mode) (display text omitted) Interface GigabitEthernet0/1 (idb 0x62E3A4AC) Hardware is BCM-12500 Internal MAC Network connection mode is AUTO MAC Registers: (display text omitted) Interface GigabitEthernet0/2 (idb 0x62E4F968) Hardware is BCM-12500 Internal MAC Network connection mode is AUTO Use the show interface or show interface slot/port command to display initialization block information, transmit ring, receive ring, and errors...
Installation Guide
Page 62
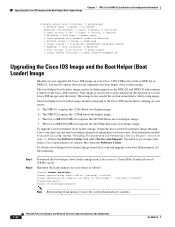
... 2 Download the boot helper (boot loader) image from the Software Center. For information on how to access Cisco.com, see the "Obtaining Documentation and Submitting a Service Request" section on the NPE-G1 and NPE-G2 and contains a subset of bootflash:complete Continue? [confirm] Note Reformatting flash memory erases the current flash memory contents. 7-62 Network Processing Engine and Network Services Engine Installation and Configuration OL-4448-12 Upgrading...
... 2 Download the boot helper (boot loader) image from the Software Center. For information on how to access Cisco.com, see the "Obtaining Documentation and Submitting a Service Request" section on the NPE-G1 and NPE-G2 and contains a subset of bootflash:complete Continue? [confirm] Note Reformatting flash memory erases the current flash memory contents. 7-62 Network Processing Engine and Network Services Engine Installation and Configuration OL-4448-12 Upgrading...
Installation Guide
Page 65
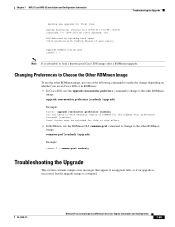
... Network Processing Engine and Network Services Engine Installation and Configuration 7-65 ROM:Rebooted by watchdog hard reset C7200 platform with 1048576 Kbytes of ROMMON for first time System Bootstrap, Version 12.2(20031011:151758) [biff] Copyright (c) 1994-2003 by cisco Systems, Inc. Router must be reloaded for this to take effect. • In ROMmon, use the upgrade rom-monitor preference command to change to the other ROMmon image: upgrade...
... Network Processing Engine and Network Services Engine Installation and Configuration 7-65 ROM:Rebooted by watchdog hard reset C7200 platform with 1048576 Kbytes of ROMMON for first time System Bootstrap, Version 12.2(20031011:151758) [biff] Copyright (c) 1994-2003 by cisco Systems, Inc. Router must be reloaded for this to take effect. • In ROMmon, use the upgrade rom-monitor preference command to change to the other ROMmon image: upgrade...


