User Guide
Page 2
... in part on the work of HDMI Licensing, LLC. z Portions of CASIO COMPUTER CO., LTD. You are based in this product are allowed to change without the permission of this manual show the XJ-H1650. 2 z Microsoft, Windows, and Windows Vista are trademarks or registered... trademarks of the Independent JPEG Group. z CASIO COMPUTER CO., LTD. z HDMI, the HDMI Logo and High-Definition Multimedia...
... in part on the work of HDMI Licensing, LLC. z Portions of CASIO COMPUTER CO., LTD. You are based in this product are allowed to change without the permission of this manual show the XJ-H1650. 2 z Microsoft, Windows, and Windows Vista are trademarks or registered... trademarks of the Independent JPEG Group. z CASIO COMPUTER CO., LTD. z HDMI, the HDMI Logo and High-Definition Multimedia...
User Guide
Page 3
Contents About this manual 5 Projector Overview 6 Projector Features and Main Functions 6 Remote Controller and Projector Keys 8 Back Terminals 9 Operation During Projection 10 Selecting the Input Source 10 To select a ...
Contents About this manual 5 Projector Overview 6 Projector Features and Main Functions 6 Remote Controller and Projector Keys 8 Back Terminals 9 Operation During Projection 10 Selecting the Input Source 10 To select a ...

User Guide
Page 5
...to a composite video output or S-video output 44 Connection to a component video output 45 Connecting the HDMI Output of the operations in this manual... D 5 All of a Video Device or Computer to the Projector 46 Remote Controller Signal Range 47 Hanging the Projector from a Ceiling ...and Screen Size 49 Aspect Ratio Setting and Projection Image 50 Supported Signals 52 Using Wired LAN to Control the Projector (XJ-H1650, XJ-H1750, XJ-ST145, XJ-ST155 55 Supported External Devices 55 Controlling the Projector from a Computer 55 Projector RS-232C Control 60 Connecting the Projector ...
...to a composite video output or S-video output 44 Connection to a component video output 45 Connecting the HDMI Output of the operations in this manual... D 5 All of a Video Device or Computer to the Projector 46 Remote Controller Signal Range 47 Hanging the Projector from a Ceiling ...and Screen Size 49 Aspect Ratio Setting and Projection Image 50 Supported Signals 52 Using Wired LAN to Control the Projector (XJ-H1650, XJ-H1750, XJ-ST145, XJ-ST155 55 Supported External Devices 55 Controlling the Projector from a Computer 55 Projector RS-232C Control 60 Connecting the Projector ...
User Guide
Page 8
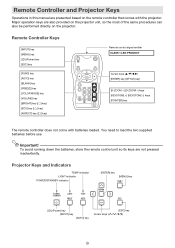
... [P] (Power) key [INPUT] key [AUTO] key [ESC] key Cursor keys (q/w/U/I) 8 Major operation keys are not pressed inadvertently. Remote Controller and Projector Keys Operations in this manual are presented based on the projector.
... [P] (Power) key [INPUT] key [AUTO] key [ESC] key Cursor keys (q/w/U/I) 8 Major operation keys are not pressed inadvertently. Remote Controller and Projector Keys Operations in this manual are presented based on the projector.
User Guide
Page 19
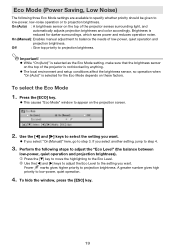
On (Manual): Enables manual adjustment to balance the needs of the projector is selected as the Eco Mode setting, make sure that the brightness sensor on the projection screen. 2. ... light, and automatically adjusts projection brightness and color accordingly. z If you select another setting, jump to step 3. Press the [ECO] key. If you select "On (Manual)" here, go to step 4. 3. Important!
On (Manual): Enables manual adjustment to balance the needs of the projector is selected as the Eco Mode setting, make sure that the brightness sensor on the projection screen. 2. ... light, and automatically adjusts projection brightness and color accordingly. z If you select another setting, jump to step 3. Press the [ECO] key. If you select "On (Manual)" here, go to step 4. 3. Important!
User Guide
Page 20
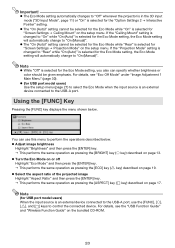
... Mode setting, the Eco Mode setting will automatically change to the USB-A port. If the "Projection Mode" setting is an external device connected to "On (Manual)". J This performs the same operation as pressing the [ECO] key (f key) described on or off Highlight "Eco Mode" and then press the [ENTER]... selected for USB port model users) Use the setup menu (page 21) to select the Eco Mode when the input source is changed to "On (Manual)". z (for the Eco Mode setting, the Eco Mode setting will automatically change to "Rear" while "On (Auto)" is selected for "Screen Settings J ...
... Mode setting, the Eco Mode setting will automatically change to the USB-A port. If the "Projection Mode" setting is an external device connected to "On (Manual)". J This performs the same operation as pressing the [ECO] key (f key) described on or off Highlight "Eco Mode" and then press the [ENTER]... selected for USB port model users) Use the setup menu (page 21) to select the Eco Mode when the input source is changed to "On (Manual)". z (for the Eco Mode setting, the Eco Mode setting will automatically change to "Rear" while "On (Auto)" is selected for "Screen Settings J ...

User Guide
Page 31
...C V Defaults Signal Specific Source Specific Important! Restore Menu R C V H D U N Source Defaults Specific Use this setting to adjust the phase manually. When this happens, use this setting when there is no input signal changes the volume setting of the currently selected signal source. z Changing this setting... to adjust the frequency manually. About the "Signal Specific" Setting Unit For the items that have "Signal Specific" in the projected image while RGB...
...C V Defaults Signal Specific Source Specific Important! Restore Menu R C V H D U N Source Defaults Specific Use this setting to adjust the phase manually. When this happens, use this setting when there is no input signal changes the volume setting of the currently selected signal source. z Changing this setting... to adjust the frequency manually. About the "Signal Specific" Setting Unit For the items that have "Signal Specific" in the projected image while RGB...

User Guide
Page 34
..." setting. For details about connection, see "Connecting a Computer to the Projector" in the "Setup Guide". Use this sub-menu to specify manually the type of signal being input from the projector's VIDEO terminal or S-VIDEO terminal. Use this option to turn on the Input Settings main ...Settings Main Menu Setting Name Input Setting Unit Description COMPUTER 1 R C Terminal/ COMPUTER 2 Terminal N Single Use this sub-menu to specify manually the type of signal being input from the video device that the "Signal Name Indicator" setting is connected to the VIDEO terminal or S-VIDEO ...
..." setting. For details about connection, see "Connecting a Computer to the Projector" in the "Setup Guide". Use this sub-menu to specify manually the type of signal being input from the projector's VIDEO terminal or S-VIDEO terminal. Use this option to turn on the Input Settings main ...Settings Main Menu Setting Name Input Setting Unit Description COMPUTER 1 R C Terminal/ COMPUTER 2 Terminal N Single Use this sub-menu to specify manually the type of signal being input from the video device that the "Signal Name Indicator" setting is connected to the VIDEO terminal or S-VIDEO ...
User Guide
Page 56
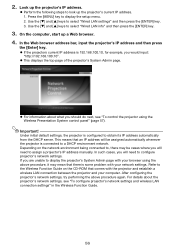
... 57). After configuring the projector's network settings, try performing the above procedure, it may be cases where you are unable to assign a projector's IP address manually. z For information about the projector's network settings, see "To control the projector using the above procedure again. In the Web browser address bar, input the...
... 57). After configuring the projector's network settings, try performing the above procedure, it may be cases where you are unable to assign a projector's IP address manually. z For information about the projector's network settings, see "To control the projector using the above procedure again. In the Web browser address bar, input the...

User Guide
Page 63
...XJ-H1650 XJ-H1700 XJ-H1750 XJ-ST145 XJ-ST155 Brightness (ANSI Lumens) 3500 4000 2500 3000 Projection System DLP DLP chip Size: 0.7 inch, Number of any USB device that you connect to change without notice. makes no guarantees concerning the operation or suitability of Pixels: XGA (1024 × 768) Projection Lens 1.2X manual optical zoom, manual focus Manual... English, French, German, Italian, Spanish, Swedish, Portuguese, Turkish, Russian, Chinese (Simplified), Chinese (Traditional), Korean, Japanese * XJ-H1650/XJ-H1750/XJ-ST145/XJ-ST155 only z CASIO COMPUTER CO., LTD.
...XJ-H1650 XJ-H1700 XJ-H1750 XJ-ST145 XJ-ST155 Brightness (ANSI Lumens) 3500 4000 2500 3000 Projection System DLP DLP chip Size: 0.7 inch, Number of any USB device that you connect to change without notice. makes no guarantees concerning the operation or suitability of Pixels: XGA (1024 × 768) Projection Lens 1.2X manual optical zoom, manual focus Manual... English, French, German, Italian, Spanish, Swedish, Portuguese, Turkish, Russian, Chinese (Simplified), Chinese (Traditional), Korean, Japanese * XJ-H1650/XJ-H1750/XJ-ST145/XJ-ST155 only z CASIO COMPUTER CO., LTD.