User Guide
Page 2
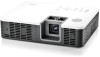
...exactly the same as the screens actually produced by the product. of HDMI Licensing, LLC. z Portions of this manual show the XJ-H1650. 2 z Copying of this manual, either in part on the work of the Independent JPEG Group. z Unless specifically stated otherwise, all illustrations in ...a registered trademark of AMX LLC of the United States. z CASIO COMPUTER CO., LTD. z The sample screens shown in Japan, the United States of this manual. shall not be registered product names or trademarks of their respective owners. z CASIO COMPUTER CO., LTD. z AMX is a registered trademark of ...
...exactly the same as the screens actually produced by the product. of HDMI Licensing, LLC. z Portions of this manual show the XJ-H1650. 2 z Copying of this manual, either in part on the work of the Independent JPEG Group. z Unless specifically stated otherwise, all illustrations in ...a registered trademark of AMX LLC of the United States. z CASIO COMPUTER CO., LTD. z The sample screens shown in Japan, the United States of this manual. shall not be registered product names or trademarks of their respective owners. z CASIO COMPUTER CO., LTD. z AMX is a registered trademark of ...
User Guide
Page 3
Contents About this manual 5 Projector Overview 6 Projector Features and Main Functions 6 Remote Controller and Projector Keys 8 Back Terminals 9 Operation During Projection 10 Selecting the Input Source 10 To select a ...
Contents About this manual 5 Projector Overview 6 Projector Features and Main Functions 6 Remote Controller and Projector Keys 8 Back Terminals 9 Operation During Projection 10 Selecting the Input Source 10 To select a ...
User Guide
Page 5
...a composite video output or S-video output 44 Connection to a component video output 45 Connecting the HDMI Output of the operations in this manual... All of a Video Device or Computer to the Projector 46 Remote Controller Signal Range 47 Hanging the Projector from a Ceiling 48 Projection... and Screen Size 49 Aspect Ratio Setting and Projection Image 50 Supported Signals 52 Using Wired LAN to Control the Projector (XJ-H1650, XJ-ST145, XJ-ST155 55 Supported External Devices 55 Controlling the Projector from a Computer 55 Projector RS-232C Control 60 Connecting the Projector to...
...a composite video output or S-video output 44 Connection to a component video output 45 Connecting the HDMI Output of the operations in this manual... All of a Video Device or Computer to the Projector 46 Remote Controller Signal Range 47 Hanging the Projector from a Ceiling 48 Projection... and Screen Size 49 Aspect Ratio Setting and Projection Image 50 Supported Signals 52 Using Wired LAN to Control the Projector (XJ-H1650, XJ-ST145, XJ-ST155 55 Supported External Devices 55 Controlling the Projector from a Computer 55 Projector RS-232C Control 60 Connecting the Projector to...
User Guide
Page 8
... avoid running down the batteries, store the remote control unit so its keys are not pressed inadvertently. Remote Controller and Projector Keys Operations in this manual are presented based on the projector. Remote Controller Keys [INPUT] key [MENU] key [P] (Power) key [ESC] key [FUNC] key [AUTO] key [BLANK] key [FREEZE] key...
... avoid running down the batteries, store the remote control unit so its keys are not pressed inadvertently. Remote Controller and Projector Keys Operations in this manual are presented based on the projector. Remote Controller Keys [INPUT] key [MENU] key [P] (Power) key [ESC] key [FUNC] key [AUTO] key [BLANK] key [FREEZE] key...

User Guide
Page 19
... when "On (Auto)" is reduced for the Eco Mode depends on the projection screen. 2. Use the [W] and [X] keys to select the setting you select "On (Manual)" here, go to appear on these factors. On (Manual): Enables manual adjustment to low-power, quiet operation. 4. z If you want .
... when "On (Auto)" is reduced for the Eco Mode depends on the projection screen. 2. Use the [W] and [X] keys to select the setting you select "On (Manual)" here, go to appear on these factors. On (Manual): Enables manual adjustment to low-power, quiet operation. 4. z If you want .
User Guide
Page 20
...to "Off" whenever the projector is in the 3D input mode ("3D Input Mode", page 11) or "On" is an external device connected to "On (Manual)". Note (for USB port model users) When the input source is selected for "Screen Settings J Projection Mode" on the setup menu. Important! z The "... "Projection Mode" setting is changed to "On" while "On (Auto)" is an external device connected to the USB-A port, use this menu to "On (Manual)". Using the [FUNC] Key Pressing the [FUNC] key displays the menu shown below . You can specify whether brightness or color should be given emphasis. z ...
...to "Off" whenever the projector is in the 3D input mode ("3D Input Mode", page 11) or "On" is an external device connected to "On (Manual)". Note (for USB port model users) When the input source is selected for "Screen Settings J Projection Mode" on the setup menu. Important! z The "... "Projection Mode" setting is changed to "On" while "On (Auto)" is an external device connected to the USB-A port, use this menu to "On (Manual)". Using the [FUNC] Key Pressing the [FUNC] key displays the menu shown below . You can specify whether brightness or color should be given emphasis. z ...
User Guide
Page 31
... Specific Source Specific Important! Use this sub-menu to return all of the projector's speaker. When this happens, use this setting to adjust the phase manually. Restore Menu R C V H D U N Source Defaults Specific Use this sub-menu to adjust the horizontal position of signal (XGA/60Hz, SXGA/60Hz,... etc.) that the phase setting is performed, and not for some reason, your manual frequency settings cause the image input from the computer to disappear from the projection, you can press the [AUTO] key to perform an...
... Specific Source Specific Important! Use this sub-menu to return all of the projector's speaker. When this happens, use this setting to adjust the phase manually. Restore Menu R C V H D U N Source Defaults Specific Use this sub-menu to adjust the horizontal position of signal (XGA/60Hz, SXGA/60Hz,... etc.) that the phase setting is performed, and not for some reason, your manual frequency settings cause the image input from the computer to disappear from the projection, you can press the [AUTO] key to perform an...
User Guide
Page 34
...Menu Setting Name Input Setting Unit Description COMPUTER 1 R C Terminal/ COMPUTER 2 Terminal N Single Use this sub-menu to specify manually the type of signal being input from the projector's VIDEO terminal or S-VIDEO terminal. For details about connection, see "Connecting a... Note that is connected to its initial default, regardless of the currently selected signal source in the "Setup Guide". Component: Select this option to specify manually the type of signal being input from the projector's COMPUTER IN 1/COMPUTER IN 2 terminal. NTSC / NTSC4.43 / PAL / PAL-M / PAL-N ...
...Menu Setting Name Input Setting Unit Description COMPUTER 1 R C Terminal/ COMPUTER 2 Terminal N Single Use this sub-menu to specify manually the type of signal being input from the projector's VIDEO terminal or S-VIDEO terminal. For details about connection, see "Connecting a... Note that is connected to its initial default, regardless of the currently selected signal source in the "Setup Guide". Component: Select this option to specify manually the type of signal being input from the projector's COMPUTER IN 1/COMPUTER IN 2 terminal. NTSC / NTSC4.43 / PAL / PAL-M / PAL-N ...

User Guide
Page 56
... , there may mean that comes with your computer. Refer to the Wireless Function Guide on the network environment being connected to assign a projector's IP address manually. z For information about the projector's network settings, see "To control the projector using the above procedure again. Depending on the CD-ROM that there is...
... , there may mean that comes with your computer. Refer to the Wireless Function Guide on the network environment being connected to assign a projector's IP address manually. z For information about the projector's network settings, see "To control the projector using the above procedure again. Depending on the CD-ROM that there is...
User Guide
Page 63
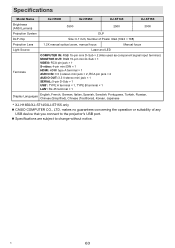
...XJ-H1600 XJ-H1650 XJ-ST145 XJ-ST155 Brightness (ANSI Lumens) 3500 2500 3000 Projection System DLP DLP chip Size: 0.7 inch, Number of any USB device that you connect to change without notice. makes no guarantees concerning the operation or suitability of Pixels: XGA (1024 × 768) Projection Lens 1.2X manual optical zoom, manual focus Manual... Spanish, Swedish, Portuguese, Turkish, Russian, Chinese (Simplified), Chinese (Traditional), Korean, Japanese * XJ-H1650/XJ-ST145/XJ-ST155 only z CASIO COMPUTER CO., LTD. C 63 z Specifications are subject to the projector's USB port.
...XJ-H1600 XJ-H1650 XJ-ST145 XJ-ST155 Brightness (ANSI Lumens) 3500 2500 3000 Projection System DLP DLP chip Size: 0.7 inch, Number of any USB device that you connect to change without notice. makes no guarantees concerning the operation or suitability of Pixels: XGA (1024 × 768) Projection Lens 1.2X manual optical zoom, manual focus Manual... Spanish, Swedish, Portuguese, Turkish, Russian, Chinese (Simplified), Chinese (Traditional), Korean, Japanese * XJ-H1650/XJ-ST145/XJ-ST155 only z CASIO COMPUTER CO., LTD. C 63 z Specifications are subject to the projector's USB port.