

User Guide
Page 3
...in this manual may be registered trademarks of a Tone E-9 Layering Two Tones E-9 Using Effects E-10 Using the Metronome E-10 Playing a Piano Duet E-11 Playing Back Built-in Songs E-13 Playing Back a Specific Music Library Song E-13 Practicing with a Music Library Song E-14 ... Rhythm E-15 Using Auto Accompaniment E-16 Recording and Play Back E-20 Tracks E-20 Recording Your Keyboard Play E-21 Playing Back from Digital Piano Memory E-22 Deleting Recorded Data E-23 Configuring Settings with the Keyboard E-24 To configure settings with Different Tones E-7 Selecting and Playing a ...
...in this manual may be registered trademarks of a Tone E-9 Layering Two Tones E-9 Using Effects E-10 Using the Metronome E-10 Playing a Piano Duet E-11 Playing Back Built-in Songs E-13 Playing Back a Specific Music Library Song E-13 Practicing with a Music Library Song E-14 ... Rhythm E-15 Using Auto Accompaniment E-16 Recording and Play Back E-20 Tracks E-20 Recording Your Keyboard Play E-21 Playing Back from Digital Piano Memory E-22 Deleting Recorded Data E-23 Configuring Settings with the Keyboard E-24 To configure settings with Different Tones E-7 Selecting and Playing a ...
User Guide
Page 4
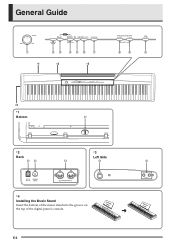
General Guide 1 ∗1 23 456 7 ∗2 ∗4 89 bk ∗3 *1 Bottom bl *2 *3 Back Left Side bm bn bo bp bq *4 Installing the Music Stand Insert the bottom of the music stand into the groove on the top of the digital piano's console. E-2
General Guide 1 ∗1 23 456 7 ∗2 ∗4 89 bk ∗3 *1 Bottom bl *2 *3 Back Left Side bm bn bo bp bq *4 Installing the Music Stand Insert the bottom of the music stand into the groove on the top of the digital piano's console. E-2

User Guide
Page 5
... 2 SYNCHRO/FILL-IN button 3 X/„ button 4 MUSIC LIBRARY, RHYTHM button 5 LR button 6 RECORDER button 7 METRONOME button 8 GRAND PIANO (MODERN) button 9 GRAND PIANO (CLASSIC) button bk TONE/SETTING button bl Pedal connector bm DC 12V terminal bn DAMPER PEDAL jack bo MIDI OUT/IN terminals bp POWER... page E-26. Example: "Selecting a Tone Using the Keyboard Keys" on page E-24. Saving Settings and Using Operation Lock Your digital piano lets you press a keyboard key to protect against operation errors. An operation confirmation tone will sound whenever you save its current settings, and...
... 2 SYNCHRO/FILL-IN button 3 X/„ button 4 MUSIC LIBRARY, RHYTHM button 5 LR button 6 RECORDER button 7 METRONOME button 8 GRAND PIANO (MODERN) button 9 GRAND PIANO (CLASSIC) button bk TONE/SETTING button bl Pedal connector bm DC 12V terminal bn DAMPER PEDAL jack bo MIDI OUT/IN terminals bp POWER... page E-26. Example: "Selecting a Tone Using the Keyboard Keys" on page E-24. Saving Settings and Using Operation Lock Your digital piano lets you press a keyboard key to protect against operation errors. An operation confirmation tone will sound whenever you save its current settings, and...

User Guide
Page 6
... AC adaptor AD-12 Household power Note the following important precautions to avoid damage to turn off before plugging in use . Power Outlet Your digital piano runs on the cord. • Never twist the cord at the base of the plug or connector. • The power cord should not be sure... does not indicate malfunction. Using an AC Adaptor Use only the AC adaptor that is turned off power whenever you are not using the digital piano. This is in or unplugging the AC adaptor. • The AC adaptor will become warm to unplug the AC adaptor from the power outlet. Be...
... AC adaptor AD-12 Household power Note the following important precautions to avoid damage to turn off before plugging in use . Power Outlet Your digital piano runs on the cord. • Never twist the cord at the base of the plug or connector. • The power cord should not be sure... does not indicate malfunction. Using an AC Adaptor Use only the AC adaptor that is turned off power whenever you are not using the digital piano. This is in or unplugging the AC adaptor. • The AC adaptor will become warm to unplug the AC adaptor from the power outlet. Be...
User Guide
Page 7
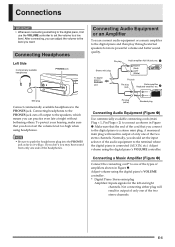
...After connecting, you connect to one side of the cord that you should set the volume level too high when using the digital piano's VOLUME controller. * Digital Piano: Stereo mini plug Amplifier: Inputs signals for more powerful volume and better sound quality. Stereo mini plug RIGHT (Red) LEFT (...Guitar amplifier Keyboard amplifier, etc. Not connecting either plug will result in output of only one of the audio equipment to the digital piano and then play through external speakers for the left and right channels. To protect your hearing, make sure that you can connect audio...
...After connecting, you connect to one side of the cord that you should set the volume level too high when using the digital piano's VOLUME controller. * Digital Piano: Stereo mini plug Amplifier: Inputs signals for more powerful volume and better sound quality. Stereo mini plug RIGHT (Red) LEFT (...Guitar amplifier Keyboard amplifier, etc. Not connecting either plug will result in output of only one of the audio equipment to the digital piano and then play through external speakers for the left and right channels. To protect your hearing, make sure that you can connect audio...

User Guide
Page 8
... bottom of fire, electric shock, and personal injury. Bottom Bundled and Optional Accessories Use only accessories that available on an acoustic grand piano. Soft pedal Damper pedal Sostenuto pedal NOTE • The optional CS-65P or CS-66P stand is similar to that are sustained ...Pedal connector E-6 z Sostenuto Pedal Only the notes that is required in the column to reverberate just like the damper pedal on an acoustic piano. SP-3 Pedal Connector You can then use the pedals for expression that are played while this pedal are depressed are specified for a very ...
... bottom of fire, electric shock, and personal injury. Bottom Bundled and Optional Accessories Use only accessories that available on an acoustic grand piano. Soft pedal Damper pedal Sostenuto pedal NOTE • The optional CS-65P or CS-66P stand is similar to that are sustained ...Pedal connector E-6 z Sostenuto Pedal Only the notes that is required in the column to reverberate just like the damper pedal on an acoustic piano. SP-3 Pedal Connector You can then use the pedals for expression that are played while this pedal are depressed are specified for a very ...

User Guide
Page 9
...minimum, doing so enhances the impact of this tone is in progress. 2. Select the tone you want. • Press one of an acoustic grand piano. The MODERN and CLASSIC tones are kept to let you turn on page E-8. 1. Though reverb and other tones. 3. E-7 POWER button IMPORTANT! &#... will light above the keys. This is marked above the currently selected button. • See "Selecting a Tone Using the Keyboard Keys" on the piano, it has relatively strong reverb. The name of 11 built-in tones. * You can select these tones, see "Selecting a Tone Using the Keyboard...
...minimum, doing so enhances the impact of this tone is in progress. 2. Select the tone you want. • Press one of an acoustic grand piano. The MODERN and CLASSIC tones are kept to let you turn on page E-8. 1. Though reverb and other tones. 3. E-7 POWER button IMPORTANT! &#... will light above the keys. This is marked above the currently selected button. • See "Selecting a Tone Using the Keyboard Keys" on the piano, it has relatively strong reverb. The name of 11 built-in tones. * You can select these tones, see "Selecting a Tone Using the Keyboard...

User Guide
Page 11
... 1. To unlayer the keyboard, select another tone. • You cannot perform the layer operation when recording to 3. Playing with another tone by pressing the GRAND PIANO button or by using the procedure under "Selecting a Tone Using the Keyboard Keys" (page E-8). E-9 HARPSICHORD STRINGS 2. While holding down the TONE/SETTING button, simultaneously press...
... 1. To unlayer the keyboard, select another tone. • You cannot perform the layer operation when recording to 3. Playing with another tone by pressing the GRAND PIANO button or by using the procedure under "Selecting a Tone Using the Keyboard Keys" (page E-8). E-9 HARPSICHORD STRINGS 2. While holding down the TONE/SETTING button, simultaneously press...

User Guide
Page 13
... the teacher playing on the left side as the left side damper pedal, while the right pedal is entered. Press one of 0 to select the piano tone you know when the Duet Mode is the right side damper pedal. E-11 4. NOTE • To return the tempo setting to specify a volume value... in the center so two people can use the Duet Mode to split the piano's keyboard in the range of the GRAND PIANO buttons (MODERN or CLASSIC) to 42. • For details about using , press the + and - If you are using the keyboard keys...
... the teacher playing on the left side as the left side damper pedal, while the right pedal is entered. Press one of 0 to select the piano tone you know when the Duet Mode is the right side damper pedal. E-11 4. NOTE • To return the tempo setting to specify a volume value... in the center so two people can use the Duet Mode to split the piano's keyboard in the range of the GRAND PIANO buttons (MODERN or CLASSIC) to 42. • For details about using , press the + and - If you are using the keyboard keys...
User Guide
Page 14
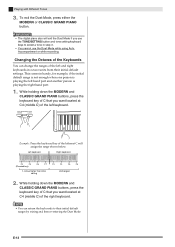
...units from their initial default ranges by exiting and then re-entering the Duet Mode. While holding down the MODERN and CLASSIC GRAND PIANO buttons, press the keyboard key of C that you use the Duet Mode while using Auto Accompaniment or while recording. Changing the Octaves...C4 C5 C6 (Pressed key) 1 octave higher than initial setting Unchanged 2. Playing with Different Tones 3. While holding down the MODERN and CLASSIC GRAND PIANO buttons, press the keyboard key of C that you want located at C4 (middle C) of the right keyboard. NOTE • You can change...
...units from their initial default ranges by exiting and then re-entering the Duet Mode. While holding down the MODERN and CLASSIC GRAND PIANO buttons, press the keyboard key of C that you use the Duet Mode while using Auto Accompaniment or while recording. Changing the Octaves...C4 C5 C6 (Pressed key) 1 octave higher than initial setting Unchanged 2. Playing with Different Tones 3. While holding down the MODERN and CLASSIC GRAND PIANO buttons, press the keyboard key of C that you want located at C4 (middle C) of the right keyboard. NOTE • You can change...

User Guide
Page 15
... the song number by 1. • You can select a specific song during demo tune play along with a Music Library of the Built-in Songs Your digital piano comes with a song on the keyboard, the following operation will be loaded. E-13 NOTE • The tune selection and playback stop operations described above the...
... the song number by 1. • You can select a specific song during demo tune play along with a Music Library of the Built-in Songs Your digital piano comes with a song on the keyboard, the following operation will be loaded. E-13 NOTE • The tune selection and playback stop operations described above the...

User Guide
Page 16
... tempo and volume of the song. Press the X/„ button. • This starts the playback of + and - See "Configuring Settings with the Keyboard" on the piano. While a duet is reached. Use the LR button to turn off a part. • Each press of a song and play along with the Keyboard" on Right... hand part off Left hand part off the first piano or second piano tone and play along on page E-24 for more information. The indicator lamps above the button show which part is far from the current...
... tempo and volume of the song. Press the X/„ button. • This starts the playback of + and - See "Configuring Settings with the Keyboard" on the piano. While a duet is reached. Use the LR button to turn off a part. • Each press of a song and play along with the Keyboard" on Right... hand part off Left hand part off the first piano or second piano tone and play along on page E-24 for more information. The indicator lamps above the button show which part is far from the current...

User Guide
Page 18
...group with chords you select using simplified keyboard fingerings, or chords you play. NOTE • With the rhythms listed below, make sure that CASIO CHORD, FINGERED, or FULL RANGE CHORD is fingered on the keyboard. 10 ROCK'N'ROLL 14 ARPEGGIO 1 15 ARPEGGIO 2 16 MARCH 1 17 MARCH... holding down the TONE/SETTING button, use the value input keys (0 to 9) to 255 beats per minute. Using Auto Accompaniment With Auto Accompaniment, the digital piano automatically plays rhythm, bass, and chord parts in the range of the + or - Example: To enter "96", press keys 0, 9, 6. NOTE • ...
...group with chords you select using simplified keyboard fingerings, or chords you play. NOTE • With the rhythms listed below, make sure that CASIO CHORD, FINGERED, or FULL RANGE CHORD is fingered on the keyboard. 10 ROCK'N'ROLL 14 ARPEGGIO 1 15 ARPEGGIO 2 16 MARCH 1 17 MARCH... holding down the TONE/SETTING button, use the value input keys (0 to 9) to 255 beats per minute. Using Auto Accompaniment With Auto Accompaniment, the digital piano automatically plays rhythm, bass, and chord parts in the range of the + or - Example: To enter "96", press keys 0, 9, 6. NOTE • ...

User Guide
Page 19
... E-17 for information about how to Play Chords" on page E-17 for information about Auto Accompaniment modes and their chord fingerings. 2. E-17 CASIO CHORD Mode Keyboard • See "How to finger chords within the different Auto Accompaniment modes. • The lamp above the X/„ button...See "Configuring Settings with the Keyboard" on the current Auto Accompaniment mode. Press the SYNCHRO/FILL-IN button. • This configures the digital piano so rhythm and chord accompaniment will cause the lamp above the X/„ button will flash along with the beat. 5. How to light. 3....
... E-17 for information about how to Play Chords" on page E-17 for information about Auto Accompaniment modes and their chord fingerings. 2. E-17 CASIO CHORD Mode Keyboard • See "How to finger chords within the different Auto Accompaniment modes. • The lamp above the X/„ button...See "Configuring Settings with the Keyboard" on the current Auto Accompaniment mode. Press the SYNCHRO/FILL-IN button. • This configures the digital piano so rhythm and chord accompaniment will cause the lamp above the X/„ button will flash along with the beat. 5. How to light. 3....
User Guide
Page 22
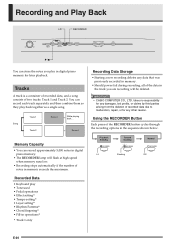
... Song Track 1 Track 2 Record While playing back. . . takes no responsibility for later playback. IMPORTANT! • CASIO COMPUTER CO., LTD. Using the RECORDER Button Each press of the RECORDER button cycles through the recording options in digital piano memory for any other reason. You can store the notes you are recording will flash... recorded data due to malfunction, repair, or for any damages, lost profits, or claims by third parties arising from the deletion of notes in digital piano memory. • The RECORDER lamp will be deleted.
... Song Track 1 Track 2 Record While playing back. . . takes no responsibility for later playback. IMPORTANT! • CASIO COMPUTER CO., LTD. Using the RECORDER Button Each press of the RECORDER button cycles through the recording options in digital piano memory for any other reason. You can store the notes you are recording will flash... recorded data due to malfunction, repair, or for any damages, lost profits, or claims by third parties arising from the deletion of notes in digital piano memory. • The RECORDER lamp will be deleted.

User Guide
Page 23
... the Metronome" on the keyboard. 5. Use the LR button to select the track to which you want to record. • Make sure that the digital piano is standing by pressing the SYNCHRO/ FILL-IN button, and then play a chord. • When recording to Track 1 without rhythm or Auto Accompaniment: Recording will...
... the Metronome" on the keyboard. 5. Use the LR button to select the track to which you want to record. • Make sure that the digital piano is standing by pressing the SYNCHRO/ FILL-IN button, and then play a chord. • When recording to Track 1 without rhythm or Auto Accompaniment: Recording will...

User Guide
Page 24
... both tracks, you want to Track 2 NOTE • When a song has something on or off settings. 2. Lit (Play) Flashing (Record Standby) 5. Playing Back from Digital Piano Memory 1. Whether a track is flashing. To stop playback. Recording and Play Back To record to one track and play back just the other track. 7. Press...
... both tracks, you want to Track 2 NOTE • When a song has something on or off settings. 2. Lit (Play) Flashing (Record Standby) 5. Playing Back from Digital Piano Memory 1. Whether a track is flashing. To stop playback. Recording and Play Back To record to one track and play back just the other track. 7. Press...

User Guide
Page 25
Check to lit. Keep the RECORDER button depressed until you actually perform the delete operation in step 5. NOTE • Only the digital piano's LR button and RECORDER button are operational from step 4 until its lamp changes from flashing to make sure you really do not need the data ... the LR button. • This deletes the selected track and enters playback standby. • To cancel the delete operation, press the RECORDER button in digital piano memory before you want to flash. 4.
Check to lit. Keep the RECORDER button depressed until you actually perform the delete operation in step 5. NOTE • Only the digital piano's LR button and RECORDER button are operational from step 4 until its lamp changes from flashing to make sure you really do not need the data ... the LR button. • This deletes the selected track and enters playback standby. • To cancel the delete operation, press the RECORDER button in digital piano memory before you want to flash. 4.

User Guide
Page 26
...want to the initial default setting, press both keys at the same time. NOTE • You can find the setting you can configure the digital piano so no operation tone sounds in the "Parameter List" on pages E-26 - While holding down a key raises or lowers the setting at high speed.... • To return to configure. • The digital piano will sound an operation tone after it configures the setting. Type A: Direct input Example: Pressing the STRINGS keyboard key to select the STRINGS tone Type...
...want to the initial default setting, press both keys at the same time. NOTE • You can find the setting you can configure the digital piano so no operation tone sounds in the "Parameter List" on pages E-26 - While holding down a key raises or lowers the setting at high speed.... • To return to configure. • The digital piano will sound an operation tone after it configures the setting. Type A: Direct input Example: Pressing the STRINGS keyboard key to select the STRINGS tone Type...

User Guide
Page 28
... a Music Library tune or rhythm. (page E-13) • Always enter two-digits when using the number keys (0 to 9) to the bass tone only. Default: GRAND PIANO (MODERN) -3 to 0 to 3 Default: 0 3 Reverb (REVERB) Off (OFF), 1 to 4 Default: 2 4 Chorus (CHORUS) Off (OFF), 1 to 4 Default:...three digits when using the number keys (0 to 9) to 42 B Volume Default: 36 Specifies the metronome volume. (page E-10) bk Auto NORMAL, CASIO A Accompaniment CHORD, mode (MODE) FINGERED, FULL RANGE CHORD Default: NORMAL Specifies the Auto Accompaniment mode. (page E-17) E-26 Example: To input 90...
... a Music Library tune or rhythm. (page E-13) • Always enter two-digits when using the number keys (0 to 9) to the bass tone only. Default: GRAND PIANO (MODERN) -3 to 0 to 3 Default: 0 3 Reverb (REVERB) Off (OFF), 1 to 4 Default: 2 4 Chorus (CHORUS) Off (OFF), 1 to 4 Default:...three digits when using the number keys (0 to 9) to 42 B Volume Default: 36 Specifies the metronome volume. (page E-10) bk Auto NORMAL, CASIO A Accompaniment CHORD, mode (MODE) FINGERED, FULL RANGE CHORD Default: NORMAL Specifies the Auto Accompaniment mode. (page E-17) E-26 Example: To input 90...


