User Guide
Page 2
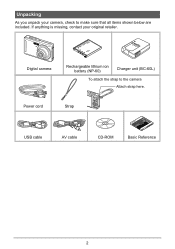
Unpacking As you unpack your original retailer. Power cord Strap USB cable AV cable CD-ROM Basic Reference 2 Digital camera Rechargeable lithium ion battery (NP-60) Charger unit (BC-60L) To attach the strap to make sure that all items shown below are included. If anything is missing, contact your camera, check to the camera Attach strap here.
Unpacking As you unpack your original retailer. Power cord Strap USB cable AV cable CD-ROM Basic Reference 2 Digital camera Rechargeable lithium ion battery (NP-60) Charger unit (BC-60L) To attach the strap to make sure that all items shown below are included. If anything is missing, contact your camera, check to the camera Attach strap here.
User Guide
Page 4
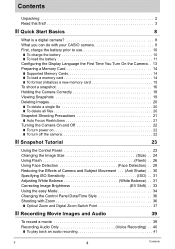
...Start Basics 8 What is a digital camera 8 What you can do with your CASIO camera 9 First, charge the battery prior to use 10 ❚ To charge the battery 10 ❚ To load the battery 11 Configuring the Display Language the First Time You Turn On the Camera. . 13 Preparing a Memory Card...Image Brightness EV Shift) . . 33 Using the easy Mode 34 Changing the Control Panel Date/Time Style 36 Shooting with Zoom 36 ❚ Optical Zoom and Digital Zoom Switch Point 37 ❚❙ Recording Movie Images and Audio 39 To record a movie 39 Recording Audio Only Voice Recording) ...
...Start Basics 8 What is a digital camera 8 What you can do with your CASIO camera 9 First, charge the battery prior to use 10 ❚ To charge the battery 10 ❚ To load the battery 11 Configuring the Display Language the First Time You Turn On the Camera. . 13 Preparing a Memory Card...Image Brightness EV Shift) . . 33 Using the easy Mode 34 Changing the Control Panel Date/Time Style 36 Shooting with Zoom 36 ❚ Optical Zoom and Digital Zoom Switch Point 37 ❚❙ Recording Movie Images and Audio 39 To record a movie 39 Recording Audio Only Voice Recording) ...
User Guide
Page 7
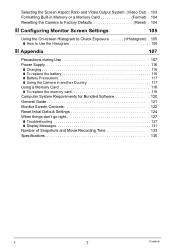
...Aspect Ratio and Video Output System (Video Out) . 103 Formatting Built-in Memory or a Memory Card Format) . 104 Resetting the Camera to Factory Defaults Reset) . 104 ❚❙ Configuring Monitor Screen Settings 105 Using the On-screen Histogram to Check Exposure Histogram) ....;❙ Appendix 107 Precautions during Use 107 Power Supply 116 ❚ Charging 116 ❚ To replace the battery 116 ❚ Battery Precautions 117 ❚ Using the Camera in another Country 117 Using a Memory Card 118 ❚ To replace the memory card 118 Computer System Requirements...
...Aspect Ratio and Video Output System (Video Out) . 103 Formatting Built-in Memory or a Memory Card Format) . 104 Resetting the Camera to Factory Defaults Reset) . 104 ❚❙ Configuring Monitor Screen Settings 105 Using the On-screen Histogram to Check Exposure Histogram) ....;❙ Appendix 107 Precautions during Use 107 Power Supply 116 ❚ Charging 116 ❚ To replace the battery 116 ❚ Battery Precautions 117 ❚ Using the Camera in another Country 117 Using a Memory Card 118 ❚ To replace the memory card 118 Computer System Requirements...
User Guide
Page 10
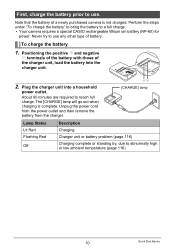
... are required to a full charge. • Your camera requires a special CASIO rechargeable lithium ion battery (NP-60) for power. terminals of the battery with those of a newly purchased camera is complete. Perform the steps under "To charge the battery" to bring the battery to reach full charge. To charge the battery 1. Unplug the power cord from the power...
... are required to a full charge. • Your camera requires a special CASIO rechargeable lithium ion battery (NP-60) for power. terminals of the battery with those of a newly purchased camera is complete. Perform the steps under "To charge the battery" to bring the battery to reach full charge. To charge the battery 1. Unplug the power cord from the power...
User Guide
Page 11
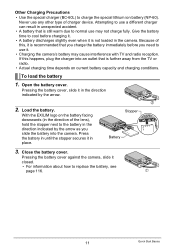
... due to cool before you need to the battery in the direction indicated by the arrow as you slide the battery into the camera. To load the battery 1. Pressing the battery cover, slide it in the camera. With the EXILIM logo on current battery capacity and charging conditions. Press the battery in until the stopper secures it in the...
... due to cool before you need to the battery in the direction indicated by the arrow as you slide the battery into the camera. To load the battery 1. Pressing the battery cover, slide it in the camera. With the EXILIM logo on current battery capacity and charging conditions. Press the battery in until the stopper secures it in the...
User Guide
Page 12
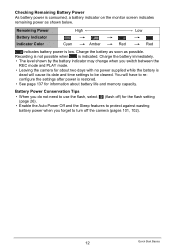
... the Auto Power Off and the Sleep features to turn off the camera (pages 101, 102). 12 Quick Start Basics Recording is not possible when is low. Charge the battery as soon as shown below. Checking Remaining Battery Power As battery power is consumed, a battery indicator on the monitor screen indicates remaining power as possible.
... the Auto Power Off and the Sleep features to turn off the camera (pages 101, 102). 12 Quick Start Basics Recording is not possible when is low. Charge the battery as soon as shown below. Checking Remaining Battery Power As battery power is consumed, a battery indicator on the monitor screen indicates remaining power as possible.
User Guide
Page 13
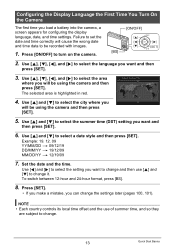
Press [SET]. • If you make a mistake, you load a battery into the camera, a screen appears for configuring the display language, date, and time settings. Configuring the Display Language the First Time You Turn On the Camera The first time you can change the settings later (pages 100, 101). Use [8] and ... selected area is highlighted in red. 4. Use [8] and [2] to change and then use of summer time, and so they are subject to turn on the camera. [BS] [ON/OFF] =8? =4? =2? =6? [SET ] 2. Failure to set the date and time correctly will cause the wrong date and time data ...
Press [SET]. • If you make a mistake, you load a battery into the camera, a screen appears for configuring the display language, date, and time settings. Configuring the Display Language the First Time You Turn On the Camera The first time you can change the settings later (pages 100, 101). Use [8] and ... selected area is highlighted in red. 4. Use [8] and [2] to change and then use of summer time, and so they are subject to turn on the camera. [BS] [ON/OFF] =8? =4? =2? =6? [SET ] 2. Failure to set the date and time correctly will cause the wrong date and time data ...
User Guide
Page 14
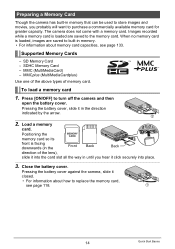
...is facing downwards (in the Front Back Back direction of memory card. SD Memory Card - To load a memory card 1. Close the battery cover. When no memory card is loaded are saved to the memory card. MMC (MultiMediaCard) - Images recorded while a memory card is ...card. Load a memory card. MMCplus (MultiMediaCardplus) Use one of the above types of the lens), slide it into place. 3. Pressing the battery cover against the camera, slide it closed. 2 • For information about memory card capacities, see page 118. 1 14 Quick Start Basics Press [ON/OFF...
...is facing downwards (in the Front Back Back direction of memory card. SD Memory Card - To load a memory card 1. Close the battery cover. When no memory card is loaded are saved to the memory card. MMC (MultiMediaCard) - Images recorded while a memory card is ...card. Load a memory card. MMCplus (MultiMediaCardplus) Use one of the above types of the lens), slide it into place. 3. Pressing the battery cover against the camera, slide it closed. 2 • For information about memory card capacities, see page 118. 1 14 Quick Start Basics Press [ON/OFF...
User Guide
Page 15
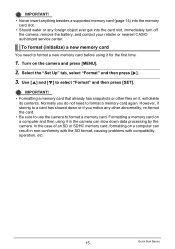
... "Format" and then press [SET]. Normally you notice any foreign object ever get into the card slot, immediately turn off the camera, remove the battery, and contact your retailer or nearest CASIO authorized service center. In the case of an SD or SDHC memory card, formatting on a computer and then using it for...
... "Format" and then press [SET]. Normally you notice any foreign object ever get into the card slot, immediately turn off the camera, remove the battery, and contact your retailer or nearest CASIO authorized service center. In the case of an SD or SDHC memory card, formatting on a computer and then using it for...

User Guide
Page 21
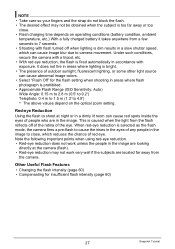
... shooting an image. Snapshot Shooting Precautions Operation • Never open the battery cover while the back lamp is shining directly onto the lens, shade the lens with a repeating horizontal pattern - Doing so can cause digital noise in memory, malfunction of the camera, etc. • If unwanted light is flashing green. Strongly back lit...
... shooting an image. Snapshot Shooting Precautions Operation • Never open the battery cover while the back lamp is shining directly onto the lens, shade the lens with a repeating horizontal pattern - Doing so can cause digital noise in memory, malfunction of the camera, etc. • If unwanted light is flashing green. Strongly back lit...
User Guide
Page 27
...: Auto) Wide Angle: 0.15 m to 2.8 m (0.5' to 9.2') Telephoto: 0.4 m to 1.5 m (1.3' to close . • Flash charging time depends on the optical zoom setting. Other Useful Flash Features • Changing the flash intensity (page 60) • Compensating for the flash setting when shooting in the image to 4.9') * The..., ambient temperature, etc.) With a fully charged battery it takes anywhere from a few seconds to cause the irises in the eyes of the eye. This is caused when the light from the camera. Note the following important points when using red-eye reduction. • ...
...: Auto) Wide Angle: 0.15 m to 2.8 m (0.5' to 9.2') Telephoto: 0.4 m to 1.5 m (1.3' to close . • Flash charging time depends on the optical zoom setting. Other Useful Flash Features • Changing the flash intensity (page 60) • Compensating for the flash setting when shooting in the image to 4.9') * The..., ambient temperature, etc.) With a fully charged battery it takes anywhere from a few seconds to cause the irises in the eyes of the eye. This is caused when the light from the camera. Note the following important points when using red-eye reduction. • ...
User Guide
Page 72
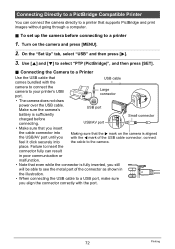
Make sure the camera's USB port battery is fully inserted, you still will be able to... 4 mark of the connector as shown in the illustration. • When connecting the USB cable to the camera. To set up the camera before connecting. On the "Set Up" tab, select "USB" and then press [6]. 3. place. Use ...[8] and [2] to your printer's USB port. Failure to insert the connector fully can connect the camera directly to a printer 1. Connecting the Camera to a Printer Use the USB cable that even while the connector is sufficiently charged before connecting to a...
Make sure the camera's USB port battery is fully inserted, you still will be able to... 4 mark of the connector as shown in the illustration. • When connecting the USB cable to the camera. To set up the camera before connecting. On the "Set Up" tab, select "USB" and then press [6]. 3. place. Use ...[8] and [2] to your printer's USB port. Failure to insert the connector fully can connect the camera directly to a printer 1. Connecting the Camera to a Printer Use the USB cable that even while the connector is sufficiently charged before connecting to a...
User Guide
Page 80
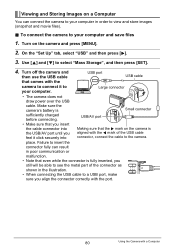
... sure that you insert the cable connector into Making sure that the 6 mark on the camera is aligned with the camera to connect it to view and store images (snapshot and movie files). . Make sure the camera's battery is fully inserted, you still will be able to see the metal part of the USB... cable connector, connect the cable to a USB port, make sure you feel it click securely into the USB/AV port until you align the connector correctly with the port. 80 Using the Camera with...
... sure that you insert the cable connector into Making sure that the 6 mark on the camera is aligned with the camera to connect it to view and store images (snapshot and movie files). . Make sure the camera's battery is fully inserted, you still will be able to see the metal part of the USB... cable connector, connect the cable to a USB port, make sure you feel it click securely into the USB/AV port until you align the connector correctly with the port. 80 Using the Camera with...
User Guide
Page 90
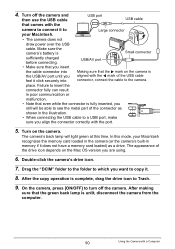
... communication or malfunction. • Note that you insert the cable connector into Making sure that comes with the camera to connect it does not have a memory card loaded) as shown in memory if it to see the ...metal part of the drive icon depends on the camera. Failure to Trash. 9. Turn on the Mac OS version you still will light green at this mode, your... the copy operation is fully inserted, you are using. 6. place. Make sure the camera's battery is Small connector sufficiently charged before connecting.
... communication or malfunction. • Note that you insert the cable connector into Making sure that comes with the camera to connect it does not have a memory card loaded) as shown in memory if it to see the ...metal part of the drive icon depends on the camera. Failure to Trash. 9. Turn on the Mac OS version you still will light green at this mode, your... the copy operation is fully inserted, you are using. 6. place. Make sure the camera's battery is Small connector sufficiently charged before connecting.
User Guide
Page 104
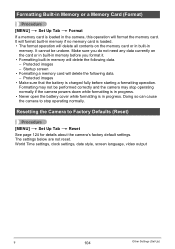
... data. - The settings below are not reset. Protected images • Make sure that the battery is in progress. It will format built-in memory if no memory card is loaded in the camera, this operation will format the memory card. Make sure you format it. • Formatting built...-in memory will delete the following data. - Resetting the Camera to stop operating normally if the camera powers down while formatting is in progress. • Never open the battery cover while formatting is charged fully before you do not need any data currently on the ...
... data. - The settings below are not reset. Protected images • Make sure that the battery is in progress. It will format built-in memory if no memory card is loaded in the camera, this operation will format the memory card. Make sure you format it. • Formatting built...-in memory will delete the following data. - Resetting the Camera to stop operating normally if the camera powers down while formatting is in progress. • Never open the battery cover while formatting is charged fully before you do not need any data currently on the ...
User Guide
Page 108
... • Water, other body of fire and electric shock. Turn off the camera. 2. . Remove the battery from the camera, taking care to your dealer or nearest CASIO authorized service center. . Contact your dealer or nearest CASIO authorized service center. . Contact your dealer or nearest CASIO authorized service center. 108 Appendix Smoke, abnormal odor, overheating, and other...
... • Water, other body of fire and electric shock. Turn off the camera. 2. . Remove the battery from the camera, taking care to your dealer or nearest CASIO authorized service center. . Contact your dealer or nearest CASIO authorized service center. . Contact your dealer or nearest CASIO authorized service center. 108 Appendix Smoke, abnormal odor, overheating, and other...
User Guide
Page 109
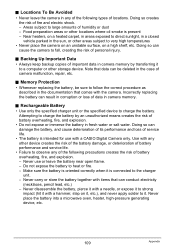
...temperatures • Never place the camera on an unstable surface, on a heated carpet, in areas exposed to strong impact (hit it is present - Near heaters, on a high shelf, etc. Make sure the battery is oriented correctly when it with a CASIO Digital Camera only. Areas subject to fall..., creating the risk of camera malfunction, repair, etc. . Doing so creates the risk of humidity or dust - Memory Protection...
...temperatures • Never place the camera on an unstable surface, on a heated carpet, in areas exposed to strong impact (hit it is present - Near heaters, on a high shelf, etc. Make sure the battery is oriented correctly when it with a CASIO Digital Camera only. Areas subject to fall..., creating the risk of camera malfunction, repair, etc. . Doing so creates the risk of humidity or dust - Memory Protection...
User Guide
Page 110
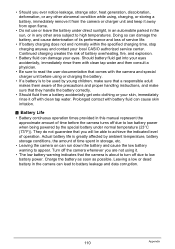
... cause deterioration of its performance and loss of time spent in the camera can cause skin irritation. . Leaving a low or dead battery in storage, etc. • Leaving the camera on can damage your local CASIO authorized service center. Turn off the camera whenever you will be able to achieve the indicated level of time before...
... cause deterioration of its performance and loss of time spent in the camera can cause skin irritation. . Leaving a low or dead battery in storage, etc. • Leaving the camera on can damage your local CASIO authorized service center. Turn off the camera whenever you will be able to achieve the indicated level of time before...
User Guide
Page 111
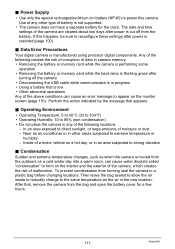
... bag before changing locations. After that, remove the camera from forming seal the camera in other type of moisture or dust - Data Error Precautions Your digital camera is not supported. • The camera does not have a separate battery for a few hours. 111 Appendix The date and... time settings of the following locations. - Any of the camera are cleared about two days after turning ...
... bag before changing locations. After that, remove the camera from forming seal the camera in other type of moisture or dust - Data Error Precautions Your digital camera is not supported. • The camera does not have a separate battery for a few hours. 111 Appendix The date and... time settings of the following locations. - Any of the camera are cleared about two days after turning ...
User Guide
Page 112
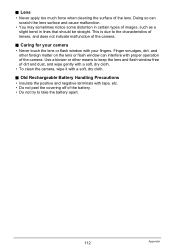
... flash window free of dirt and dust, and wipe gently with a soft, dry cloth. • To clean the camera, wipe it with tape, etc. • Do not peel the covering off of the battery. • Do not try to the characteristics of lenses, and does not indicate malfunction of images, such as... a slight bend in certain types of the camera. . . Lens • Never apply too much force when cleaning the surface of...
... flash window free of dirt and dust, and wipe gently with a soft, dry cloth. • To clean the camera, wipe it with tape, etc. • Do not peel the covering off of the battery. • Do not try to the characteristics of lenses, and does not indicate malfunction of images, such as... a slight bend in certain types of the camera. . . Lens • Never apply too much force when cleaning the surface of...


