Owners Manual
Page 2
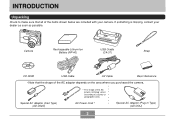
Camera Rechargeable Lithium Ion Battery (NP-40) USB Cradle (CA-31) Strap CD-ROM USB Cable AV Cable Basic Reference • Note that all of the items shown below are included with your dealer as soon as possible. If something is missing, contact your camera. Special AC Adaptor (Inlet Type) (AD-C52G) * The ...shape of the AC adaptor depends on the area where you purchased the camera. AC Power Cord * Special AC Adaptor (Plug-in Type) (AD-C52J) 2 INTRODUCTION INTRODUCTION Unpacking Check to make sure that the shape of the AC power...
Camera Rechargeable Lithium Ion Battery (NP-40) USB Cradle (CA-31) Strap CD-ROM USB Cable AV Cable Basic Reference • Note that all of the items shown below are included with your dealer as soon as possible. If something is missing, contact your camera. Special AC Adaptor (Inlet Type) (AD-C52G) * The ...shape of the AC adaptor depends on the area where you purchased the camera. AC Power Cord * Special AC Adaptor (Plug-in Type) (AD-C52J) 2 INTRODUCTION INTRODUCTION Unpacking Check to make sure that the shape of the AC power...
Owners Manual
Page 3
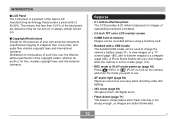
... Contents of the Monitor Screen 33 Attaching the Strap 35 Power Requirements 35 Loading the Rechargeable Battery 35 To charge the battery 37 To replace the battery 41 Power Supply Precautions 42 Turning the Camera On and Off 45 Configuring Power Saving Settings 47 Using the On-screen Menus 48 Configuring... To configure display language and clock settings 52 54 BASIC IMAGE RECORDING Recording an Image 54 Specifying the Recording Mode 54 Aiming the Camera 55 Recording an Image 56 Using the Optical Viewfinder 62 Using Zoom 63 Optical Zoom 63 Digital Zoom 65 3
... Contents of the Monitor Screen 33 Attaching the Strap 35 Power Requirements 35 Loading the Rechargeable Battery 35 To charge the battery 37 To replace the battery 41 Power Supply Precautions 42 Turning the Camera On and Off 45 Configuring Power Saving Settings 47 Using the On-screen Menus 48 Configuring... To configure display language and clock settings 52 54 BASIC IMAGE RECORDING Recording an Image 54 Specifying the Recording Mode 54 Aiming the Camera 55 Recording an Image 56 Using the Optical Viewfinder 62 Using Zoom 63 Optical Zoom 63 Digital Zoom 65 3
Owners Manual
Page 9
... of malfunction, repairs, or battery replacement. shall not be trademarks or service marks of others. • Photo Loader and Photohands are the property of CASIO COMPUTER CO., LTD. assumes no responsibility for any loss or claims by the screens and configuration of the actual camera. • The SD logo... CO., LTD. assumes no responsibility for any damage or loss resulting from the use or malfunction of the EX-Z850. • CASIO COMPUTER CO., LTD. INTRODUCTION IMPORTANT! • The contents of this manual are either registered trademarks or trademarks of Adobe Systems...
... of malfunction, repairs, or battery replacement. shall not be trademarks or service marks of others. • Photo Loader and Photohands are the property of CASIO COMPUTER CO., LTD. assumes no responsibility for any loss or claims by the screens and configuration of the actual camera. • The SD logo... CO., LTD. assumes no responsibility for any damage or loss resulting from the use or malfunction of the EX-Z850. • CASIO COMPUTER CO., LTD. INTRODUCTION IMPORTANT! • The contents of this manual are either registered trademarks or trademarks of Adobe Systems...
Owners Manual
Page 10
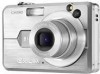
...to use. • AF assist light (page 59) Improves auto focus accuracy when shooting under dim lighting. • 24X zoom (page 63) 3X optical zoom, 8X digital zoom • Flash Assist (page 71) This feature compensates when flash intensity is a product of the latest LCD manufacturing technology that ... using a memory card. • Bundled with a USB Cradle The bundled USB cradle can be used to charge the camera's battery (page 37), to view images on the camera and enter the mode you want to a computer (page 238). INTRODUCTION I Copyright Restrictions Except for free, violates copyright...
...to use. • AF assist light (page 59) Improves auto focus accuracy when shooting under dim lighting. • 24X zoom (page 63) 3X optical zoom, 8X digital zoom • Flash Assist (page 71) This feature compensates when flash intensity is a product of the latest LCD manufacturing technology that ... using a memory card. • Bundled with a USB Cradle The bundled USB cradle can be used to charge the camera's battery (page 37), to view images on the camera and enter the mode you want to a computer (page 238). INTRODUCTION I Copyright Restrictions Except for free, violates copyright...
Owners Manual
Page 14
... service center. • Keep the small parts and accessories of this manual to "camera" refer to the CASIO EX-Z850 Digital Camera. • Never try to open the case of the camera or attempt your nearest CASIO authorized service center for repair. Intense light from the flash can interfere with the driver...and other liquids, and never let it get into the camera, immediately turn it off . Never use the camera outdoors in this camera out of the reach of the camera, immediately turn it off . Next, remove the camera's battery and/or unplug the AC adaptor power cord from the power...
... service center. • Keep the small parts and accessories of this manual to "camera" refer to the CASIO EX-Z850 Digital Camera. • Never try to open the case of the camera or attempt your nearest CASIO authorized service center for repair. Intense light from the flash can interfere with the driver...and other liquids, and never let it get into the camera, immediately turn it off . Never use the camera outdoors in this camera out of the reach of the camera, immediately turn it off . Next, remove the camera's battery and/or unplug the AC adaptor power cord from the power...
Owners Manual
Page 15
...it or otherwise subjecting it to personal computer memory. • Never open the battery cover, disconnect the AC adaptor from the camera, or unplug the AC adaptor from the power outlet, and contact your dealer or nearest CASIO authorized service center. • Never use it is in its use is being... recorded. Next, remove the camera's battery and/or unplug the AC adaptor power cord from the wall socket while an image is ...
...it or otherwise subjecting it to personal computer memory. • Never open the battery cover, disconnect the AC adaptor from the camera, or unplug the AC adaptor from the power outlet, and contact your dealer or nearest CASIO authorized service center. • Never use it is in its use is being... recorded. Next, remove the camera's battery and/or unplug the AC adaptor power cord from the wall socket while an image is ...
Owners Manual
Page 16
...battery power - Removing the battery or memory card, or setting the camera onto the USB cradle while the camera is being performed - Follow the instructions provided by the message to appear on the monitor screen (page 271). I Test for proper operation before using the camera! INTRODUCTION I Data Error Precautions • Your digital camera is manufactured using precision digital... components. Disconnecting the USB cable, removing the camera from the USB ...
...battery power - Removing the battery or memory card, or setting the camera onto the USB cradle while the camera is being performed - Follow the instructions provided by the message to appear on the monitor screen (page 271). I Test for proper operation before using the camera! INTRODUCTION I Data Error Precautions • Your digital camera is manufactured using precision digital... components. Disconnecting the USB cable, removing the camera from the USB ...
Owners Manual
Page 17
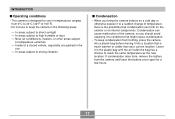
...especially one parked in the sun - If condensation does form, remove the battery from 0°C to 40°C (32°F to conditions that is designed for use or keep condensation from forming, place the camera into a plastic bag before moving it into a location that might cause condensation.... • To keep the camera in temperatures ranging from the camera and leave the battery cover open for a few hours. 17 Near air conditioners...
...especially one parked in the sun - If condensation does form, remove the battery from 0°C to 40°C (32°F to conditions that is designed for use or keep condensation from forming, place the camera into a plastic bag before moving it into a location that might cause condensation.... • To keep the camera in temperatures ranging from the camera and leave the battery cover open for a few hours. 17 Near air conditioners...

Owners Manual
Page 18
...use. This is not supplied power by using a lens blower to reconfigure these settings after power is not supported. • This camera does not have a separate battery for your fingers. You can interfere with a soft, dry cloth. I Power Supply • Use only the special NP-40 ...rechargeable lithium ion battery to the characteristics of lens, and does not indicate malfunction of the camera. INTRODUCTION I Other • The camera may sometimes notice some distortion in certain types of images, such as a slight bend in ...
...use. This is not supplied power by using a lens blower to reconfigure these settings after power is not supported. • This camera does not have a separate battery for your fingers. You can interfere with a soft, dry cloth. I Power Supply • Use only the special NP-40 ...rechargeable lithium ion battery to the characteristics of lens, and does not indicate malfunction of the camera. INTRODUCTION I Other • The camera may sometimes notice some distortion in certain types of images, such as a slight bend in ...
Owners Manual
Page 19
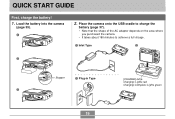
Load the battery into the camera (page 35). 1 2. Place the camera onto the USB cradle to charge the battery (page 37). • Note that the shape of the AC adaptor depends on the area where you purchased the camera. • It takes about 180 minutes to achieve a full charge. 1 Inlet Type 2 2 Stopper 1 Plug-in Type [CHARGE] lamp Charging: Lights red Charging Complete: Lights green 3 19 QUICK START GUIDE QUICK START GUIDE First, charge the battery! 1.
Load the battery into the camera (page 35). 1 2. Place the camera onto the USB cradle to charge the battery (page 37). • Note that the shape of the AC adaptor depends on the area where you purchased the camera. • It takes about 180 minutes to achieve a full charge. 1 Inlet Type 2 2 Stopper 1 Plug-in Type [CHARGE] lamp Charging: Lights red Charging Complete: Lights green 3 19 QUICK START GUIDE QUICK START GUIDE First, charge the battery! 1.
Owners Manual
Page 23
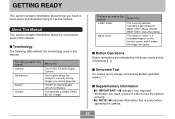
... • IMPORTANT! GETTING READY GETTING READY This section contains information about things you record (page 56) The NP-40 Rechargeable Lithium Ion Battery The optionally available CASIO BC-30L charger This term as used in this manual: "camera" "file memory" "battery" "charger" Means this: The CASIO EX-Z850 Digital Camera The location where the camera is useful when operating the...
... • IMPORTANT! GETTING READY GETTING READY This section contains information about things you record (page 56) The NP-40 Rechargeable Lithium Ion Battery The optionally available CASIO BC-30L charger This term as used in this manual: "camera" "file memory" "battery" "charger" Means this: The CASIO EX-Z850 Digital Camera The location where the camera is useful when operating the...

Owners Manual
Page 26
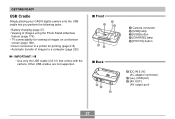
M R Q P ON 26 GETTING READY I Bottom M Stopper N Memory card slot O Battery compartment P Battery cover Q Connector R Tripod screw hole * Use this hole when attaching to a tripod.
M R Q P ON 26 GETTING READY I Bottom M Stopper N Memory card slot O Battery compartment P Battery cover Q Connector R Tripod screw hole * Use this hole when attaching to a tripod.
Owners Manual
Page 27
... port) 8 [AV OUT] (AV output port) 27 Other USB cradles are not supported. GETTING READY USB Cradle Simply placing your CASIO digital camera onto the USB cradle lets you perform the following tasks. • Battery charging (page 37) • Viewing of images using the Photo Stand slideshow feature (page 174). • TV connectability for... printing (page 215) • Automatic transfer of images to a computer (page 220) IMPORTANT! • Use only the USB cradle (CA-31) that comes with the camera.
... port) 8 [AV OUT] (AV output port) 27 Other USB cradles are not supported. GETTING READY USB Cradle Simply placing your CASIO digital camera onto the USB cradle lets you perform the following tasks. • Battery charging (page 37) • Viewing of images using the Photo Stand slideshow feature (page 174). • TV connectability for... printing (page 215) • Automatic transfer of images to a computer (page 220) IMPORTANT! • Use only the USB cradle (CA-31) that comes with the camera.
Owners Manual
Page 29
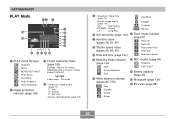
Focus mode, White balance, Self-timer, Metering, REC modes - EX menu screen (page 149) image size, white balance, AF area 29 GETTING READY 6 REC modes (page 54) Snapshot BEST SHOT Aperture Priority AE Shutter Speed ...; Snapshots: Image size (page 76) • Movies: Recording time (page 121) 9 • Snapshots: Memory capacity (pages 58, 273) • Movies: Remaining recording time (page 120) C Battery capacity (page 40) D Histogram (page 134) E Anti Shake indicator (page 108) F Focus frame (page 57) • Focusing complete: Green • Focusing failed: Red NOTE •...
Focus mode, White balance, Self-timer, Metering, REC modes - EX menu screen (page 149) image size, white balance, AF area 29 GETTING READY 6 REC modes (page 54) Snapshot BEST SHOT Aperture Priority AE Shutter Speed ...; Snapshots: Image size (page 76) • Movies: Recording time (page 121) 9 • Snapshots: Memory capacity (pages 58, 273) • Movies: Remaining recording time (page 120) C Battery capacity (page 40) D Histogram (page 134) E Anti Shake indicator (page 108) F Focus frame (page 57) • Focusing complete: Green • Focusing failed: Red NOTE •...
Owners Manual
Page 32
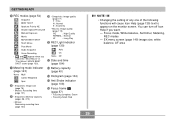
... Flash 9 Date and time (page 194) Red-eye reduction 0 Metering mode indicator C REC modes (page 54) (page 143) Snapshot Multi BEST SHOT Center Weighted Spot D Battery capacity (page 40) A White balance indicator (pages 89, 159) AWB Auto E Histogram (page 134) F EV value (page 88) Daylight Cloudy Shade 32
... Flash 9 Date and time (page 194) Red-eye reduction 0 Metering mode indicator C REC modes (page 54) (page 143) Snapshot Multi BEST SHOT Center Weighted Spot D Battery capacity (page 40) A White balance indicator (pages 89, 159) AWB Auto E Histogram (page 134) F EV value (page 88) Daylight Cloudy Shade 32
Owners Manual
Page 35
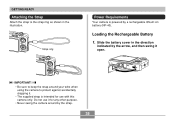
... around by the arrow, and then swing it . • The supplied strap is powered by a rechargeable lithium ion battery (NP-40). Slide the battery cover in the illustration. Do not use with this camera only. GETTING READY Attaching the Strap Attach the strap to protect against accidentally dropping it open. Strap ring Power...
... around by the arrow, and then swing it . • The supplied strap is powered by a rechargeable lithium ion battery (NP-40). Slide the battery cover in the illustration. Do not use with this camera only. GETTING READY Attaching the Strap Attach the strap to protect against accidentally dropping it open. Strap ring Power...
Owners Manual
Page 36
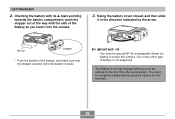
...the bottom of the battery, and make sure that the stopper securely locks the battery in the direction indicated by the arrow. The battery is not supported. You need to power this camera. Swing the battery cover closed, and then slide it in place. Orienting the battery with its ̆... mark pointing towards the battery compartment, push the stopper...
...the bottom of the battery, and make sure that the stopper securely locks the battery in the direction indicated by the arrow. The battery is not supported. You need to power this camera. Swing the battery cover closed, and then slide it in place. Orienting the battery with its ̆... mark pointing towards the battery compartment, push the stopper...
Owners Manual
Page 37
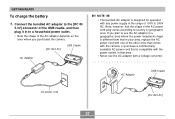
... NOTE • The bundled AC adaptor is designed for operation with any power supply in the range of the other ones that comes with the camera, or purchase a commercially available AC power cord that is different from that in that the shape of the AC power cord plug varies according to... converter. Note, however, that area. • Never use the AC adaptor with one of 100V to country or geographic area. GETTING READY To charge the battery 1.
... NOTE • The bundled AC adaptor is designed for operation with any power supply in the range of the other ones that comes with the camera, or purchase a commercially available AC power cord that is different from that in that the shape of the AC power cord plug varies according to... converter. Note, however, that area. • Never use the AC adaptor with one of 100V to country or geographic area. GETTING READY To charge the battery 1.
Owners Manual
Page 38
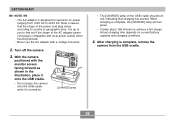
... the [CHARGE] lamp will turn red, indicating that the shape of the power cord plug varies according to achieve a full charge. With the camera positioned with a voltage converter. 2. GETTING READY NOTE • The AC adaptor is designed for operation on power ranging from the USB cradle. 38... in the illustration, place it onto the USB cradle. • Do not place the camera onto the USB cradle while it is turned on. [CHARGE] lamp • The [CHARGE] lamp on current battery capacity and charging conditions. 4. Actual charging time depends on the USB cradle should turn green...
... the [CHARGE] lamp will turn red, indicating that the shape of the power cord plug varies according to achieve a full charge. With the camera positioned with a voltage converter. 2. GETTING READY NOTE • The AC adaptor is designed for operation on power ranging from the USB cradle. 38... in the illustration, place it onto the USB cradle. • Do not place the camera onto the USB cradle while it is turned on. [CHARGE] lamp • The [CHARGE] lamp on current battery capacity and charging conditions. 4. Actual charging time depends on the USB cradle should turn green...
Owners Manual
Page 39
... as it will start right away if you try to charge immediately after using the camera (which causes battery to become warm) or when it is on the USB cradle are performing the charge operation. Remove the camera from the USB cradle and see if it works normally. • The only operations that... can be performed while the camera is too hot or too cold where you are : battery charging, Photo Stand, image output to a TV, and USB data communication. 39 GETTING READY IMPORTANT! • Use only the USB cradle (CA...
... as it will start right away if you try to charge immediately after using the camera (which causes battery to become warm) or when it is on the USB cradle are performing the charge operation. Remove the camera from the USB cradle and see if it works normally. • The only operations that... can be performed while the camera is too hot or too cold where you are : battery charging, Photo Stand, image output to a TV, and USB data communication. 39 GETTING READY IMPORTANT! • Use only the USB cradle (CA...


