Owners Manual
Page 2
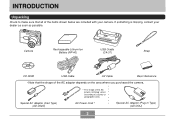
... cord plug varies according to make sure that the shape of the AC adaptor depends on the area where you purchased the camera. Camera Rechargeable Lithium Ion Battery (NP-40) USB Cradle (CA-31) Strap CD-ROM USB Cable AV Cable Basic Reference • Note that all of the items shown below are...
... cord plug varies according to make sure that the shape of the AC adaptor depends on the area where you purchased the camera. Camera Rechargeable Lithium Ion Battery (NP-40) USB Cradle (CA-31) Strap CD-ROM USB Cable AV Cable Basic Reference • Note that all of the items shown below are...
Owners Manual
Page 3
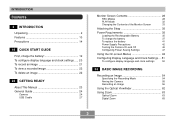
... record an image 21 To view a recorded image 22 To delete an image 22 23 GETTING READY About This Manual 23 General Guide 24 Camera 24 USB Cradle 27 Monitor Screen Contents 28 REC Modes 28 PLAY Mode 32 Changing the Contents of the Monitor Screen 33 Attaching the Strap 35 Power... Settings ... 51 To configure display language and clock settings 52 54 BASIC IMAGE RECORDING Recording an Image 54 Specifying the Recording Mode 54 Aiming the Camera 55 Recording an Image 56 Using the Optical Viewfinder 62 Using Zoom 63 Optical Zoom 63 Digital Zoom 65 3
... record an image 21 To view a recorded image 22 To delete an image 22 23 GETTING READY About This Manual 23 General Guide 24 Camera 24 USB Cradle 27 Monitor Screen Contents 28 REC Modes 28 PLAY Mode 32 Changing the Contents of the Monitor Screen 33 Attaching the Strap 35 Power... Settings ... 51 To configure display language and clock settings 52 54 BASIC IMAGE RECORDING Recording an Image 54 Specifying the Recording Mode 54 Aiming the Camera 55 Recording an Image 56 Using the Optical Viewfinder 62 Using Zoom 63 Optical Zoom 63 Digital Zoom 65 3
Owners Manual
Page 10
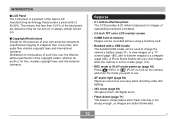
... on the cradle (page 174). • REC mode or PLAY mode power up (page 45) Press [ ] (REC) or [ ] (PLAY) to use. • AF assist light (page 59) Improves auto focus accuracy when shooting under dim lighting. • 24X zoom (page 63) 3X optical zoom, 8X digital zoom • Flash Assist (page 71) This.... I LCD Panel The LCD panel is not strong enough, so images are defective (they do not turn on or always remain turned on the camera and enter the mode you want to turn on ). This means that provides a pixel yield of 99.99%. INTRODUCTION I Copyright Restrictions Except for free...
... on the cradle (page 174). • REC mode or PLAY mode power up (page 45) Press [ ] (REC) or [ ] (PLAY) to use. • AF assist light (page 59) Improves auto focus accuracy when shooting under dim lighting. • 24X zoom (page 63) 3X optical zoom, 8X digital zoom • Flash Assist (page 71) This.... I LCD Panel The LCD panel is not strong enough, so images are defective (they do not turn on or always remain turned on the camera and enter the mode you want to turn on ). This means that provides a pixel yield of 99.99%. INTRODUCTION I Copyright Restrictions Except for free...
Owners Manual
Page 16
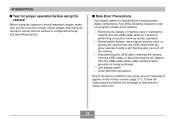
...corruption of the error. 16 Disconnecting the USB cable, removing the camera from the USB cradle, or disconnecting the AC adaptor from the USB cradle while a data communication operation is still flashing after you first record ...camera onto the USB cradle while the green operation lamp is being performed - I Test for proper operation before using the camera! Other abnormal operations Any of test images and check the results to appear on the monitor screen (page 271). INTRODUCTION I Data Error Precautions • Your digital camera is manufactured using precision digital...
...corruption of the error. 16 Disconnecting the USB cable, removing the camera from the USB cradle, or disconnecting the AC adaptor from the USB cradle while a data communication operation is still flashing after you first record ...camera onto the USB cradle while the green operation lamp is being performed - I Test for proper operation before using the camera! Other abnormal operations Any of test images and check the results to appear on the monitor screen (page 271). INTRODUCTION I Data Error Precautions • Your digital camera is manufactured using precision digital...

Owners Manual
Page 18
... particles from the lens surface by the battery and/or the USB cradle for the clock. Never touch the lens with proper operation of the lens can interfere with your camera • Fingerprints, dust, or any other soiling of the camera. Use of any other type of images, such as a slight bend in...
... particles from the lens surface by the battery and/or the USB cradle for the clock. Never touch the lens with proper operation of the lens can interfere with your camera • Fingerprints, dust, or any other soiling of the camera. Use of any other type of images, such as a slight bend in...
Owners Manual
Page 19
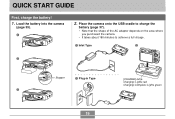
Load the battery into the camera (page 35). 1 2. Place the camera onto the USB cradle to charge the battery (page 37). • Note that the shape of the AC adaptor depends on the area where you purchased the camera. • It takes about 180 minutes to achieve a full charge. 1 Inlet Type 2 2 Stopper 1 Plug-in Type [CHARGE] lamp Charging: Lights red Charging Complete: Lights green 3 19 QUICK START GUIDE QUICK START GUIDE First, charge the battery! 1.
Load the battery into the camera (page 35). 1 2. Place the camera onto the USB cradle to charge the battery (page 37). • Note that the shape of the AC adaptor depends on the area where you purchased the camera. • It takes about 180 minutes to achieve a full charge. 1 Inlet Type 2 2 Stopper 1 Plug-in Type [CHARGE] lamp Charging: Lights red Charging Complete: Lights green 3 19 QUICK START GUIDE QUICK START GUIDE First, charge the battery! 1.
Owners Manual
Page 27
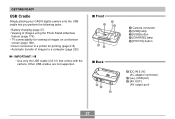
GETTING READY USB Cradle Simply placing your CASIO digital camera onto the USB cradle lets you perform the following tasks. • Battery charging (page 37) • Viewing of images using the Photo Stand slideshow feature (page 174). • TV ... a printer for printing (page 215) • Automatic transfer of images to a computer (page 220) IMPORTANT! • Use only the USB cradle (CA-31) that comes with the camera. I Front 2 13 54 I Back 67 8 1 Camera connector 2 [USB] lamp 3 [USB] button 4 [CHARGE] lamp 5 [PHOTO] button 6 [DC IN 5.3V] (AC adaptor connector) 7 [ ] (USB port) 8 [AV ...
GETTING READY USB Cradle Simply placing your CASIO digital camera onto the USB cradle lets you perform the following tasks. • Battery charging (page 37) • Viewing of images using the Photo Stand slideshow feature (page 174). • TV ... a printer for printing (page 215) • Automatic transfer of images to a computer (page 220) IMPORTANT! • Use only the USB cradle (CA-31) that comes with the camera. I Front 2 13 54 I Back 67 8 1 Camera connector 2 [USB] lamp 3 [USB] button 4 [CHARGE] lamp 5 [PHOTO] button 6 [DC IN 5.3V] (AC adaptor connector) 7 [ ] (USB port) 8 [AV ...
Owners Manual
Page 37
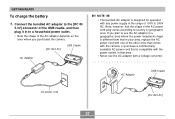
GETTING READY To charge the battery 1. If you purchased the camera. [DC IN 5.3V] USB Cradle AC Adaptor NOTE • The bundled AC adaptor is compatible with the power ... according to 240V AC. Connect the bundled AC adaptor to the [DC IN 5.3V] connector of the USB cradle, and then plug it in to a household power outlet. • Note the shape of the AC adaptor ... one of the other ones that comes with the camera, or purchase a commercially available AC power cord that the shape of 100V to country or geographic area. AC Adaptor USB Cradle AC power cord [DC IN 5.3V] 37 Note...
GETTING READY To charge the battery 1. If you purchased the camera. [DC IN 5.3V] USB Cradle AC Adaptor NOTE • The bundled AC adaptor is compatible with the power ... according to 240V AC. Connect the bundled AC adaptor to the [DC IN 5.3V] connector of the USB cradle, and then plug it in to a household power outlet. • Note the shape of the AC adaptor ... one of the other ones that comes with the camera, or purchase a commercially available AC power cord that the shape of 100V to country or geographic area. AC Adaptor USB Cradle AC power cord [DC IN 5.3V] 37 Note...
Owners Manual
Page 38
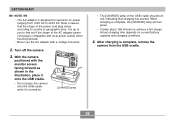
...plug varies according to country or geographic area. With the camera positioned with the monitor screen facing forward as shown in the illustration, place it onto the USB cradle. • Do not place the camera onto the USB cradle while it is compatible with local power outlets when traveling... abroad. • Never use the AC adaptor with a voltage converter. 2. Turn off the camera. 3. After charging is complete, remove the camera from 100V AC to...
...plug varies according to country or geographic area. With the camera positioned with the monitor screen facing forward as shown in the illustration, place it onto the USB cradle. • Do not place the camera onto the USB cradle while it is compatible with local power outlets when traveling... abroad. • Never use the AC adaptor with a voltage converter. 2. Turn off the camera. 3. After charging is complete, remove the camera from 100V AC to...
Owners Manual
Page 39
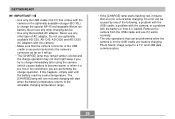
...allowable charging temperature range. • If the [CHARGE] lamp starts flashing red, it works normally. • The only operations that can be performed while the camera is on the USB cradle are performing the charge operation. An error can be caused by any of the following: a problem with the USB... or too cold where you are : battery charging, Photo Stand, image output to charge the special NP-40 rechargeable lithium ion battery. Remove the camera from the USB cradle and see if it means that an error occurs while charging. GETTING READY IMPORTANT! • Use only the USB...
...allowable charging temperature range. • If the [CHARGE] lamp starts flashing red, it works normally. • The only operations that can be performed while the camera is on the USB cradle are performing the charge operation. An error can be caused by any of the following: a problem with the USB... or too cold where you are : battery charging, Photo Stand, image output to charge the special NP-40 rechargeable lithium ion battery. Remove the camera from the USB cradle and see if it means that an error occurs while charging. GETTING READY IMPORTANT! • Use only the USB...
Owners Manual
Page 40
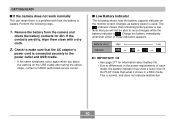
.... Battery Level High Low Indicator IMPORTANT! • See page 277 for dirt. I If the camera does not work normally This can mean there is used. Note that you place the camera on the monitor screen changes as battery power is a problem with a dry cloth. 2. Check... I Low Battery Indicator The following steps. 1. Perform the following shows how the battery capacity indicator on the USB cradle after taking the above steps, contact a CASIO authorized service center. The indicator means that the AC adaptor's power cord is loaded. Charge the battery immediately whenever ...
.... Battery Level High Low Indicator IMPORTANT! • See page 277 for dirt. I If the camera does not work normally This can mean there is used. Note that you place the camera on the monitor screen changes as battery power is a problem with a dry cloth. 2. Check... I Low Battery Indicator The following steps. 1. Perform the following shows how the battery capacity indicator on the USB cradle after taking the above steps, contact a CASIO authorized service center. The indicator means that the AC adaptor's power cord is loaded. Charge the battery immediately whenever ...
Owners Manual
Page 42
...optional charger. - Do not immerse the battery in this camera. - Do not use any other charging device. • Failure to observe any other area subject to the CASIO NP-40 Rechargeable Lithium Ion Battery. • Use only the USB cradle (CA-31) that can conduct electricity (necklaces, pencil ...lead, etc.) - Never carry or store the battery together with items that comes with the camera or the optionally available charger...
...optional charger. - Do not immerse the battery in this camera. - Do not use any other charging device. • Failure to observe any other area subject to the CASIO NP-40 Rechargeable Lithium Ion Battery. • Use only the USB cradle (CA-31) that can conduct electricity (necklaces, pencil ...lead, etc.) - Never carry or store the battery together with items that comes with the camera or the optionally available charger...
Owners Manual
Page 43
... your skin, immediately rinse it off with the optional charger before using , charging, or storing a battery, immediately remove it from the camera or charger, and keep it away from open flame: - Doing so can cause deformation of the battery and lead to be used by... stop charging. Battery deformation - Should battery fluid get onto clothing or your eyes accidentally, immediately rinse them aware of this CASIO digital camera only. • Use only the USB cradle that the battery has reached the end of overheating, fire, and explosion. • Battery fluid can cause skin irritation. ...
... your skin, immediately rinse it off with the optional charger before using , charging, or storing a battery, immediately remove it from the camera or charger, and keep it away from open flame: - Doing so can cause deformation of the battery and lead to be used by... stop charging. Battery deformation - Should battery fluid get onto clothing or your eyes accidentally, immediately rinse them aware of this CASIO digital camera only. • Use only the USB cradle that the battery has reached the end of overheating, fire, and explosion. • Battery fluid can cause skin irritation. ...
Owners Manual
Page 44
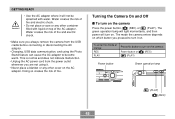
I USB Cradle and AC Adaptor Precautions Caution! • Never use . • Store the battery in a cool, dry...optional charger for information about charging procedures and charging times. • When transporting a battery, keep it away from the camera when you remove the battery from heat. A damaged power cord creates the risk of fire and electric shock. •...create the risk of fire and electric shock. • Never touch the AC adaptor while your dealer or nearest CASIO authorized service center. Doing so creates the risk of fire and electric shock. • Should the cord of the...
I USB Cradle and AC Adaptor Precautions Caution! • Never use . • Store the battery in a cool, dry...optional charger for information about charging procedures and charging times. • When transporting a battery, keep it away from the camera when you remove the battery from heat. A damaged power cord creates the risk of fire and electric shock. •...create the risk of fire and electric shock. • Never touch the AC adaptor while your dealer or nearest CASIO authorized service center. Doing so creates the risk of fire and electric shock. • Should the cord of the...
Owners Manual
Page 45
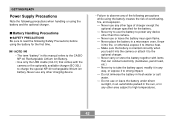
... power button, [ ] (REC) or [ ] (PLAY). This is normal and does not indicate malfunction. • Unplug the AC power cord from the USB cradle before connecting or disconnecting the AC adaptor. • Charging, USB data communication, and using it will turn it on. The green operation lamp will light ... blanket or any other cover on the AC adaptor. Water creates the risk of fire and electric shock. • Make sure you always remove the camera from the power outlet whenever you pressed to become warm. Water creates the risk of fire and electric shock. • Do not place a vase or...
... power button, [ ] (REC) or [ ] (PLAY). This is normal and does not indicate malfunction. • Unplug the AC power cord from the USB cradle before connecting or disconnecting the AC adaptor. • Charging, USB data communication, and using it will turn it on. The green operation lamp will light ... blanket or any other cover on the AC adaptor. Water creates the risk of fire and electric shock. • Make sure you always remove the camera from the power outlet whenever you pressed to become warm. Water creates the risk of fire and electric shock. • Do not place a vase or...
Owners Manual
Page 48
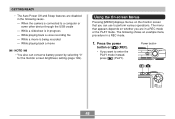
When the camera is connected to enter the PLAY mode instead, press [ ] (PLAY). Power button [ ][ ] 48 GETTING READY • The Auto Power Off and Sleep features are in a ... Menus Pressing [MENU] displays menus on the monitor screen that appears depends on whether you want to a computer or some other device through the USB cradle -
When the camera is connected to enter the PLAY mode instead, press [ ] (PLAY). Power button [ ][ ] 48 GETTING READY • The Auto Power Off and Sleep features are in a ... Menus Pressing [MENU] displays menus on the monitor screen that appears depends on whether you want to a computer or some other device through the USB cradle -
Owners Manual
Page 51
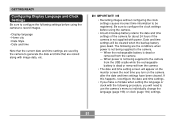
...current date and time settings are used by the camera to generate the date and time that are the conditions when power is not being supplied to the camera from the USB cradle while the rechargeable battery is dead or removed from the camera - Date and time settings will be registered.... When the rechargeable battery is dead or removed from the camera • The date and time setting screen will...
...current date and time settings are used by the camera to generate the date and time that are the conditions when power is not being supplied to the camera from the USB cradle while the rechargeable battery is dead or removed from the camera - Date and time settings will be registered.... When the rechargeable battery is dead or removed from the camera • The date and time setting screen will...
Owners Manual
Page 60
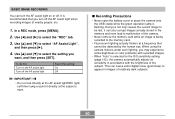
...You can turn off . In a REC mode, press [MENU]. 2. I Recording Precautions • Never open the battery cover or place the camera onto the USB cradle while the green operation lamp is being recorded to select the "REC" tab. 3. It is recommended that cannot be lost, it directly at... a frequency that you may experience some digital noise (graininess) to appear in images of nearby people, etc. 1. Use [̆] and [̄...
...You can turn off . In a REC mode, press [MENU]. 2. I Recording Precautions • Never open the battery cover or place the camera onto the USB cradle while the green operation lamp is being recorded to select the "REC" tab. 3. It is recommended that cannot be lost, it directly at... a frequency that you may experience some digital noise (graininess) to appear in images of nearby people, etc. 1. Use [̆] and [̄...
Owners Manual
Page 174
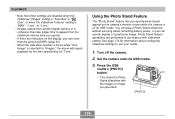
Press the USB cradle's [PHOTO] button. • This starts the Photo Stand slideshow with slideshow setting. Using the Photo Stand Feature The "Photo Stand" feature lets you specify what should appear on the camera's monitor screen while the camera is selected for "Images", the movie ... are indicators on its USB cradle. PLAYBACK • Note that effect settings are disabled when the slideshow "Images" setting is "Favorites" or " Only", or when the slideshow "Interval" setting is "MAX", "1 sec", or "2 sec". • Images copied from another digital camera or a computer may take longer...
Press the USB cradle's [PHOTO] button. • This starts the Photo Stand slideshow with slideshow setting. Using the Photo Stand Feature The "Photo Stand" feature lets you specify what should appear on the camera's monitor screen while the camera is selected for "Images", the movie ... are indicators on its USB cradle. PLAYBACK • Note that effect settings are disabled when the slideshow "Images" setting is "Favorites" or " Only", or when the slideshow "Interval" setting is "MAX", "1 sec", or "2 sec". • Images copied from another digital camera or a computer may take longer...
Owners Manual
Page 180
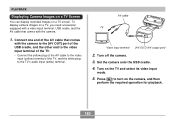
... can display recorded images on the TV and select its video input mode. 5. Turn off the camera. 3. Connect one end of the AV cable that comes with the camera to the [AV OUT] port of the USB cradle, and the other end to the video input terminal of the TV. • Connect the... of the TV, and the white plug to turn on the camera, and then perform the required operation for playback. 180 To display camera images on a TV, you need a television equipped with a video input terminal, USB cradle, and the AV cable that comes with the camera. 1. Press [ ] to the TV's audio input (white) terminal...
... can display recorded images on the TV and select its video input mode. 5. Turn off the camera. 3. Connect one end of the AV cable that comes with the camera to the [AV OUT] port of the USB cradle, and the other end to the video input terminal of the TV. • Connect the... of the TV, and the white plug to turn on the camera, and then perform the required operation for playback. 180 To display camera images on a TV, you need a television equipped with a video input terminal, USB cradle, and the AV cable that comes with the camera. 1. Press [ ] to the TV's audio input (white) terminal...

