
Owners Manual
Page 2
If anything is missing, contact your camera, check to the camera Attach strap here. Digital camera Rechargeable lithium ion battery (NP-60) Charger unit (BC-60L) To attach the strap to make sure that all items shown below are included. Unpacking As you unpack your original retailer. Power cord Strap USB cable AV cable CD-ROM Basic Reference 2
If anything is missing, contact your camera, check to the camera Attach strap here. Digital camera Rechargeable lithium ion battery (NP-60) Charger unit (BC-60L) To attach the strap to make sure that all items shown below are included. Unpacking As you unpack your original retailer. Power cord Strap USB cable AV cable CD-ROM Basic Reference 2
Owners Manual
Page 4
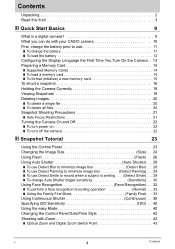
...3 ❚❙ Quick Start Basics 9 What is a digital camera 9 What you can do with your CASIO camera 10 First, charge the battery prior to use 11 ❚ To charge the battery 11 ❚ To load the battery 12 Configuring the Display Language the First Time You Turn On the Camera. . 13 Preparing a Memory Card 14 ❚ Supported Memory... Continuous Shutter Continuous) . . 38 Specifying ISO Sensitivity ISO) . . 40 Using the easy Mode 40 Changing the Control Panel Date/Time Style 42 Shooting with Zoom 42 ❚ Optical Zoom and Digital Zoom Switch Point 43 C 4 Contents
...3 ❚❙ Quick Start Basics 9 What is a digital camera 9 What you can do with your CASIO camera 10 First, charge the battery prior to use 11 ❚ To charge the battery 11 ❚ To load the battery 12 Configuring the Display Language the First Time You Turn On the Camera. . 13 Preparing a Memory Card 14 ❚ Supported Memory... Continuous Shutter Continuous) . . 38 Specifying ISO Sensitivity ISO) . . 40 Using the easy Mode 40 Changing the Control Panel Date/Time Style 42 Shooting with Zoom 42 ❚ Optical Zoom and Digital Zoom Switch Point 43 C 4 Contents

Owners Manual
Page 7
... Number Generation Rule . . . . . (File No.) . 124 Configuring World Time Settings World Time) . 124 Time Stamping Snapshots Timestamp) . 125 Setting the Camera's Clock Adjust) . 126 Specifying the Date Style Date Style) . 126 Specifying the Display Language Language) . 127 Configuring Sleep State Settings Sleep) . 127 Configuring Auto...the Histogram 132 ❚❙ Appendix 133 Precautions during Use 133 Power Supply 142 ❚ Charging 142 ❚ To replace the battery 142 ❚ Battery Precautions 143 ❚ Using the Camera in another Country 143 7 Contents
... Number Generation Rule . . . . . (File No.) . 124 Configuring World Time Settings World Time) . 124 Time Stamping Snapshots Timestamp) . 125 Setting the Camera's Clock Adjust) . 126 Specifying the Date Style Date Style) . 126 Specifying the Display Language Language) . 127 Configuring Sleep State Settings Sleep) . 127 Configuring Auto...the Histogram 132 ❚❙ Appendix 133 Precautions during Use 133 Power Supply 142 ❚ Charging 142 ❚ To replace the battery 142 ❚ Battery Precautions 143 ❚ Using the Camera in another Country 143 7 Contents

Owners Manual
Page 11
... required to charge the special lithium ion battery (NP-60). terminals of battery. Never try to a full charge. • Your camera requires a special CASIO rechargeable lithium ion battery (NP-60) for power. To charge the battery 1. Because of charger device. Perform the steps under "To charge the battery" to bring the battery to use any other type of...
... required to charge the special lithium ion battery (NP-60). terminals of battery. Never try to a full charge. • Your camera requires a special CASIO rechargeable lithium ion battery (NP-60) for power. To charge the battery 1. Because of charger device. Perform the steps under "To charge the battery" to bring the battery to use any other type of...

Owners Manual
Page 12
...EXILIM logo on the battery facing downwards (in the direction of the lens), hold the stopper next to be cleared. Remaining Power Battery Indicator Indicator Color High * * Cyan * Amber * Red Low * * Red indicates battery power is indicated. Charge the battery immediately. • The level shown by the battery...information about how to turn off the camera (pages 127, 128). 12 Quick Start Basics Battery Power Conservation Tips • When you forget to replace the battery, see page 142. 2 1 Checking Remaining Battery Power As battery power is restored. • See ...
...EXILIM logo on the battery facing downwards (in the direction of the lens), hold the stopper next to be cleared. Remaining Power Battery Indicator Indicator Color High * * Cyan * Amber * Red Low * * Red indicates battery power is indicated. Charge the battery immediately. • The level shown by the battery...information about how to turn off the camera (pages 127, 128). 12 Quick Start Basics Battery Power Conservation Tips • When you forget to replace the battery, see page 142. 2 1 Checking Remaining Battery Power As battery power is restored. • See ...

Owners Manual
Page 13
... want to change and then use of summer time, and so they are subject to set the date and time correctly will be using the camera and then press [SET]. Use [4] and [6] to change . To switch between 12-hour and 24-hour format, press [BS]. 8. NOTE • Each country ... it. Use [8] and [2] to select the city where you will cause the wrong date and time data to select the area where you load a battery into the camera, a screen appears for configuring the display language, date, and time settings. Press [SET]. • If you make a mistake, you want and then press ...
... want to change and then use of summer time, and so they are subject to set the date and time correctly will be using the camera and then press [SET]. Use [4] and [6] to change . To switch between 12-hour and 24-hour format, press [BS]. 8. NOTE • Each country ... it. Use [8] and [2] to select the city where you will cause the wrong date and time data to select the area where you load a battery into the camera, a screen appears for configuring the display language, date, and time settings. Press [SET]. • If you make a mistake, you want and then press ...
Owners Manual
Page 14
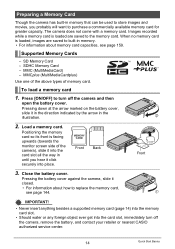
... the memory card slot. • Should water or any foreign object ever get into the card slot, immediately turn off the camera, remove the battery, and contact your retailer or nearest CASIO authorized service center. 14 Quick Start Basics Positioning the memory card so its front is loaded are saved to built-in...
... the memory card slot. • Should water or any foreign object ever get into the card slot, immediately turn off the camera, remove the battery, and contact your retailer or nearest CASIO authorized service center. 14 Quick Start Basics Positioning the memory card so its front is loaded are saved to built-in...
Owners Manual
Page 21
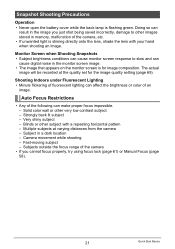
...quality set for image composition. Monitor Screen when Shooting Snapshots • Subject brightness conditions can cause digital noise in a dark location - Subjects outside the focus range of the camera • If you just shot being saved incorrectly, damage to slow and can cause monitor ...screen response to other very low contrast subject - Snapshot Shooting Precautions Operation • Never open the battery cover while the back lamp is ...
...quality set for image composition. Monitor Screen when Shooting Snapshots • Subject brightness conditions can cause digital noise in a dark location - Subjects outside the focus range of the camera • If you just shot being saved incorrectly, damage to slow and can cause monitor ...screen response to other very low contrast subject - Snapshot Shooting Precautions Operation • Never open the battery cover while the back lamp is ...
Owners Manual
Page 26
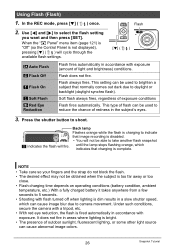
...exposure. Soft flash always fires, regardless of outdoor sunlight, fluorescent lighting, or some other light source can be able to camera movement. This setting can cause image blur due to take another flash snapshot until the lamp stops flashing orange, which indicates... obtained when the subject is too far away or too close. • Flash charging time depends on operating conditions (battery condition, ambient temperature, etc.) With a fully charged battery it takes anywhere from a few seconds to shoot. 2N < indicates the flash will cycle through the available flash settings...
...exposure. Soft flash always fires, regardless of outdoor sunlight, fluorescent lighting, or some other light source can be able to camera movement. This setting can cause image blur due to take another flash snapshot until the lamp stops flashing orange, which indicates... obtained when the subject is too far away or too close. • Flash charging time depends on operating conditions (battery condition, ambient temperature, etc.) With a fully charged battery it takes anywhere from a few seconds to shoot. 2N < indicates the flash will cycle through the available flash settings...

Owners Manual
Page 97
Large connector • The camera does not draw USB power over the USB cable. Make sure the camera's USB port battery is aligned with the 4 mark of the connector as shown in Making sure that supports PictBridge and print images without going through a computer. .... On the "Set Up" tab, select "USB" and then press [6]. 3. Connecting the Camera to a Printer Use the USB...
Large connector • The camera does not draw USB power over the USB cable. Make sure the camera's USB port battery is aligned with the 4 mark of the connector as shown in Making sure that supports PictBridge and print images without going through a computer. .... On the "Set Up" tab, select "USB" and then press [6]. 3. Connecting the Camera to a Printer Use the USB...

Owners Manual
Page 105
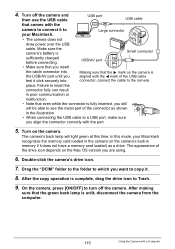
... communication or malfunction. • Note that even while the connector is Small connector sufficiently charged before connecting. place. To connect the camera to select "Mass Storage", and then press [SET]. 4. USB/AV port • Make sure that you insert the cable connector...the USB cable connector, connect the cable to the camera. Turn on the camera and press [MENU]. 2. Make sure the camera's battery is fully inserted, you align the connector correctly with a Computer Turn on the camera. 105 Using the Camera with the port. 5. Failure to insert the ...
... communication or malfunction. • Note that even while the connector is Small connector sufficiently charged before connecting. place. To connect the camera to select "Mass Storage", and then press [SET]. 4. USB/AV port • Make sure that you insert the cable connector...the USB cable connector, connect the cable to the camera. Turn on the camera and press [MENU]. 2. Make sure the camera's battery is fully inserted, you align the connector correctly with a Computer Turn on the camera. 105 Using the Camera with the port. 5. Failure to insert the ...
Owners Manual
Page 115
.... After making sure that even while the connector is fully inserted, you still will light green at this mode, your Macintosh. Turn off the camera. USB/AV port • Make sure that you insert the cable connector into the USB/AV port until you want to Trash. 9. Turn..." folder to the folder to which you feel it . 8. Make sure the camera's battery is unlit, disconnect the camera from the computer. 115 Using the Camera with the port. 5. place. After the copy operation is aligned with the camera to connect it does not have a memory card loaded) as shown in poor ...
.... After making sure that even while the connector is fully inserted, you still will light green at this mode, your Macintosh. Turn off the camera. USB/AV port • Make sure that you insert the cable connector into the USB/AV port until you want to Trash. 9. Turn..." folder to the folder to which you feel it . 8. Make sure the camera's battery is unlit, disconnect the camera from the computer. 115 Using the Camera with the port. 5. place. After the copy operation is aligned with the camera to connect it does not have a memory card loaded) as shown in poor ...
Owners Manual
Page 130
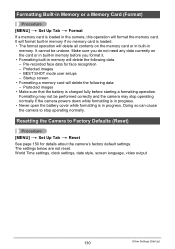
... for face recognition - Formatting may not be undone. Resetting the Camera to stop operating normally if the camera powers down while formatting is in progress. • Never open the battery cover while formatting is in the camera, this operation will format the memory card. Protected images •... Make sure that the battery is charged fully before you do not need any data currently on...
... for face recognition - Formatting may not be undone. Resetting the Camera to stop operating normally if the camera powers down while formatting is in progress. • Never open the battery cover while formatting is in the camera, this operation will format the memory card. Protected images •... Make sure that the battery is charged fully before you do not need any data currently on...
Owners Manual
Page 134
..., which can cause it is emitting smoke or strange odor, or while it to your dealer or nearest CASIO authorized service center. . . Immediately perform the following steps whenever any way. Remove the battery from the camera. 3. Disassembly and Modification • Never try to protect yourself against burn injury. 3. Smoke, abnormal odor, overheating, and...
..., which can cause it is emitting smoke or strange odor, or while it to your dealer or nearest CASIO authorized service center. . . Immediately perform the following steps whenever any way. Remove the battery from the camera. 3. Disassembly and Modification • Never try to protect yourself against burn injury. 3. Smoke, abnormal odor, overheating, and...
Owners Manual
Page 135
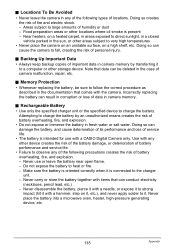
... humidity or dust - Never use with items that can cause the camera to the charger unit. - Make sure the battery is oriented correctly when it is present - . Note that comes with the camera. Locations To Be Avoided • Never leave the camera in camera memory. . Near heaters, on a heated carpet, in areas exposed to ... that data can result in corruption or loss of data in any other locations where oil smoke is connected to fall, creating the risk of camera malfunction, repair, etc. . Never carry or store the battery together with a CASIO Digital Camera only.
... humidity or dust - Never use with items that can cause the camera to the charger unit. - Make sure the battery is oriented correctly when it is present - . Note that comes with the camera. Locations To Be Avoided • Never leave the camera in camera memory. . Near heaters, on a heated carpet, in areas exposed to ... that data can result in corruption or loss of data in any other locations where oil smoke is connected to fall, creating the risk of camera malfunction, repair, etc. . Never carry or store the battery together with a CASIO Digital Camera only.
Owners Manual
Page 136
...affected by ambient temperature, battery storage conditions, the amount of time spent in the camera can run down the battery and cause the low battery warning to appear. Turn off the camera whenever you are not using it off with battery fluid can damage your local CASIO authorized service center. ...Doing so can damage the battery, and cause deterioration of ...
...affected by ambient temperature, battery storage conditions, the amount of time spent in the camera can run down the battery and cause the low battery warning to appear. Turn off the camera whenever you are not using it off with battery fluid can damage your local CASIO authorized service center. ...Doing so can damage the battery, and cause deterioration of ...

Owners Manual
Page 137
... creates the risk of corruption of data in the new location. Data Error Precautions Your digital camera is not supported. • The camera does not have a separate battery for a few hours. 137 Appendix Inside of battery is manufactured using precision digital components. Near an air conditioner or in an area subjected to extreme temperature or humidity...
... creates the risk of corruption of data in the new location. Data Error Precautions Your digital camera is not supported. • The camera does not have a separate battery for a few hours. 137 Appendix Inside of battery is manufactured using precision digital components. Near an air conditioner or in an area subjected to extreme temperature or humidity...

Owners Manual
Page 138
... malfunction. • You may sometimes notice some distortion in certain types of the battery. • Do not try to take the battery apart. 138 Appendix . Lens • Never apply too much force when cleaning the surface of the camera. . This is due to keep the lens and flash window free of dirt... and dust, and wipe gently with a soft, dry cloth. • To clean the camera, wipe it with ...
... malfunction. • You may sometimes notice some distortion in certain types of the battery. • Do not try to take the battery apart. 138 Appendix . Lens • Never apply too much force when cleaning the surface of the camera. . This is due to keep the lens and flash window free of dirt... and dust, and wipe gently with a soft, dry cloth. • To clean the camera, wipe it with ...

Owners Manual
Page 142
... hot or too cold. Open the battery cover and remove the current battery. Stopper 142 Appendix The battery is faulty or the battery is faulty. Contact your nearest CASIO authorized service center. When the camera returns to normal temperature. To replace the battery 1. If problems continue to make sure that the battery is loaded in the illustration. Charging...
... hot or too cold. Open the battery cover and remove the current battery. Stopper 142 Appendix The battery is faulty or the battery is faulty. Contact your nearest CASIO authorized service center. When the camera returns to normal temperature. To replace the battery 1. If problems continue to make sure that the battery is loaded in the illustration. Charging...

Owners Manual
Page 143
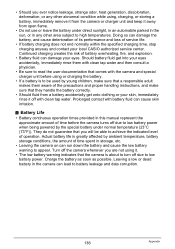
...each country or geographic area. Doing so can cause deterioration of its charge before storing it probably means the battery has reached the end of battery characteristics. Using the Camera in order to avoid not being able to shoot images due to charge when you are not using it ...is within the range of the battery, not the camera. • Charge the battery in a cool, dry place (20°C (68°F) or lower). Extra Batteries • Taking along on a trip, check with travel agent about the power supply requirements...
...each country or geographic area. Doing so can cause deterioration of its charge before storing it probably means the battery has reached the end of battery characteristics. Using the Camera in order to avoid not being able to shoot images due to charge when you are not using it ...is within the range of the battery, not the camera. • Charge the battery in a cool, dry place (20°C (68°F) or lower). Extra Batteries • Taking along on a trip, check with travel agent about the power supply requirements...


