Owners Manual
Page 3
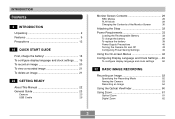
...the battery 39 Power Supply Precautions 40 Turning the Camera On and Off 43 Configuring Power Saving Settings 45 Using the On-screen Menus 46 Configuring Display Language and Clock Settings ... 49 To configure display language and clock settings 50 52 BASIC IMAGE RECORDING... Recording an Image 52 Specifying the Recording Mode 52 Aiming the Camera 53 Recording an Image 54 Using the Optical Viewfinder 60 Using Zoom 61 Optical Zoom 61 Digital Zoom ...
...the battery 39 Power Supply Precautions 40 Turning the Camera On and Off 43 Configuring Power Saving Settings 45 Using the On-screen Menus 46 Configuring Display Language and Clock Settings ... 49 To configure display language and clock settings 50 52 BASIC IMAGE RECORDING... Recording an Image 52 Specifying the Recording Mode 52 Aiming the Camera 53 Recording an Image 54 Using the Optical Viewfinder 60 Using Zoom 61 Optical Zoom 61 Digital Zoom ...

Owners Manual
Page 4
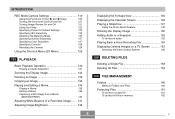
... Manually 86 Using the Manual Exposure mode 87 Using a Continuous Shutter Mode 89 Using the Normal Continuous Shutter Mode 90 Using the Zoom Continuous Shutter Mode 91 25-shot Stop Action Images (Using the Multi Continuous Shutter Mode) 92 Continuous Shutter Precautions 93 Using the ...Recording a Short Movie (Short Movie Mode) 106 Recording Past Action (Past Movie Mode) 108 Instant Movie Setups (MOVIE BEST SHOT Mode 110 Displaying All of the MOVIE BEST SHOT Sample Scenes on a Single Screen 111 Creating Your Own MOVIE BEST SHOT Setup 112 Recording Audio 114 Adding ...
... Manually 86 Using the Manual Exposure mode 87 Using a Continuous Shutter Mode 89 Using the Normal Continuous Shutter Mode 90 Using the Zoom Continuous Shutter Mode 91 25-shot Stop Action Images (Using the Multi Continuous Shutter Mode) 92 Continuous Shutter Precautions 93 Using the ...Recording a Short Movie (Short Movie Mode) 106 Recording Past Action (Past Movie Mode) 108 Instant Movie Setups (MOVIE BEST SHOT Mode 110 Displaying All of the MOVIE BEST SHOT Sample Scenes on a Single Screen 111 Creating Your Own MOVIE BEST SHOT Setup 112 Recording Audio 114 Adding ...
Owners Manual
Page 5
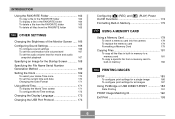
...126 Specifying Outline Sharpness 127 Specifying Color Saturation 127 Specifying Contrast 128 Resetting the Camera 128 Using the Shortcut Menu (EX Menu 129 130 PLAYBACK Basic Playback Operation 130 Playing an Audio Snapshot 131 Zooming the Display Image 132 Resizing an Image 133 Cropping an Image 134 Playing and Editing a... 150 Adding Audio to a Snapshot 152 To re-record audio 153 Playing Back a Voice Recording File 154 Displaying Camera Images on a TV Screen 155 Selecting the Video Output System 156 158 DELETING FILES Deleting a Single File 158 Deleting All ...
...126 Specifying Outline Sharpness 127 Specifying Color Saturation 127 Specifying Contrast 128 Resetting the Camera 128 Using the Shortcut Menu (EX Menu 129 130 PLAYBACK Basic Playback Operation 130 Playing an Audio Snapshot 131 Zooming the Display Image 132 Resizing an Image 133 Cropping an Image 134 Playing and Editing a... 150 Adding Audio to a Snapshot 152 To re-record audio 153 Playing Back a Voice Recording File 154 Displaying Camera Images on a TV Screen 155 Selecting the Video Output System 156 158 DELETING FILES Deleting a Single File 158 Deleting All ...
Owners Manual
Page 6
... 170 To set the current time and date 170 Changing the Date Format 171 Using World Time 171 To display the World Time screen 171 To configure World Time settings 172 Changing the Display Language 173 Changing the USB Port Protocol 173 Configuring [ ] (REC) and [ ] (PLAY) Power... On/Off Functions 174 Formatting Built-in Memory 175 177 USING A MEMORY CARD Using a Memory Card 178 To insert a memory card into the camera 178 To replace the ...
... 170 To set the current time and date 170 Changing the Date Format 171 Using World Time 171 To display the World Time screen 171 To configure World Time settings 172 Changing the Display Language 173 Changing the USB Port Protocol 173 Configuring [ ] (REC) and [ ] (PLAY) Power... On/Off Functions 174 Formatting Built-in Memory 175 177 USING A MEMORY CARD Using a Memory Card 178 To insert a memory card into the camera 178 To replace the ...

Owners Manual
Page 7
... 208 Memory Folder Structure 209 Image Files Supported by the Camera 210 212 USING THE CAMERA WITH A COMPUTER Using the Camera with a Windows Computer ......... 212 About the bundled CD-ROM... User Documentation (PDF Files) 225 User Registration 226 Exiting the Menu Application 226 Using the Camera with a Macintosh Computer ....... 227 About the bundled CD-ROM 227 Computer System Requirements 228 ...229 Viewing User Documentation (PDF Files) 230 To register as a camera user 230 231 APPENDIX Menu Reference 231 Indicator Lamp Reference 234 Troubleshooting Guide 237 If...
... 208 Memory Folder Structure 209 Image Files Supported by the Camera 210 212 USING THE CAMERA WITH A COMPUTER Using the Camera with a Windows Computer ......... 212 About the bundled CD-ROM... User Documentation (PDF Files) 225 User Registration 226 Exiting the Menu Application 226 Using the Camera with a Macintosh Computer ....... 227 About the bundled CD-ROM 227 Computer System Requirements 228 ...229 Viewing User Documentation (PDF Files) 230 To register as a camera user 230 231 APPENDIX Menu Reference 231 Indicator Lamp Reference 234 Troubleshooting Guide 237 If...

Owners Manual
Page 9
...99%. This means that provides a pixel yield of very highresolution for crisp, clear, prints and display images. • 2.5-inch TFT color LCD monitor screen • 8.3MB flash memory Images can be used to charge the camera's battery (page 34), to view images on ). Distribution to use. • AF assist ...bundled USB cradle can be recorded without permission of the total pixels are defective (they do not turn on the camera and enter the mode you view images while the camera is a product of the latest LCD manufacturing technology that less than 0.01% of the copyright holder, whether ...
...99%. This means that provides a pixel yield of very highresolution for crisp, clear, prints and display images. • 2.5-inch TFT color LCD monitor screen • 8.3MB flash memory Images can be used to charge the camera's battery (page 34), to view images on ). Distribution to use. • AF assist ...bundled USB cradle can be recorded without permission of the total pixels are defective (they do not turn on the camera and enter the mode you view images while the camera is a product of the latest LCD manufacturing technology that less than 0.01% of the copyright holder, whether ...
Owners Manual
Page 11
... for SD memory cards and MMC (MultiMedia Cards) for memory expansion (page 177) • Digital Print Order Format (DPOF) (page 185) Images can print images without going through a computer... which makes shooting under difficult lighting conditions easier than ever before. • EX Menu (page 129) EX Menu gives you short-cut menu access to four frequently-used when specifying images...of images after they are recorded. • Calendar screen (page 146) A simple operation displays a full-month calendar on the camera, press the shutter button half-way or all the way, or perform a key operation...
... for SD memory cards and MMC (MultiMedia Cards) for memory expansion (page 177) • Digital Print Order Format (DPOF) (page 185) Images can print images without going through a computer... which makes shooting under difficult lighting conditions easier than ever before. • EX Menu (page 129) EX Menu gives you short-cut menu access to four frequently-used when specifying images...of images after they are recorded. • Calendar screen (page 146) A simple operation displays a full-month calendar on the camera, press the shutter button half-way or all the way, or perform a key operation...

Owners Manual
Page 13
... get wet. Never attempt your nearest CASIO authorized service center for repair. Never use the camera outdoors in the rain or snow, at the seashore or beach, in display while operating a motor vehicle or while walking. When using the EX-Z750. INTRODUCTION Precautions I General Precautions Be ...Never fire the flash in this camera. Next, remove the camera's battery and/or unplug the AC adaptor power cord from the camera, take pictures or use the AC adaptor to power any other device besides this manual to "camera" refer to the CASIO EX-Z750 Digital Camera. • Never try to ...
... get wet. Never attempt your nearest CASIO authorized service center for repair. Never use the camera outdoors in the rain or snow, at the seashore or beach, in display while operating a motor vehicle or while walking. When using the EX-Z750. INTRODUCTION Precautions I General Precautions Be ...Never fire the flash in this camera. Next, remove the camera's battery and/or unplug the AC adaptor power cord from the camera, take pictures or use the AC adaptor to power any other device besides this manual to "camera" refer to the CASIO EX-Z750 Digital Camera. • Never try to ...
Owners Manual
Page 19
... [̄] to select the language you want , and then press [SET]. [̈] 7. QUICK START GUIDE To configure display language and clock settings • Be sure to configure the following settings before using the camera to register the clock settings and exit the setting screen. 19 Use and [̈] to select the date...
... [̄] to select the language you want , and then press [SET]. [̈] 7. QUICK START GUIDE To configure display language and clock settings • Be sure to configure the following settings before using the camera to register the clock settings and exit the setting screen. 19 Use and [̈] to select the date...

Owners Manual
Page 21
QUICK START GUIDE To view a recorded image To delete an image See page 130 for details. 1 1 See page 158 for details. 2 1. Use [̇] and [̈] to select "Delete". • To exit the image delete operation without deleting anything, select "Cancel". 5. Press [ ] (PLAY). 2. Use [̆] and [̄] to scroll through the images. 2, 3, 4, 5 1. Press [ ] (PLAY). • This enters the PLAY (playback) mode. 2. Use [̇] and [̈] to display the image you want to delete the image. 21 Press [SET] to delete. 4. Press [̄] ( ). 3.
QUICK START GUIDE To view a recorded image To delete an image See page 130 for details. 1 1 See page 158 for details. 2 1. Use [̇] and [̈] to select "Delete". • To exit the image delete operation without deleting anything, select "Cancel". 5. Press [ ] (PLAY). 2. Use [̆] and [̄] to scroll through the images. 2, 3, 4, 5 1. Press [ ] (PLAY). • This enters the PLAY (playback) mode. 2. Use [̇] and [̈] to display the image you want to delete the image. 21 Press [SET] to delete. 4. Press [̄] ( ). 3.

Owners Manual
Page 28
... 28 EV shift 4 Manual focus (MF) setting (page 80) Use this item to select the exposure mode. • The exposure mode is displayed in the exposure panel when the mode dial is set to "M" (manual exposure). Note that the current REC mode determines which items appear. 1 Exposure... mode (pages 56, 87) Use this item for adjust focus manually. • The manual focus setting item is displayed in the lower right corner of the REC modes monitor screen that appear on the monitor screen) using [̆] ( ). GETTING READY I Exposure Panel...
... 28 EV shift 4 Manual focus (MF) setting (page 80) Use this item to select the exposure mode. • The exposure mode is displayed in the exposure panel when the mode dial is set to "M" (manual exposure). Note that the current REC mode determines which items appear. 1 Exposure... mode (pages 56, 87) Use this item for adjust focus manually. • The manual focus setting item is displayed in the lower right corner of the REC modes monitor screen that appear on the monitor screen) using [̆] ( ). GETTING READY I Exposure Panel...
Owners Manual
Page 30
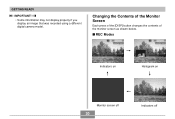
I REC Modes Indicators on Histogram on Monitor screen off 30 Indicators off GETTING READY IMPORTANT! • Some information may not display properly if you display an image that was recorded using a different digital camera model. Changing the Contents of the Monitor Screen Each press of the [DISP] button changes the contents of the monitor screen as shown below.
I REC Modes Indicators on Histogram on Monitor screen off 30 Indicators off GETTING READY IMPORTANT! • Some information may not display properly if you display an image that was recorded using a different digital camera model. Changing the Contents of the Monitor Screen Each press of the [DISP] button changes the contents of the monitor screen as shown below.

Owners Manual
Page 31
While a Voice Recording file is displayed in the PLAY mode, pressing [DISP] toggles between "indicators on" and "indicators off". • When playing back the content of an audio snapshot. • Pressing [...
While a Voice Recording file is displayed in the PLAY mode, pressing [DISP] toggles between "indicators on" and "indicators off". • When playing back the content of an audio snapshot. • Pressing [...

Owners Manual
Page 46
The following cases. - While playing back a voice recording file - During Past Movie standby Using the On-screen Menus Pressing [MENU] displays menus on the monitor screen that appears depends on whether you are disabled in the following shows an example menu procedure in progress - Power button [ ][ ] ... you can use to a computer or some other device through the USB cradle - During Short Movie standby - While a slideshow is in a REC mode. 1. When the camera is being recorded -
The following cases. - While playing back a voice recording file - During Past Movie standby Using the On-screen Menus Pressing [MENU] displays menus on the monitor screen that appears depends on whether you are disabled in the following shows an example menu procedure in progress - Power button [ ][ ] ... you can use to a computer or some other device through the USB cradle - During Short Movie standby - While a slideshow is in a REC mode. 1. When the camera is being recorded -

Owners Manual
Page 47
... want to do this: Move between tabs Move from the tab to the settings Move from the settings to the tab Move between the settings Display the options available for a setting Select an option Apply the setting and exit the menu screen Apply the setting and return to tab selection Exit...
... want to do this: Move between tabs Move from the tab to the settings Move from the settings to the tab Move between the settings Display the options available for a setting Select an option Apply the setting and exit the menu screen Apply the setting and return to tab selection Exit...
Owners Manual
Page 49
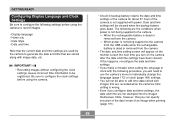
... data stored with images that are recorded while the camera's time setting is dead or removed from the camera - GETTING READY Configuring Display Language and Clock Settings Be sure to configure the following settings before using the camera to record images. • Display language • Home city • Date Style... • Date and time Note that the current date and time settings are used by the camera to generate the date and time that are ...
... data stored with images that are recorded while the camera's time setting is dead or removed from the camera - GETTING READY Configuring Display Language and Clock Settings Be sure to configure the following settings before using the camera to record images. • Display language • Home city • Date Style... • Date and time Note that the current date and time settings are used by the camera to generate the date and time that are ...

Owners Manual
Page 50
... , and then press [SET]. Use and [̈] to select the name of the city where you live , and then press [SET]. 4. GETTING READY To configure display language and clock settings 1. Press the power button, [ ] (REC) or [ ] (PLAY) to select the summer time (DST) setting you live , and then press [SET]. 5. Use...
... , and then press [SET]. Use and [̈] to select the name of the city where you live , and then press [SET]. 4. GETTING READY To configure display language and clock settings 1. Press the power button, [ ] (REC) or [ ] (PLAY) to select the summer time (DST) setting you live , and then press [SET]. 5. Use...

Owners Manual
Page 51
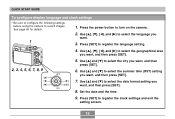
Press [̇] and [̈]. Example: December 24, 2005 To display the date like this: 05/12/24 24/12/05 12/24/05 Select this : Press [̆] and [̄]. Set the current date and the time. Press [SET] to select the date format setting you want, and then press [SET]. To do this: Change the setting at the current cursor location Move the cursor between settings Toggle between 12-hour and 24hour timekeeping Do this format: YY/MM/DD DD/MM/YY MM/DD/YY 7. Use [̆] and [̄] to register the settings and exit the setting screen. 51 Press [DISP]. 8. GETTING READY 6.
Press [̇] and [̈]. Example: December 24, 2005 To display the date like this: 05/12/24 24/12/05 12/24/05 Select this : Press [̆] and [̄]. Set the current date and the time. Press [SET] to select the date format setting you want, and then press [SET]. To do this: Change the setting at the current cursor location Move the cursor between settings Toggle between 12-hour and 24hour timekeeping Do this format: YY/MM/DD DD/MM/YY MM/DD/YY 7. Use [̆] and [̄] to register the settings and exit the setting screen. 51 Press [DISP]. 8. GETTING READY 6.

Owners Manual
Page 53
... 110). • (Movie mode) Use this mode for general movie recording (page 105). BASIC IMAGE RECORDING • (MOVIE BEST SHOT mode) This mode makes camera setup as easy as selecting the applicable sample scene. Snapshot mode icon 10 1600 1200N 05/ 12 /24 12 : 58 Aiming the...hands. 53 Holding the camera with one of the MOVIE BEST SHOT scenes and the camera automatically configures itself with the setup for the Snapshot mode) is above the lens. Select one hand increases the chance of the currently selected recording mode (like for that the flash is displayed on the monitor screen....
... 110). • (Movie mode) Use this mode for general movie recording (page 105). BASIC IMAGE RECORDING • (MOVIE BEST SHOT mode) This mode makes camera setup as easy as selecting the applicable sample scene. Snapshot mode icon 10 1600 1200N 05/ 12 /24 12 : 58 Aiming the...hands. 53 Holding the camera with one of the MOVIE BEST SHOT scenes and the camera automatically configures itself with the setup for the Snapshot mode) is above the lens. Select one hand increases the chance of the currently selected recording mode (like for that the flash is displayed on the monitor screen....

Owners Manual
Page 55
... in memory yet. Compose the image on the monitor screen so the main subject is within the focus frame. • The focusing range of the display. Snapshot mode icon 10 1600 1200N 05/ 12 /24 12 : 58 Focus frame 3. Align the mode dial with " " (Snapshot mode) (page 52). •... viewfinder to compose images, you press the shutter button half way, the camera's Auto Focus feature automatically focuses the image, and displays the shutter speed and aperture values. will be visible at the top of the camera depends on the monitor screen while the Snapshot mode is focused by observing ...
... in memory yet. Compose the image on the monitor screen so the main subject is within the focus frame. • The focusing range of the display. Snapshot mode icon 10 1600 1200N 05/ 12 /24 12 : 58 Focus frame 3. Align the mode dial with " " (Snapshot mode) (page 52). •... viewfinder to compose images, you press the shutter button half way, the camera's Auto Focus feature automatically focuses the image, and displays the shutter speed and aperture values. will be visible at the top of the camera depends on the monitor screen while the Snapshot mode is focused by observing ...


