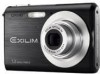
Owners Manual
Page 3
... ..... 18 To record an image 19 To view a recorded image 20 To delete an image 20 21 GETTING READY About This Manual 21 General Guide 22 Camera 22 Lithium Ion Battery Charger 24 Monitor Screen Contents 25 REC Mode 25 PLAY Mode 27 Changing the Contents of the Monitor Screen...To charge the battery 31 To load the battery 34 Low Battery Indicator 36 To replace the battery 37 Power Supply Precautions 38 Turning the Camera On and Off 41 Configuring Power Saving Settings 42 Using the On-screen Menus 44 Configuring Display Language and Clock Settings ... 46 To ...
... ..... 18 To record an image 19 To view a recorded image 20 To delete an image 20 21 GETTING READY About This Manual 21 General Guide 22 Camera 22 Lithium Ion Battery Charger 24 Monitor Screen Contents 25 REC Mode 25 PLAY Mode 27 Changing the Contents of the Monitor Screen...To charge the battery 31 To load the battery 34 Low Battery Indicator 36 To replace the battery 37 Power Supply Precautions 38 Turning the Camera On and Off 41 Configuring Power Saving Settings 42 Using the On-screen Menus 44 Configuring Display Language and Clock Settings ... 46 To ...

Owners Manual
Page 4
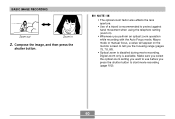
INTRODUCTION 50 BASIC IMAGE RECORDING Recording an Image 50 Aiming the Camera 50 Recording an Image 51 Using the easy Mode 55 Recording Precautions 57 Using Zoom 59 Optical Zoom 59 Digital Zoom 61 Using the Flash 63 Flash Unit Status 65 Changing the Flash Intensity Setting 66 Using Flash Assist 66 Using ...the Focus Mode 74 Using Auto Focus 75 Using the Macro Mode 78 Using Pan Focus 79 Using the Infinity Mode 79 Using Manual Focus 80 Using Focus Lock 81 Exposure Compensation (EV Shift 82 Adjusting White Balance 84 Configuring the White Balance Setting...
INTRODUCTION 50 BASIC IMAGE RECORDING Recording an Image 50 Aiming the Camera 50 Recording an Image 51 Using the easy Mode 55 Recording Precautions 57 Using Zoom 59 Optical Zoom 59 Digital Zoom 61 Using the Flash 63 Flash Unit Status 65 Changing the Flash Intensity Setting 66 Using Flash Assist 66 Using ...the Focus Mode 74 Using Auto Focus 75 Using the Macro Mode 78 Using Pan Focus 79 Using the Infinity Mode 79 Using Manual Focus 80 Using Focus Lock 81 Exposure Compensation (EV Shift 82 Adjusting White Balance 84 Configuring the White Balance Setting...
Owners Manual
Page 8
...or any loss or claims by third parties which may differ somewhat by deletion of this manual are either registered trademarks or trademarks of Adobe Systems Incorporated in this manual. • CASIO COMPUTER CO., LTD. shall not be trademarks or service marks of others. • ...any damage or loss resulting from the use of the EX-Z70. • CASIO COMPUTER CO., LTD. Except as a result of CASIO COMPUTER CO., LTD. assumes no responsibility for any damage or loss caused by the screens and configuration of the actual camera. • The SD logo is a registered trademark...
...or any loss or claims by third parties which may differ somewhat by deletion of this manual are either registered trademarks or trademarks of Adobe Systems Incorporated in this manual. • CASIO COMPUTER CO., LTD. shall not be trademarks or service marks of others. • ...any damage or loss resulting from the use of the EX-Z70. • CASIO COMPUTER CO., LTD. Except as a result of CASIO COMPUTER CO., LTD. assumes no responsibility for any damage or loss caused by the screens and configuration of the actual camera. • The SD logo is a registered trademark...

Owners Manual
Page 12
... your own repairs. If swallowed accidentally, contact your PC. Always leave maintenance and repair work up to a CASIO authorized service center. • Keep the small parts and accessories of this manual to "camera" refer to the CASIO EX-Z70 Digital Camera. • Never try to take pictures or use the built-in display while operating a motor vehicle or...
... your own repairs. If swallowed accidentally, contact your PC. Always leave maintenance and repair work up to a CASIO authorized service center. • Keep the small parts and accessories of this manual to "camera" refer to the CASIO EX-Z70 Digital Camera. • Never try to take pictures or use the built-in display while operating a motor vehicle or...
Owners Manual
Page 21
This term as used in this manual: "camera" "file memory" "battery" "digital noise" Means this: The CASIO EX-Z70 Digital Camera The location where the camera is currently storing images you need to know in order to use the camera correctly. • NOTE indicates information that is always enclosed by the button name inside of brackets ([ ]). I Terminology The following table defines...
This term as used in this manual: "camera" "file memory" "battery" "digital noise" Means this: The CASIO EX-Z70 Digital Camera The location where the camera is currently storing images you need to know in order to use the camera correctly. • NOTE indicates information that is always enclosed by the button name inside of brackets ([ ]). I Terminology The following table defines...
Owners Manual
Page 22
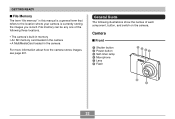
... images, see page 201. General Guide The following three locations. • The camera's built-in memory • An SD memory card loaded in the camera • A MultiMediaCard loaded in this manual is a general term that refers to the location where your camera is currently storing the images you record. GETTING READY I Front 1 Shutter button...
... images, see page 201. General Guide The following three locations. • The camera's built-in memory • An SD memory card loaded in the camera • A MultiMediaCard loaded in this manual is a general term that refers to the location where your camera is currently storing the images you record. GETTING READY I Front 1 Shutter button...
Owners Manual
Page 25
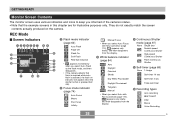
...eye reduction • appears momentarily when you select Auto Flash as the flash mode, and then disappears. • If the camera detects that the example screens in this chapter are for illustrative purposes only. GETTING READY Monitor Screen Contents The monitor screen uses ..., and then disappears from the display. 3 White balance indicator (page 84) AWB Auto Daylight Overcast Shade Day White Fluorescent Daylight Fluorescent Tungsten Manual • When you select Auto with Key Customize (page 112), AWB appears only briefly, and then disappears from the display. 4 Continuous ...
...eye reduction • appears momentarily when you select Auto Flash as the flash mode, and then disappears. • If the camera detects that the example screens in this chapter are for illustrative purposes only. GETTING READY Monitor Screen Contents The monitor screen uses ..., and then disappears from the display. 3 White balance indicator (page 84) AWB Auto Daylight Overcast Shade Day White Fluorescent Daylight Fluorescent Tungsten Manual • When you select Auto with Key Customize (page 112), AWB appears only briefly, and then disappears from the display. 4 Continuous ...

Owners Manual
Page 28
... 84) AWB Auto Daylight Overcast 6 ISO sensitivity (page 117) 7 Aperture value (page 53) Shade Day White Fluorescent Daylight Fluorescent 8 Shutter speed value (page 53) Tungsten Manual 9 Date and time (page 166) B Flash mode indicator (page 63) 0 Metering mode indicator (page 118) Multi Center Weighted Spot Flash On Flash Off Soft Flash...) E Histogram (page 109) F EV value (page 82) IMPORTANT! • Some information may not display properly if you display an image that was recorded using a different digital camera model. 28 B
... 84) AWB Auto Daylight Overcast 6 ISO sensitivity (page 117) 7 Aperture value (page 53) Shade Day White Fluorescent Daylight Fluorescent 8 Shutter speed value (page 53) Tungsten Manual 9 Date and time (page 166) B Flash mode indicator (page 63) 0 Metering mode indicator (page 118) Multi Center Weighted Spot Flash On Flash Off Soft Flash...) E Histogram (page 109) F EV value (page 82) IMPORTANT! • Some information may not display properly if you display an image that was recorded using a different digital camera model. 28 B
Owners Manual
Page 38
...of overheating, fire, and explosion. - Do not immerse the battery in this camera. - Never try to observe any way, or expose it to high temperatures. 38 Do not use any device other than this manual refers to read the following precautions when handling or using the battery and the... heat. - NOTE • The term "battery" in fresh water or salt water. - I Battery Handling Precautions G SAFETY PRECAUTIONS Be sure to the CASIO NP-20 Rechargeable Lithium Ion Battery. • Use only the battery charger (BC-11L) that can conduct electricity (necklaces, pencil lead, etc.) -
...of overheating, fire, and explosion. - Do not immerse the battery in this camera. - Never try to observe any way, or expose it to high temperatures. 38 Do not use any device other than this manual refers to read the following precautions when handling or using the battery and the... heat. - NOTE • The term "battery" in fresh water or salt water. - I Battery Handling Precautions G SAFETY PRECAUTIONS Be sure to the CASIO NP-20 Rechargeable Lithium Ion Battery. • Use only the battery charger (BC-11L) that can conduct electricity (necklaces, pencil lead, etc.) -
Owners Manual
Page 58
... the resulting image will be difficult or even impossible when shooting the following types of subjects. - This tends to shade the lens from the camera - To protect against this, use your free hand to happen when recording images outdoors in bright sunlight. Strongly backlit subjects - Very shiny objects...produce the results you want for some reason, try using focus lock (page 81) or manual focus (page 80). 58 I About Auto Focus • Proper focus may also be difficult or impossible if the camera is moving. • Note that a green operation lamp and focus frame do not necessarily...
... the resulting image will be difficult or even impossible when shooting the following types of subjects. - This tends to shade the lens from the camera - To protect against this, use your free hand to happen when recording images outdoors in bright sunlight. Strongly backlit subjects - Very shiny objects...produce the results you want for some reason, try using focus lock (page 81) or manual focus (page 80). 58 I About Auto Focus • Proper focus may also be difficult or impossible if the camera is moving. • Note that a green operation lamp and focus frame do not necessarily...
Owners Manual
Page 60
...• Use of a tripod is recommended to protect against hand movement when using the telephoto setting (zoom in 2. Digital zoom only is disabled during movie recording. Make sure you select the optical zoom setting you want to use before you the focusing range (pages 75, 78, 80). • ...Optical zoom is available. BASIC IMAGE RECORDING Zoom out Zoom in ). • Whenever you perform an optical zoom operation while recording with the Auto Focus mode, Macro mode or manual focus, a value will appear on the monitor screen to tell you...
...• Use of a tripod is recommended to protect against hand movement when using the telephoto setting (zoom in 2. Digital zoom only is disabled during movie recording. Make sure you select the optical zoom setting you want to use before you the focusing range (pages 75, 78, 80). • ...Optical zoom is available. BASIC IMAGE RECORDING Zoom out Zoom in ). • Whenever you perform an optical zoom operation while recording with the Auto Focus mode, Macro mode or manual focus, a value will appear on the monitor screen to tell you...

Owners Manual
Page 74
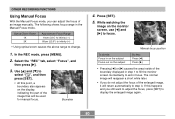
... [̆] and [̄] to appear on a certain subject distance Infinity recording Manual focus recording Select this : Adjusts focus automatically • Auto Focus cannot be ...press [̈]. 3. In the REC mode, press [MENU]. 2. Close-up ) (Pan Focus) (Infinity) (Manual Focus) IMPORTANT! • You can select one of five different focus modes: Auto Focus, Macro, Pan Focus, Infinity, and... Manual Focus. • This causes the focus mode indicator to select the setting you press [̇] or...
... [̆] and [̄] to appear on a certain subject distance Infinity recording Manual focus recording Select this : Adjusts focus automatically • Auto Focus cannot be ...press [̈]. 3. In the REC mode, press [MENU]. 2. Close-up ) (Pan Focus) (Infinity) (Manual Focus) IMPORTANT! • You can select one of five different focus modes: Auto Focus, Macro, Pan Focus, Infinity, and... Manual Focus. • This causes the focus mode indicator to select the setting you press [̇] or...
Owners Manual
Page 80
... 1X 3X Approximate Focus Range 10cm (3.9˝) to infinity (∞) 60cm (23.6˝) to infinity (∞) • Using optical zoom causes the above range to display the enlarged image again. 80 In the REC mode, press [MENU]. 2. Use [̆] and [̄] to select " ", and then ... [SET]. • At this : Press [̇]. While watching the image on the display, indicating the part of the image that will be used for manual focus. Manual focus position To do not adjust the focus of the enlarged image, it will return automatically to step 3. The normal image will reappear a short while...
... 1X 3X Approximate Focus Range 10cm (3.9˝) to infinity (∞) 60cm (23.6˝) to infinity (∞) • Using optical zoom causes the above range to display the enlarged image again. 80 In the REC mode, press [MENU]. 2. Use [̆] and [̄] to select " ", and then ... [SET]. • At this : Press [̇]. While watching the image on the display, indicating the part of the image that will be used for manual focus. Manual focus position To do not adjust the focus of the enlarged image, it will return automatically to step 3. The normal image will reappear a short while...
Owners Manual
Page 81
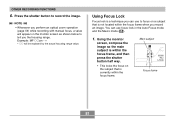
... is not located within the focus frame when you the focusing range. OTHER RECORDING FUNCTIONS 6. NOTE • Whenever you perform an optical zoom operation (page 59) while recording with manual focus, a value will be replaced by the actual focusing range value. Example: MF ȚȚcm will appear on the subject that...
... is not located within the focus frame when you the focusing range. OTHER RECORDING FUNCTIONS 6. NOTE • Whenever you perform an optical zoom operation (page 59) while recording with manual focus, a value will be replaced by the actual focusing range value. Example: MF ȚȚcm will appear on the subject that...

Owners Manual
Page 82
.... In the REC mode, press [MENU]. 2. Keeping the shutter button pressed half way down, recompose the image as you change the exposure setting (EV value) manually to adjust for the lighting of the way to record it. • The focus and image recording operations are identical to +2.0EV Steps: 1/3EV 1. OTHER...
.... In the REC mode, press [MENU]. 2. Keeping the shutter button pressed half way down, recompose the image as you change the exposure setting (EV value) manually to adjust for the lighting of the way to record it. • The focus and image recording operations are identical to +2.0EV Steps: 1/3EV 1. OTHER...
Owners Manual
Page 84
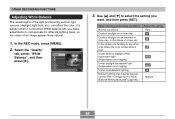
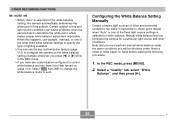
... fluorescent light (suppresses color fogging) Under daylight fluorescent light (suppresses color fogging) Under incandescent lighting Difficult lighting that requires manual control (See "Configuring the White Balance Setting Manually" (page 85).) Select this setting: Auto N D Manual 84 Select the "Quality" tab, select "White Balance", and then press [̈]. 3. In the REC mode, press [MENU...
... fluorescent light (suppresses color fogging) Under daylight fluorescent light (suppresses color fogging) Under incandescent lighting Difficult lighting that requires manual control (See "Configuring the White Balance Setting Manually" (page 85).) Select this setting: Auto N D Manual 84 Select the "Quality" tab, select "White Balance", and then press [̈]. 3. In the REC mode, press [MENU...
Owners Manual
Page 85
... of the subject. Select a "Quality" tab, select "White Balance", and then press [̈]. 85 B Manual white balance lets you will be shooting under the same conditions you configure the camera for a particular light source and other environmental conditions can cause problems when the... camera tries to auto. Configuring the White Balance Setting Manually Certain complex light sources or other conditions. In the REC ...
... of the subject. Select a "Quality" tab, select "White Balance", and then press [̈]. 85 B Manual white balance lets you will be shooting under the same conditions you configure the camera for a particular light source and other environmental conditions can cause problems when the... camera tries to auto. Configuring the White Balance Setting Manually Certain complex light sources or other conditions. In the REC ...
Owners Manual
Page 86
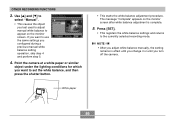
... setting remains in effect until you change it or until you configured during a previous manual white balance setting operation, skip step 4 and perform step 5. 4. If you last used to adjust manual white balance to set the white balance, and then press the shutter button. • This starts..." appears on the monitor screen. Use [̆] and [̄] to select "Manual". • This causes the object you want to appear on the monitor screen after white balance adjustment is complete. 5. Point the camera at a white paper or similar object under the lighting conditions for which you want...
... setting remains in effect until you change it or until you configured during a previous manual white balance setting operation, skip step 4 and perform step 5. 4. If you last used to adjust manual white balance to set the white balance, and then press the shutter button. • This starts..." appears on the monitor screen. Use [̆] and [̄] to select "Manual". • This causes the object you want to appear on the monitor screen after white balance adjustment is complete. 5. Point the camera at a white paper or similar object under the lighting conditions for which you want...
Owners Manual
Page 115
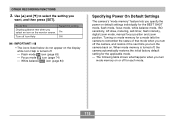
...(page 74) - Turning on mode memory for each mode. 115 White balance AWB icon (page 84) Specifying Power On Default Settings The camera's "mode memory" feature lets you want, and then press [SET]. The following table shows what happens when you turn mode memory on or... mode memory is turned off , the camera automatically restores the initial factory default setting for the BEST SHOT mode, flash mode, focus mode, white balance mode, ISO sensitivity, AF Area, metering, self-timer, flash intensity, digital zoom mode, manual focus position and zoom position. To do this setting: On ...
...(page 74) - Turning on mode memory for each mode. 115 White balance AWB icon (page 84) Specifying Power On Default Settings The camera's "mode memory" feature lets you want, and then press [SET]. The following table shows what happens when you turn mode memory on or... mode memory is turned off , the camera automatically restores the initial factory default setting for the BEST SHOT mode, flash mode, focus mode, white balance mode, ISO sensitivity, AF Area, metering, self-timer, flash intensity, digital zoom mode, manual focus position and zoom position. To do this setting: On ...
Owners Manual
Page 116
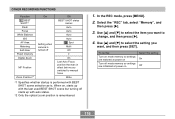
... SHOT*1 Flash Focus White Balance ISO AF Area Metering Self-timer Flash Intensity Digital Zoom On Setting when camera is turned off starts up with the last used BEST SHOT scene but turning off MF Position Zoom Position*2 Off BEST SHOT status cancel Auto Auto Auto Auto Spot Multi Off ...0 On Last Auto Focus position that was in effect before you want to select the setting you switched to manual focus Wide *1 Specifies whether startup is performed with auto status. *2 Only the optical zoom position is . Select the "REC" tab, select "Memory", and then press [̈]. 3. In the REC...
... SHOT*1 Flash Focus White Balance ISO AF Area Metering Self-timer Flash Intensity Digital Zoom On Setting when camera is turned off starts up with the last used BEST SHOT scene but turning off MF Position Zoom Position*2 Off BEST SHOT status cancel Auto Auto Auto Auto Spot Multi Off ...0 On Last Auto Focus position that was in effect before you want to select the setting you switched to manual focus Wide *1 Specifies whether startup is performed with auto status. *2 Only the optical zoom position is . Select the "REC" tab, select "Memory", and then press [̈]. 3. In the REC...

