
Owners Manual
Page 12
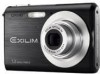
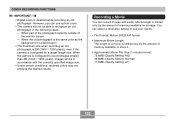
... easy. All references in this camera out of the reach of accident. 12 Always leave maintenance and repair work up to a CASIO authorized service center. • Keep the small parts and accessories of this manual to "camera" refer to the CASIO EX-Z70 Digital Camera. • Never try to... open the case of the camera or attempt your physician immediately. • Never fire...
... easy. All references in this camera out of the reach of accident. 12 Always leave maintenance and repair work up to a CASIO authorized service center. • Keep the small parts and accessories of this manual to "camera" refer to the CASIO EX-Z70 Digital Camera. • Never try to... open the case of the camera or attempt your physician immediately. • Never fire...
Owners Manual
Page 37
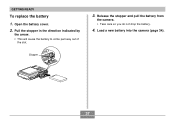
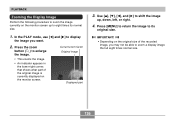
Release the stopper and pull the battery from the camera. • Take care so you do not drop the battery. 4. Load a new battery into the camera (page 34). 37 Open the battery cover. 2. Pull the stopper in the direction indicated by the arrow. • This will cause the battery to come part way out of the slot. Stopper 3. GETTING READY To replace the battery 1.
Release the stopper and pull the battery from the camera. • Take care so you do not drop the battery. 4. Load a new battery into the camera (page 34). 37 Open the battery cover. 2. Pull the stopper in the direction indicated by the arrow. • This will cause the battery to come part way out of the slot. Stopper 3. GETTING READY To replace the battery 1.

Owners Manual
Page 61
... image using digital zoom 1. Optical Zoom range Digital Zoom range 1X 3X 12X Zoom pointer Optical/digital zoom switch over point, it will stop. Digital zoom indicator Zoom indicator 2. In the REC mode, hold down the telephoto ( ) side of the zoom button. • This causes the zoom indicator to enlarge the center of the image screen. BASIC IMAGE RECORDING Digital Zoom Digital zoom digitally enlarges the part of the...
... image using digital zoom 1. Optical Zoom range Digital Zoom range 1X 3X 12X Zoom pointer Optical/digital zoom switch over point, it will stop. Digital zoom indicator Zoom indicator 2. In the REC mode, hold down the telephoto ( ) side of the zoom button. • This causes the zoom indicator to enlarge the center of the image screen. BASIC IMAGE RECORDING Digital Zoom Digital zoom digitally enlarges the part of the...
Owners Manual
Page 80
... the focus, press [SET] to display the enlarged image again. 80 Boundary 4. If this point, a boundary also appears on the display, indicating the part of the enlarged image, it will return automatically to step 3. The following shows focus range in the Manual Focus mode. Select the "REC" tab, select... out on the monitor screen, use [̇] and [̈] to change. 1. While watching the image on the subject Do this: Press [̇]. Optical Zoom Factor 1X 3X Approximate Focus Range 10cm (3.9˝) to infinity (∞) 60cm (23.6˝) to infinity (∞) • Using optical...
... the focus, press [SET] to display the enlarged image again. 80 Boundary 4. If this point, a boundary also appears on the display, indicating the part of the enlarged image, it will return automatically to step 3. The following shows focus range in the Manual Focus mode. Select the "REC" tab, select... out on the monitor screen, use [̇] and [̈] to change. 1. While watching the image on the subject Do this: Press [̇]. Optical Zoom Factor 1X 3X Approximate Focus Range 10cm (3.9˝) to infinity (∞) 60cm (23.6˝) to infinity (∞) • Using optical...
Owners Manual
Page 99
...digital camera technology. When the subject is the same color as -is portrait orientation, be able to select "Correct", and then press [SET]. • Selecting "Cancel" in the following cases. - Restoring an Old Photograph You can use the procedure in landscape (horizontal) orientation. 99 OTHER RECORDING FUNCTIONS 4. IMPORTANT! • Digital zoom... is configured for a larger image size. Use [̆] and [̄] to recognize the subject in place of the monitor screen - When part of the subject extends outside of "...
...digital camera technology. When the subject is the same color as -is portrait orientation, be able to select "Correct", and then press [SET]. • Selecting "Cancel" in the following cases. - Restoring an Old Photograph You can use the procedure in landscape (horizontal) orientation. 99 OTHER RECORDING FUNCTIONS 4. IMPORTANT! • Digital zoom... is configured for a larger image size. Use [̆] and [̄] to recognize the subject in place of the monitor screen - When part of the subject extends outside of "...
Owners Manual
Page 102
... currently specified image size. • Under certain conditions, restored colors may not produce the desired results. You can use optical zoom. • The camera will be able to suit your needs. • File Format: Motion JPEG AVI format • Maximum Movie Length: The ... Normal) 17.5MB (Quality Setting: LP) 102 When the camera is limited only by the amount of the monitor screen - OTHER RECORDING FUNCTIONS IMPORTANT! • Digital zoom is disabled while recording an old photograph. When part of the photograph extends outside of memory available to record images ...
... currently specified image size. • Under certain conditions, restored colors may not produce the desired results. You can use optical zoom. • The camera will be able to suit your needs. • File Format: Motion JPEG AVI format • Maximum Movie Length: The ... Normal) 17.5MB (Quality Setting: LP) 102 When the camera is limited only by the amount of the monitor screen - OTHER RECORDING FUNCTIONS IMPORTANT! • Digital zoom is disabled while recording an old photograph. When part of the photograph extends outside of memory available to record images ...

Owners Manual
Page 118
In the REC mode, press [MENU]. 2. Use [̆] and [̄] to change the camera's metering mode. 1. You can cause digital noise (graininess), which makes an image appear rough. For clean, good-quality images, use the key customization feature (page 112) to ...a nearby subject may result in combination with the flash to configure the camera so the ISO sensitivity setting changes whenever you want, and then press [SET]. 118 Selecting the Metering Mode The metering mode determines what part of the current ISO sensitivity setting. OTHER RECORDING FUNCTIONS IMPORTANT! •...
In the REC mode, press [MENU]. 2. Use [̆] and [̄] to change the camera's metering mode. 1. You can cause digital noise (graininess), which makes an image appear rough. For clean, good-quality images, use the key customization feature (page 112) to ...a nearby subject may result in combination with the flash to configure the camera so the ISO sensitivity setting changes whenever you want, and then press [SET]. 118 Selecting the Metering Mode The metering mode determines what part of the current ISO sensitivity setting. OTHER RECORDING FUNCTIONS IMPORTANT! •...
Owners Manual
Page 126
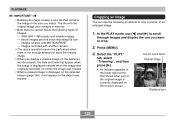
... lower right corner, that shows what part of the recorded image, you want. 2. Press [MENU] to return the image to its normal size. 1. In the PLAY mode, use [̇] and [̈] to display the image you may not be able to zoom a display image the full eight times...and [̈] to shift the image up to eight times its original size. PLAYBACK Zooming the Display Image Perform the following procedure to zoom the image currently on the monitor screen. Current zoom factor Original image Displayed part 3. IMPORTANT! • Depending on the original size of the original image is ...
... lower right corner, that shows what part of the recorded image, you want. 2. Press [MENU] to return the image to its normal size. 1. In the PLAY mode, use [̇] and [̈] to display the image you may not be able to zoom a display image the full eight times...and [̈] to shift the image up to eight times its original size. PLAYBACK Zooming the Display Image Perform the following procedure to zoom the image currently on the monitor screen. Current zoom factor Original image Displayed part 3. IMPORTANT! • Depending on the original size of the original image is ...
Owners Manual
Page 128
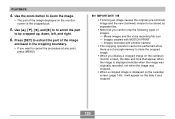
... when there is not enough memory to store the resized image. • When you display a resized image on the date it will appear on the camera's monitor screen, the date and time that you want to crop a portion of an enlarged image. 1. Press [MENU]. 3. Select the "PLAY" tab...), it was resized. In the PLAY mode, use the following types of images. - Current zoom factor Original image Displayed part 128 PLAYBACK IMPORTANT! • Resizing an image creates a new file that shows what part of the original image is currently displayed on the monitor screen. VGA (640 × 480 ...
... when there is not enough memory to store the resized image. • When you display a resized image on the date it will appear on the camera's monitor screen, the date and time that you want to crop a portion of an enlarged image. 1. Press [MENU]. 3. Select the "PLAY" tab...), it was resized. In the PLAY mode, use the following types of images. - Current zoom factor Original image Displayed part 128 PLAYBACK IMPORTANT! • Resizing an image creates a new file that shows what part of the original image is currently displayed on the monitor screen. VGA (640 × 480 ...
Owners Manual
Page 129
...Trimming an image causes the original (pre-trimmed) image and the new (trimmed) version to zoom the image. • The part of images. - Movie images and the voice recording file icon - Images created with another camera • The cropping operation cannot be cropped up, down, left, and right. 6. Press... [SET] to extract the part of the image enclosed in the cropping boundary. • If you cannot crop ...
...Trimming an image causes the original (pre-trimmed) image and the new (trimmed) version to zoom the image. • The part of images. - Movie images and the voice recording file icon - Images created with another camera • The cropping operation cannot be cropped up, down, left, and right. 6. Press... [SET] to extract the part of the image enclosed in the cropping boundary. • If you cannot crop ...
Owners Manual
Page 134
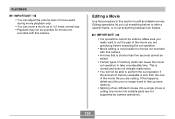
... a single movie or cutting one movie into multiple parts are specifying before or after a specific frame, or to cut operation if the amount of memory available is less than five seconds cannot be edited. • Certain types of memory cards can zoom a movie up to 3.5 times normal size. &#... does not indicate malfunction. • You will not be undone. Editing operations let you are not supported by camera operations. 134 Make sure you really want to cut the part of the movie you cut everything between two frames. PLAYBACK IMPORTANT! • You can adjust the volume level ...
... a single movie or cutting one movie into multiple parts are specifying before or after a specific frame, or to cut operation if the amount of memory available is less than five seconds cannot be edited. • Certain types of memory cards can zoom a movie up to 3.5 times normal size. &#... does not indicate malfunction. • You will not be undone. Editing operations let you are not supported by camera operations. 134 Make sure you really want to cut the part of the movie you cut everything between two frames. PLAYBACK IMPORTANT! • You can adjust the volume level ...
Owners Manual
Page 135
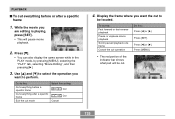
... where you want to perform. Use [̆] and [̄] to be cut. 135 Press [MENU]. • The red portion of the indicator bar shows what part will pause movie playback. 2. To do this: Fast forward or fast reverse playback Pause or unpause movie playback Scroll paused playback one frame Cancel the...
... where you want to perform. Use [̆] and [̄] to be cut. 135 Press [MENU]. • The red portion of the indicator bar shows what part will pause movie playback. 2. To do this: Fast forward or fast reverse playback Pause or unpause movie playback Scroll paused playback one frame Cancel the...
Owners Manual
Page 137
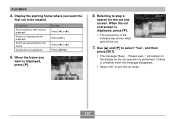
... want the first cut end screen. When the frame you want is displayed, press [̄]. • The red portion of the indicator bar shows what part will remain on the display as the cut mode. 137 To do this: Fast forward or fast reverse playback Pause or unpause movie playback Scroll...
... want the first cut end screen. When the frame you want is displayed, press [̄]. • The red portion of the indicator bar shows what part will remain on the display as the cut mode. 137 To do this: Fast forward or fast reverse playback Pause or unpause movie playback Scroll...
Owners Manual
Page 173
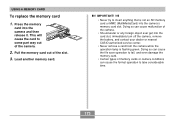
... • Certain types of memory cards or camera conditions can cause malfunction of the camera. • Should water or any foreign object ever get into the card slot, immediately turn off the camera, remove the battery, and contact your dealer or nearest CASIO authorized service center. • Never remove a... CARD To replace the memory card 1. Doing so can cause the format operation to come part way out of the slot. 3. Pull the memory card out of the camera. 2. Press the memory card into the camera's memory card slot. This will cause the card to take considerable time. 173
... • Certain types of memory cards or camera conditions can cause malfunction of the camera. • Should water or any foreign object ever get into the card slot, immediately turn off the camera, remove the battery, and contact your dealer or nearest CASIO authorized service center. • Never remove a... CARD To replace the memory card 1. Doing so can cause the format operation to come part way out of the slot. 3. Pull the memory card out of the camera. 2. Press the memory card into the camera's memory card slot. This will cause the card to take considerable time. 173
Owners Manual
Page 202
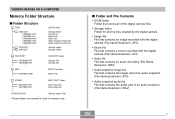
...File Contents • DCIM folder Folder that stores all of the digital camera files • Storage folder Folder for storing files created by the digital camera • Image file File that contains an image recorded with the digital camera (File Name Extension: JPG) • Movie file File that ...contains a movie recorded with the digital camera (File Name Extension: AVI) • Audio file File that contains an audio recording (File Name Extension: WAV) • Audio snapshot image file File that contains the image part of an audio snapshot (File Name Extension: JPG)...
...File Contents • DCIM folder Folder that stores all of the digital camera files • Storage folder Folder for storing files created by the digital camera • Image file File that contains an image recorded with the digital camera (File Name Extension: JPG) • Movie file File that ...contains a movie recorded with the digital camera (File Name Extension: AVI) • Audio file File that contains an audio recording (File Name Extension: WAV) • Audio snapshot image file File that contains the image part of an audio snapshot (File Name Extension: JPG)...
Owners Manual
Page 238
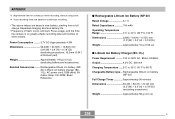
... 60.6(H) × 19.8(D) mm (3.8˝(W) × 2.4˝(H) × 0.78˝(D)) (excluding projections; 16.2mm (0.64˝) at thinnest part) Weight Approximately 118 g (4.2 oz) (excluding battery and accessories) Bundled Accessories ........ AV Cable; Rechargeable lithium ion battery (NP-20) Full Charge Times...battery charger (BC11L); AC power cord; USB cable; Repeated charging shortens battery life. • Frequency of flash, zoom, and Auto Focus usage, and the time the camera is on continuous recording. • The above values are based a new battery, starting from a full charge....
... 60.6(H) × 19.8(D) mm (3.8˝(W) × 2.4˝(H) × 0.78˝(D)) (excluding projections; 16.2mm (0.64˝) at thinnest part) Weight Approximately 118 g (4.2 oz) (excluding battery and accessories) Bundled Accessories ........ AV Cable; Rechargeable lithium ion battery (NP-20) Full Charge Times...battery charger (BC11L); AC power cord; USB cable; Repeated charging shortens battery life. • Frequency of flash, zoom, and Auto Focus usage, and the time the camera is on continuous recording. • The above values are based a new battery, starting from a full charge....
