Owners Manual
Page 2
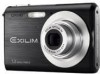
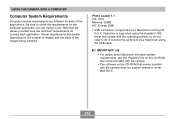
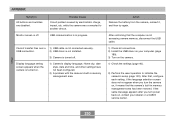
INTRODUCTION INTRODUCTION Unpacking Check to make sure that all of the AC power cord plug varies according to country or geographic area. Strap CD-ROM USB Cable AV Cable 2 Basic Reference Camera Rechargeable Lithium Ion Battery (NP-20) Lithium Ion Battery Charger (BC-11L) AC Power Cord * * The shape of the items shown below are included with your dealer as soon as possible. If something is missing, contact your camera.
INTRODUCTION INTRODUCTION Unpacking Check to make sure that all of the AC power cord plug varies according to country or geographic area. Strap CD-ROM USB Cable AV Cable 2 Basic Reference Camera Rechargeable Lithium Ion Battery (NP-20) Lithium Ion Battery Charger (BC-11L) AC Power Cord * * The shape of the items shown below are included with your dealer as soon as possible. If something is missing, contact your camera.
Owners Manual
Page 14
...of data in file memory. - Removing the battery or memory card while the camera is being performed - INTRODUCTION I Data Error Precautions • Your digital camera is manufactured using the camera! Any of the following creates the risk of corruption of the above conditions can... operation lamp is configured correctly and operating properly. Disconnecting the USB cable while a data communication operation is performing a record or memory access operation - Before using the camera to ensure that the camera is still flashing green after you first record a number of the...
...of data in file memory. - Removing the battery or memory card while the camera is being performed - INTRODUCTION I Data Error Precautions • Your digital camera is manufactured using the camera! Any of the following creates the risk of corruption of the above conditions can... operation lamp is configured correctly and operating properly. Disconnecting the USB cable while a data communication operation is performing a record or memory access operation - Before using the camera to ensure that the camera is still flashing green after you first record a number of the...
Owners Manual
Page 148
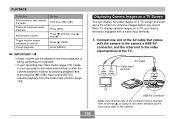
... be adjusted only when playback is being performed or is facing in the same direction as the front (lens side) of the camera. Connect one end of the AV cable that is marked with a video input terminal. 1. Press [̄] and then use a TV screen to resume playback from the index ...mark position (page 108). Press [SET]. Displaying Camera Images on and off Cancel playback Do this: Hold down [̇] or [̈]. Press [MENU]. Next, ...
... be adjusted only when playback is being performed or is facing in the same direction as the front (lens side) of the camera. Connect one end of the AV cable that is marked with a video input terminal. 1. Press [̄] and then use a TV screen to resume playback from the index ...mark position (page 108). Press [SET]. Displaying Camera Images on and off Cancel playback Do this: Hold down [̇] or [̈]. Press [MENU]. Next, ...
Owners Manual
Page 149
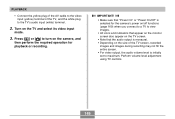
Press [ ] or [ ] to turn on the TV and select its video input mode. 3. Turn on the camera, and then perform the required operation for the camera's power on/off functions (page 169) when you connect to a TV to view images. • All icons and indicators that appear on the monitor ...On/Off" is selected for playback or recording. Perform volume level adjustment using TV controls. 149 PLAYBACK • Connect the yellow plug of the AV cable to the video input (yellow) terminal of the TV screen, recorded images and images during recording may not fill the entire screen. • For ...
Press [ ] or [ ] to turn on the TV and select its video input mode. 3. Turn on the camera, and then perform the required operation for the camera's power on/off functions (page 169) when you connect to a TV to view images. • All icons and indicators that appear on the monitor ...On/Off" is selected for playback or recording. Perform volume level adjustment using TV controls. 149 PLAYBACK • Connect the yellow plug of the AV cable to the video input (yellow) terminal of the TV screen, recorded images and images during recording may not fill the entire screen. • For ...
Owners Manual
Page 150
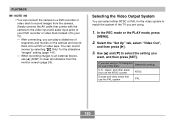
...selecting " Only" for use in this setting: NTSC PAL 150 Selecting the Video Output System You can play a slideshow of snapshots and movies on the camera and record them onto a DVD or video tape. Use [̆] and [̄] to your TV. - After connecting, you can select either NTSC ... match the system of to select the setting you are using . 1. Simply connect the AV cable that use [̆] (DISP) to clear all indicators from the camera. PLAYBACK NOTE • You can connect the camera to a DVD recorder or video deck to record images from the monitor screen (page 29). ...
...selecting " Only" for use in this setting: NTSC PAL 150 Selecting the Video Output System You can play a slideshow of snapshots and movies on the camera and record them onto a DVD or video tape. Use [̆] and [̄] to your TV. - After connecting, you can select either NTSC ... match the system of to select the setting you are using . 1. Simply connect the AV cable that use [̆] (DISP) to clear all indicators from the camera. PLAYBACK NOTE • You can connect the camera to a DVD recorder or video deck to record images from the monitor screen (page 29). ...
Owners Manual
Page 184
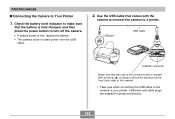
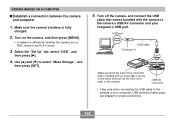
...power button to turn off the camera. • If battery power is facing in the same direction as the front (lens side) of the connector that is marked with the camera to connect the camera to a printer. Use the USB cable that the side of the camera. • Take care when connecting... the USB cable to Your Printer 1. PRINTING IMAGES I Connecting the Camera to the camera or your printer. USB port USB USB cable USB/AV connector Make sure ...
...power button to turn off the camera. • If battery power is facing in the same direction as the front (lens side) of the connector that is marked with the camera to connect the camera to a printer. Use the USB cable that the side of the camera. • Take care when connecting... the USB cable to Your Printer 1. PRINTING IMAGES I Connecting the Camera to the camera or your printer. USB port USB USB cable USB/AV connector Make sure ...
Owners Manual
Page 186
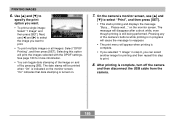
... The message will be printed when "On" is turned on and off the camera and then disconnect the USB cable from the camera. 186 "On" indicates that date stamping is indicated on the monitor screen. On the camera's monitor screen, use [̇] and [̈] to select the image you... can toggle date stamping of the camera's buttons while printing is in progress will...
... The message will be printed when "On" is turned on and off the camera and then disconnect the USB cable from the camera. 186 "On" indicates that date stamping is indicated on the monitor screen. On the camera's monitor screen, use [̇] and [̈] to select the image you... can toggle date stamping of the camera's buttons while printing is in progress will...
Owners Manual
Page 187
... the image, turn on date stamping for printing on an image that some professional print services do not support date printing. Check with the camera - Note that already has date/time stamp data embedded in it . - The Photohands User's Guide is in image prints. I Printing...Contact your printer manufacturer for details about models that support PictBridge and USB DIRECT-PRINT, upgrades, etc. • Never disconnect the USB cable or perform any camera operation while printing is provided as a PDF file on date stamping ("Date" or "Date&Time") (page 122). • Specifying date...
... the image, turn on date stamping for printing on an image that some professional print services do not support date printing. Check with the camera - Note that already has date/time stamp data embedded in it . - The Photohands User's Guide is in image prints. I Printing...Contact your printer manufacturer for details about models that support PictBridge and USB DIRECT-PRINT, upgrades, etc. • Never disconnect the USB cable or perform any camera operation while printing is provided as a PDF file on date stamping ("Date" or "Date&Time") (page 122). • Specifying date...
Owners Manual
Page 192
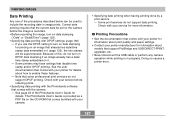
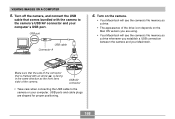
... 192 USB/AV connector • Take care when connecting the USB cable to the camera or your computer's USB port. Turn on the camera, and then press [MENU]. • It makes no difference whether the camera is in the same direction as the front (lens side) of the...in a REC mode or the PLAY mode. 3. Turn off the camera, and connect the USB cable that is fully charged. 2. VIEWING IMAGES ON A COMPUTER I Establish a connection between the camera and computer 1. Make sure the camera's battery is marked with the camera to select "Mass Storage", and then press [SET]. 5. Select...
... 192 USB/AV connector • Take care when connecting the USB cable to the camera or your computer's USB port. Turn on the camera, and then press [MENU]. • It makes no difference whether the camera is in the same direction as the front (lens side) of the...in a REC mode or the PLAY mode. 3. Turn off the camera, and connect the USB cable that is fully charged. 2. VIEWING IMAGES ON A COMPUTER I Establish a connection between the camera and computer 1. Make sure the camera's battery is marked with the camera to select "Mass Storage", and then press [SET]. 5. Select...
Owners Manual
Page 195
...procedures to terminate the USB connection. Always copy images to another location before performing any edit, delete, move , or rename images stored in the camera's file memory. Depending on the version of Windows you want to save the contents of the existing "DCIM" folder, change its name or ...move it may make it impossible to display images on the camera or it to your computer before saving a new "DCIM" folder. Next, disconnect the USB cable from the computer. Doing so can cause problems with the newly saved folder. VIEWING IMAGES ON A COMPUTER...
...procedures to terminate the USB connection. Always copy images to another location before performing any edit, delete, move , or rename images stored in the camera's file memory. Depending on the version of Windows you want to save the contents of the existing "DCIM" folder, change its name or ...move it may make it impossible to display images on the camera or it to your computer before saving a new "DCIM" folder. Next, disconnect the USB cable from the computer. Doing so can cause problems with the newly saved folder. VIEWING IMAGES ON A COMPUTER...
Owners Manual
Page 196
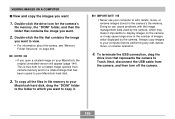
...can cause the image to "burn in" on the screen. • Never disconnect the USB cable or perform any camera operation while data communication is in the procedures that follow below. IMPORTANT! • This camera does not support operation on a computer running Mac OS 9 or OS X (10.1, 10.2, ... 10.0. You can cause data to the documentation that comes with your Macintosh for a long time. Using the Camera with your OS. 1. Establish a connection between the camera and your computer screen for other information about each operation in progress. View and copy the images you want. ...
...can cause the image to "burn in" on the screen. • Never disconnect the USB cable or perform any camera operation while data communication is in the procedures that follow below. IMPORTANT! • This camera does not support operation on a computer running Mac OS 9 or OS X (10.1, 10.2, ... 10.0. You can cause data to the documentation that comes with your Macintosh for a long time. Using the Camera with your OS. 1. Establish a connection between the camera and your computer screen for other information about each operation in progress. View and copy the images you want. ...
Owners Manual
Page 198
... proper positioning. 198 Make sure that the side of the camera. USB/AV connector • Take care when connecting the USB cable to the camera's USB/AV connector and your computer. Turn off the camera, and connect the USB cable that is marked with the camera to the camera or your computer's USB port. USB ports and...
... proper positioning. 198 Make sure that the side of the camera. USB/AV connector • Take care when connecting the USB cable to the camera's USB/AV connector and your computer. Turn off the camera, and connect the USB cable that is marked with the camera to the camera or your computer's USB port. USB ports and...
Owners Manual
Page 199
... the USB connection, drag the drive icon that contains the image you want to Trash. NOTE • If you open a rotated image on the camera or it may make it . To copy all the files in file memory to your Macintosh hard disk, drag the "DCIM" folder to the folder... memory. IMPORTANT! • Never use your computer to display images on your Macintosh hard disk. 3. Next, disconnect the USB cable from camera memory and for the camera's file memory, the "DCIM" folder, and then the folder that has been copied to your Macintosh, the original unrotated version will appear (page 144). ...
... the USB connection, drag the drive icon that contains the image you want to Trash. NOTE • If you open a rotated image on the camera or it may make it . To copy all the files in file memory to your Macintosh hard disk, drag the "DCIM" folder to the folder... memory. IMPORTANT! • Never use your computer to display images on your Macintosh hard disk. 3. Next, disconnect the USB cable from camera memory and for the camera's file memory, the "DCIM" folder, and then the folder that has been copied to your Macintosh, the original unrotated version will appear (page 144). ...
Owners Manual
Page 200
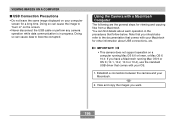
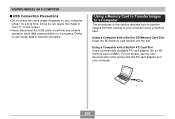
...A COMPUTER I USB Connection Precautions • Do not leave the same image displayed on the screen. • Never disconnect the USB cable or perform any camera operation while data communication is in progress. Doing so can cause the image to become corrupted. For full details, see the user documentation... that comes with a Built-in this section describe how to transfer images from the camera to your computer using a memory card. Using a Computer with the PC card adaptor and your computer screen for an SD memory card ...
...A COMPUTER I USB Connection Precautions • Do not leave the same image displayed on the screen. • Never disconnect the USB cable or perform any camera operation while data communication is in progress. Doing so can cause the image to become corrupted. For full details, see the user documentation... that comes with a Built-in this section describe how to transfer images from the camera to your computer using a memory card. Using a Computer with the PC card adaptor and your computer screen for an SD memory card ...
Owners Manual
Page 213
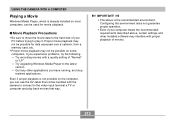
... a TV or computer and play it. Quit any other installed software may not be possible on most computers, can use the AV cable that way. Configuring this environment does not guarantee proper operation. • Even if your PC before trying to play back movies that ... be used for movie playback. IMPORTANT! • The above , certain settings and other applications you experience problems, try the following. - USING THE CAMERA WITH A COMPUTER Playing a Movie Windows Media Player, which is already installed on some computers. I Movie Playback Precautions • Be sure to move the...
... a TV or computer and play it. Quit any other installed software may not be possible on most computers, can use the AV cable that way. Configuring this environment does not guarantee proper operation. • Even if your PC before trying to play back movies that ... be used for movie playback. IMPORTANT! • The above , certain settings and other applications you experience problems, try the following. - USING THE CAMERA WITH A COMPUTER Playing a Movie Windows Media Player, which is already installed on some computers. I Movie Playback Precautions • Be sure to move the...
Owners Manual
Page 216
...the requirements for the particular application you need to do is connect the camera to use. Photo Loader 1.1 OS: OS 9 Memory: 32MB HD: At least 3MB • USB connection is supported using the USB cable. Operation is supported on the CD-ROM that the values provided here ... minimum system requirements, see the "Readme" file on the CD-ROM that comes with the camera. • The software on a Macintosh running each of the images being handled. USING THE CAMERA WITH A COMPUTER Computer System Requirements Computer system requirements are greater, depending on the number of ...
...the requirements for the particular application you need to do is connect the camera to use. Photo Loader 1.1 OS: OS 9 Memory: 32MB HD: At least 3MB • USB connection is supported using the USB cable. Operation is supported on the CD-ROM that the values provided here ... minimum system requirements, see the "Readme" file on the CD-ROM that comes with the camera. • The software on a Macintosh running each of the images being handled. USING THE CAMERA WITH A COMPUTER Computer System Requirements Computer system requirements are greater, depending on the number of ...

Owners Manual
Page 218
... the language whose user's guide you experience problems, try the following. - I To view the camera user's guide 1. If you can use the AV cable that comes bundled with the camera to connect to the video input terminal a TV or Macintosh and play back movies. On the CD... Playback Precautions • Even if your computer meets the minimum requirements described above, certain settings and other applications that are running. Open the "Digital Camera" folder, and then open the "Manual" folder. 2. Quit any other installed software may not be possible on your Macintosh, you don't, go...
... the language whose user's guide you experience problems, try the following. - I To view the camera user's guide 1. If you can use the AV cable that comes bundled with the camera to connect to the video input terminal a TV or Macintosh and play back movies. On the CD... Playback Precautions • Even if your computer meets the minimum requirements described above, certain settings and other applications that are running. Open the "Digital Camera" folder, and then open the "Manual" folder. 2. Quit any other installed software may not be possible on your Macintosh, you don't, go...
Owners Manual
Page 230
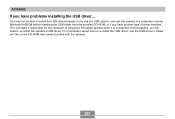
... reset operation to another device. USB connection. 2) USB driver is not installed. 3) Camera is not accessing camera memory, disconnect the USB cable. 1) Check all connections. 2) Install the USB driver on your computer (page 189). 3) Turn on , contact your retailer or a CASIO service center. After confirming that the computer is turned off . After that the...
... reset operation to another device. USB connection. 2) USB driver is not installed. 3) Camera is not accessing camera memory, disconnect the USB cable. 1) Check all connections. 2) Install the USB driver on your computer (page 189). 3) Turn on , contact your retailer or a CASIO service center. After confirming that the computer is turned off . After that the...
Owners Manual
Page 231
..., you will make it is connected. You may not be able to install the USB driver properly if you use the USB cable to connect the camera to recognize the digital camera when it impossible for the computer to a computer running Windows 98SE/98 before installing the USB driver from the bundled CD-ROM.... This will need to re-install the USB driver, see the USB driver's "Read me" file on the CD-ROM that comes bundled with the camera. 231
..., you will make it is connected. You may not be able to install the USB driver properly if you use the USB cable to connect the camera to recognize the digital camera when it impossible for the computer to a computer running Windows 98SE/98 before installing the USB driver from the bundled CD-ROM.... This will need to re-install the USB driver, see the USB driver's "Read me" file on the CD-ROM that comes bundled with the camera. 231
Owners Manual
Page 238
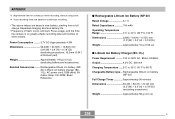
...Weight Approximately 58 g (2.0 oz) 238 B Rechargeable lithium ion battery (NP20); AV Cable; Strap; Repeated charging shortens battery life. • Frequency of flash, zoom, and Auto Focus usage, and the time the camera is on continuous recording. • The above values are based on greatly affects recording ...time and number of shots values. AC power cord; USB cable; CD-ROM; APPENDIX *3 Approximate...
...Weight Approximately 58 g (2.0 oz) 238 B Rechargeable lithium ion battery (NP20); AV Cable; Strap; Repeated charging shortens battery life. • Frequency of flash, zoom, and Auto Focus usage, and the time the camera is on continuous recording. • The above values are based on greatly affects recording ...time and number of shots values. AC power cord; USB cable; CD-ROM; APPENDIX *3 Approximate...

