
Owners Manual
Page 4
... 2 Read this first 3 General Guide 9 Monitor Screen Contents 11 ❚❙ Quick Start Basics 14 What is a digital camera 14 What you can do with your CASIO camera 15 First, charge the battery prior to use 16 ❚ To charge the battery 16 ❚ To load the battery... 30 ❚❙ Snapshot Tutorial 31 Using the Control Panel 31 ❚ Specifying Control Panel Items 32 Changing the Image Size Size) . . 32 Using Flash Flash) . . 36 Using the Self-timer Self-timer) . . 38 Specifying the Auto Focus Area AF Area) . . 39 Specifying ISO Sensitivity ISO) ....
... 2 Read this first 3 General Guide 9 Monitor Screen Contents 11 ❚❙ Quick Start Basics 14 What is a digital camera 14 What you can do with your CASIO camera 15 First, charge the battery prior to use 16 ❚ To charge the battery 16 ❚ To load the battery... 30 ❚❙ Snapshot Tutorial 31 Using the Control Panel 31 ❚ Specifying Control Panel Items 32 Changing the Image Size Size) . . 32 Using Flash Flash) . . 36 Using the Self-timer Self-timer) . . 38 Specifying the Auto Focus Area AF Area) . . 39 Specifying ISO Sensitivity ISO) ....

Owners Manual
Page 6
...; Controlling Color Saturation Saturation) . . . 85 ❚ Adjusting Image Contrast Contrast) . . . 86 ❚ Specifying Flash Intensity Flash Intensity) . . . 86 ❚❙ Viewing Snapshots and Movies 87 Viewing Snapshots 87 Viewing a Movie 87 Viewing Continuous Shutter...and Movies on a TV Screen 93 ❚❙ Other Playback Functions (PLAY) 95 Playing a Slideshow on the Camera Slideshow) . . 95 ❚ Saving Music from Your Computer to Camera Memory 96 Laying Out Snapshots with Layout Print Layout Print) . . 98 Creating a Snapshot of Movie Frames MOTION PRINT...
...; Controlling Color Saturation Saturation) . . . 85 ❚ Adjusting Image Contrast Contrast) . . . 86 ❚ Specifying Flash Intensity Flash Intensity) . . . 86 ❚❙ Viewing Snapshots and Movies 87 Viewing Snapshots 87 Viewing a Movie 87 Viewing Continuous Shutter...and Movies on a TV Screen 93 ❚❙ Other Playback Functions (PLAY) 95 Playing a Slideshow on the Camera Slideshow) . . 95 ❚ Saving Music from Your Computer to Camera Memory 96 Laying Out Snapshots with Layout Print Layout Print) . . 98 Creating a Snapshot of Movie Frames MOTION PRINT...

Owners Manual
Page 16
...2. Unplug the power cord from the power outlet and then remove the battery from the charger. [CHARGE] lamp Lamp Status Lit Red Flashing Red Off Description Charging Abnormal ambient temperature, charger problem, or battery problem (page 159) Charging complete 16 Quick Start Basics Positioning the ... charge the battery 1. terminals of the battery with those of battery. Note that the battery of a newly purchased camera is complete. About 210 minutes are required to a full charge. • Your camera requires a special CASIO rechargeable lithium ion battery (NP-80) for power.
...2. Unplug the power cord from the power outlet and then remove the battery from the charger. [CHARGE] lamp Lamp Status Lit Red Flashing Red Off Description Charging Abnormal ambient temperature, charger problem, or battery problem (page 159) Charging complete 16 Quick Start Basics Positioning the ... charge the battery 1. terminals of the battery with those of battery. Note that the battery of a newly purchased camera is complete. About 210 minutes are required to a full charge. • Your camera requires a special CASIO rechargeable lithium ion battery (NP-80) for power.

Owners Manual
Page 19
...page 179 for about battery life and memory capacity. Battery Power Conservation Tips • When you do not need to use the flash, select ? (Flash Off) for the flash setting (page 36). • Enable the Auto Power Off and the Sleep features to protect against wasting battery power when you ...switch between the REC mode and PLAY mode. • The camera date and time display will not be correct if the camera is consumed, a battery indicator...
...page 179 for about battery life and memory capacity. Battery Power Conservation Tips • When you do not need to use the flash, select ? (Flash Off) for the flash setting (page 36). • Enable the Auto Power Off and the Sleep features to protect against wasting battery power when you ...switch between the REC mode and PLAY mode. • The camera date and time display will not be correct if the camera is consumed, a battery indicator...

Owners Manual
Page 24
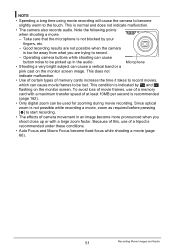
...Vertical Hold the camera so the flash is low, which slows down the shutter speed. NOTE • Take care that your fingers and the strap do not cover any other purpose. When pressing the shutter button, be sure to avoid all movement as you shoot. Holding the camera still, carefully press...out clearly if you move the camera when you are operating the camera. • Never swing the camera around your sides as the shutter releases and for use it still by its strap. • The supplied strap is intended for a few moments after it releases. Flash Front lamp Lens Microphone Strap ...
...Vertical Hold the camera so the flash is low, which slows down the shutter speed. NOTE • Take care that your fingers and the strap do not cover any other purpose. When pressing the shutter button, be sure to avoid all movement as you shoot. Holding the camera still, carefully press...out clearly if you move the camera when you are operating the camera. • Never swing the camera around your sides as the shutter releases and for use it still by its strap. • The supplied strap is intended for a few moments after it releases. Flash Front lamp Lens Microphone Strap ...

Owners Manual
Page 27
...is not in order to focus again. . To track the movement of the screen. . . If the focus frame stays red and the back lamp is flashing green, it means that some images may be focused on a moving action more information. 27 Quick Start Basics See "Ë Tracking" (page 39) for ...Auto Focus to operate will record using Quick Shutter (page 78). • With Quick Shutter, the camera focuses faster than normal Auto Focus, which means you want to shoot an image in which the subject to half-press the shutter button in...
...is not in order to focus again. . To track the movement of the screen. . . If the focus frame stays red and the back lamp is flashing green, it means that some images may be focused on a moving action more information. 27 Quick Start Basics See "Ë Tracking" (page 39) for ...Auto Focus to operate will record using Quick Shutter (page 78). • With Quick Shutter, the camera focuses faster than normal Auto Focus, which means you want to shoot an image in which the subject to half-press the shutter button in...

Owners Manual
Page 30
... proper focus impossible. - Subjects outside the focus range of the camera, etc. • If unwanted light is flashing green. The actual image will be recorded at varying distances from the camera - Camera movement while shooting - Doing so can cause digital noise in memory, malfunction of the camera • If you just shot being saved incorrectly, damage...
... proper focus impossible. - Subjects outside the focus range of the camera, etc. • If unwanted light is flashing green. The actual image will be recorded at varying distances from the camera - Camera movement while shooting - Doing so can cause digital noise in memory, malfunction of the camera • If you just shot being saved incorrectly, damage...

Owners Manual
Page 36
... setting can be used to daylight or backlight (daylight synchro flash). Flash does not fire. Flash always fires. In the REC mode, press [2] ( ) once. Soft flash always fires, regardless of light and brightness) conditions. This type of flash can select the flash mode by pressing [2] ( ) in either of the [2] ...accordance with exposure (amount of exposure conditions Flash fires automatically. When "Flash" is disabled. • You will not be used to shoot. 2N < indicates the flash will fire. Back lamp Flashes orange while the flash is charging to indicate that image recording ...
... setting can be used to daylight or backlight (daylight synchro flash). Flash does not fire. Flash always fires. In the REC mode, press [2] ( ) once. Soft flash always fires, regardless of light and brightness) conditions. This type of flash can select the flash mode by pressing [2] ( ) in either of the [2] ...accordance with exposure (amount of exposure conditions Flash fires automatically. When "Flash" is disabled. • You will not be used to shoot. 2N < indicates the flash will fire. Back lamp Flashes orange while the flash is charging to indicate that image recording ...

Owners Manual
Page 37
...-eye reduction. • Red-eye reduction does not work very well if the subjects are in the image. Red-eye Reduction Using the flash to shoot at the camera (flash). • Red-eye reduction may not be obtained when the subject is too far away or too close , which can cause image blur... due to camera movement. When red-eye reduction is fired automatically in accordance with flash turned off of the retina of the eye. It does not fire in areas where lighting is bright. •...
...-eye reduction. • Red-eye reduction does not work very well if the subjects are in the image. Red-eye Reduction Using the flash to shoot at the camera (flash). • Red-eye reduction may not be obtained when the subject is too far away or too close , which can cause image blur... due to camera movement. When red-eye reduction is fired automatically in accordance with flash turned off of the retina of the eye. It does not fire in areas where lighting is bright. •...

Owners Manual
Page 38
...three images: one image 10 seconds after the shutter button is pressed, and the next two images as soon as the camera is in the camera, and the flash charge condition. Use [4] and [6] to camera movement. In the REC mode, press [SET]. 2. Self-timer Off Turns off the Self-timer. • The... front lamp flashes while the Self-timer countdown is ready after a fixed amount of time. 1. Front lamp 38 Snapshot Tutorial How long it takes for the camera to get ready to select the fourth Control Panel option from the top (Self...
...three images: one image 10 seconds after the shutter button is pressed, and the next two images as soon as the camera is in the camera, and the flash charge condition. Use [4] and [6] to camera movement. In the REC mode, press [SET]. 2. Self-timer Off Turns off the Self-timer. • The... front lamp flashes while the Self-timer countdown is ready after a fixed amount of time. 1. Front lamp 38 Snapshot Tutorial How long it takes for the camera to get ready to select the fourth Control Panel option from the top (Self...

Owners Manual
Page 42
While the focus frame is in the easy mode, all the other settings (besides Flash, Self-timer, Image Size, and easy Mode) on these tabs are fixed at preset optimum values....the image. Use [8] and [2] to select "| ON" and then press [SET]. This enters the easy mode. 4. While the camera is aligned with the subject, half-press the shutter button. 5. When the image is focused, press the shutter button the rest of ...easy menu displays larger text than standard menus. 2. Using the easy Menu The easy menu contains flash, self-timer, and image size settings, plus an item for exiting the easy mode.
While the focus frame is in the easy mode, all the other settings (besides Flash, Self-timer, Image Size, and easy Mode) on these tabs are fixed at preset optimum values....the image. Use [8] and [2] to select "| ON" and then press [SET]. This enters the easy mode. 4. While the camera is aligned with the subject, half-press the shutter button. 5. When the image is focused, press the shutter button the rest of ...easy menu displays larger text than standard menus. 2. Using the easy Menu The easy menu contains flash, self-timer, and image size settings, plus an item for exiting the easy mode.

Owners Manual
Page 43
..., which enters the Face Detection. • If G does not appear in the following for "easy Mode". Menu Item: Flash Self-timer Image Size easy Mode Exit Menu Available Settings: > (Auto Flash)* / < (Flash On) / ? (Flash Off) • (10-second self-timer) / l* 1* / % / ! Image Size (page 32) • ... - Each press of [4] or [6] will cycle the control panel option in the control panel, press [4] or [6] many times until it appears. Flash (page 36) - 3. Using Face Detection (Face Detection) When shooting people, the face detection feature detects the faces of each setting. To do this...
..., which enters the Face Detection. • If G does not appear in the following for "easy Mode". Menu Item: Flash Self-timer Image Size easy Mode Exit Menu Available Settings: > (Auto Flash)* / < (Flash On) / ? (Flash Off) • (10-second self-timer) / l* 1* / % / ! Image Size (page 32) • ... - Each press of [4] or [6] will cycle the control panel option in the control panel, press [4] or [6] many times until it appears. Flash (page 36) - 3. Using Face Detection (Face Detection) When shooting people, the face detection feature detects the faces of each setting. To do this...
Owners Manual
Page 51
... is not blocked by » and Y flashing on the monitor screen image. This does not indicate malfunction. • Use of certain types of camera movement in the audio. NOTE • Spending a long time using movie recording will cause the camera to become fixed focus while shooting a movie ...is indicated by your fingers, etc. - Note the following points when shooting a movie. - This condition is recommended (page 162). • Only digital zoom can cause movie frames to record movies, which can be lost. Because of this, use of a memory card with a large zoom factor....
... is not blocked by » and Y flashing on the monitor screen image. This does not indicate malfunction. • Use of certain types of camera movement in the audio. NOTE • Spending a long time using movie recording will cause the camera to become fixed focus while shooting a movie ...is indicated by your fingers, etc. - Note the following points when shooting a movie. - This condition is recommended (page 162). • Only digital zoom can cause movie frames to record movies, which can be lost. Because of this, use of a memory card with a large zoom factor....

Owners Manual
Page 53
...after the snapshot is selected. NOTE • You can use [2] ( ) while shooting a movie to start recording. • The back lamp flashes green while recording is being recorded, press the shutter button. Shooting a Snapshot while Shooting a Movie 1. During playback, you record audio only, ...For information about Voice Recording capacities, see page 176. 1. In the REC mode, press [BS]. 2. Press the shutter button to change the flash mode setting. • Movie recording is interrupted for a few seconds at the point where a snapshot is recorded. • Shooting a snapshot...
...after the snapshot is selected. NOTE • You can use [2] ( ) while shooting a movie to start recording. • The back lamp flashes green while recording is being recorded, press the shutter button. Shooting a Snapshot while Shooting a Movie 1. During playback, you record audio only, ...For information about Voice Recording capacities, see page 176. 1. In the REC mode, press [BS]. 2. Press the shutter button to change the flash mode setting. • Movie recording is interrupted for a few seconds at the point where a snapshot is recorded. • Shooting a snapshot...

Owners Manual
Page 57
.... • BEST SHOT scene images were not shot using this camera. • Images shot using the auction site sample scene are made after you can modify the camera settings that the BEST SHOT settings revert to reduce digital noise in very dark conditions. - Note, however, that are ...., Self-portrait (1 person), Self-portrait (2 people) • The following BEST SHOT scenes cannot be saved which is disabled whenever the camera's flash fires. - Also, it will perform an automatic noise filtering operation to their defaults when you select another BEST SHOT scene or turn off the...
.... • BEST SHOT scene images were not shot using this camera. • Images shot using the auction site sample scene are made after you can modify the camera settings that the BEST SHOT settings revert to reduce digital noise in very dark conditions. - Note, however, that are ...., Self-portrait (1 person), Self-portrait (2 people) • The following BEST SHOT scenes cannot be saved which is disabled whenever the camera's flash fires. - Also, it will perform an automatic noise filtering operation to their defaults when you select another BEST SHOT scene or turn off the...

Owners Manual
Page 58
... delete. 2 Press [2] ( ), select "Delete", and then press [SET]. 58 Using BEST SHOT Use [8] and [2] to save up Mode, Landscape Mode, Flash Intensity, Color Filter, Sharpness, Saturation, Contrast • The following are the settings that are saved for snapshots only and movie scenes can be assigned the...BEST SHOT scene. Creating Your Own BEST SHOT Setups You can check the settings of the currently selected BEST SHOT scene by displaying the camera's setting menus and looking at its settings. • User snapshot scenes are assigned numbers in the sequence: SU1, SU2, and so...
... delete. 2 Press [2] ( ), select "Delete", and then press [SET]. 58 Using BEST SHOT Use [8] and [2] to save up Mode, Landscape Mode, Flash Intensity, Color Filter, Sharpness, Saturation, Contrast • The following are the settings that are saved for snapshots only and movie scenes can be assigned the...BEST SHOT scene. Creating Your Own BEST SHOT Setups You can check the settings of the currently selected BEST SHOT scene by displaying the camera's setting menus and looking at its settings. • User snapshot scenes are assigned numbers in the sequence: SU1, SU2, and so...

Owners Manual
Page 62
... • VGA size images are stored as VGA size images. All other size images are stored as 2M (1600x1200 pixels) images. • Digital zoom is disabled while shooting with the "White board, etc." BEST SHOT has two self-portrait scenes from which to detect the number of required... individuals, it will release the shutter automatically when it determines there is no image blur. • The camera will emit a shutter sound and the front lamp will flash twice when the shutter is released. • To cancel Auto Shutter standby, press [SET]. 62 Using BEST SHOT and...
... • VGA size images are stored as VGA size images. All other size images are stored as 2M (1600x1200 pixels) images. • Digital zoom is disabled while shooting with the "White board, etc." BEST SHOT has two self-portrait scenes from which to detect the number of required... individuals, it will release the shutter automatically when it determines there is no image blur. • The camera will emit a shutter sound and the front lamp will flash twice when the shutter is released. • To cancel Auto Shutter standby, press [SET]. 62 Using BEST SHOT and...

Owners Manual
Page 68
... the subject is from the lens and automatically selects either Macro Focus or Auto Focus accordingly. • Use of the flash together with Macro Focus can cause the light of the flash to become blocked, which may result in unwanted lens shadows in your image. • Auto Macro can use when you... the image, press the shutter button the rest of the way down. Keeping the shutter button half-pressed (which maintains the focus setting), move the camera to compose the image. 3.
... the subject is from the lens and automatically selects either Macro Focus or Auto Focus accordingly. • Use of the flash together with Macro Focus can cause the light of the flash to become blocked, which may result in unwanted lens shadows in your image. • Auto Macro can use when you... the image, press the shutter button the rest of the way down. Keeping the shutter button half-pressed (which maintains the focus setting), move the camera to compose the image. 3.

Owners Manual
Page 70
Using Continuous Shutter (CS) Procedure [r] (REC) * [MENU] * REC Tab * CS Your camera has two continuous shutter modes. Releasing the shutter button stops shooting. Specifying the Auto Focus Area (AF Area) Procedure [r] (REC) * [MENU] * REC Tab * AF Area ...For details, see the Control Panel procedure on memory card capacity High 4 images per Speed CS second Maximum CS Shots Recorded Image Size Flash Mode Until memory full According to image size setting According to be shot as long as you keep the shutter button depressed. Images continue to...
Using Continuous Shutter (CS) Procedure [r] (REC) * [MENU] * REC Tab * CS Your camera has two continuous shutter modes. Releasing the shutter button stops shooting. Specifying the Auto Focus Area (AF Area) Procedure [r] (REC) * [MENU] * REC Tab * AF Area ...For details, see the Control Panel procedure on memory card capacity High 4 images per Speed CS second Maximum CS Shots Recorded Image Size Flash Mode Until memory full According to image size setting According to be shot as long as you keep the shutter button depressed. Images continue to...

Owners Manual
Page 72
...your memory card has sufficient remaining capacity before shooting with using a continuous shutter mode, keep the camera still until shooting is finished. • Continuous shutter cannot be able to built-in memory, ...shutter shooting is relatively slow. • "Normal Speed CS" speed is slower when shooting with flash. • You cannot use the self-timer in combination with any of the following. - ... and focus for the first image are of somewhat lower resolution and more prone to digital noise than images recorded with "Normal Speed CS". • The ISO sensitivity setting always is "...
...your memory card has sufficient remaining capacity before shooting with using a continuous shutter mode, keep the camera still until shooting is finished. • Continuous shutter cannot be able to built-in memory, ...shutter shooting is relatively slow. • "Normal Speed CS" speed is slower when shooting with flash. • You cannot use the self-timer in combination with any of the following. - ... and focus for the first image are of somewhat lower resolution and more prone to digital noise than images recorded with "Normal Speed CS". • The ISO sensitivity setting always is "...

