

Owners Manual
Page 4
...; Auto Focus Restrictions 22 ❚❙ Snapshot Tutorial 23 Using the Control Panel 23 Changing the Image Size Size) . . 24 Using Flash Flash) . . 26 Using Face Detection Face Detection) . . 28 Reducing the Effects of Camera and Subject Movement . . . (Anti Shake) . . 30 Specifying ISO Sensitivity ISO) . . 32 Adjusting White Balance White Balance) . . 32 Correcting Image Brightness EV Shift) . . 34 Using the easy Mode 35 Changing the Control Panel Date/Time Style 38 Shooting with Zoom 39 ❚❙ Recording Movie Images and Audio 40 To record a movie...
...; Auto Focus Restrictions 22 ❚❙ Snapshot Tutorial 23 Using the Control Panel 23 Changing the Image Size Size) . . 24 Using Flash Flash) . . 26 Using Face Detection Face Detection) . . 28 Reducing the Effects of Camera and Subject Movement . . . (Anti Shake) . . 30 Specifying ISO Sensitivity ISO) . . 32 Adjusting White Balance White Balance) . . 32 Correcting Image Brightness EV Shift) . . 34 Using the easy Mode 35 Changing the Control Panel Date/Time Style 38 Shooting with Zoom 39 ❚❙ Recording Movie Images and Audio 40 To record a movie...

Owners Manual
Page 5
... the Effects of Camera and Subject Movement . . . . (Anti Shake) . . . 54 ❚ Specifying the Auto Focus Area AF Area) . . . 54 ❚ Using the easy Mode easy Mode) . . . 55 ❚ Assigning Functions to the [4] and [6] Keys L/R Key) . . . 55 ❚ Displaying the On-screen Grid Grid) . . . 55 ❚ Turning on Image Review Review) . . . 56 ❚ Using Icon Help Icon Help) . . . 56 ❚ Configuring Power On Default Settings Memory) . . . 57 Image Quality Settings Quality) . . 58 ❚ Specifying Snapshot Size Size) . . . 58 ❚...
... the Effects of Camera and Subject Movement . . . . (Anti Shake) . . . 54 ❚ Specifying the Auto Focus Area AF Area) . . . 54 ❚ Using the easy Mode easy Mode) . . . 55 ❚ Assigning Functions to the [4] and [6] Keys L/R Key) . . . 55 ❚ Displaying the On-screen Grid Grid) . . . 55 ❚ Turning on Image Review Review) . . . 56 ❚ Using Icon Help Icon Help) . . . 56 ❚ Configuring Power On Default Settings Memory) . . . 57 Image Quality Settings Quality) . . 58 ❚ Specifying Snapshot Size Size) . . . 58 ❚...

Owners Manual
Page 6
...; Connecting the Camera to Your Computer and Saving Files 90 ❚ Transferring Images Automatically and Managing Them on Your Macintosh. . . 92 ❚ Playing a Movie 93 ❚ Viewing User Documentation PDF Files) . . . 93 ❚ User Registration 93 Files and Folders 94 Memory Card Data 95 ❚❙ Other Settings (Set Up) 97 Turning Control Panel Display On or Off R Panel) . . 97 Configuring Camera Sound Settings Sounds) . . 98 Specifying the File Name Serial Number Generation Rule . . . . . (File No.) . . 98 Configuring World Time Settings World Time...
...; Connecting the Camera to Your Computer and Saving Files 90 ❚ Transferring Images Automatically and Managing Them on Your Macintosh. . . 92 ❚ Playing a Movie 93 ❚ Viewing User Documentation PDF Files) . . . 93 ❚ User Registration 93 Files and Folders 94 Memory Card Data 95 ❚❙ Other Settings (Set Up) 97 Turning Control Panel Display On or Off R Panel) . . 97 Configuring Camera Sound Settings Sounds) . . 98 Specifying the File Name Serial Number Generation Rule . . . . . (File No.) . . 98 Configuring World Time Settings World Time...

Owners Manual
Page 7
... Use 107 Power Supply 115 ❚ Charging 115 ❚ To replace the battery 115 ❚ Battery Precautions 116 ❚ Using the Camera in another Country 116 Using a Memory Card 117 ❚ To replace the memory card 117 Computer System Requirements for Bundled Software 119 General Guide 120 Monitor Screen Contents 121 Reset Initial Default Settings 123 When things don't go right 125 ❚ Troubleshooting 125 ❚ Display Messages 129 Number of Snapshots and Movie Recording Time 131 Specifications...
... Use 107 Power Supply 115 ❚ Charging 115 ❚ To replace the battery 115 ❚ Battery Precautions 116 ❚ Using the Camera in another Country 116 Using a Memory Card 117 ❚ To replace the memory card 117 Computer System Requirements for Bundled Software 119 General Guide 120 Monitor Screen Contents 121 Reset Initial Default Settings 123 When things don't go right 125 ❚ Troubleshooting 125 ❚ Display Messages 129 Number of Snapshots and Movie Recording Time 131 Specifications...

Owners Manual
Page 13
... controls its local time offset and the use [8] and [2] to select the city where you want to change . 13 Quick Start Basics To switch between 12-hour and 24-hour format, press [BS]. 8. Press [SET]. • If you make a mistake, you load a battery into the camera, a [ON/OFF] screen appears for configuring the display language, date, and time settings. Configuring the Display Language the First Time You Turn On the Camera The first time...
... controls its local time offset and the use [8] and [2] to select the city where you want to change . 13 Quick Start Basics To switch between 12-hour and 24-hour format, press [BS]. 8. Press [SET]. • If you make a mistake, you load a battery into the camera, a [ON/OFF] screen appears for configuring the display language, date, and time settings. Configuring the Display Language the First Time You Turn On the Camera The first time...

Owners Manual
Page 21
... no longer need to free up storage and record more images. • Remember that a file (image) delete operation cannot be undone. • Deleting an audio snapshot (page 69) deletes both the snapshot and the audio file. Press [p] (PLAY) to select "All Files Delete" and then press [SET]. 3. Use [4] and [6] to scroll through the files until the one you no files" to appear. 21 Quick Start Basics To delete a single file 1. Deleting Images If memory becomes...
... no longer need to free up storage and record more images. • Remember that a file (image) delete operation cannot be undone. • Deleting an audio snapshot (page 69) deletes both the snapshot and the audio file. Press [p] (PLAY) to select "All Files Delete" and then press [SET]. 3. Use [4] and [6] to scroll through the files until the one you no files" to appear. 21 Quick Start Basics To delete a single file 1. Deleting Images If memory becomes...

Owners Manual
Page 23
... another setting, repeat steps 2 and 3. 5. Snapshot Tutorial Using the Control Panel The Control Panel can be displayed while an easy mode, or Voice Recording Operation is always displayed along the right side of the monitor screen. This will cause a Control Panel to change . 1Image size/Quality* (pages 24, 58) 2Flash (page 26) 3Face detection (page 28) 4Anti shake (page 30) 5ISO sensitivity (page 32) 6White balance...
... another setting, repeat steps 2 and 3. 5. Snapshot Tutorial Using the Control Panel The Control Panel can be displayed while an easy mode, or Voice Recording Operation is always displayed along the right side of the monitor screen. This will cause a Control Panel to change . 1Image size/Quality* (pages 24, 58) 2Flash (page 26) 3Face detection (page 28) 4Anti shake (page 30) 5ISO sensitivity (page 32) 6White balance...

Owners Manual
Page 43
... to marker Volume adjustment Monitor screen on a computer using Windows Media Player or QuickTime (pages 85, 93) - Audio Data: WAVE/IMA-ADPCM (WAV extension) - Press [SET] to resume playback. Audio File Size: Approximately 165KB (Approximately 30 seconds of an image for a Voice Recording file. 2. In the PLAY mode, use [4] and [6] to display the Voice Recording file you want to play back an audio recording 1. Press [2] and then press [8] [2] [8] (DISP) [MENU] 43 Recording Movie Images and...
... to marker Volume adjustment Monitor screen on a computer using Windows Media Player or QuickTime (pages 85, 93) - Audio Data: WAVE/IMA-ADPCM (WAV extension) - Press [SET] to resume playback. Audio File Size: Approximately 165KB (Approximately 30 seconds of an image for a Voice Recording file. 2. In the PLAY mode, use [4] and [6] to display the Voice Recording file you want to play back an audio recording 1. Press [2] and then press [8] [2] [8] (DISP) [MENU] 43 Recording Movie Images and...
Owners Manual
Page 53
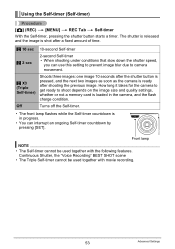
How long it takes for the camera to get ready to camera movement. The shutter is released and the image is shot after shooting the previous image. Off Turns off the Self-timer. • The front lamp flashes while the Self-timer countdown is in progress. • You can use this setting to prevent image blur due to shoot depends on the image size and quality settings, whether or not a memory card is ready...
How long it takes for the camera to get ready to camera movement. The shutter is released and the image is shot after shooting the previous image. Off Turns off the Self-timer. • The front lamp flashes while the Self-timer countdown is in progress. • You can use this setting to prevent image blur due to shoot depends on the image size and quality settings, whether or not a memory card is ready...

Owners Manual
Page 71
..., 93). Copying Files (Copy) Procedure [p] (PLAY) * Snapshot Screen * [MENU] * PLAY Tab * Copy Files can be copied from the camera's built-in memory to a memory card or from built-in camera memory to a memory card. It cannot be used to copy a single file. NOTE • You can copy snapshots, movies, audio snapshots, or Voice Recording files you want to copy. 2Use [8] and [2] to select "Copy" and then press [SET]. Voice Recording Playback Controls Fast forward/fast reverse Play/pause Volume adjustment Display content switching Stop playback [4] [6] [SET] Press [2] and...
..., 93). Copying Files (Copy) Procedure [p] (PLAY) * Snapshot Screen * [MENU] * PLAY Tab * Copy Files can be copied from the camera's built-in memory to a memory card or from built-in camera memory to a memory card. It cannot be used to copy a single file. NOTE • You can copy snapshots, movies, audio snapshots, or Voice Recording files you want to copy. 2Use [8] and [2] to select "Copy" and then press [SET]. Voice Recording Playback Controls Fast forward/fast reverse Play/pause Volume adjustment Display content switching Stop playback [4] [6] [SET] Press [2] and...

Owners Manual
Page 72
... Compatible Printer You can use commercially available software to print. • You can take a memory card that comes bundled with Memory Card Slot You can print on page 84. Printing with a Computer Windows Computer Install the software (Photo Loader with HOT ALBUM) that contains the images you want to print to a professional print service and have them printed. Printing Printing Snapshots Professional Print Service You can specify which images you want to print, the number of copies, and date stamp settings before printing...
... Compatible Printer You can use commercially available software to print. • You can take a memory card that comes bundled with Memory Card Slot You can print on page 84. Printing with a Computer Windows Computer Install the software (Photo Loader with HOT ALBUM) that contains the images you want to print to a professional print service and have them printed. Printing Printing Snapshots Professional Print Service You can specify which images you want to print, the number of copies, and date stamp settings before printing...

Owners Manual
Page 77
... an image that support Exif Print, printer upgrades, etc. 77 Printing Configure the Camera's Time Stamp setting (page 99). • The camera's Time Stamp setting imprints the date into images using the bundled Photo Loader with HOT ALBUM (page 79) software (Windows only). You can stamp dates into a snapshot when you print. Configuring camera settings Configuring computer settings Professional print service Configure DPOF settings (page 75). Doing so can turn on a printer that supports Exif Print (Exif 2.2) uses information about models that includes a date stamped with...
... an image that support Exif Print, printer upgrades, etc. 77 Printing Configure the Camera's Time Stamp setting (page 99). • The camera's Time Stamp setting imprints the date into images using the bundled Photo Loader with HOT ALBUM (page 79) software (Windows only). You can stamp dates into a snapshot when you print. Configuring camera settings Configuring computer settings Professional print service Configure DPOF settings (page 75). Doing so can turn on a printer that supports Exif Print (Exif 2.2) uses information about models that includes a date stamped with...
Owners Manual
Page 93
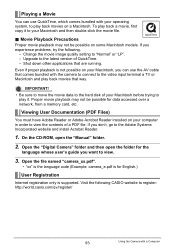
... Using the Camera with your operating system, to the Adobe Systems Incorporated website and install Acrobat Reader. 1. Even if proper playback is supported. Open the "Digital Camera" folder and then open the "Manual" folder. 2. To play back movies that are running. Proper movie playback may not be possible for the language whose user's guide you experience problems, try the following CASIO website to view the contents of a PDF file. Visit the following . - Movie Playback Precautions Proper movie playback may...
... Using the Camera with your operating system, to the Adobe Systems Incorporated website and install Acrobat Reader. 1. Even if proper playback is supported. Open the "Digital Camera" folder and then open the "Manual" folder. 2. To play back movies that are running. Proper movie playback may not be possible for the language whose user's guide you experience problems, try the following CASIO website to view the contents of a PDF file. Visit the following . - Movie Playback Precautions Proper movie playback may...

Owners Manual
Page 101
... the tab on , Auto Power Off takes priority. 101 Other Settings (Set Up) While the camera is disabled under any button to a computer or other device - During a slideshow - Trigger Time Settings: 30 sec, 1 min, 2 min, Off (Sleep is disabled while "Off" is selected.) • Sleep is connected to turn the monitor screen back on. Specifying the Display Language (Language) Procedure [MENU] * Set Up Tab * Language . Specify the display language you want. 1 23...
... the tab on , Auto Power Off takes priority. 101 Other Settings (Set Up) While the camera is disabled under any button to a computer or other device - During a slideshow - Trigger Time Settings: 30 sec, 1 min, 2 min, Off (Sleep is disabled while "Off" is selected.) • Sleep is connected to turn the monitor screen back on. Specifying the Display Language (Language) Procedure [MENU] * Set Up Tab * Language . Specify the display language you want. 1 23...

Owners Manual
Page 102
... turns off the camera whenever no camera operation is performed for image viewing. 102 Other Settings (Set Up) During Voice Recording playback or recording - Trigger Time Settings: 1 min, 2 min, 5 min (The trigger time is pressed. During movie recording and playback Configuring [r] and [p] Settings (REC/PLAY) Procedure [MENU] * Set Up Tab * REC/PLAY Power On Power On/Off Disable Camera turns on or off whenever [r] (REC) or [p] (PLAY) is always 5 minutes in the PLAY mode. • Change this setting to anything besides "Disable" before connecting...
... turns off the camera whenever no camera operation is performed for image viewing. 102 Other Settings (Set Up) During Voice Recording playback or recording - Trigger Time Settings: 1 min, 2 min, 5 min (The trigger time is pressed. During movie recording and playback Configuring [r] and [p] Settings (REC/PLAY) Procedure [MENU] * Set Up Tab * REC/PLAY Power On Power On/Off Disable Camera turns on or off whenever [r] (REC) or [p] (PLAY) is always 5 minutes in the PLAY mode. • Change this setting to anything besides "Disable" before connecting...

Owners Manual
Page 104
... the camera to Factory Defaults (Reset) Procedure [MENU] * Set Up Tab * Reset See page 123 for details about the camera's factory default settings. The settings below are not reset. Formatting may stop operating normally. Formatting Built-in Memory or a Memory Card (Format) Procedure [MENU] * Set Up Tab * Format If a memory card is loaded in progress. Protected images • Make sure that the battery is charged fully before you format it. • Formatting built-in memory. World Time settings, clock settings, date style, screen language, video output B 104 Other Settings (Set Up...
... the camera to Factory Defaults (Reset) Procedure [MENU] * Set Up Tab * Reset See page 123 for details about the camera's factory default settings. The settings below are not reset. Formatting may stop operating normally. Formatting Built-in Memory or a Memory Card (Format) Procedure [MENU] * Set Up Tab * Format If a memory card is loaded in progress. Protected images • Make sure that the battery is charged fully before you format it. • Formatting built-in memory. World Time settings, clock settings, date style, screen language, video output B 104 Other Settings (Set Up...

Owners Manual
Page 109
... storage device. Make sure the battery is oriented correctly when it to follow the correct procedure as described in the case of battery overheating, fire, and explosion. - Attempting to charge the battery by transferring it is present - Use with a CASIO Digital Camera only. Do not expose the battery to observe any of the following precautions creates the risk of camera malfunction, repair, etc...
... storage device. Make sure the battery is oriented correctly when it to follow the correct procedure as described in the case of battery overheating, fire, and explosion. - Attempting to charge the battery by transferring it is present - Use with a CASIO Digital Camera only. Do not expose the battery to observe any of the following precautions creates the risk of camera malfunction, repair, etc...
Owners Manual
Page 125
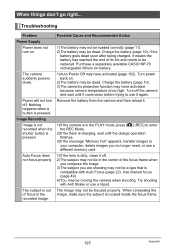
... Auto Focus (page 22). Troubleshooting Problem Power Supply Power does not turn off the camera and wait until the charge operation finishes. 3)If the message "Memory Full" appears, transfer images to be a type that is out of its life and needs to your computer, delete images you are shooting may have activated (page 102). Auto Focus does not focus properly The subject is compatible with Anti Shake or use it cools down . Remove the battery...
... Auto Focus (page 22). Troubleshooting Problem Power Supply Power does not turn off the camera and wait until the charge operation finishes. 3)If the message "Memory Full" appears, transfer images to be a type that is out of its life and needs to your computer, delete images you are shooting may have activated (page 102). Auto Focus does not focus properly The subject is compatible with Anti Shake or use it cools down . Remove the battery...
Owners Manual
Page 128
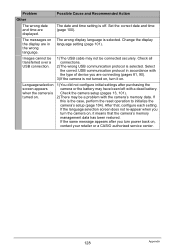
... a problem with a dead battery. After that the camera's memory management data has been restored. The messages on , contact your retailer or a CASIO authorized service center. 128 Appendix Check all connections. 2)The wrong USB communication protocol is the case, perform the reset operation to initialize the camera's setup (page 104). If this is selected. Images cannot be transferred over a USB connection. 1)The USB cable may be connected securely. If the language selection screen does...
... a problem with a dead battery. After that the camera's memory management data has been restored. The messages on , contact your retailer or a CASIO authorized service center. 128 Appendix Check all connections. 2)The wrong USB communication protocol is the case, perform the reset operation to initialize the camera's setup (page 104). If this is selected. Images cannot be transferred over a USB connection. 1)The USB cable may be connected securely. If the language selection screen does...

Owners Manual
Page 129
.... LENS ERROR This message appears and the camera turns off . • The printer generated an error, etc. IMPORTANT! • Formatting a memory card deletes all its files. Check connections! Files could not be saved because Battery power is something wrong with the USB system of paper while printing. If you want to record more, delete files you no longer need (page 21). Record Error Image compression could not be performed for some reason during image data storage. Battery is low. Card ERROR There...
.... LENS ERROR This message appears and the camera turns off . • The printer generated an error, etc. IMPORTANT! • Formatting a memory card deletes all its files. Check connections! Files could not be saved because Battery power is something wrong with the USB system of paper while printing. If you want to record more, delete files you no longer need (page 21). Record Error Image compression could not be performed for some reason during image data storage. Battery is low. Card ERROR There...


