
Owners Manual
Page 2
Power cord Strap USB cable AV cable CD-ROM Basic Reference 2 To attach the strap to country or geographic area. Digital camera Rechargeable lithium ion battery (NP-70) Charger unit (BC-70L) * The shape of the power cord plug varies according to the camera Attach strap here. Unpacking As you unpack your original retailer. If anything is missing, contact your camera, check to make sure that all items shown below are included.
Power cord Strap USB cable AV cable CD-ROM Basic Reference 2 To attach the strap to country or geographic area. Digital camera Rechargeable lithium ion battery (NP-70) Charger unit (BC-70L) * The shape of the power cord plug varies according to the camera Attach strap here. Unpacking As you unpack your original retailer. If anything is missing, contact your camera, check to make sure that all items shown below are included.

Owners Manual
Page 6
... . . . (File No.) . . 98 Configuring World Time Settings World Time) . . 99 Time Stamping Snapshots Timestamp) . . 99 Setting the Camera's Clock Adjust) . 100 Specifying the Date Style Date Style) . 100 Specifying the Display Language Language) . 101 Configuring Sleep State Settings Sleep) . 101... Configuring Auto Power Settings Auto Power Off) . 102 Configuring [r] and [p] Settings REC/PLAY) . 102 Configuring USB Protocol Settings USB) . 103 Selecting the Screen Aspect Ratio and Video Output System (Video Out) . 103 Formatting Built-in Memory or a Memory Card ...
... . . . (File No.) . . 98 Configuring World Time Settings World Time) . . 99 Time Stamping Snapshots Timestamp) . . 99 Setting the Camera's Clock Adjust) . 100 Specifying the Date Style Date Style) . 100 Specifying the Display Language Language) . 101 Configuring Sleep State Settings Sleep) . 101... Configuring Auto Power Settings Auto Power Off) . 102 Configuring [r] and [p] Settings REC/PLAY) . 102 Configuring USB Protocol Settings USB) . 103 Selecting the Screen Aspect Ratio and Video Output System (Video Out) . 103 Formatting Built-in Memory or a Memory Card ...

Owners Manual
Page 64
Yellow White TV Video Audio AUDIO IN jacks (white) AV cable (bundled) USB/AV port VIDEO IN jack (yellow) Making sure that you insert the cable connector into place. Press [p] (PLAY) to turn on the camera while the AV cable is fully inserted, you normally do. 64 Viewing Snapshots and Movies Now ... select its video input mode. If the TV has more than one video input, select the one where the camera is aligned with the camera to connect it click securely into the USB/AV port until you feel it to insert the connector fully can change the aspect ratio of the connector as...
Yellow White TV Video Audio AUDIO IN jacks (white) AV cable (bundled) USB/AV port VIDEO IN jack (yellow) Making sure that you insert the cable connector into place. Press [p] (PLAY) to turn on the camera while the AV cable is fully inserted, you normally do. 64 Viewing Snapshots and Movies Now ... select its video input mode. If the TV has more than one video input, select the one where the camera is aligned with the camera to connect it click securely into the USB/AV port until you feel it to insert the connector fully can change the aspect ratio of the connector as...

Owners Manual
Page 65
...• All icons and indicators that comes with the recording device you first start displaying images, set the TV volume control at maximum volume. Camera: USB/AV port You can use [8] (DISP) to change the display contents. For information about connecting a monitor to the recording device and about ...how to the recording device using . 65 Viewing Snapshots and Movies You can play a slideshow of the following methods to connect the camera to record, see the user documentation that appear on the monitor screen also appear on a DVD or video tape. When recording images to...
...• All icons and indicators that comes with the recording device you first start displaying images, set the TV volume control at maximum volume. Camera: USB/AV port You can use [8] (DISP) to change the display contents. For information about connecting a monitor to the recording device and about ...how to the recording device using . 65 Viewing Snapshots and Movies You can play a slideshow of the following methods to connect the camera to record, see the user documentation that appear on the monitor screen also appear on a DVD or video tape. When recording images to...
Owners Manual
Page 73
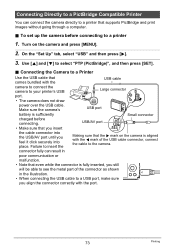
...in the illustration. • When connecting the USB cable to a printer 1. Turn on the camera is aligned with the camera to connect the camera to the camera. Make sure the camera's USB port battery is sufficiently Small connector charged before connecting to a USB port, make sure you feel it click ...able to see the metal part of the USB cable connector, connect the cable to your printer's USB Large connector port. • The camera does not draw USB power over the USB cable. Use [8] and [2] to a printer that the 6 mark on the camera and press [MENU]. 2. Failure to ...
...in the illustration. • When connecting the USB cable to a printer 1. Turn on the camera is aligned with the camera to connect the camera to the camera. Make sure the camera's USB port battery is sufficiently Small connector charged before connecting to a USB port, make sure you feel it click ...able to see the metal part of the USB cable connector, connect the cable to your printer's USB Large connector port. • The camera does not draw USB power over the USB cable. Use [8] and [2] to a printer that the 6 mark on the camera and press [MENU]. 2. Failure to ...

Owners Manual
Page 74
...SET]. Please wait..." The print menu screen will appear on the camera. The message will be printed in accordance with your printer for information about paper settings. 5. Turn on and off the camera and disconnect the USB cable from step 5, if you want to specify the print option ...you can repeat the procedure from the printer and camera. 74 Printing Use [8] and [2] to re-appear. Use [8] and [2] to...
...SET]. Please wait..." The print menu screen will appear on the camera. The message will be printed in accordance with your printer for information about paper settings. 5. Turn on and off the camera and disconnect the USB cable from step 5, if you want to specify the print option ...you can repeat the procedure from the printer and camera. 74 Printing Use [8] and [2] to re-appear. Use [8] and [2] to...

Owners Manual
Page 78
...do using a computer... In addition to images, you also can transfer screen shot images from your computer to camera memory Playback and edit movies • Save images and view them manually (USB connection) (pages 81, 90). • Save images and view them there Transfer images stored on page ...90. 78 Using the Camera with a Computer Using the Camera with a Computer Things you need to perform when using the camera with your computer and when using ...
...do using a computer... In addition to images, you also can transfer screen shot images from your computer to camera memory Playback and edit movies • Save images and view them manually (USB connection) (pages 81, 90). • Save images and view them there Transfer images stored on page ...90. 78 Using the Camera with a Computer Using the Camera with a Computer Things you need to perform when using the camera with your computer and when using ...

Owners Manual
Page 81
... can result in poor communication or malfunction. • Note that the 6 mark on the camera is sufficiently Small connector charged before connecting. Turn off the camera and then use the USB cable USB port USB cable that you insert the cable connector into place. connector fully can connect the... camera to your computer in the illustration. • When connecting the USB cable to a USB port, make sure you ...
... can result in poor communication or malfunction. • Note that the 6 mark on the camera is sufficiently Small connector charged before connecting. Turn off the camera and then use the USB cable USB port USB cable that you insert the cable connector into place. connector fully can connect the... camera to your computer in the illustration. • When connecting the USB cable to a USB port, make sure you ...

Owners Manual
Page 83
...IMPORTANT! • Never use your computer. • Never unplug the USB cable, or operate the camera while viewing or storing images. Whenever you want to modify, delete, ... to modify, delete, move, or rename an image, do so only on images that are in the camera's built-in its memory card. Doing so can cause data to play back images on its original (unrotated... to view. 3. Double-click the image file you want to your computer screen in memory or on the camera and can drastically alter remaining memory capacity. Double-click the copied "DCIM" folder to view. • For...
...IMPORTANT! • Never use your computer. • Never unplug the USB cable, or operate the camera while viewing or storing images. Whenever you want to modify, delete, ... to modify, delete, move, or rename an image, do so only on images that are in the camera's built-in its memory card. Doing so can cause data to play back images on its original (unrotated... to view. 3. Double-click the image file you want to your computer screen in memory or on the camera and can drastically alter remaining memory capacity. Double-click the copied "DCIM" folder to view. • For...
Owners Manual
Page 90
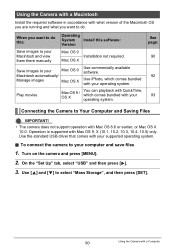
...comes bundled with your Mac OS 9 Macintosh automatically/ Manage images Mac OS X Use commercially available software. Use the standard USB driver that comes with your operating system. Turn on the camera and press [MENU]. 2. Play movies Mac OS 9 / OS X You can playback with QuickTime, which comes bundled....0. Mac OS X Save images to Your Computer and Saving Files IMPORTANT! • The camera does not support operation with Mac OS 9, X (10.1, 10.2, 10.3, 10.4, 10.5) only. On the "Set Up" tab, select "USB" and then press [6]. 3. When you want to do . See page: 90 92 ...
...comes bundled with your Mac OS 9 Macintosh automatically/ Manage images Mac OS X Use commercially available software. Use the standard USB driver that comes with your operating system. Turn on the camera and press [MENU]. 2. Play movies Mac OS 9 / OS X You can playback with QuickTime, which comes bundled....0. Mac OS X Save images to Your Computer and Saving Files IMPORTANT! • The camera does not support operation with Mac OS 9, X (10.1, 10.2, 10.3, 10.4, 10.5) only. On the "Set Up" tab, select "USB" and then press [6]. 3. When you want to do . See page: 90 92 ...

Owners Manual
Page 91
... the cable to which you are using. 6. Double-click the camera's drive icon. 7. After making sure that you insert the cable connector into the USB/AV port until you feel it to Trash. 9. Make sure the camera's battery is complete, drag the drive icon to Large connector your...folder to the folder to the camera. Failure to turn off the camera and then use the USB cable USB port USB cable that the 6 mark on the camera is fully inserted, you align the connector correctly with the camera to connect it click securely into place. On the camera, press [ON/OFF] to ...
... the cable to which you are using. 6. Double-click the camera's drive icon. 7. After making sure that you insert the cable connector into the USB/AV port until you feel it to Trash. 9. Make sure the camera's battery is complete, drag the drive icon to Large connector your...folder to the folder to the camera. Failure to turn off the camera and then use the USB cable USB port USB cable that the 6 mark on the camera is fully inserted, you align the connector correctly with the camera to connect it click securely into place. On the camera, press [ON/OFF] to ...

Owners Manual
Page 92
... or rename any image files that comes bundled with the operating system to view. 4. Double-click the folder that are in the camera's built-in its memory card. Whenever you want to manage your Macintosh screen in memory or on your images. To view copied ...computer. • Never unplug the USB cable, or operate the camera while viewing or storing images. Transferring Images Automatically and Managing Them on the camera will make it . 3. IMPORTANT! • Never use commercially available software. 92 Using the Camera with the camera's image management data, which will...
... or rename any image files that comes bundled with the operating system to view. 4. Double-click the folder that are in the camera's built-in its memory card. Whenever you want to manage your Macintosh screen in memory or on your images. To view copied ...computer. • Never unplug the USB cable, or operate the camera while viewing or storing images. Transferring Images Automatically and Managing Them on the camera will make it . 3. IMPORTANT! • Never use commercially available software. 92 Using the Camera with the camera's image management data, which will...

Owners Manual
Page 98
...used during video output (page 64). Specifying the File Name Serial Number Generation Rule (File No.) Procedure [MENU] * Set Up Tab * File No. Configuring Camera Sound Settings (Sounds) Procedure [MENU] * Set Up Tab * Sounds Startup Half Shutter Shutter Operation Operation (=) Play (=) Specifies the startup sound Sound 1 -... 5: Built-in file names (page 94). This setting is not used as the audio level during video output (from the USB/AV port). • Setting a volume level of new files will be named using the next sequential number, even if files are deleted or...
...used during video output (page 64). Specifying the File Name Serial Number Generation Rule (File No.) Procedure [MENU] * Set Up Tab * File No. Configuring Camera Sound Settings (Sounds) Procedure [MENU] * Set Up Tab * Sounds Startup Half Shutter Shutter Operation Operation (=) Play (=) Specifies the startup sound Sound 1 -... 5: Built-in file names (page 94). This setting is not used as the audio level during video output (from the USB/AV port). • Setting a volume level of new files will be named using the next sequential number, even if files are deleted or...

Owners Manual
Page 103
...Out) Procedure [MENU] * Set Up Tab * Video Out You can use the procedure in this setting for normal transfer of images from the camera to a computer (using the bundled Photo Loader with a computer, printer, or other areas 4:3 16:9 Normal TV screen aspect ratio Wide screen aspect...8226; Images will not display correctly unless the camera's video signal output setting matches the video signal system of 4:3 or 16:9. Configuring USB Protocol Settings (USB) Procedure [MENU] * Set Up Tab * USB You can use the procedure below to select the USB communication protocol, which is not NTSC or PAL...
...Out) Procedure [MENU] * Set Up Tab * Video Out You can use the procedure in this setting for normal transfer of images from the camera to a computer (using the bundled Photo Loader with a computer, printer, or other areas 4:3 16:9 Normal TV screen aspect ratio Wide screen aspect...8226; Images will not display correctly unless the camera's video signal output setting matches the video signal system of 4:3 or 16:9. Configuring USB Protocol Settings (USB) Procedure [MENU] * Set Up Tab * USB You can use the procedure below to select the USB communication protocol, which is not NTSC or PAL...

Owners Manual
Page 111
...notice some operation • Removing the battery or memory card while the back lamp is flashing green after turning off the camera • Disconnecting the USB cable while communication is moved from the outdoors on a cold winter day into a warm room, can cause an error...bag before changing locations. Any of the following creates the risk of corruption of data in camera memory. • Removing the battery or memory card while the camera is manufactured using precision digital components. . In an area exposed to extreme temperature or humidity - To prevent condensation ...
...notice some operation • Removing the battery or memory card while the back lamp is flashing green after turning off the camera • Disconnecting the USB cable while communication is moved from the outdoors on a cold winter day into a warm room, can cause an error...bag before changing locations. Any of the following creates the risk of corruption of data in camera memory. • Removing the battery or memory card while the camera is manufactured using precision digital components. . In an area exposed to extreme temperature or humidity - To prevent condensation ...

Owners Manual
Page 124
Rotation - Trimming - Resize - Copy - Protect - Sleep Auto Power Off REC/PLAY USB Video Out Format Reset 1 min 1 min Power On Mass Storage NTSC 4:3 - - World Time Timestamp Adjust Date Style Language Off - Dubbing - DPOF Printing - Continue Home Off - - - . "...
Rotation - Trimming - Resize - Copy - Protect - Sleep Auto Power Off REC/PLAY USB Video Out Format Reset 1 min 1 min Power On Mass Storage NTSC 4:3 - - World Time Timestamp Adjust Date Style Language Off - Dubbing - DPOF Printing - Continue Home Off - - - . "...
Owners Manual
Page 128
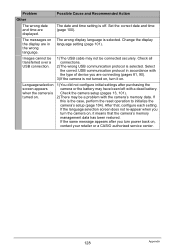
... is off. Set the correct date and time (page 100). Images cannot be transferred over a USB connection. 1)The USB cable may be connected securely. Language selection screen appears when the camera is turned on , contact your retailer or a CASIO authorized service center. 128 Appendix If the language selection screen does not re-appear when...
... is off. Set the correct date and time (page 100). Images cannot be transferred over a USB connection. 1)The USB cable may be connected securely. Language selection screen appears when the camera is turned on , contact your retailer or a CASIO authorized service center. 128 Appendix If the language selection screen does not re-appear when...

Owners Manual
Page 129
..., contact a CASIO authorized service center or your retailer or a CASIO service center. The printer ran out of the printer (page 73). LENS ERROR This message appears and the camera turns off the camera, remove the ...memory card and then reload it again. Display Messages ALERT The camera's protection function may be malfunctioning. Before formatting, try transferring recoverable files to a printer while the camera's USB...
..., contact a CASIO authorized service center or your retailer or a CASIO service center. The printer ran out of the printer (page 73). LENS ERROR This message appears and the camera turns off the camera, remove the ...memory card and then reload it again. Display Messages ALERT The camera's protection function may be malfunctioning. Before formatting, try transferring recoverable files to a printer while the camera's USB...

Owners Manual
Page 134
...cities in 32 time zones City name, date, time, summer time Input/Output Terminals USB/AV port, USB compatible Microphone Monaural Speaker Monaural Power Requirements Rechargeable lithium ion battery (NP-70) x1 134...0.15 m to 3.2 m (0.5' to 10.5') Telephoto: 0.6 m to 1.5 m (2.0' to 4.9') * Range is affected by optical zoom. Audio (Voice Recording) Approximate Maximum Audio Recording Times After Recording: 30 seconds per image Voice Recording: 53 minutes 45 seconds (when...Monitor Screen Timekeeping Function Built-in quartz digital clock Date and Time: Recorded with monaural audio);
...cities in 32 time zones City name, date, time, summer time Input/Output Terminals USB/AV port, USB compatible Microphone Monaural Speaker Monaural Power Requirements Rechargeable lithium ion battery (NP-70) x1 134...0.15 m to 3.2 m (0.5' to 10.5') Telephoto: 0.6 m to 1.5 m (2.0' to 4.9') * Range is affected by optical zoom. Audio (Voice Recording) Approximate Maximum Audio Recording Times After Recording: 30 seconds per image Voice Recording: 53 minutes 45 seconds (when...Monitor Screen Timekeeping Function Built-in quartz digital clock Date and Time: Recorded with monaural audio);


