Owners Manual
Page 2
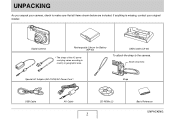
Attach strap here. USB Cradle (CA-36) To attach the strap to make sure that all items shown below are included. If anything is missing, contact your camera, check to the camera. Special AC Adaptor (AD-C52G)/AC Power Cord * Strap USB Cable AV Cable CD-ROMs (2) 2 Basic Reference UNPACKING UNPACKING As you unpack your original retailer. Digital Camera Rechargeable Lithium Ion Battery (NP-40) * The shape of the AC power cord plug varies according to country or geographic area.
Attach strap here. USB Cradle (CA-36) To attach the strap to make sure that all items shown below are included. If anything is missing, contact your camera, check to the camera. Special AC Adaptor (AD-C52G)/AC Power Cord * Strap USB Cable AV Cable CD-ROMs (2) 2 Basic Reference UNPACKING UNPACKING As you unpack your original retailer. Digital Camera Rechargeable Lithium Ion Battery (NP-40) * The shape of the AC power cord plug varies according to country or geographic area.

Owners Manual
Page 3
... Features 22 Read this first 23 Precautions during Use 27 GETTING READY 37 Charging the Battery 37 ■ To load the battery 37 ■ To charge the battery 38 ■ Replacing the Battery 42 ■ Battery Precautions 42 Using the Camera in another Country 43 Turning Power On and Off 44 Using a Memory Card 47 ■...
... Features 22 Read this first 23 Precautions during Use 27 GETTING READY 37 Charging the Battery 37 ■ To load the battery 37 ■ To charge the battery 38 ■ Replacing the Battery 42 ■ Battery Precautions 42 Using the Camera in another Country 43 Turning Power On and Off 44 Using a Memory Card 47 ■...

Owners Manual
Page 9
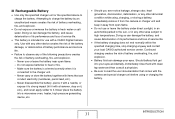
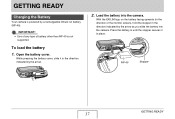
Close the battery cover. (page 37) QUICK START BASICS 9 While pressing lightly on the cover, slide it in the direction indicated by the arrow to open. 2. QUICK START BASICS First, charge the battery ■ Loading the Battery into the camera. 3. Load the battery into the Camera 1. Open the battery cover.
Close the battery cover. (page 37) QUICK START BASICS 9 While pressing lightly on the cover, slide it in the direction indicated by the arrow to open. 2. QUICK START BASICS First, charge the battery ■ Loading the Battery into the camera. 3. Load the battery into the Camera 1. Open the battery cover.

Owners Manual
Page 13
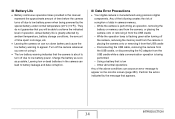
...and press until it in memory if there is loaded, the camera stores images you can use built-in memory, skip this procedure and go to open. (page 47) 2. QUICK START BASICS 13 Close the battery cover. While pressing lightly on the cover, slide it clicks ...securely into the camera. Load a memory card into place. 3. Open the battery cover. NOTE • Though the camera has built-in memory, using a memory card provides additional capacity ...
...and press until it in memory if there is loaded, the camera stores images you can use built-in memory, skip this procedure and go to open. (page 47) 2. QUICK START BASICS 13 Close the battery cover. While pressing lightly on the cover, slide it clicks ...securely into the camera. Load a memory card into place. 3. Open the battery cover. NOTE • Though the camera has built-in memory, using a memory card provides additional capacity ...

Owners Manual
Page 28
...Contact your physician. ■ Connections • Never plug any devices that are present. 1. Remove the battery from the camera, taking care to strong impact. Immediately perform the following steps whenever any of the liquid inside of an...the display panel glass to crack. • Should the display panel ever become cracked, never touch any of the camera while it is emitting smoke or strange odor, or while it to protect yourself against burn injury. 3. Improper use...not specified for at least 15 minutes and contact your dealer or nearest CASIO authorized service center.
...Contact your physician. ■ Connections • Never plug any devices that are present. 1. Remove the battery from the camera, taking care to strong impact. Immediately perform the following steps whenever any of the liquid inside of an...the display panel glass to crack. • Should the display panel ever become cracked, never touch any of the camera while it is emitting smoke or strange odor, or while it to protect yourself against burn injury. 3. Improper use...not specified for at least 15 minutes and contact your dealer or nearest CASIO authorized service center.

Owners Manual
Page 29
... perform the following steps whenever any of water, or in a bathroom. 1. Remove the battery from the camera. 3. Remove the battery from the camera. 3. Contact your dealer or nearest CASIO authorized service center. ■ Dropping and Rough Treatment • Continued use of the camera after it to explode and creates the risk of fire and electric shock...
... perform the following steps whenever any of water, or in a bathroom. 1. Remove the battery from the camera. 3. Remove the battery from the camera. 3. Contact your dealer or nearest CASIO authorized service center. ■ Dropping and Rough Treatment • Continued use of the camera after it to explode and creates the risk of fire and electric shock...

Owners Manual
Page 30
Be sure to leave all internal inspection, maintenance, and repair up to your dealer or nearest CASIO authorized service center. ■ Locations To Be Avoided • Never leave the camera in any way. Near heaters, on a heated carpet, in areas exposed to direct sunlight, in a closed ...vehicle parked in the documentation that data can be deleted in the case of camera malfunction, repair, etc. ■ Memory Protection • Whenever replacing the battery, be sure to follow the correct procedure as described in the sun, or other personal injury. INTRODUCTION...
Be sure to leave all internal inspection, maintenance, and repair up to your dealer or nearest CASIO authorized service center. ■ Locations To Be Avoided • Never leave the camera in any way. Near heaters, on a heated carpet, in areas exposed to direct sunlight, in a closed ...vehicle parked in the documentation that data can be deleted in the case of camera malfunction, repair, etc. ■ Memory Protection • Whenever replacing the battery, be sure to follow the correct procedure as described in the sun, or other personal injury. INTRODUCTION...
Owners Manual
Page 31
... any other abnormal condition while using or charging the battery. Never carry or store the battery together with a CASIO Digital Camera only. Doing so can conduct electricity (necklaces, pencil lead, etc.) - Continued charging creates the risk of battery overheating, fire, and explosion. • Battery fluid can damage the battery, and cause deterioration of its performance and loss of...
... any other abnormal condition while using or charging the battery. Never carry or store the battery together with a CASIO Digital Camera only. Doing so can conduct electricity (necklaces, pencil lead, etc.) - Continued charging creates the risk of battery overheating, fire, and explosion. • Battery fluid can damage the battery, and cause deterioration of its performance and loss of...

Owners Manual
Page 32
...responsible adult makes them aware of the precautions and proper handling instructions, and make sure that they handle battery correctly. • Should fluid from a battery accidentally get onto clothing or your dealer or nearest CASIO authorized service center. Use the AC adaptor to supply power only to 240V AC (50/60Hz) ...Never try to modify the AC adaptor or subject it to be used by other devices, or into a wall outlet that are specified for this camera. - Should the power cord or plug ever become damaged, creating the risk of fire and electric shock. Use a 100 to devices that is...
...responsible adult makes them aware of the precautions and proper handling instructions, and make sure that they handle battery correctly. • Should fluid from a battery accidentally get onto clothing or your dealer or nearest CASIO authorized service center. Use the AC adaptor to supply power only to 240V AC (50/60Hz) ...Never try to modify the AC adaptor or subject it to be used by other devices, or into a wall outlet that are specified for this camera. - Should the power cord or plug ever become damaged, creating the risk of fire and electric shock. Use a 100 to devices that is...
Owners Manual
Page 34
...Any of time spent in the camera can cause an error message to battery leakage and data corruption. ■ Data Error Precautions • Your digital camera is flashing green after turning off the camera whenever you will be able to low battery power when being performed - Perform... the action indicated by ambient temperature, battery storage conditions, the amount of the above conditions ...
...Any of time spent in the camera can cause an error message to battery leakage and data corruption. ■ Data Error Precautions • Your digital camera is flashing green after turning off the camera whenever you will be able to low battery power when being performed - Perform... the action indicated by ambient temperature, battery storage conditions, the amount of the above conditions ...
Owners Manual
Page 35
...happens, be straight. Note that , open for the clock. The date and time settings of the camera are cleared about 12 hours after power is not supported. • The camera does not have a separate battery for a few hours. ■ Power Supply • Use only the special rechargeable lithium ion... to 40°C (32°F to 104°F). • Do not place the camera in the bag has had enough time to become acclimated to the new temperature before subjecting it open the battery cover and leave it to strong vibration ■ Condensation • Sudden and extreme temperature ...
...happens, be straight. Note that , open for the clock. The date and time settings of the camera are cleared about 12 hours after power is not supported. • The camera does not have a separate battery for a few hours. ■ Power Supply • Use only the special rechargeable lithium ion... to 40°C (32°F to 104°F). • Do not place the camera in the bag has had enough time to become acclimated to the new temperature before subjecting it open the battery cover and leave it to strong vibration ■ Condensation • Sudden and extreme temperature ...
Owners Manual
Page 37
... screen), hold the stopper in place. Load the battery into the camera. Open the battery cover. With the EXILIM logo on the battery facing upwards (in the direction of battery other than NP-40 is powered by the arrow as you slide the battery into the camera. Press the battery in until the stopper secures it in the direction...
... screen), hold the stopper in place. Load the battery into the camera. Open the battery cover. With the EXILIM logo on the battery facing upwards (in the direction of battery other than NP-40 is powered by the arrow as you slide the battery into the camera. Press the battery in until the stopper secures it in the direction...

Owners Manual
Page 38
Close the battery cover. The battery is not fully charged when you press it off . USB Cradle AC Adaptor [DC IN 5.3V] AC power cord 2. Use the following procedure to turn it against the camera. Plug the USB cradle into place as you use the camera for the first time after purchasing it onto the USB cradle. GETTING READY 38 Make sure the camera is on, be sure to press [ON/OFF] to charge it securely into a household power outlet. If the camera is turned off before placing it . To charge the battery 1. 3. Swing the battery cover closed, and then slide it .
Close the battery cover. The battery is not fully charged when you press it off . USB Cradle AC Adaptor [DC IN 5.3V] AC power cord 2. Use the following procedure to turn it against the camera. Plug the USB cradle into place as you use the camera for the first time after purchasing it onto the USB cradle. GETTING READY 38 Make sure the camera is on, be sure to press [ON/OFF] to charge it securely into a household power outlet. If the camera is turned off before placing it . To charge the battery 1. 3. Swing the battery cover closed, and then slide it .

Owners Manual
Page 39
...cradle. If this happens, wait until the camera returns to achieve a full charge. When the camera returns to green. With the camera positioned so the monitor screen is too hot or too cold. Actual charging time depends on current battery capacity, remaining power, and charging conditions. ...Cradle contact Carefully insert the camera as far as shown in your location is facing towards you have just finished using the camera, or because the temperature in the illustration, ...
...cradle. If this happens, wait until the camera returns to achieve a full charge. When the camera returns to green. With the camera positioned so the monitor screen is too hot or too cold. Actual charging time depends on current battery capacity, remaining power, and charging conditions. ...Cradle contact Carefully insert the camera as far as shown in your location is facing towards you have just finished using the camera, or because the temperature in the illustration, ...

Owners Manual
Page 40
... separately available AD-C30, AD-C40, AD-C620, or AD-C630 is not supported. ■ Battery Life and Number of charger device. Remove the battery from the camera and check if its contacts are , wipe them off with the camera. Contact your nearest CASIO authorized service center. Never use a different charger can result in the...
... separately available AD-C30, AD-C40, AD-C620, or AD-C630 is not supported. ■ Battery Life and Number of charger device. Remove the battery from the camera and check if its contacts are , wipe them off with the camera. Contact your nearest CASIO authorized service center. Never use a different charger can result in the...
Owners Manual
Page 41
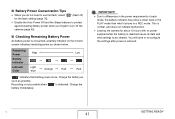
... features to protect against wasting battery power when you do not need to use the flash, select " " (flash off the camera (page 45). ■ Checking Remaining Battery Power As battery power is low. Remaining High Low Power Battery Indicator Indicator Light Orange Red... Red Color blue " " indicates that battery power is consumed, a battery indicator on the monitor screen indicates ...
... features to protect against wasting battery power when you do not need to use the flash, select " " (flash off the camera (page 45). ■ Checking Remaining Battery Power As battery power is low. Remaining High Low Power Battery Indicator Indicator Light Orange Red... Red Color blue " " indicates that battery power is consumed, a battery indicator on the monitor screen indicates ...

Owners Manual
Page 42
...life. While still holding the stopper, pull the battery out the rest of 10°C to 35°C (50°F to the characteristics of the battery, not the camera. • Charge the battery in the direction indicated by a battery under cold conditions is always less than normal or... even cause charging to fail. • If a battery provides only very limited operation following a full charge, it ...
...life. While still holding the stopper, pull the battery out the rest of 10°C to 35°C (50°F to the characteristics of the battery, not the camera. • Charge the battery in the direction indicated by a battery under cold conditions is always less than normal or... even cause charging to fail. • If a battery provides only very limited operation following a full charge, it ...

Owners Manual
Page 43
...AC, 50/60Hz. GETTING READY 43 If you are not using it. Leaving a battery in the camera can cause it to deteriorate. - Always remove the battery from the camera when you do not plan to use a battery for operation with travel agent about the power supply requirements in your destination(s). •...the power cord plug depends on a trip in a cool, dry place (20°C (68°F) or lower). Before taking the camera and AC adaptor along extra fully charged batteries (NP-40) is designed for some time, fully use up its charge before storing it. - ■ Storage Precautions • ...
...AC, 50/60Hz. GETTING READY 43 If you are not using it. Leaving a battery in the camera can cause it to deteriorate. - Always remove the battery from the camera when you do not plan to use a battery for operation with travel agent about the power supply requirements in your destination(s). •...the power cord plug depends on a trip in a cool, dry place (20°C (68°F) or lower). Before taking the camera and AC adaptor along extra fully charged batteries (NP-40) is designed for some time, fully use up its charge before storing it. - ■ Storage Precautions • ...
Owners Manual
Page 45
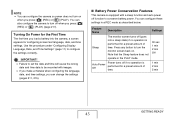
...; If you make a mistake when configuring the language, date, and time settings, you can change the settings (pages 211, 215). ■ Battery Power Conservation Features This camera is equipped with a sleep function and auto power off when you press [ ] (REC) or [ ] (PLAY) (page 217). You can...under "Configuring Display Language, Date, and Time Settings" (page 11) to conserve battery power. Note that the Sleep feature does not operate in a REC mode as described below. You can also configure the camera to turn off function to configure the settings correctly. Settings 30 sec 1 min...
...; If you make a mistake when configuring the language, date, and time settings, you can change the settings (pages 211, 215). ■ Battery Power Conservation Features This camera is equipped with a sleep function and auto power off when you press [ ] (REC) or [ ] (PLAY) (page 217). You can...under "Configuring Display Language, Date, and Time Settings" (page 11) to conserve battery power. Note that the Sleep feature does not operate in a REC mode as described below. You can also configure the camera to turn off function to configure the settings correctly. Settings 30 sec 1 min...

Owners Manual
Page 49
...the battery cover, slide it against the camera. Close the battery cover. MEMORY CARD Front Back 3. Load a memory card into the slot when you feel resistance. 1. GETTING READY 49 Never try to orient the card correctly when loading it click securely into place. Open the battery cover. Swing the battery cover... closed, and then slide it securely into place as you press it in until you hear it . Positioning the memory card so its front is facing upwards (towards the monitor screen side of the camera), slide it into...
...the battery cover, slide it against the camera. Close the battery cover. MEMORY CARD Front Back 3. Load a memory card into the slot when you feel resistance. 1. GETTING READY 49 Never try to orient the card correctly when loading it click securely into place. Open the battery cover. Swing the battery cover... closed, and then slide it securely into place as you press it in until you hear it . Positioning the memory card so its front is facing upwards (towards the monitor screen side of the camera), slide it into...


